
Up until now, we have learned how to integrate the Angular application with IdentityServer4 and how to retrieve different tokens after successful login action. From these previous articles, we know that the id token is important for the client application because it contains information about the end-user, while the access token is important for the Web API application because we use it to secure calls to the Web API from the client application.
That said, in this article, we are going to learn how to use the access token to secure communication between the client application (Angular application) and the Web API application to enable consuming protected resources from the Web API.
If you want to read the entire IdentityServer4, OAuth2, and OIDC series, feel free to do that and learn a lot more about the application security in ASP.NET Core.
It’s time to start.
Inspecting the Web API Application
We already have the Web API configuration in place that supports communication with the IDP server.
If we inspect the Startup.cs class, we are going to see the required configuration in place:
services.AddAuthentication("Bearer")
    .AddJwtBearer("Bearer", opt =>
    {
        opt.RequireHttpsMetadata = false;
        opt.Authority = "https://localhost:5005";
        opt.Audience = "companyApi";
    });
For this configuration to work, we had to install the Microsoft.AspNetCore.Authentication.JwtBearer library.
Also on the IDP level, we have added the API scope and the resource to support this configuration:
public static IEnumerable<ApiScope> GetApiScopes() =>
    new List<ApiScope> { new ApiScope("companyApi", "CompanyEmployee API") };

public static IEnumerable<ApiResource> GetApiResources() =>
    new List<ApiResource>
    {
        new ApiResource("companyApi", "CompanyEmployee API")
        {
            Scopes = { "companyApi" }
        }
    };
Finally, we have to open the CompaniesController file in the WebAPI project and uncomment the [Authorize] attribute. This will protect the GetCompanies action.
Right now, we can start all the applications and take a look at the Angular application. We can see the Company and Privacy links in the menu bar even though we are not authenticated. For now, let’s just hide them both for the unauthorized users by modifying the menu.component.html file:
<div class="collapse navbar-collapse" id="navbarSupportedContent">
  <ul class="navbar-nav mr-auto">
    <li class="nav-item">
      <a *ngIf="isUserAuthenticated" class="nav-link" [routerLink]="['/company/companies']" routerLinkActive="active"
        [routerLinkActiveOptions]="{exact: true}"> Companies </a>
    </li>
    <li class="nav-item">
      <a *ngIf="isUserAuthenticated" class="nav-link" href="#"> Privacy </a>
    </li>
  </ul>
  <section>
    <button *ngIf="!isUserAuthenticated" class="btn btn-link" style="color:gray" (click)="login()">Login</button>
    <button *ngIf="isUserAuthenticated" class="btn btn-link" style="color:gray" (click)="logout()">Logout</button>
  </section>
</div>
Now, if we inspect the UI, we won’t be able to see these links:

Pay attention that with this modification, we are just hiding the links, we are not protecting anything. The unauthorized users still have access to both pages just by typing the right URI in the browser. But for now, this is quite enough, we are going to deal with this in the next article.
After we log in successfully, we are going to see both links in the menu.
Now, we can click the Companies link to try to fetch the data from the API:
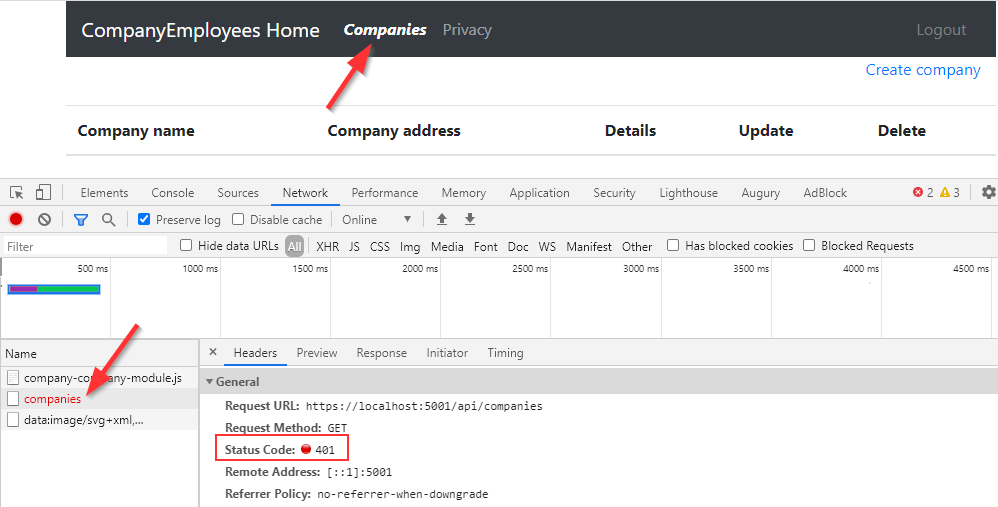
But, as you can see, we get the 401 Unauthorized response. And that’s great because we are sure that our API is secured.
Adding Access Token Manually to Secure Calls to the Web API
Right now, our client application is unable to access the protected resources from the Web API. As we already know (from the previous articles of this series) if we want to enable that access – and we want, we have to pass the access token with the request inside the Authorization Header with the Bearer prefix.
Before we do that, we have to create a logic to extract the access token from the user object. So, let’s open the auth.service.ts file and add another function to retrieve the token:
public getAccessToken = (): Promise<string> => {
  return this._userManager.getUser()
    .then(user => {
       return !!user && !user.expired ? user.access_token : null;
  })
}
All we do here is call the getUser function from the UserManager class and extract the user object from the promise. If the user is not null and not expired, we extract the access token. Otherwise, we return null.
Now, we can open the shared/services/repository.service.ts file and modify the getData function to attach the token inside the request’s header:
import { AuthService } from './auth.service';
import { Injectable } from '@angular/core';
import { HttpClient, HttpHeaders } from '@angular/common/http';
import { EnvironmentUrlService } from './environment-url.service';
import { from } from 'rxjs';

@Injectable({
  providedIn: 'root'
})
export class RepositoryService {

  constructor(private http: HttpClient, private envUrl: EnvironmentUrlService, private _authService: AuthService) { }

  public getData = (route: string) => {
      return from(
        this._authService.getAccessToken()
        .then(token => {
          const headers = new HttpHeaders().set('Authorization', `Bearer ${token}`);
          return this.http.get(this.createCompleteRoute(route, this.envUrl.urlAddress), { headers: headers }).toPromise();
        })
      );
    }

  private createCompleteRoute = (route: string, envAddress: string) =>    {
    return `${envAddress}/${route}`;
  }
}
We need access to the getAccessToken function and for that, we have to inject the _authService object. Then, inside the getData function, we call the getAccessToken function and attach a callback with the then function to resolve the promise. Inside the callback, we create a headers property by instantiating the HttpHeaders class and calling the set function where we pass the name of the header and the token itself with the Bearer prefix.
After that, we have an http get request but this time with the headers object included and converted to promise. If we leave it like this, we are going to return a Promise<object> from this function, and for our current setup, the getData function should return the Observable<object>. So, to do that, we have to wrap this body inside the from() function from rxjs.
Inspecting the Result
With this code in place, we can start our Angular application once again, log in with valid credentials and click the Companies link:
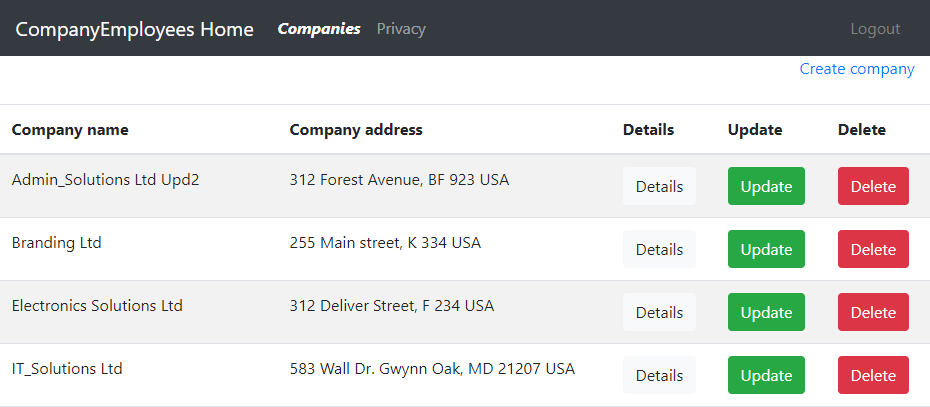
This time we can see the required result from the API and we are sure that the access token was validated on the Web API application.
Let’s inspect the console logs from the Web API application:

Here, we can see that the token was successfully validated and that authorization was successful.
Finally, we can inspect the request from the browser to confirm that we are sending the token in the Authorization header:
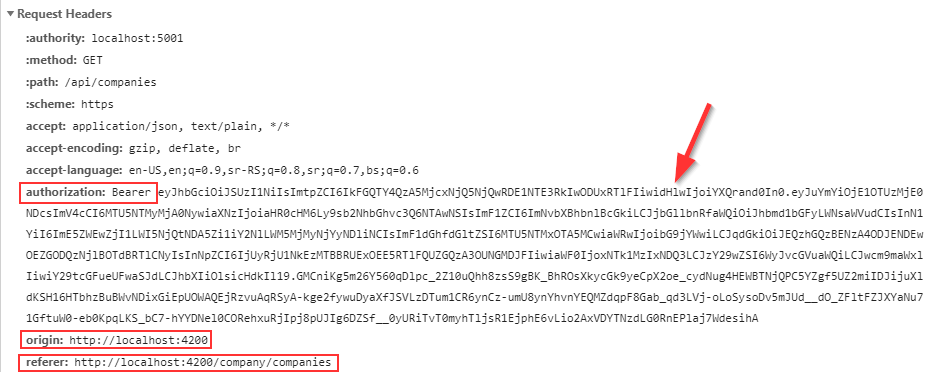
And we do.
So, everything works perfectly, but we still have a problem here.
Adding Access Token with the Authentication Interceptor
Right now, we only have one HTTP call to the Web API. But in a real-world application, we would have more than one repository file and for sure more HTTP calls. With the solution, as we have it now, we have to make the same changes on each HTTP function all over the project and duplicate the same code. We can all agree that this is not something we want.
So, to improve this solution, we are going to create a centralized place to inject the access token in the request and use that logic in our HTTP calls without the code repetition.
Let’s start by creating a new auth-interceptor service file:
ng g service /shared/services/auth-interceptor --skipTests
After the creation, we are going to modify it to implement the HttpInterceptor interface:
import { HttpInterceptor, HttpRequest, HttpHandler, HttpEvent } from '@angular/common/http';
import { Observable } from 'rxjs';

@Injectable({
  providedIn: 'root'
})
export class AuthInterceptorService implements HttpInterceptor {

  constructor() { }
  intercept(req: HttpRequest<any>, next: HttpHandler): Observable<HttpEvent<any>> {
    throw new Error("Method not implemented.");
  }
}
As you can see, we inherit from the HttpInterceptor interface and add the default implementation of the intercept function. With this function, we can intercept any HTTP call, modify it, and then let it continue its journey to the Web API.
Now, we can continue our implementation:
constructor(private _authService: AuthService) { }

intercept(req: HttpRequest<any>, next: HttpHandler): Observable<HttpEvent<any>> {
  return from(
    this._authService.getAccessToken()
    .then(token => {
      const headers = new HttpHeaders().set('Authorization', `Bearer ${token}`);
      const authRequest = req.clone({ headers });
      return next.handle(authRequest).toPromise();
    })
  );
}
Here, we get the access token from the authentication service, create the header object, and then clone the request passing the headers parameter to it. The req parameter contains the request that we can inspect and modify before we pass it out to the Web API. Then, we have to handle our cloned request, convert it to promise, and wrap the entire functionality with the from() function from rxjs.
One more thing. Right now, our Angular application communicates only with a single Web API project, but maybe in the future, it may communicate with multiple Web Apis. Maybe some of those APIs will not require secure access to the resources since they are not protected. That said, we don’t have to pass the access token to all the APIs, just to the one we have a token generated for:
intercept(req: HttpRequest<any>, next: HttpHandler): Observable<HttpEvent<any>> {
  if(req.url.startsWith(Constants.apiRoot)){
    return from(
      this._authService.getAccessToken()
      .then(token => {
        const headers = new HttpHeaders().set('Authorization', `Bearer ${token}`);
        const authRequest = req.clone({ headers });
        return next.handle(authRequest).toPromise();
      })
    );
  }
  else {
    return next.handle(req);
  }
}
That’s it.
Note: With this interceptor implementation, it will override any custom header you send in a request. If you don’t have any custom headers in the request, you can use the code as-is. But if you want to preserve a custom header and add the Authorization header as well, you should use :
const headers = req.headers.set('Authorization', `Bearer ${token}`);
instead of :
const headers = new HttpHeaders().set('Authorization', `Bearer ${token}`);
This way, your custom headers won’t be overridden.
We can move on.
Interceptor Registration and Testing
Let’s open the app.module.ts file and inject this interceptor in the providers array:
providers: [
    { provide: HTTP_INTERCEPTORS, useClass: AuthInterceptorService, multi: true }
],
Of course, we have to import the HTTP_INTERCEPTORS and AuthInterceptorServices in the module file:
import { HttpClientModule, HTTP_INTERCEPTORS } from '@angular/common/http';
import { AuthInterceptorService } from './shared/services/auth-interceptor.service';
Finally, we have to revert the changes for the getData function:
public getData = (route: string) => {
  return this.http.get(this.createCompleteRoute(route, this.envUrl.urlAddress));
}
We just return this function to its previous state because now, we provide the access token differently from the interceptor function.
With all these in place. We can start the Angular app once again, log in and click the Companies link:
Again, we can access the protected Web API’s resources and retrieve the data. Also, we can inspect the request and find the access token in the Authorization header.
Conclusion
We did a great job here.
Now, we know how to extract the access token from the user object generated by the oidc-client library. Also, we know how to modify the request with HttpInterceptor to pass the token in the Authorization header inside the request.
In the next article, we are going to learn how to use the Role-Based authorization to protect our routes and content of the Angular application.

