
We have set up our identity server but we lack UI for the users to enter their credentials. We’ve shown how we can retrieve our token but for better user experience, we have to add UI to our Authorization Server. So, adding IdentityServer4 UI is our goal for this article. Additionally, we are going to learn how we can protect our API and the way to access protected resources. This will be a basic protection setup, but we are going to enhance it during this series.
To navigate through the entire series, visit the IdentityServer4 series page.
Let’s start.
Installing IdentityServer4 UI and Overview
If we start our authorization server now, we are going to see a not-found page in a browser for sure. Even though the server works, this is not user-friendly at all. So let’s do something about that. There is already created UI for the IdentityServer which is easy to install and modify, and we are going to use it for our project.
So, the first thing we are going to do is to open a PowerShell window and navigate to the folder where we have our OAuth project (…\CompanyEmployees.OAuth\CompanyEmployees.OAuth). Once the window is up, let’s execute a command to download the entire UI project:
iex ((New-Object System.Net.WebClient).DownloadString('https://raw.githubusercontent.com/IdentityServer/IdentityServer4.Quickstart.UI/main/getmain.ps1'))
After a couple of seconds, we can see a confirmation about installed Quickstart, Views, and wwwroot folders:

File Inspection And Configuration
If we inspect the SolutionExplorer window of our project, we are going to see three additional folders:
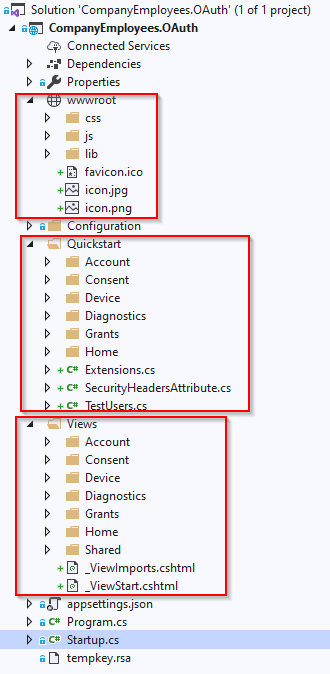
We can see the wwwroot folder with the static files required for the UI. There is the Quickstart folder with different controllers, models, and additional classes. Finally, there is the Views folder with different views (.cshtml files) inside. Everything we downloaded is easy to maintain and modify so, this speeds up the UI creation process a lot. For our examples the default created files will be quite enough.
Now, we have to configure this UI.
So, the first thing we are going to do is to modify the Configure method in the Startup class:
public void Configure(IApplicationBuilder app, IWebHostEnvironment env)
{
    if (env.IsDevelopment())
    {
        app.UseDeveloperExceptionPage();
    }

    app.UseStaticFiles();
    app.UseRouting();

    app.UseIdentityServer();

    app.UseAuthorization();
    app.UseEndpoints(endpoints =>
    {
        endpoints.MapDefaultControllerRoute();
    });
}
With the UseStaticFiles method, we enable serving static files from the wwwroot folder. Additionally, we are adding routing and authorization to the pipeline and configuring endpoints to use a default /Home/Index endpoint. If we open the Quickstart/Home folder, we are going to find a HomeController with the Index action inside. So, this is our entry point.
We have to modify the ConfigureServices method as well:
public void ConfigureServices(IServiceCollection services)
{
    services.AddIdentityServer()
        .AddInMemoryIdentityResources(InMemoryConfig.GetIdentityResources())
        .AddTestUsers(InMemoryConfig.GetUsers())
        .AddInMemoryClients(InMemoryConfig.GetClients())
        .AddDeveloperSigningCredential(); //not something we want to use in a production environment;

        services.AddControllersWithViews();
}
Excellent. Now, we can test our UI.
Testing IdentityServer4 UI
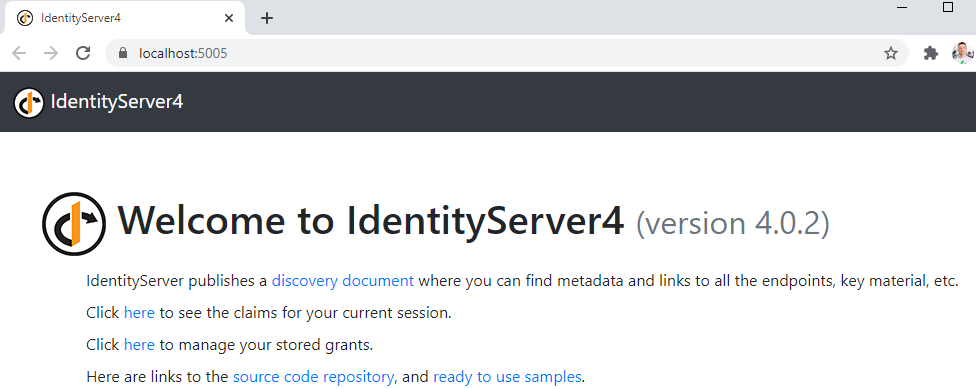
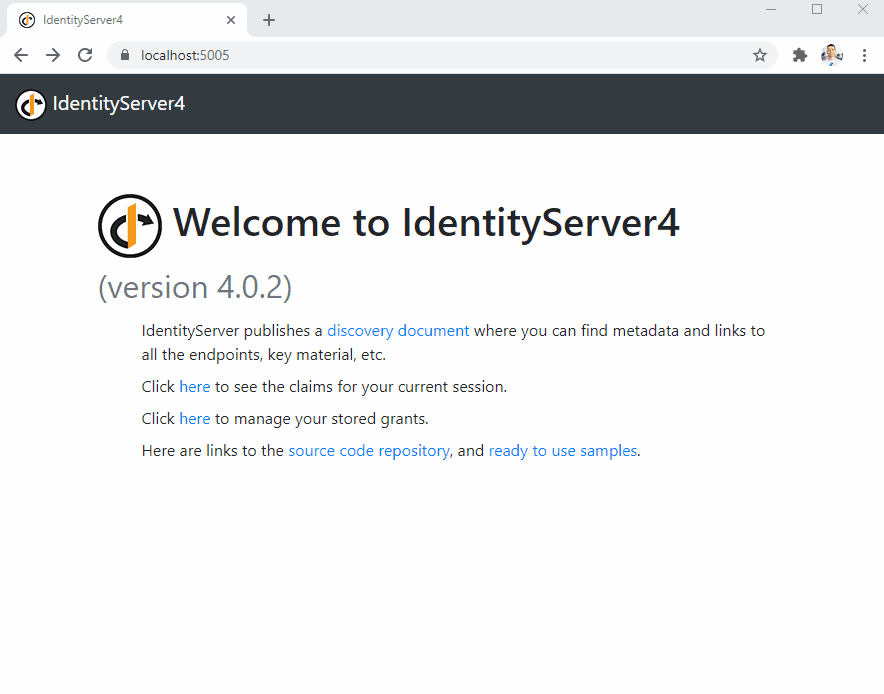
Let’s start the application. It should automatically navigate to localhost:5005 and show the Welcome page:
If we click the discovery document link, we are going to see different endpoints we’ve been talking about in a previous article.
Once we click the second link, we are going to be directed to the login page and after we enter Mick’s credentials, we are going to see all the claims:
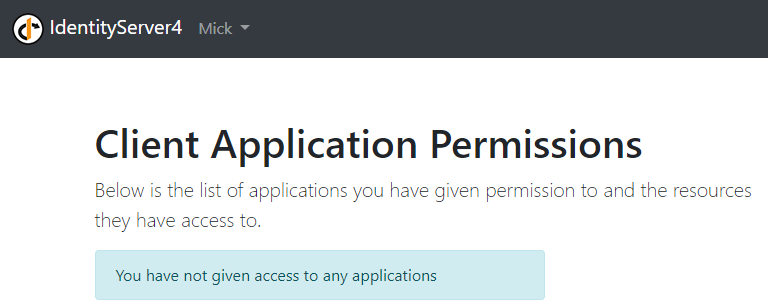
Now, if we click the second “here” link, for the stored grants, we are going to be directed to the login page but as soon as we enter credentials, we are going to see the message informing us about not given access to any applications:
So, we see everything is working as expected. We can logout as well by clicking the username (Mick) and then the Logout link. In the rest of the series, we are going to use this UI quite frequently.
Now, let’s see how we can protect our API using the authorization server.
Configuring API Resources
The first thing we have to do is to add our API scopes in the Authorization Server:
public static IEnumerable<ApiScope> GetApiScopes() =>
    new List<ApiScope> { new ApiScope("companyApi", "CompanyEmployee API") };
Then, as we did with the IdentityResources, in a previous article to support different identity-related data, we are going to support our API resource as well. So, let’s add additional code in the InMemoryConfig class in the OAuth project:
public static IEnumerable<ApiResource> GetApiResources() =>
    new List<ApiResource>
    {
        new ApiResource("companyApi", "CompanyEmployee API")
        {
            Scopes = { "companyApi" }
        }
    };
As you can see, we can add multiple API resources, but for now, we add only one with the name and displayname parameters. Also, we have to specify the scopes related to this resource.
Additionally, we have to modify the client:
public static IEnumerable<Client> GetClients() =>
    new List<Client>
    {
        new Client
        {
            ClientId = "company-employee",
            ClientSecrets = new [] { new Secret("codemazesecret".Sha512()) },
            AllowedGrantTypes = GrantTypes.ResourceOwnerPasswordAndClientCredentials,
            AllowedScopes = { IdentityServerConstants.StandardScopes.OpenId, "companyApi" }
         }
     };
We just add additional scope to support our API scope.
Finally, we have to include this configuration in the ConfigureServices method:
 services.AddIdentityServer()
     .AddInMemoryApiScopes(InMemoryConfig.GetApiScopes())
     .AddInMemoryApiResources(InMemoryConfig.GetApiResources())
     .AddInMemoryIdentityResources(InMemoryConfig.GetIdentityResources())
     .AddTestUsers(InMemoryConfig.GetUsers())
     .AddInMemoryClients(InMemoryConfig.GetClients())
     .AddDeveloperSigningCredential(); //not something we want to use in a production environment;
That is all regarding the IdentityServer configuration and we can continue with the API security logic.
Securing Web API
Before we configure our middleware to support IdentityServer, we have to install a Nuget package to help us in the process:

After the installation, we can modify the ConfigureServices method in the Startup class:
services.AddAuthentication("Bearer")
   .AddJwtBearer("Bearer", opt =>
   {
       opt.RequireHttpsMetadata = false;
       opt.Authority = "https://localhost:5005";
       opt.Audience = "companyApi";
   });

services.AddControllers();
We use the AddAuthentication method to add authentication services to the IOC in our project. Moreover, we use the AddJwtBearer method to configure support for our Authorization Server. In that method, we specify several options:
- RequireHttpsMetadata – We set this to false because we are in a development environment and we don’t require HTTPS
- Authority – Address to use when sending OpenID Connect calls
- Audience – Audience value for received OpenID Connect tokens. This value has to be the same as the one provided in the authorization server configuration for the API resource
We have to do one more thing in the Configure class:
app.UseAuthentication();
app.UseAuthorization();
Now, all we have to do is to protect our action in the CompaneesController by placing the [Authorize] attribute on top of the action or controller itself. For that, we have to include Microsoft.AspNetCore.Authorization endpoint in the controller.
Let’s start both applications and send a request with Postman:
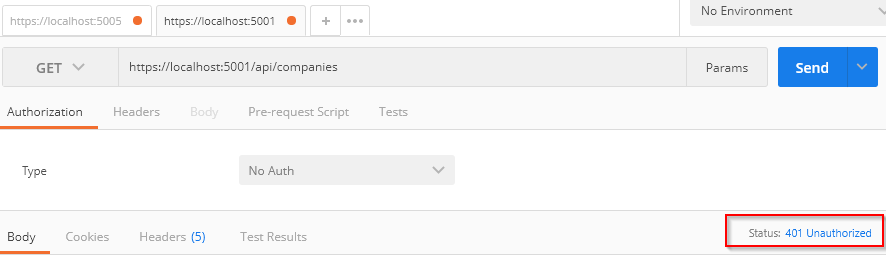
As expected, we get the 401 – Unauthorized response.
Now, to provide access to the authorized resource, we are going to send another request, but to the authorization server first:
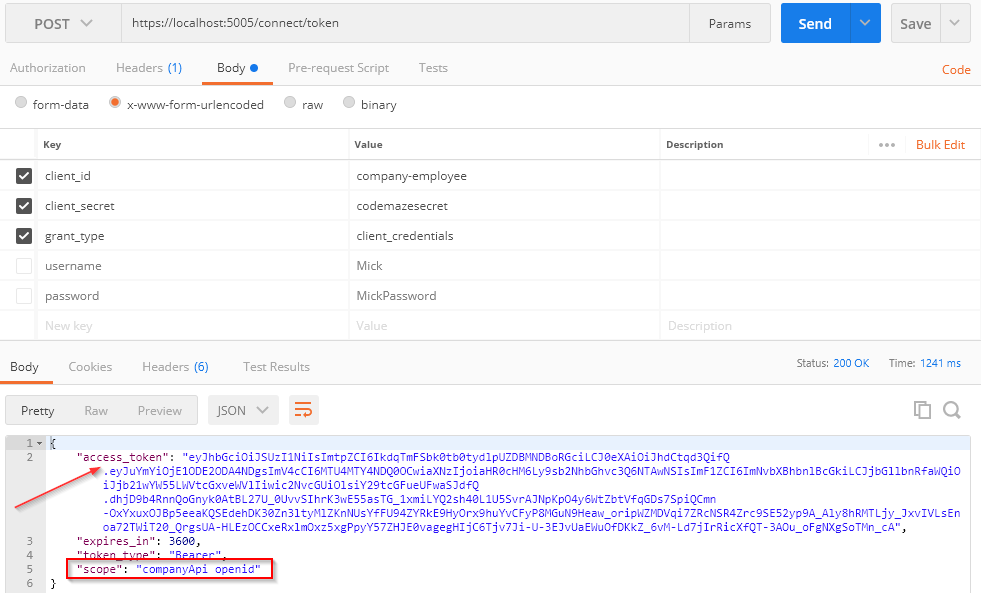
Great, we have a token. Let’s copy our token and add it to the previous request as the Authorization parameter in the Headers tab:
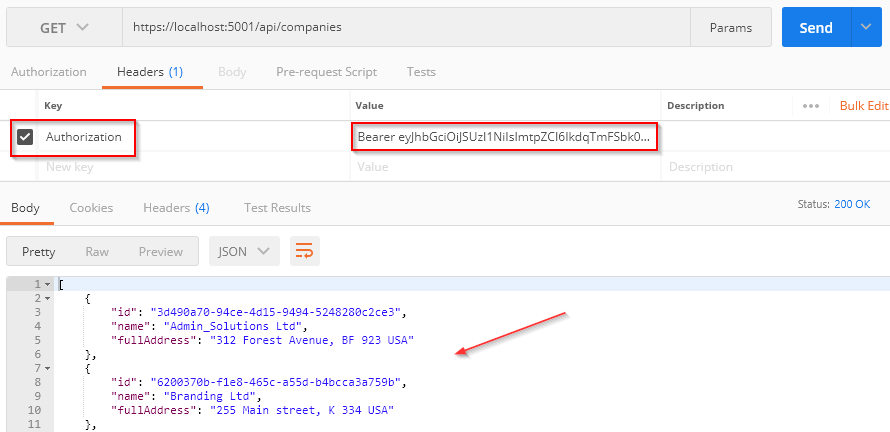
And, there we go. We have the required data. So, we are authorized to communicate with our API.
Inspecting Console Logs
Now, let’s take a look at the console window of the IdentityServer project:
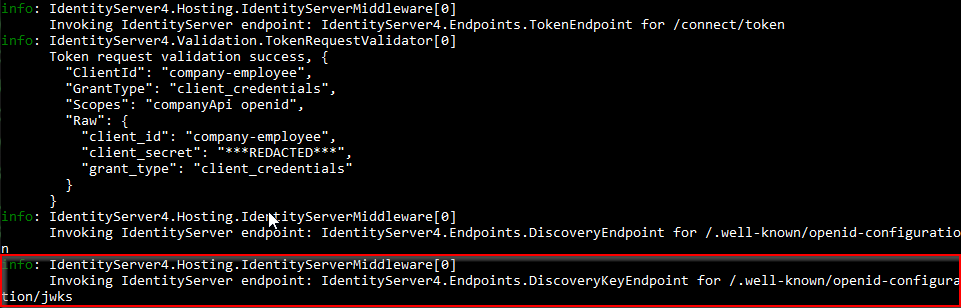
What we can see here is that our API sent a request to the /.well-known/openid-configuration/jwks endpoint to retrieve a public key from the identity server to validate our token.
We can validate that this communication is taking place by modifying our token in Postman. If we do that, we are going to get 401 for sure as a result, because the token is tempered with and is valid no more:
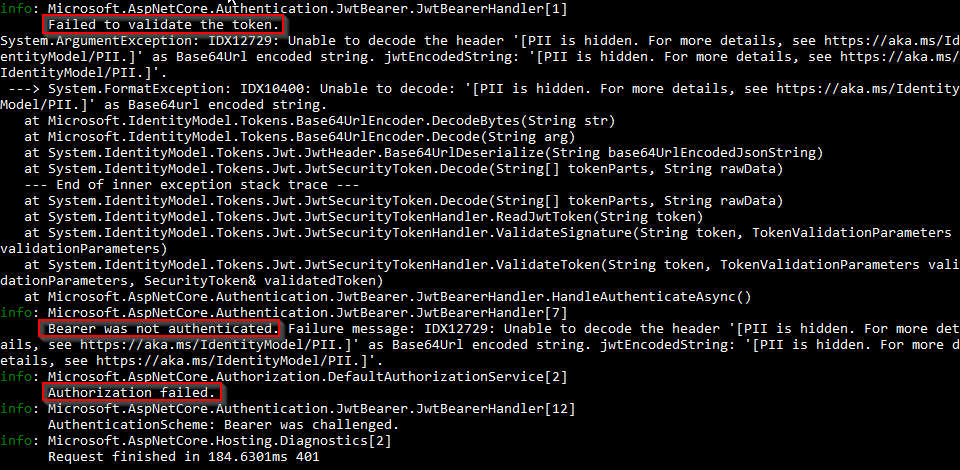
Excellent. We can see the communication between our API and the Identity Server is working flawlessly.
Inspecting Claims
Finally, we can inspect the claims from the token. To do that let’s add a single code line in the GetCompanies action:
var claims = User.Claims;
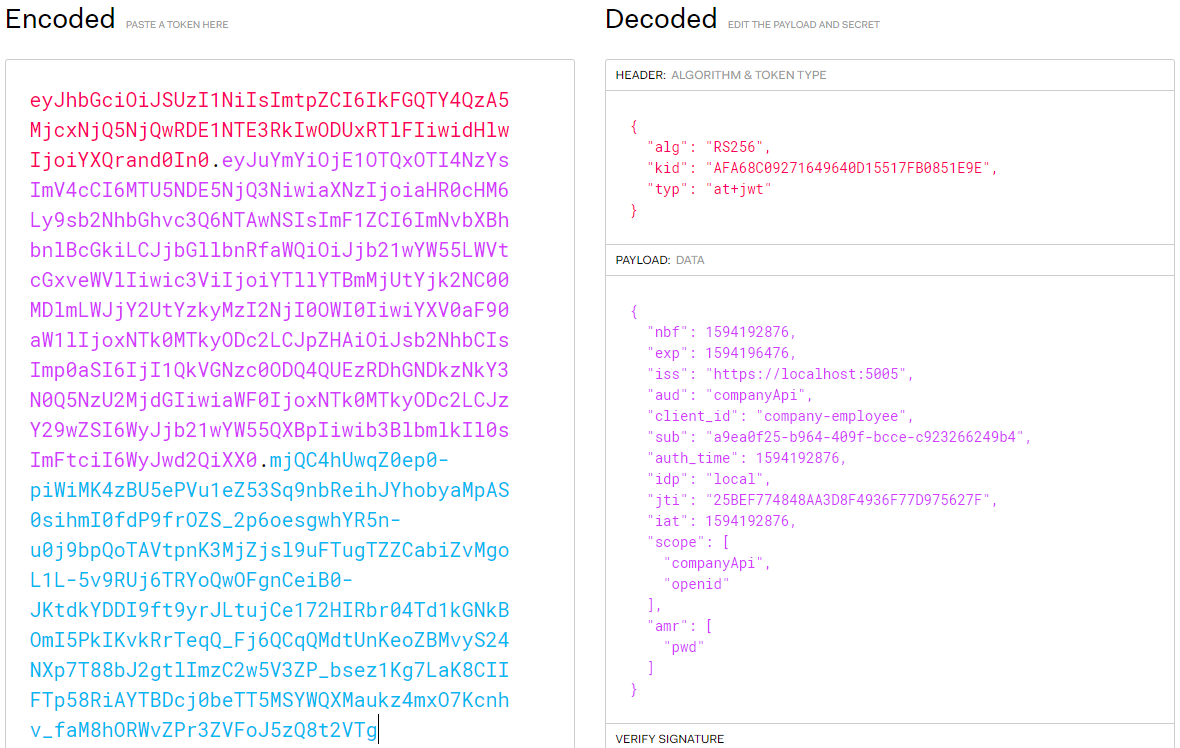
After we acquire a valid token again and send a request to our API, we can see all the claims:
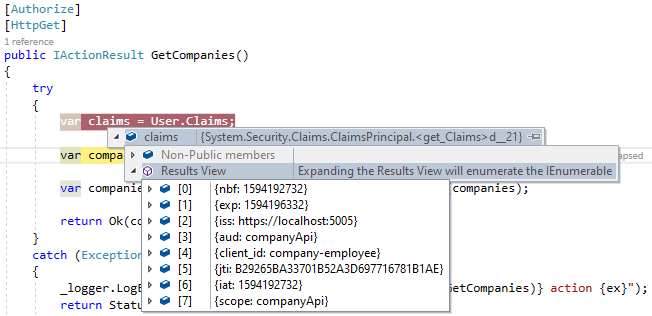
So, we can see all the data from the access token provided as a Bearer token in our request. And we can confirm that this token is not tampered with, because at this point, the token is already validated and the API has all the required information from it.
Of course, we’ve used the Client_Credentials flow in this example, but if you use the ResourceOwnerPassword flow, we are going to get additional claims for sure:
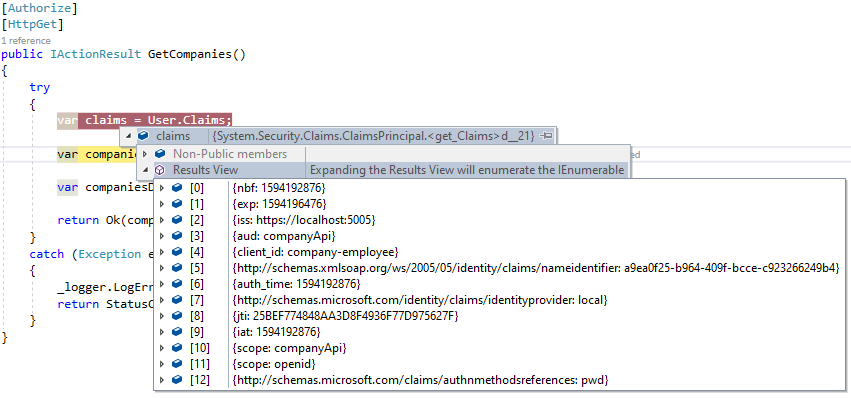
If we decode this token, we are going to get the same result:
Excellent. Everything works as expected.
Conclusion
So, we have learned how to add the UI part to our authorization server and also how to protect our Web API by using two different flows. Of course, we are going to learn more about API protection with additional flows and we are going to use this UI for that purpose as well.
In the next article, we are going to learn how to use the Hybrid flow to protect our web application.

Hi Marinko,
Thanks for your great tutorials.
In your example where you have obtained the token and retrieve results successfully, the postman graphic shows you using https and port 5001. This doesn’t work for me (but it all works fine with http/port 5000). I went back into ConfigureServices, and set ‘opt.RequireHttpsMetadata = true’ in the addAuthentication(“Bearer”) section, but this didn’t make a difference. Should I be able to retrieve results (using a token) on https and port 5001?
Hello Mc Alex. If you inspect the launchSettings file of the Web API project, you will find registered both URIs: “applicationUrl”: “https://localhost:5001;http://localhost:5000“,
Please chack that and also that the Configure method (Startup class) contains this line: app.UseHttpsRedirection();
When I run the CompaniesEmployees API and configure as article said but it threw an exception like below
“System.InvalidOperationException: IDX20803: Unable to obtain configuration from: ‘https://localhost:5005/.well-known/openid-configuration’.”
I browser the link https://localhost:5005/.well-known/openid-configuration and it works well.
Please help me. Thanks
Hi. I would gladly help you but without your code it is not that simple. Please download our source code, you have a link at the top of this article, and compare your solution with ours. This is the easiest way to find what you missed.
I have downloaded the code, and then start the app and when I navigate to localhost:5050 I get the welcome page to identity server I and when I try to login with username/password Mick/MickPassword mothing happens it takes me back to the login page.
I tried both codes from IdentityServer4 UI repository (Start folder) and the IdentityServer4 UI repository (End folder).
I am really not sure why is that. Just checked the source code again (from the end folder) and it works as shown in the article.
What do I need to download, the Start code or End code thanks
If you want to follow along with this article, you have to download the project from the Start folder. But if you want a finished project, then you have to download the End folder.
I have done so tried to follow from the start folder and I could not get it to work and thus I downloaded the code from finished project and no luck.
I have noticed that in the in memory config the users are Mick and Jane, whereas in the Quickstart folder the test users are bob and alice. I tries it on debug mode and I also noticed that the context was null.
We are using just in memory config class not the one i the Quickstary folder. Also, I am not sure what context are you talking about? We are not using database in this article.
Project IdentityServerHost.Quickstart.UI
Class AccountController
Method [HttpPost] Login(LoginInputModel model, string button)
[ValidateAntiForgeryToken]
public async Task
{
// check if we are in the context of an authorization request
var context = await _interaction.GetAuthorizationContextAsync(model.ReturnUrl);
If the above context is null when I am running in debug mode.
and on line 115
var user = _users.FindByUsername(model.Username);
it does find the user,
On the next line it calls
await _events.RaiseAsync(new UserLoginSuccessEvent(user.Username, user.SubjectId, user.Username, clientId: context?.Client.ClientId));
at this the point the context is null and thus the clienttId is null.
Awesome course 🙂
I cannot get it to work.
Thanks
Jason
That context is null, but the line 115 finds Mick as the user if you use Mick’s credentials. Again, I am testing this with our End project linked in the article. I really have no idea why you facing a problem with our source code.
In the AccountController it goes to BuildLoginViewModelAsync
var schemes = await _schemeProvider.GetAllSchemesAsync();
The above returns two schemes
var providers = schemes
.Where(x => x.DisplayName != null)
.Select(x => new ExternalProvider
{
DisplayName = x.DisplayName ?? x.Name,
AuthenticationScheme = x.Name
}).ToList();
providers is empty.
It just redirects me to the same page and there are no errors. If I type the wrong password it catches and tells me Invalid username or password.
Thanks for taking a look.
Jason
Just to clarify one thing. The controller we are talking about is provided out of the box by installing the UI project, it is already implemented as is and we didn’t modify it in this article at all. So, all the behavior you are experiencing is the same for me, except the final result. Have you tried creating a new project and start working from the begining of this tutorial? Not just this article, but the entire series. This is very strange, and I am out of ideas.
I have and the only thing I could get to work is the code in the first article, thank you very much for taking a look.
I am out of ideas too. I am very curious that you could get it to work with the final code on your computer. I have noticed that you are using https on localhost it would not work would it ?
Is there a parameter within the code that says we need to use https ?
I have the same issue, if i used 5005 with https i get:
The webpage at https://localhost:5005/ might be temporarily down or it may have moved permanently to a new web address.
ERR_HTTP2_INADEQUATE_TRANSPORT_SECURITY
If I use 5006 it loads the page but I cannot login
For anyone else who has this issue, it is caused because of an incompatibility of .net core dev-cert with HTTP2, so to disable HTTP2 for this project just add this to your appsettings: and you should be good at least in chrome
“Kestrel”: {
“EndpointDefaults”: {
“Protocols”: “Http1”
}
}
Thanks Daniel for sharing. I’ve faced http2 issue only in win7, once win10 was installed http2 support was out of the box. I am not sure thiugh, why do you have such a problem.
Well seems like http2 is what’s causing the problem. The dev certificate generated by visual studio is for some reason not compatible with http2. I saw this discussion on Github so it must not be just me :).
That being said, I do want to say that I’m following your tutorial and enjoying it very much. You are building it step by step breaking it down so we can absorb it one step at at time. Fantastic job! Thank you!!
You are very welcome. Thank you too, for these kind words. This really means a lot to me. Once you are done with this series, if you want, you can check our main page and dive into the Angular or Blazor WASM course using IS4. Just to step out of the MVC client world 🙂
Hi Marinko,
the problem was that the browser was complaining about https was not secure on localhost and thus when I switched to localhost the problem disappeared. I had no errors but no redirection.
Now I switched back to https as you have it in your article and now it works.
Thanks
Jason
Great, I’m so glad you found the solution. Thanks for sharing the solution with us here.
https://uploads.disquscdn.com/images/e489d93a05ec00a5b055e0e7a5fb8bfb7a8bc8d7e4b1fc5f3701521cf859592a.png
When I login this is what I get in the network tab using the debug tools and If I enter the wrong password it catches it. If I enter the correct password it redirects me back to the login page
Hi, I do not get fully the distinction between the ApiScope and ApiResource. Ok we define our ApiResouces depending on what Apis we are going to protect. But the ApiScope, as far as I know for fine tuning the allowed operations on the ApiResource. Is it not enough to define theApiScopes and then let the clients have a Scopes field showing what they are allowed to do on the Apis. I wonder if you could give a more elaborate example showing the connection between them if we have more than one api and more than one scope?
Thank you.
Before the update of IS4, you could have registered only one. But since the last update to version 4.x.x you have to add them both. Or, to register just resources and then provide an additional configuration options on the web api side (I can’t remember currently which one is that since I updated the series months ago.).
Since a lot of developers use a mac, if you don’t use Powershell the other way to go with the iex command is run these 2 commands from the Start folder (this is the recommended way from IdentityServer4):
1.
dotnet new -i IdentityServer4.Templates2.
dotnet new is4ui -n CompanyEmployees.OAuthThese commands will put you exactly where you need to be to keep up with this tutorial. The first command installs the IS4 templates while the second command adds the folders and files to your already created OAuth folder.
Since the IS4 templates are having a few issues right now you will need to fix the AccountsController and ExternalController by adding a
using IdentityServer4;up top.Hi David. Even though these template comands are great and speed up the process, Im not a great fan if you are new to IS4. These commands will create everything out of the box and you will miss a great learning part how it really works behind the scenes, and I believe it is really important to understand that. But the second command you mentioned will add just the UI folders, so I believe it is ok at this point.
These commands do exactly what your iex command does. I didn’t include the is4empty command which is what you are talking about.
Just wanted to make sure new people to IS4 know that they don’t have to use Powershell if they don’t have access to it.
Yeah, thanks for that and for those suggestions. I hope you enjoy the series.
Thank you for doing it. I have gone through a couple different series now to make sure I know for sure what’s going on and I appreciate yours a lot!