

In this post, we are going to write about what we consider to be the best practices while developing the .NET Core Web API project. How we can make it better and how to make it more maintainable.
While we are working on a project, our main goal is to make it work as it is supposed to and fulfill all the customer’s requirements.
VIDEO: ASP.NET Core Web API Best Practices.
But wouldn’t you agree that creating a project that works is not enough? Shouldn’t that project be maintainable and readable as well?
It turns out that we need to put a lot more attention to our projects to write them in a more readable and maintainable way. The main reason behind this statement is that probably we are not the only ones who will work on that project. Other people will most probably work on it once we are done with it.
So, what should we pay attention to?
Startup/Program Class and the Service Configuration
We will talk about .NET 5, and .NET 6 and above versions here.
If we are looking at .NET 5 template, we can find the Startup class with two methods: the ConfigureServices method for registering the services and the Configure method for adding the middleware components to the application’s pipeline.
So, the best practice is to keep the ConfigureServices method clean and readable as much as possible. Of course, we need to write the code inside that method to register the services, but we can do that in a more readable and maintainable way by using the Extension methods.
For example, let’s look at the wrong way to register CORS:
public void ConfigureServices(IServiceCollection services)
{
    services.AddCors(options =>
    {
        options.AddPolicy("CorsPolicy",
            builder => builder.AllowAnyOrigin()
            .AllowAnyMethod()
            .AllowAnyHeader());
    });
}
In .NET 6 and later, we don’t have the Startup class. Instead, we use only the Program class without the two mentioned methods:
builder.Services.AddCors(options =>
{
    options.AddPolicy("CorsPolicy", builder =>
        builder.AllowAnyOrigin()
       .AllowAnyMethod()
       .AllowAnyHeader());
});
Even though this way will work just fine, and will register CORS without any problem, imagine the size of this method after registering dozens of services.
That’s not readable at all.
The better way is to create an extension class with the static method:
public static class ServiceExtensions
{
    public static void ConfigureCors(this IServiceCollection services)
    {
        services.AddCors(options =>
        {
            options.AddPolicy("CorsPolicy",
                builder => builder.AllowAnyOrigin()
                .AllowAnyMethod()
                .AllowAnyHeader());
        });
    }
}
And then just to call this extended method upon the IServiceCollection type in the Startup class in .NET 5, or the Program class in .NET 6:
services.ConfigureCors();

//.NET 6 and later
builder.Services.ConfigureCors();
To learn more about the .NET Core’s project configuration check out: .NET Core Project Configuration.
Project Organization
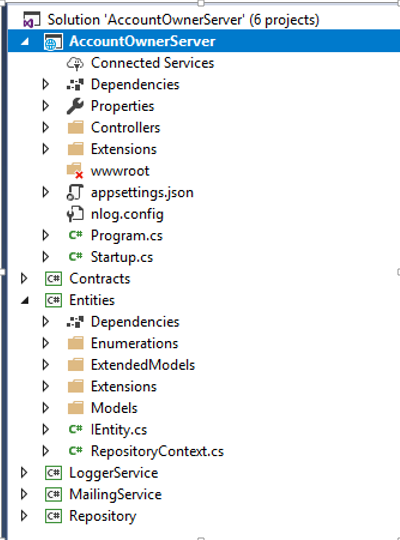
We should always try to split our application into smaller projects. That way we are getting the best project organization and separation of concerns (SoC). The business logic related to our entities, contracts, accessing the database, logging messages, or sending an email message should always be in a separate .NET Class Library project.
Every small project inside our application should contain a number of folders to organize the business logic.
Here is just one simple example of what a completed project should look like:
Environment Based Settings
While we develop our application, that application is in the development environment. But as soon as we publish our application it is going to be in the production environment. Therefore having a separate configuration for each environment is always a good practice.
In .NET Core, this is very easy to accomplish.
As soon as we create the project, we are going to get the appsettings.json file and when we expand it we are going to see the appsetings.Development.json file:
![]()
All the settings inside this file are going to be used for the development environment.
We should add another file appsettings.Production.json, to use in a production environment:

The production file is going to be placed right beneath the development one.
With this setup in place, we can store different settings in the different appsettings files, and depending on the environment our application is on, .NET Core will serve us the right settings. For more information about this topic, check out Multiple Environments in ASP.NET Core.
Data Access Layer
In many examples and different tutorials, we may see the DAL implemented inside the main project and instantiated in every controller. This is something we shouldn’t do.
When we work with DAL we should always create it as a separate service. This is very important in the .NET Core project because when we have DAL as a separate service we can register it inside the IOC (Inversion of Control) container. The IOC is the .NET Core’s built-in feature and by registering a DAL as a service inside the IOC we are able to use it in any class by simple constructor injection:
public class RepoService
{
    private IRepository _repository;

    public RepoService(IRepository repository)
    {
        _repository = repository;
    }
}
The repository logic should always be based on interfaces and if you want, making it generic will allow you reusability as well. Check out this post: .Net Core series – Part 4 to see how we implement the Generic Repository Pattern inside the .NET Core’s project.
Controllers
The controllers should always be as clean as possible. We shouldn’t place any business logic inside it.
So, our controllers should be responsible for accepting the service instances through the constructor injection and for organizing HTTP action methods (GET, POST, PUT, DELETE, PATCH…):
public class OwnerController: Controller
{
    private ILoggerManager _logger;
    private IRepoService _repoService;

    public OwnerController(ILoggerManager logger, IRepoService repoService)
    {
        _logger = logger;
        _repoService = repoService;
    }

    [HttpGet]
    public IActionResult GetAllOwners()
    {
    }

    [HttpGet("{id}", Name = "OwnerById")]
    public IActionResult GetOwnerById(Guid id)
    {
    }

    [HttpGet("{id}/account")]
    public IActionResult GetOwnerWithDetails(Guid id)
    {
    }

    [HttpPost]
    public IActionResult CreateOwner([FromBody]OwnerForCreationDto owner)
    {
    }

    [HttpPut("{id}")]
    public IActionResult UpdateOwner(Guid id, [FromBody]OwnerForUpdateDto owner)
    {
    }

    [HttpDelete("{id}")]
    public IActionResult DeleteOwner(Guid id)
    {
    }
}
Actions
Our actions should always be clean and simple. Their responsibilities include handling HTTP requests, validating models, catching errors, and returning responses:
[HttpPost]
public IActionResult CreateOwner([FromBody]OwnerForCreationDto owner)
{
    try
    {
        if (owner == null)
        {
            return BadRequest("Owner object is null");
        }

        if (!ModelState.IsValid)
        {
            return BadRequest("Invalid model object");
        }

        //additional code

        return CreatedAtRoute("OwnerById", new { id = createdOwner.Id }, createdOwner);
    }
    catch (Exception ex)
    {
        _logger.LogError($"Something went wrong inside the CreateOwner action: {ex}");
        return StatusCode(500, "Internal server error");
    }
}
Our actions should have IActionResult as a return type in most of the cases (sometimes we want to return a specific type or a JsonResult…). That way we can use all the methods inside .NET Core which returns results and the status codes as well.
The most used methods are:
- OK => returns the 200 status code
- NotFound => returns the 404 status code
- BadRequest => returns the 400 status code
- NoContent => returns the 204 status code
- Created, CreatedAtRoute, CreatedAtAction => returns the 201 status code
- Unauthorized => returns the 401 status code
- Forbid => returns the 403 status code
- StatusCode => returns the status code we provide as input
Handling Errors Globally
In the example above, our action has its own try-catch block. This is very important because we need to handle all the errors (that in another way would be unhandled) in our action method. Many developers are using try-catch blocks in their actions and there is absolutely nothing wrong with that approach. But, we want our actions to be clean and simple, therefore, removing try-catch blocks from our actions and placing them in one centralized place would be an even better approach.
.NET Core gives us an opportunity to implement exception handling globally with little effort by using built-in and ready-to-use middleware. All we have to do is to add that middleware in the Startup class by modifying the Configure method (for .NET 5), or to modify the pipeline registration part of the Program class in .NET 6 and later:
app.UseExceptionHandler(config =>
{
     config.Run(async context =>
     {
         context.Response.StatusCode = (int)HttpStatusCode.InternalServerError;
         context.Response.ContentType = "application/json";

         var error = context.Features.Get<IExceptionHandlerFeature>();
         if (error != null)
         {
             var ex = error.Error;

             await context.Response.WriteAsync(new ErrorModel()
             {
                 StatusCode = context.Response.StatusCode,
                 ErrorMessage = ex.Message
             }.ToString()); //ToString() is overridden to Serialize object
         }
     });
 });

 ...
We can even write our own custom error handlers by creating custom middleware:
public class CustomExceptionMiddleware
{
    //constructor and service injection

    public async Task Invoke(HttpContext httpContext)
    {
        try
        {
            await _next(httpContext);
        }
        catch (Exception ex)
        {
            _logger.LogError("Unhandled exception ...", ex);
            await HandleExceptionAsync(httpContext, ex);
        }
    }

    //additional methods
}
After that we need to register it and add it to the applications pipeline:
public static IApplicationBuilder UseCustomExceptionMiddleware(this IApplicationBuilder builder)
{
    return builder.UseMiddleware<CustomExceptionMiddleware>();
}
app.UseCustomExceptionMiddleware();
To read in more detail about this topic, visit Global Error Handling in ASP.NET Core Web API.
Using ActionFilters to Remove Duplicated Code
Filters in ASP.NET Core allow us to run some code prior to or after the specific stage in a request pipeline. Therefore, we can use them to execute validation actions that we need to repeat in our action methods.
When we handle a PUT or POST request in our action methods, we need to validate our model object as we did in the Actions part of this article. As a result, that would cause the repetition of our validation code, and we want to avoid that (Basically we want to avoid any code repetition as much as we can).
We can do that by using ActionFilters. Instead of validation code in our action:
if (!ModelState.IsValid)
{
  // bad request and logging logic
}
We can create our filter:
public class ModelValidationAttribute : ActionFilterAttribute
{
    public override void OnActionExecuting(ActionExecutingContext context)
    {
        if (!context.ModelState.IsValid)
        {
            context.Result = new BadRequestObjectResult(context.ModelState); // returns 400 with error
        }
    }
}
And register it in the Startup class in the ConfigureServices method:
services.AddScoped<ModelValidationAttribute>();
Or for .NET 6 and later in the Program class:
builder.Services.AddScoped<ModelValidationAttribute>();
Now, we can use that filter with our action methods.
To read in more detail about using Action Filters, visit our post: Action Filters in .NET Core.
Using DTOs to Return Results and Accept Inputs
Even though we can use the same model class to return results or accept parameters from the client, that is not a good practice. A much better practice is to separate entities that communicate with the database from the entities that communicate with the client. Yes, the answer is to use DTOs.
The model class is a full representation of our database table and being like that, we are using it to fetch the data from the database. But once the data is fetched we should map the data to the DTO and return that result to the client. By doing so, if for some reason we have to change the database, we would have to change only the model class but not the DTO because the client may still want to have the same result. You can read more about the DTO’s usage in the fifth part of the .NET Core series.
We shouldn’t be using DTOs only for the GET requests. We should use them for other actions as well. For example, if we have a POST or PUT action, we should use the DTOs as well. To read more about this topic, you can read the sixth part of the .NET Core series.
Additionally, DTOs will prevent circular reference problems as well in our project.
Routing
In the .NET Core Web API projects, we should use Attribute Routing instead of Conventional Routing. That’s because Attribute Routing helps us match the route parameter names with the actual parameters inside the action methods. Another reason is the description of the route parameters. It is more readable when we see the parameter with the name “ownerId” than just “id”.
We can use the [Route] attribute on top of the controller and on top of the action itself:
[Route("api/[controller]")]
public class OwnerController: Controller
{
     [Route("{id}")]
     [HttpGet]
     public IActionResult GetOwnerById(Guid id)
     {

     }
}
There is another way to create routes for the controller and actions:
[Route("api/owner")]
public class OwnerController: Controller
{
     [HttpGet("{id}")]
     public IActionResult GetOwnerById(Guid id)
     {

     }
}
There are different opinions on which way is better, but we would always recommend the second way, and this is something we always use in our projects.
When we talk about routing we need to mention the route naming convention. We can use descriptive names for our actions, but for the routes/endpoints, we should use NOUNS and not VERBS.
A few wrong examples:
[Route("api/owner")]
public class OwnerController : Controller
{
    [HttpGet("getAllOwners")]
    public IActionResult GetAllOwners()
    {
    }

    [HttpGet("getOwnerById/{id}"]
    public IActionResult GetOwnerById(Guid id)
    {
    }
}
The good examples:
[Route("api/owner")]
public class OwnerController : Controller
{
    [HttpGet]
    public IActionResult GetAllOwners()
    {
    }

    [HttpGet("{id}"]
    public IActionResult GetOwnerById(Guid id)
    {
    }
}
For a more detailed explanation of the Restful practices check out: Top REST API Best Practices.
Logging
If we plan to publish our application to production, we should have a logging mechanism in place. Log messages are very helpful when figuring out how our software behaves in production.
.NET Core has its own logging implementation by using the ILoggerinterface. It is very easy to implement it by using the Dependency Injection feature:
public class TestController: Controller
{
    private readonly ILogger _logger;

    public TestController(ILogger<TestController> logger)
    {
        _logger = logger;
    }
}
Then in our actions, we can utilize various logging levels by using the _logger object.
.NET Core supports a logging API that works with a variety of logging providers. Therefore, we may use different logging providers to implement our own logging logic inside our project.
The NLog is a great library to use for implementing our own custom logging logic. It is extensible, supports structured logging, and is very easy to configure. We can log our messages in the console window, files, or even database.
To learn more about using this library inside the .NET Core check out: .NET Core series – Logging With NLog.
The Serilog is a great library as well. It fits in with the .NET Core built-in logging system.
Paging, Searching, and Sorting
We don’t want to return a collection of all resources when querying our API. That can cause performance issues and it’s in no way optimized for public or private APIs. It can cause massive slowdowns and even application crashes in severe cases. So, implementing paging, searching, and sorting will allow our users to easily find and navigate through returned results, but it will also narrow down the resulting scope, which can speed up the process for sure.
There is a lot of implementation involving these three features, so to learn more about them, you can read our articles on Paging, Searching, and Sorting.
Versioning APIs
The requirements for our API may change over time, and we want to change our API to support those requirements. But, while doing so, we don’t want to make out API consumers change their code, because for some customers the old version works just fine and for others, the new one is the go-to option. To support that, the best practice is to implement API versioning. This will preserve the old functionality and still promote a new one.
We can achieve versioning in a few different ways:
- With attributes:
[ApiVersion("2.0")] - We can provide a version as a query string within the request:
https://some-address/api-version-2.0 - By using the URL versioning:
[Route("api/{v:apiversion}/some-resource")]and the request:https://some-address/2.0/resource - With HTTP header versioning
- Using conventions
We are talking in great detail about this feature and all the other best practices in our Ultimate ASP.NET Core Web API book.
Using Asynchronous Code
With async programming, we avoid performance bottlenecks and enhance the responsiveness of our application.
The reason for that is that we are not sending requests to the server and blocking it while waiting for the responses anymore (as long as it takes). So, by sending a request to the server, the thread pool delegates a thread to that request. Once the thread finishes its job it returns to the thread pool freeing itself for the next request. At some point, the application fetches the data from the database and it needs to send that data to the requester. Here is where the thread pool provides another thread to handle that work. Once the work is done, a thread is going back to the thread pool.
One important thing to understand is that if we send a request to an endpoint and it takes the application three or more seconds to process that request, we probably won’t be able to execute this request any faster using the async code. It is going to take the same amount of time as the sync request. But the main advantage is that with the async code the thread won’t be blocked for three or more seconds, and thus it will be able to process other requests. This is what makes our solution scalable.
Of course, using the async code for the database fetching operations is just one example. There are a lot of other use cases of using the async code and improving the scalability of our application and preventing the thread pool blockings.
So, for example, instead of having the synchronous action in our controller:
[HttpGet]
public IActionResult Get()
{
    var owners = _repository.Owner.GetAllOwners();
     _logger.LogInfo($"Returned all owners from database.");
    return Ok(owners);
}
We can have an asynchronous one:
[HttpGet]
public async Task<IActionResult> Get()
{
    var owners = await _repository.Owner.GetAllOwnersAsync();
    _logger.LogInfo($"Returned all owners from database.");

    return Ok(owners);
}
Of course, this example is just a part of the story. For the complete asynchronous example, you can read our Implementing Asynchronous Code in ASP.NET Core article.
Caching
Caching allows us to boost performance in our applications.
There are different caching technologies that we can use:
Caching is helpful because reading data from memory is much faster than reading it from a disk. It can reduce the database cost as well. Basically, the primary purpose is to reduce the need for accessing the storage layers, thus improving the data retrieval process.
Different caching technologies use different techniques to cache data. Response caching reduces the number of requests to a web server. It reduces the amount of work the web server performs to generate a response. Also, it uses headers that specify how we want to cache responses. In-memory caching uses server memory to store cached data. Distributed caching technology uses a distributed cache to store data in memory for the applications hosted in a cloud or server farm. The cache is shared across the servers that process requests.
Basically, it is up to developers to decide what caching technique is the best for the app they are developing.
You can read more about caching, and also more about all of the topics from this article in our Ultimate ASP.NET Core Web API book.
Using the ReadFormAsync() Method
There are a lot of cases where we need to read the content from the form body. One of these cases is when we upload files with our Web API project. In this situation, we can use the Request.Form expression to get our file from the body:
public IActionResult Upload()
{
    try
    {
        var file = Request.Form.Files[0];
        var folderName = Path.Combine("Resources", "Images");
        var pathToSave = Path.Combine(Directory.GetCurrentDirectory(), folderName);
        if (file.Length > 0)
        {
            var fileName = ContentDispositionHeaderValue.Parse(file.ContentDisposition).FileName.Trim('"');
            var fullPath = Path.Combine(pathToSave, fileName);
            var dbPath = Path.Combine(folderName, fileName);
            using (var stream = new FileStream(fullPath, FileMode.Create))
            {
                file.CopyTo(stream);
            }
            return Ok(new { dbPath });
        }
        else
        {
            return BadRequest();
        }
    }
    catch (Exception ex)
    {
        return StatusCode(500, $"Internal server error: {ex}");
    }
}
Here we use the Requst.Form.Files expression to access the file in the form body. This is a good solution if we don’t create a large application for millions of users. But if we create a large app for a lot of users, with this solution we can end up with thread pool starvation. This is mainly because of the Request.Form is the synchronous technique to read the data from the form body.
If we want to avoid that (thread pool starvation), we have to use an async way with the ReadFromAsync method:
public async Task<IActionResult> Upload()
{
    try
    {
        var formCollection = await Request.ReadFormAsync();
        var file = formCollection.Files.First();

        //everything else is the same
For applications with a lot of users, using the Request.Form expression is safe only if we use the ReadFromAsync method to read the form and then use the Request.Form to read the cached form value.
To see a full example of both approaches, you can read our Upload Files with .NET Core Web API article.
CryptoHelper And Data Protection
We won’t talk about how we shouldn’t store the passwords in a database as plain text and how we need to hash them out due to security reasons. That’s out of the scope of this article. There are various hashing algorithms all over the internet, and there are many different and great ways to hash a password.
If we want to do it on our own, we can always use the IDataProtector interface which is quite easy to use and implement in the existing project.
To register it, all we have to do is to use the AddDataProtection method in the ConfigureServices method. Then it can be injected via Dependency Injection:
private readonly IDataProtector _protector;

public EmployeesController( IDataProtectionProvider provider)
{
    _protector = provider.CreateProtector("EmployeesApp.EmployeesController");
}
Finally, we can use it: _protector.Protect("string to protect");
You can read more about it in the Protecting Data with IDataProtector article.
But if need a library that provides support to the .NET Core’s application and that is easy to use, the CryptoHelper is quite a good library.
The CryptoHelper is a standalone password hasher for .NET Core that uses a PBKDF2 implementation. The passwords are hashed using the new Data Protection stack.
This library is available for installation through NuGet and its usage is quite simple:
using CryptoHelper;

// Method for hashing the password
public string HashPassword(string password)
{
    return Crypto.HashPassword(password);
}

// Method to verify the password hash against the given password
public bool VerifyPassword(string hash, string password)
{
    return Crypto.VerifyHashedPassword(hash, password);
}
Content Negotiation
By default, .NET Core Web API returns a JSON formatted result. In most cases, that’s all we need.
But what if the consumer of our Web API wants another response format, like XML for example?
For that, we need to create a server configuration to format our response in the desired way:
public void ConfigureServices(IServiceCollection services)
{
    services.AddMvc(config =>
    {
        // Add XML Content Negotiation
        config.RespectBrowserAcceptHeader = true;
    });
}
Or in .NET 6 in the Program class:
builder.Services.AddMvc(config =>
{
    // Add XML Content Negotiation
    config.RespectBrowserAcceptHeader = true;
});
Sometimes the client may request a format that is not supported by our Web API and then the best practice is to respond with the status code 406 Not Acceptable. That can be configured inside our ConfigureServices method as well:
config.ReturnHttpNotAcceptable = true;
We can create our own custom format rules as well.
Content negotiation is a pretty big topic so if you want to learn more about it, check out: Content Negotiation in .NET Core.
Security and Using JWT
JSON Web Tokens (JWT) are becoming more popular by the day in web development. It is very easy to implement JWT Authentication due to the .NET Core’s built-in support. JWT is an open standard and it allows us to transmit the data between a client and a server as a JSON object in a secure way.
We can configure the JWT Authentication in the ConfigureServices method for .NET 5:
public void ConfigureServices(IServiceCollection services)
{
     services.AddAuthentication(opt => {
        opt.DefaultAuthenticateScheme = JwtBearerDefaults.AuthenticationScheme;
        opt.DefaultChallengeScheme = JwtBearerDefaults.AuthenticationScheme;
    })
    .AddJwtBearer(options =>
       {
          options.TokenValidationParameters = new TokenValidationParameters
          {
             //Configuration in here
          };
       });
}
Or in the Program class for .NET 6 and later:
builder.Services.AddAuthentication(opt => {
    opt.DefaultAuthenticateScheme = JwtBearerDefaults.AuthenticationScheme;
    opt.DefaultChallengeScheme = JwtBearerDefaults.AuthenticationScheme;
})
.AddJwtBearer(options =>
{
     options.TokenValidationParameters = new TokenValidationParameters
     {
        //Configuration in here
     };
});
In order to use it inside the application, we need to invoke this code:
app.UseAuthentication();
app.UseAuthorization();
We may use JWT for the Authorization part as well, by simply adding the role claims to the JWT configuration.
To learn in more detail about JWT authentication and authorization in .NET Core, check out JWT with .NET Core and Angular Part 1 and Part 2 of the series.
ASP.NET Core Identity
Additionally, if you want to use some advanced security actions in your application like Password Reset, Email Verification, Third Party Authorization, etc, you can always refer to the ASP.NET Core Identity. ASP.NET Core Identity is the membership system for web applications that includes membership, login, and user data. It contains a lot of functionalities to help us in the user management process. In our ASP.NET Core Identity series, you can learn a lot about those features and how to implement them in your ASP.NET Core project.
Using IdentityServer4/Duende – OAuth2 and OpenID Connect
IdentityServer4 is an Authorization Server that can be used by multiple clients for Authentication actions. It has nothing to do with the user store management but it can be easily integrated with the ASP.NET Core Identity library to provide great security features to all the client applications. OAuth2 and OpenID Connect are protocols that allow us to build more secure applications.
OAuth2 is more related to the authorization part whereas OpenID Connect (OIDC) is related to the Identity(Authentication) part. We can use different flows and endpoints to apply security and retrieve tokens from the Authorization Server. You can always read our IdentityServer4, OAuth2, and OIDC series to learn more about OAuth2.
Testing Our Applications
We should write tests for our applications as much as we can. From our experience, we know there is no always time to do that, but it is very important for checking the quality of the software we are writing. We can discover potential bugs in the development phase and make sure that our app is working as expected before publishing it to production. Of course, there are many additional reasons to write tests for our applications.
To learn more about testing in ASP.NET Core applications (Web API, MVC, or any other), you can read our ASP.NET Core Testing Series, where we explain the process in great detail.
Conclusion
If you liked this article, and want to learn in great detail about all these features and more, we recommend checking our Ultimate ASP.NET Core Web API book.
In this article, our main goal was to familiarize you with the best practices when developing a Web API project in .NET Core. Some of those could be used in other frameworks as well, therefore, having them in mind is always helpful.
If you find that something is missing from the list, don’t hesitate to add it in a comment section.
Thank you for reading the article and we hope you found something useful in it.

I love your website. it teach me a lot about .NET technologies. Thank you for sharing
Glad to hear that. Thank you for reading.
I’ve been around and or involved in API development for a couple
of years now and I haven’t been fully immersed in it enough to be
comfortable with some of the concepts to know the “why” and the “what”
of some things that go on. Specifically, I’m interested in know why things
like interfaces need to be added to the build pipeline in the program class
file and what things specifically needed to be added? How do you know when
you need to add something to the build pipeline. Is there a resource that you
can point me to that will help me understand this better?
Hello Mike.
Well, when you register your interfaces as services in the Program class, you do that so you could enable dependency injection for that service. After the registration, you can use it when you need it.
When we talk about the pipeline add-ons, this is a bit different thing. Many services need to be executed during every request-response cycle. And then, for those services, you register them as a service and then add them to the invocation pipeline. That service has its own middleware that will be executed during the regular pipeline flow and then once executed will handle the execution to the next middleware until the request is finished and a response is returned to the client.
So, when you ask how we know when to add, well, I am not sure what to tell you here because, basically, you must add those as the documentation states the same. For example, if you are using an authentication mechanism in Web API, you have to add it to a pipeline because the authentication middleware needs to kick in for every authorized request and not kick in for anonymous actions. All that logic is built inside the authentication middleware and once you register it inside the pipeline, it will be executed during each request-response cycle. The same goes for CORS, Caching, etc.
The same applies to your custom services, like when you create your global error handler. You can check out this article: https://code-maze.com/global-error-handling-aspnetcore/ especially the Handling Errors Globally With the Custom Middleware part.
Now, I am not sure if I even managed to closely reply to your questions, but I really tried to present it in the easiest way I could.
Of course, we have the Web API book package, where we create an app from scratch to some advanced points, and from there, you can see when and what should be registered as a service or as a middleware.
Lots of points here are very subjective and depend on the personal preferences and selected aproaches to follow. Many points I would not consider being the best practices at all for dotNET API. I would say that the article is very controversial…
I strongly disagree points are not the best practices, just as the opposite. But again, it is our article and our view on how APIs should be designed or at least what should be considered while designing APIs. Also, this is something used and proven over the years of experience. If we go all the way up to analyze your comment, we can say it is subjective as well: “Many points I would not consider being the best practices” – so as you can see, this is your point of view, the article is mine.
I have added my points on that to this Linkedin discussion (if anybody interested)
It’s a very good topic, thanks to those who contributed.
You are most welcome.
I did not find such a detailed step-by-step topic on .net core API development. This has all the detail that one needed to develop an e2e.core API. Thank you for sharing this tutorial.
Marinko, do we have articles about the best microservice architecture design and unit testing practices for API projects?
Hello Ashok. Thanks a lot for the kind words. Regarding your question, we do have articles on microservices and testing, and you can find them on our site using the search field. But we don’t have any best practices articles on these topics.
Very helpful article. It filled my gaps in learning and answered to so many questions in my daily routine tasks. Thanks.
Thanks a lot, Muaaz. I am glad you find it useful. Have a great day.
Hi Marinko,
After reading the Onion Architecture link you provided me, I came up with few questions that need clarification.
1. Why you did not put Services and Services.Abstraction project inside Infrastructure Layer, since Services usually handles multiple Repository data.
Also since Repository is located in Infrastructure layer, so service were also supposed to be there, I assume !
2. Naming convention you used like “Contracts” project which contain exclusively Dto classes are a bit confusing. Because Contract in programming means like Interface / Abstract type.
Regards
Johnson
This article was written by one of our authors who had similar project structure on his daily job, so he just transferred it to the article. Feel free to modify our structure or naming convention to your needs. I think the Onion article shows well how clean architecture should be applied, but of course, everyone should modify it to fit their needs or demands. I can agree with you about Contracts, in our book, we did a bit different job with naming projects.
Hi Marinko,
What to do if I want to deal with data from multiple entities/repositories ?
I mean like in a Data Report, you have a DTO class that needs to gather data from multiple(2-3-4) entites/repositories to be consumed by external system, what do I do ?
I’m asking cause I’m about confused as other people say that Controller must not have many logics in it, also Repository is usually per entity.
So What to do :
– Should I create a repository that has method parameter all the entities that I need ?
– should I create another layer like Service (Repository-Service) which is gonna deal with that like on this link ?
In brief, what is the best practice when a DTO needs data from multiple entities, and do some calculations on these datas then sent the result out ?
On your book Ultimate API 1st version, I didn’t see something like that.
Regards
Johnson
Hello Johnson.
It is the best way to have a service layer between your Presentation layer and your Repository layer. In our book, but the second edition, we’ve explained that in great detail and we use the Service layer throughout the entire application. Also, you can read more about it here: https://code-maze.com/onion-architecture-in-aspnetcore/
Thank you so much for your quick reply.
I love reading your articles.
Hi Marinko, thank you so much for your article.
I have a concern :
Is it a good practice in this 2021 or 2022 or to have Api Dto classes as extension methods ?
I’m asking because I’m working on an old API project created 6 years ago that have Dtos created as extension methods.
Regards
Freesix
Hello Freesix. To be honest with you, I am not even sure what are you asking me. How Dto, which is the class or record itself be an extension method at the same time? What we are doing currently is using Records instead of Classes for our DTOs. Even in our Web API book Second Edition we talk more about it and use the records throughout the entire project.
The information you’ve shared in this blog is highly remarkable. Thanks for sharing such quality information.
You arr most welcome.
Thanks a lot. All the best.
Hello, Absolutely great blog here.
thanks for your easy-to-understand example.
You are most welcome. We are glad you like it.
Great work! but
Your controller method naming is against Microsoft Web API best practice
https://docs.microsoft.com/en-us/azure/architecture/best-practices/api-design
”
“
Thanks for reading the article and for your suggestion, but I must say your suggestion can’t be applied to our article. It is a good suggestion, just we didn’t make any mistake in our article.
You can’t find a route (like you wrote that should be avoided) in our article. If you want to create an owner, the URI for that endpoint is: POST => /api/owner or in full https://localhost:5001/api/owner.
Also, if you want to get owner by id, you won’t find /api/get-owner-by-id but you will find /api/owner/id
So, the naming of the actions doesn’t play a role for the routes, these names are here for the description of the action. The URIs, on the other hand, are organized as suggested in the article you linked.
Excellent Work!
Thank you very much. I am glad you like it.
This is a very well written article, covering wide area of dotnet core API best practices
Thanks a lot. Glad you like it.
great job
Hey , i read your blog it is very informative and helpful for many of us . Thankyou for sharing it .
thanks
You are welcome.
can you please add about the versioning in this article
You are right, it should be added. We have plans to update it with some additional content.
wonderful explanation! really appreciate. Sir, i am not sure if you had a blog for microservices also. actually i am looking for great stuff related to CQRS and MadiatR implementation.
Thank you Pawan. Right now, we don’t have any articles covering these topics. But will be in a near future for sure.
Can you please share the source code download link what you have explain in article
Hi RMah, this article in particual doesn’t have a source code attached, because it just gives examples of best practices.
If you want to learn more, you can follow the links in the article to the other articles that explain these concepts further.
Alternatively you can buy our book, which implements these projects on a real-wordls example and explains these concepts in-depth:
https://code-maze.com/ultimate-aspnet-core-3-web-api
Controllers have one responsibility to accept request and pass it on and provide response based on the request. Controllers are not a place to talk to the database.
I completely agree. And, that is exactly what we state in the article.
Should I create a new project named “Bussiness” or “Service” take responsibility for Application’s logic, e.g Bussiness receive LoginDTO from Controller and process login logic, then it response to Controller with “login response – successful or failed”. Can you help me with my question? Thank you!
Yes, you should do exactly that. Create another Service project, put all the business logic inside it. Inject the repository inside the service classes, and inject service inside the controller.
Thank you for this article. Most detailed and concise that I’ve come across so far. Bookmarked
Thank you Sunny. Feel free to search through our site, you will find a lot of interesting stuff. And if you like it, you may subscribe as well to get notified about new content on our site. Best regards.
Highly recommended blog! Thanks for your sharing!
A quick question, is it possible to have 2 different DB Contexts at the same time? Thanks again.
Hello Eric. First of all, thank you very much for the kind words. To answer your question, yes it is possible to have more than one db context in your project. You can read our EF Core series, there you can learn more about EF Core and db context as well. Thank you one more time and all the best.
Hi,
Great blog you have written for best practice of .net core.
i have one query,I am using .net core console Application for using API, some times we are getting duplicate request from APP end so is there any option in .net core – “PreventDuplicateRequest” like MVC ?
Awesome 🙂 this is exactly what i was looking for. thanks you for this post.
Thank you Abhishek. It is always nice to hear something like that. We hope you will find our other articles usefull. All the best.
Great Blog! I am surprised I have found it only today!
About .net core we can find tons of tutorials and howtos but I was having hard time to find something more detailed and with a better quality! I am really glad to found you! I am going to subscribe.
Thank you very much Francesco. We are doing our best to provide a grate quality content for our readers. So, having to read comment like yours is always a sign that we are on a right track. People will find us (sooner or later) but you guys with your comments and sharing are helping us a lot. One more time, thank you a lot. Best regards.
You guys deserve this type of comments. I come from a PHP background, in particular using Laravel framework and I found laracast very useful. When I had the need to switch to .NET stack I had hard time to find valid resources so I got stuck with the official documentation, which is pretty good though. But deeper you go better resources you need. It could be an idea to make a video series for those type of tutorials -it’s just an idea not a request-
Best regards
Thank you for the kind words Francesco! It means a lot to us to read such a positive feedback from time to time.
You might be onto something with video series, but shhh… 😀
Subscribed. Quality work! Thank you.
Hello Vedran. Thank you for reading the article and for the sub as well. All the best.
Hi, really good material, is there a way to get the full sample of the code. I have checked and done step by step of the asp.net series till the angular part, and this seems to have more services implemented.
Hello Gallo. Yes this articles shows even more features which we find to be the best practices in ASP.NET Core. You can find the full code samples in the articles we linked below the topics from this article. We hope you will enjoy those articles as well. And feel free to look the angular as well, it fits perfectly with .NET Core (at least by my opinion 😀 ) All the best.
Thank you for this article! it’s really useful for beginners and not only, and easy understandable! thanks for great work, keep on going!
You are very welcome Arthur. Thank you for reading it.
Nice article and great pictures!
I found a typo though:”JSON Web Tokens (JWT) are becoming more popular by the day in the web development. It is very easy to implement JWT Authentication is very easy to implement due to the .NET Core’s built-in support.”
Hello. It seams that it is so easy to implement JWT that I had to state it twice 😀 😀 😀 Thank you for suggestion, will be fixed. All the best.
Thank you very much for the damn right explanation of migrating from asp.net to .net core. each topic is short and concise. keep up the great work
Thank you Javid.
can u provide download option for the details u have mention as empty skeleton ? I mean .net solution .sln
Hello Kaushik Thanki. Well, for most of the topics in this article we have provided a link to the article where you can find additional explanations and source code as well. So that could help you, if you need a code.
In your handling Errors Globally Section; one brackets remains unclosed and I am getting exception at build time
error CS1913: Member 'StatusCode' cannot be initialized. It is not a field or property.The same error is with ErrorMessage also.
Hello Jaidev. For the concrete implementation, refer to the link, which is below each section. These are just code snippets for different practices. Still thank you for suggestion, it is fixed now.
Nice summary, and some really good practices in there, thanks! It’s also great that you expanded on each section with a link to further reading. I can’t subscribe to your guide though, it tells me my email is invalid 🙁
Thank you for the reading and your comment as well. We are doing our best not just to write theory but to show real examples, thus the links for all the chapters from this article. We will see about subscription, what is wrong in there. I hope you will find other articles useful. All the best Greg.
Marvellous article. We need best reference about WebAPI. You’re master of the world.
In building APIs and In consuming APIs:
https://www.domstamand.com/webapis-what-you-should-not-forget/
HttpClient issues:
https://medium.com/@nuno.caneco/c-httpclient-should-not-be-disposed-or-should-it-45d2a8f568bc
Finding best practices using WebAPI
https://hackernoon.com/restful-api-designing-guidelines-the-best-practices-60e1d954e7c9
JWT vs OAuth2 ?
Great article!
Thank you Victor very much. We are glad you enjoy it. All the best.
Very well written, thank you. Would you recommend a good tutorial about JWT usage with a custom made authentication logic.
Hello Eugeniu Rata. Thank you for reading the article and for your comment. We are doing our best. About a JWT tutorial. Well the fun fact is that we have it written (JWT with .NET Core and Angular) just not published yet (it wasn’t its turn 😀 ). When I have searched about JWT, all I did was typing the “JWT in .NET Core” term in Google search and red a couple of article results. You can find a lot of good articles.
Awesome work.
Thank you very much. I am glad you like the article. All the best.
I agree with Devlin. This is very well written.
Thank you a lot for reading the article and for the comment. All the best.