

Securing a web application is one of the most important jobs to do and usually one of the hardest things to pull off. In this series, we are going to learn how to implement JWT authentication in ASP.Net Core Web API on the server-side and Angular on the client side.
We are also going to learn how authentication works in general and how to utilize JSON web tokens to securely transmit the user’s credentials from the server to the client and vice versa.
VIDEO: ASP.NET Core Authentication with JWT and Angular - Part 1.
Therefore, we are going to divide this series into three parts. In the first part, we are going to implement a JWT authentication in ASP.NET Core Web API and see how the integration process works between Web API and JWT (JSON web token). In the second part, we are going to implement front-end features like login, logout, securing routes, and role-based authorization with Angular. Finally, in the third part of the series, we are going to learn about refresh tokens and their use in modern web applications.
So, let’s start.
The Big Picture of JWT Authentication
Before we get into the implementation of authentication and authorization, let’s have a quick look at the JWT authentication big picture. There is an application that has a login form. A user enters their username, and password and presses the login button. After pressing the login button, a client (eg web browser) sends the user’s data to the server’s API endpoint: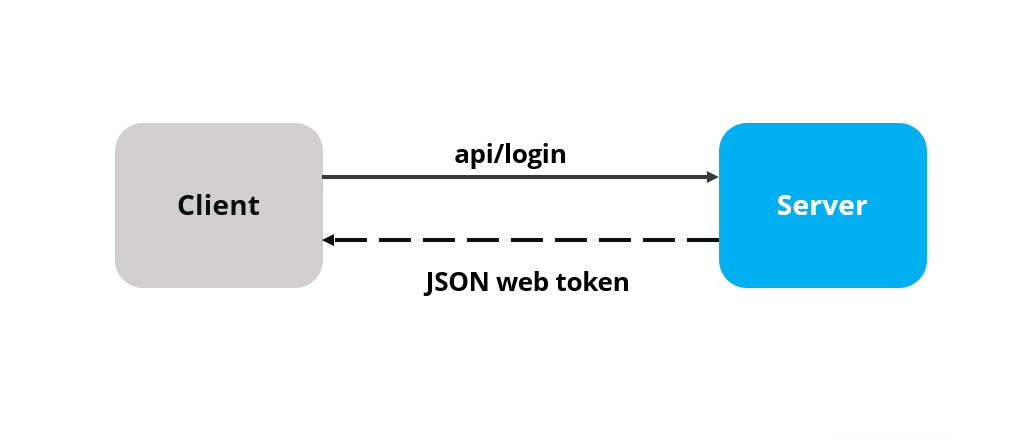
When the server validates the user’s credentials and confirms that the user is valid, it’s going to send an encoded JWT to the client. JSON web token is basically a JavaScript object that can contain some attributes of the logged-in user. It can contain a username, user subject, user roles, or some other useful information.
On the client-side, we store the JWT in the browser’s storage to remember the user’s login session. We may also use the information from the JWT to enhance the security of our application as well.
What is JWT (JSON Web Token)
JSON web tokens enable a secure way to transmit data between two parties in the form of a JSON object. It’s an open standard and it’s a popular mechanism for web authentication. In our case, we are going to use JSON web tokens to securely transfer a user’s data between the client and the server.
JSON web tokens consist of three basic parts: the header, payload, and signature.
One real example of a JSON web token:
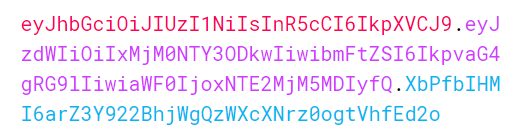
Different token parts are shown with different colors:
Header
The first part of JWT is the Header, which is a JSON object encoded in the base64 format. The header is a standard part of JWT and we don’t have to worry about it. It contains information like the type of token and the name of the algorithm:
{
    "alg": "HS256",
    "typ": "JWT"
}
Payload
After the Header, we have a Payload which is also a JavaScript object encoded in the base64 format. The payload contains some attributes about the logged-in user. For example, it can contain the user id, user subject, and information about whether a user is an admin user or not. JSON web tokens are not encrypted and can be decoded with any base64 decoder so we should never include sensitive information in the Payload:
{
    "sub": "1234567890",
    "name": "John Doe",
    "iat": 1516239022
}
Signature
Finally, we have the Signature part. Usually, the server uses the signature part to verify whether the token contains valid information – the information the server is issuing. It is a digital signature that gets generated by combining the header and the payload together. Moreover, it’s based on a secret key that only the server knows:
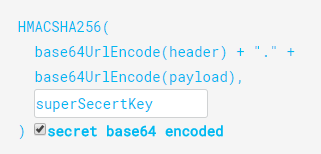
So, if malicious users try to modify the values in the payload, they have to recreate the signature and for that purpose, they need the secret key that only the server knows about. On the server side, we can easily verify if the values are original or not by comparing the original signature with a new signature computed from the values coming from the client.
So, we can easily verify the integrity of our data just by comparing the digital signatures. This is the reason why we use JWT.
Creating ASP.NET Core Web API Project
Now let’s create a brand new ASP.NET Core Web API project. We can create a new Web API project with .NET Core CLI or we can use Visual Studio. For this article, let’s use Visual Studio.
We can open the launchSettings.json file and modify the applicationUrl property:
"applicationUrl": "https://localhost:5001;http://localhost:5000"
Now, we can start our project.
As a result, we will see our application hosted at https://localhost:5001 and the browser automatically sends a GET request to /weatherforecast.
So far so good.
In the next step, we are going to configure JWT authentication in our application.
Configuring JWT Authentication
To configure JWT authentication in .NET Core, we need to modify Program.csfile. If you are using .NET Core version 5, you have to add the modifications in the Startup.cs file inside the ConfigureServices method.
For the sake of simplicity, we are going to add all the code inside the Program class. But the better practice is to use Extension methods so we could free our class from extra code lines. If you want to learn how to do that, and to learn more about configuring the .NET Core Web API project, check out: .NET Core Service Configuration.
First, let’s install the Microsoft.AspNetCore.Authentication.JwtBearer NuGet package that we require to work with JWT in the ASP.NET Core app:
Install-Package Microsoft.AspNetCore.Authentication.JwtBearer
Next, let’s add the code to configure JWT right above the builder.Services.AddControllers() line:
builder.Services.AddAuthentication(opt => {
    opt.DefaultAuthenticateScheme = JwtBearerDefaults.AuthenticationScheme;
    opt.DefaultChallengeScheme = JwtBearerDefaults.AuthenticationScheme;
})
    .AddJwtBearer(options =>
    {
        options.TokenValidationParameters = new TokenValidationParameters
        {
            ValidateIssuer = true,
            ValidateAudience = true,
            ValidateLifetime = true,
            ValidateIssuerSigningKey = true,
            ValidIssuer = "https://localhost:5001",
            ValidAudience = "https://localhost:5001",
            IssuerSigningKey = new SymmetricSecurityKey(Encoding.UTF8.GetBytes("superSecretKey@345"))
        };
    });
In order for this to work, we have to add a few using directives:
using Microsoft.AspNetCore.Authentication.JwtBearer;
using Microsoft.IdentityModel.Tokens;
using System.Text;
JWT Configuration Explanation
Firstly, we register the JWT authentication middleware by calling the AddAuthentication method. Next, we specify the default authentication scheme JwtBearerDefaults.AuthenticationScheme as well as DefaultChallengeScheme.
By calling the AddJwtBearer method, we enable the JWT authenticating using the default scheme, and we pass a parameter, which we use to set up JWT bearer options:
- The issuer is the actual server that created the token (ValidateIssuer=true)
- The receiver of the token is a valid recipient (ValidateAudience=true)
- The token has not expired (ValidateLifetime=true)
- The signing key is valid and is trusted by the server (ValidateIssuerSigningKey=true)
Additionally, we are providing values for the issuer, audience, and the secret key that the server uses to generate the signature for JWT.
We are going to hardcode both username and password for the sake of simplicity. But, the best practice is to put the credentials in a database or a configuration file or to store the secret key in the environment variable.
There is one more step we need to do to make our authentication middleware available to the application:
app.UseHttpsRedirection();

app.UseAuthentication();
app.UseAuthorization();

app.MapControllers();

app.Run();
And that’s all we need to configure the JWT authentication in ASP.NET Core. This is something we would do in the Configure method inside the Startup class if we were using the .NET 5 app.
Securing API Endpoints
We already have an API endpoint /weatherforecast to get some example weather information and that endpoint is not secure. Anyone can send a request to https://localhost:5001/weatherforecast to fetch the values. So, in this section, we are going to add a new api/customers endpoint to serve a list of the customers. This endpoint is going to be secure from anonymous users and only logged-in users will be able to consume it.
Now, let’s add an empty CustomersController in the Controllers folders. Inside the controller, we are going to add a Get action method that is going to return an array of customers. More importantly, we are going to add an extra security layer by decorating the action method with the[Authorize] attribute so only logged-in users can access the route:
[Route("api/[controller]")]
[ApiController]
public class CustomersController : ControllerBase
{
    [HttpGet, Authorize]
    public IEnumerable<string> Get()
    {
        return new string[] { "John Doe", "Jane Doe" };
    }
}
To be able to use the Authorize attribute we have to add a new using directive inside the file:
using Microsoft.AspNetCore.Authorization;
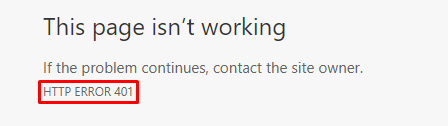
Authorize attribute on top of the GET method restricts access to only authorized users. Only users who are logged in can fetch the list of customers. Therefore, this time if we make a request to https://localhost:5001/api/customers from the browser’s address bar, instead of getting a list of customers, we are going to get a 401 Not Authorized response:
Adding Login Endpoint
To authenticate anonymous users, we have to provide a login endpoint so the users can log in and access protected resources. A user is going to provide a username and password, and if the credentials are valid we are going to issue a JSON web token for the requesting client.
In addition, before we start implementing the authentication controller, we need to add a LoginModel to hold user’s credentials on the server. LoginModel is a simple class that contains two properties: UserName and Password. We are going to create a Models folder in the root directory and inside it a LoginModel class:
public class LoginModel
{
    public string? UserName { get; set; }
    public string? Password { get; set; }
}
Also, let’s create one more class inside the same Models folder:
public class AuthenticatedResponse
{
    public string? Token { get; set; }
}
We will see in a minute why we need this class.
Now let’s create the AuthController inside the Controllers folder.
Inside the AuthControllerwe are going to add the Login action to validate the user’s credentials. If the credentials are valid, we are going to issue a JSON web token. For this demo, we are going to hardcode the username and password to implement a fake user. After validating the user’s credentials we are going to generate a JWT with a secret key. JWT uses the secret key to generate the signature.
So, let’s implement the AuthController:
[Route("api/[controller]")]
[ApiController]
public class AuthController : ControllerBase
{
    [HttpPost("login")]
    public IActionResult Login([FromBody] LoginModel user)
    {
        if (user is null)
        {
            return BadRequest("Invalid client request");
        }

        if (user.UserName == "johndoe" && user.Password == "def@123")
        {
            var secretKey = new SymmetricSecurityKey(Encoding.UTF8.GetBytes("superSecretKey@345"));
            var signinCredentials = new SigningCredentials(secretKey, SecurityAlgorithms.HmacSha256);
            var tokeOptions = new JwtSecurityToken(
                issuer: "https://localhost:5001",
                audience: "https://localhost:5001",
                claims: new List<Claim>(),
                expires: DateTime.Now.AddMinutes(5),
                signingCredentials: signinCredentials
            );

            var tokenString = new JwtSecurityTokenHandler().WriteToken(tokeOptions);

            return Ok(new AuthenticatedResponse { Token = tokenString });
        }

        return Unauthorized();
    }
}
Login Action Explanation
We decorate our Login action with the HttpPost attribute. Inside the login method, we create the SymmetricSecretKey with the secret key value superSecretKey@345. Then, we create the SigningCredentials object and as arguments, we provide a secret key and the name of the algorithm that we are going to use to encode the token.
Here comes the interesting part.
The first two steps are the standard steps that we don’t need to worry about. The third step is the one that we are interested in. In the third step, we create the JwtSecurityToken object with some important parameters:
- Issuer: The first parameter is a simple
stringrepresenting the name of the webserver that issues the token - Audience: The second parameter is a
stringvalue representing valid recipients - Claims: The third argument is a list of user roles, for example, the user can be an admin, manager, or author (we are going to add roles in the next post)
- Expires: The fourth argument is the
DateTimeobject that represents the date and time after which the token expires
Then, we create a string representation of JWT by calling the WriteToken method on JwtSecurityTokenHandler. Finally, we return JWT in a response. As a response, we create the AuthenticatedResponse object that contains only the Token property.
Testing the JWT Authentication
Now, let’s start our application. Also, we are going to use Postman to send requests.
That said, let’s send a POST request to https://localhost:5001/api/auth/login and provide a request body:
{
    "UserName":"johndoe",
    "Password": "def@123"
}
In the response section, we are going to see a 200 OK response with the JWT string in the response body:
Conclusion
In this post, we have learned more about security and how it is a crucial part of web application development. We talked about what JWT is and how it fits in the implementation of web security. Additionally, we’ve seen how to use the Authorize attribute to protect our action, and how to implement a Login action that issues a new JWT if a login is successful.
In the next part, we are going to implement a front-end side of our application with Angular. We are going to implement login, logout, authorization, secure the routes, and much more.

thanks for usefull information
You are most welcome.
Thanks for all your posts. Also your Core Web Api book is great.
I’d love to see a blog or some content about create resource owners. For example, say I have an object model (Employee or Company using the examples from your book) and I have set up a JWT login system. How do I then add a CreatedBy field on those object so I can retrieve the user info of the creator, and also make it so that only the creator can edit that resource (or people the creator has given permission to)?
Hi Gary. First of all, thank you very much for the kind words. It always means a lot to hear something like that.
Now about your question, you can always store the username of the logged-in user in the JWT and use it once you create your resource. Now, there are different ways to provide that additional field for each of your entities, but maybe the most used one is to have a base class for all the entities to inherit from, and that base class can hold that property. Now, this also means that in your tables, you must have a column for that property. Once you have that in the database and in the JWT, it is easy to use some business logic to restrict editing of the resource only to those who actually created it.
Hello,
I’m using VisualStudio 17.4 Preview on Mac os with .NET 6.0 and Postman web version. When attempting to connect, it gave this error: “Could not send request
Cloud Agent Error: Can not send requests to localhost. Select a different agent.”
I’m not sure why this happens. But in case it helps someone else, I had to use the Postman Desktop Agent to connect and that worked fine, just not in the web version of Postman.
Thank you very much for sharing this info here. Maybe it helps someone.
Hi Marinko,
This is good one. do you have the same implemented in the microservice scenario? I am going to start the development of a microservice in .Net core and for the authetication and autherization I do not wish to use the IdentityServer4 or other third party tools. Let me know if you have the sample for the microservice architecture.
Hello Rohan. We don’t have any specific microservices article with authentication. You can search for our microservice articles here: https://code-maze.com/?s=Microservices
Token is not getting expired, what changes required for the same ?
You should always give 5 minutes or so for the token to expire. This is the default behavior. But also, you can use the ClockSkew = TimeSpan.Zero property, to set the token to expire at the exact time you have added in the configuration.
When I putting ClockSkew = TimeSpan.Zero, then its not authenticating even within the time span…
in .net core 6…
Could you please download our source code? This article was updated a few weeks ago, so it uses .NET Core 6 and Angular 13. I didn’t test it yet with that new property but without it, everything is working fine.
This post broke it down so well. Thank you
Awesome and comprehensive ASP.NET JWT + Swagger tutorial
Hi
I have implemented your code in one of our application, the question is what should be issuer and audience in production, localhost or the domain name?
Could you please assist here, since it throws error when I set it to non localhost
You are the one to decide about these values. The important thing is that these values from the configuration must match the ones in the login action. In the configuration, you provide the values to state who is the valid issuer and audience, and during the login action, you provide the values to validate against. If they don’t match, validation will fail and you will get 401.
Hi, where should I store API keys? Which solution that you recommend?
If you don’t want those to be visible to anybody else, you should store them in the environment variables.
Hello Guys,
this article is awesome and help me a lot.
I have tried to make the expire date in the past, but the token still valid, any explanation?
I am not sure why is that, also not sure why would you do that. Basically, after the expiration period (we set it to 5 minutes) it will add by default additional 5, after which the token won’t be valid anymore. So maybe if you set the time a minute or two in the past, it is still valid.
I did that to test if the token expiration
So I did the following
1- generate a token with 5 minutes expiration date from now after succes login
2- try to access an endpoint after 10 mins with the generated token
I expected that it will throw unauthorized exceptions as the token is expired, but it access the endpoint as no expired date validation
Have you tried that with our source code? Maybe to wait a bit more as well? It shouldn’t allow you to access protected resource once the token is expired.
Hello Marinko,
thanks for quick response
1- added 10 seconds when generating the token
                       var tokeOptions = new JwtSecurityToken(

				issuer: _appSettings.JwtSettings.Issuer,

				audience: _appSettings.JwtSettings.Audience,

				claims: claims,

				expires: DateTime.UtcNow.AddSeconds(10),

				//expires: DateTime.UtcNow.AddMinutes(_appSettings.JwtSettings.Lifetime),

				signingCredentials: signinCredentials

			);
2- wait for more than 10 seconds and call any protected api
3- no expire exception
4- wait for longer time (10 mins), I got expire exception
after some investigation, I found that I need to add this to the statup.cs
ClockSkew = TimeSpan.Zero,
                               opt.TokenValidationParameters = new TokenValidationParameters

				{

					ValidateIssuer = false,

					ValidIssuer = jwtSettings.Issuer,

					ValidateAudience = false,

					ValidAudience = jwtSettings.Audience,

					ValidateIssuerSigningKey = true,

					ValidateLifetime = true,

					ClockSkew = TimeSpan.Zero,

					IssuerSigningKey = new SymmetricSecurityKey(Encoding.ASCII.GetBytes(jwtSettings.Key))

				};
set clockskew to zero so tokens expire exactly at token expiration time (instead of 5 minutes later)
this means .net add more 5 minutes to the 10 seconds
now it expires exactly after 10 seconds
Yes you are right. The ClockSkew property does exactly that. Though, we didn’t want to add that to the article since we think it’s a better practice to live some additional time slots due to the possible time difference between different servers (if any). Anyhow, I’m glad you solved it out.
what’s the difference between them securitytokendescriptor vs jwtsecuritytoken
Thank you, Dude!!
You are very welcome. If you didn’t already, you can read the part 2 and the refresh token part to gain even more knowledge on this topic. Just follow the links from this article. Have a great day.
This is Easy to understand Thank you guys for the awesome content 😀 Keep up
Thank you for reading it. I hope you will enjoy other articles in this series.
hi,
I just needed an info, if using Lazy loading is good ? If yes, do you have any blogs for that? If not, can you suggest an alternate way to handle such functions?
My code looks like,
public string UserId { get; set; }
public int JobId { get; set; }
[ForeignKey(“JobId”)]
public virtual Job JobName { get; set; }
public virtual List Languages { get; set; }
I wanted to load the JobName & Languages.
Hello. If you refer to Entity Framework Core Lazy Load, we have a great series on that: code-maze.com/entity-framework-core-series/
Guys, in Asp.Net Core 3.0 whe need to do a extra configuration, See below:
services.AddAuthentication(options =>{
options.DefaultAuthenticateScheme = JwtBearerDefaults.AuthenticationScheme;
options.DefaultChallengeScheme = JwtBearerDefaults.AuthenticationScheme;
})
.AddJwtBearer(options =>
{
options.TokenValidationParameters = new TokenValidationParameters
{
ValidateIssuer = true,
ValidateAudience = true,
ValidateLifetime = true,
ValidateIssuerSigningKey = true,
ValidIssuer = Configuration["Host"],
ValidAudience = Configuration["Host"],
IssuerSigningKey = new SymmetricSecurityKey(Encoding.UTF8.GetBytes("yourKey"))
};
});
And add Authorization too:
            app.UseAuthentication();

            app.UseAuthorization();
Hello Martin. Thank you very much for that. Soon, we will convert our articles to 3.0, we just didn’t find time yet. But this will help us a lot and save us some googling time. One more time, thank you a lot. Best regards.
Thanks for the tutorial but i’m having difficulty to find which nuget packages to install and what are the required namespaces
Hello Ozan. If you are using VisualStudio it is enough for you to hit CTRL+. on the error and it will give you suggestion about namespaces. As for the NuGet packages you don’t have to install any, all is already provided by .NET Core. Finally, if you continue to have these problems, you can download our source code and have a look by your self. Best regards.
Thanks for quick reply. I’m using visual studio code and trying to follow your steps. First it seemed like the problem is dotnet core version. But after i installed 2.2 nothing changed. Don’t have any idea which nuget packages are needed.
UPDATE: after adding using statements for these namespaces following problems are fixed
using Microsoft.AspNetCore.Authentication.JwtBearer;
using Microsoft.IdentityModel.Tokens;
using System.Text;
Here is the errors:
The name ‘JwtBearerDefaults’ does not exist in the current context (CS0103) [sample_webapi]
The type or namespace name ‘TokenValidationParameters’ could not be found (are you missing a using directive or an assembly reference?) (CS0246) [sample_webapi]
The type or namespace name ‘SymmetricSecurityKey’ could not be found (are you missing a using directive or an assembly reference?) (CS0246) [sample_webapi]
The name ‘Encoding’ does not exist in the current context (CS0103) [sample_webapi]
The namespace for the JwtBearerDefaults is : using Microsoft.AspNetCore.Authentication.JwtBearer;
The namespace for the TokenValidationParameters and SymmetricSecurityKey is: using Microsoft.IdentityModel.Tokens;
Finally Encoding comes from: System.Text.
What is most important here is that all of these namespaces are provided by default in ASP.NET Core Web API project. So it is really strange why you have a problem at all.
Probably it related with that i’m not familiar vs code. I now how to add automatically missing using statments in visual studio but cant find a way to do it in vs code yet
In general I love your tutorials. I am not new to web development but I am new to the .NET world. One thing that would be very helpful to me is if you would mention the using statements that are added to a class. Sometimes they are very easy to figure out with a right click in Visual Studio, but since I’m switching over to .NET core I am also trying out VS code and it has been much less helpful. Thanks!
Hello Jim, thank you very much for the kind words. About the using statements, we generally don’t include them in our code samples because in visual studio all you have to do is to type CTRL+. and you will see a suggestion for the current problem. But we will think about it. If you want, you can take a look at this article http://34.65.74.140/visual-studio-productivity/ and you will find a lot of interesting VS features that will help you with the coding process overall. All the best, and thanks again.
How can I create an ASP.NET Core project targeting .NET Framework and continure the tutorial as I need to reference an existing layer.
Hey Andrew,
If you want to reference .NET Framework class library, you can do it from a .NET Core project, but you must make sure to use 4.6.1 or higher version (the higher, the better, 4.7.2 is recommended) of the framework.
Here’s the document that can help you out a bit:
https://docs.microsoft.com/en-us/dotnet/standard/net-standard
Great article…. could you please help me to figure out one problem… I am new to ASP.Net Core and Angular development…
I have used,
ASP.Net Core 2.0 Identity
Angular 6
for my development . following some articles I configured the JWT middleware as follows.
in Startup.cs -> ConfigureServices()
services.AddAuthentication()
.AddJwtBearer(cfg =>
{
cfg.RequireHttpsMetadata = false;
cfg.SaveToken = true;
cfg.TokenValidationParameters = new TokenValidationParameters()
{
ValidIssuer = Configuration[“JwtSecurityToken:Issuer”],
ValidAudience = Configuration[“JwtSecurityToken:Audience”],
IssuerSigningKey = new SymmetricSecurityKey(Encoding.UTF8.GetBytes(Configuration[“JwtSecurityToken:Key”]))
};
});
and in Startup.cs -> Configure()
app.UseAuthentication();
then in one of my controllers I applied like this.
[Authorize(Roles = “Agent”)]
[Route(“artists”)]
public IActionResult Artists()
{
// some logic
}
Problem:
in my Login method, I don’t issue any token. So when the logged in user(with Agent role) tries to call this controller,
surprisingly even without having a token from the client request, the authorization works. Again when I try to call this controller by logged in with different role it throws unauthorized access error which is as the expected. I don’t have any idea on how the authorization process works without creating and exchanging the tokens. Have I missed something here…
it is possible to get the LoginModel instance of a logged user in other controller?
Yes you can get it, though why would you need user credentials in any other action except login? You can target a new controller/action route with that model from client, or you can store the model in HttpContext and then use it where you need it.
Getting Error in the below line.
IssuerSigningKeys = new SymmetricSecurityKey(Encoding.UTF8.GetBytes(“superSecretKey@345”))
I’m getting the below error.
Cannot implicitly convert Microsoft.IdentityModel.Tokens.SymmetricSecurityKey’ to ‘System.Collections.Generic.IEnumerable
Fed Up!!!!!!
Finally Solve this by using the below line of code.
IssuerSigningKeys = new [] { new SymmetricSecurityKey(Encoding.UTF8.GetBytes(“superSecretKey@345”)) }
Please update your Article.
True Reader
Thanks
Hello Ajit. Thank you for your suggestion but please pay attention that you are using plural IssuerSigningKeys and not singular IssuerSigningKey as stated in article. That was the reason for your error, which is pretty self explanatory “can not convert key into collection of keys”.
All the best and thank you for reading our articles. We appreciate it a lot.
This is the best article I’ve read so far regarding ASP.Net Core Authentication. I just have 1 question. Can I utilize the feature of PasswordSignInAsync method of SignInManager object of ASP.Net Identity to authenticate the user in the Login method of your example? This is as replacement for hard-coded username and password.
Hello JoselitoAlonzo. Thank you so much for your kind words. I hope you will find our other articles useful as well. Regarding your question, I am not sure about that, because I have never tried it. But I can ask you to try it and to post comment in here about your result. The situation is win win, you will learn more and all of us as from you as well 🙂 One morem time, thank you very much and all the best.
Thanks for the tutorial it works perfectly. I have want to use Angular to implement the token and access and [authorize] site in net core 2.1
You are very welcome. You can check out our other tutorials and articles, we are sure you can find more interesting things. Thank you a lot for reading. All the best.
Hello,
I followed your article and tried to implement it. The login and logout works. It gives me a token after login but when try to access a restricted resource using that token, it is giving me 401 “Unauthorised” error. When I try to access it using postman than also it gives 401 error. (www-authenticate →Bearer error=”invalid_token”, error_description=”The signature is invalid”). Please help
As it says, you have invalid token signature. I haven’t tried or seen your code, so I can only guess that you messed up something with your token configuration in the Login action for the tokenOptions variable. Check also the secret key, if it’s matching with the key from the ConfigureServices method. If nothing works, you can upload your code for the review, and I will take a look at it.
All the best, and thanks for reading.
Yeah.. I had messed up the security key generation step. I had by mistake encoded the security key using UTF7 in AuthController whereas in startup I had configured using UTF8. Thanks a lot for your help.
You are very welcome.
Thanks for an excellent series. What I think would be great to see is how ASP.NET Core Identity fits in to JWT.
Thank you very much for the reading and commenting as well. We have some articles about Identity in progress, so stay tuned and subscribed to receive notifications about our new articles.
All the best.
Hello Marinko,
I am coming again to distrub you. 😉 I read your article I am not able to understand the functionality of jwt in core applicartiion, Can you explain it more details like using extention class and adding claims refresh token,
Compare to your other article this one is very less informative, Can you please write in details like other article,
Thanks
Omkar.
There is part two. You will find there about angular part, about authorization, and in a comment section, an idea for refresh token logic.
Awesome post, Marinko. This is JWT in a nutshell.
Thank you very much Devlin. We hope you will enjoy the JWT article part 2 (if you haven’t read it already 😀 ).
Oh. I didn’t see that. Thanks for letting me know. I’m reading it now. lol