

In this article, we are going to learn about refresh tokens and their use in modern web application development. This is part of the ASP.NET Core Authentication with JWT and Angular series.
In the first part of this series, we learned how to implement authentication with ASP.Net Core on the server-side using the JSON web tokens (JWT). Then, in the second part, we looked at how to implement authentication and authorization in a front-end app using Angular.
Now, we are going to look at how we can implement refresh tokens in the authentication workflow.
Let’s start.
VIDEO: Refresh Token Implementation in .NET Core Web API.
Refresh Tokens
Let’s look at the JWT based authentication workflow that we implemented in the previous parts of this series:
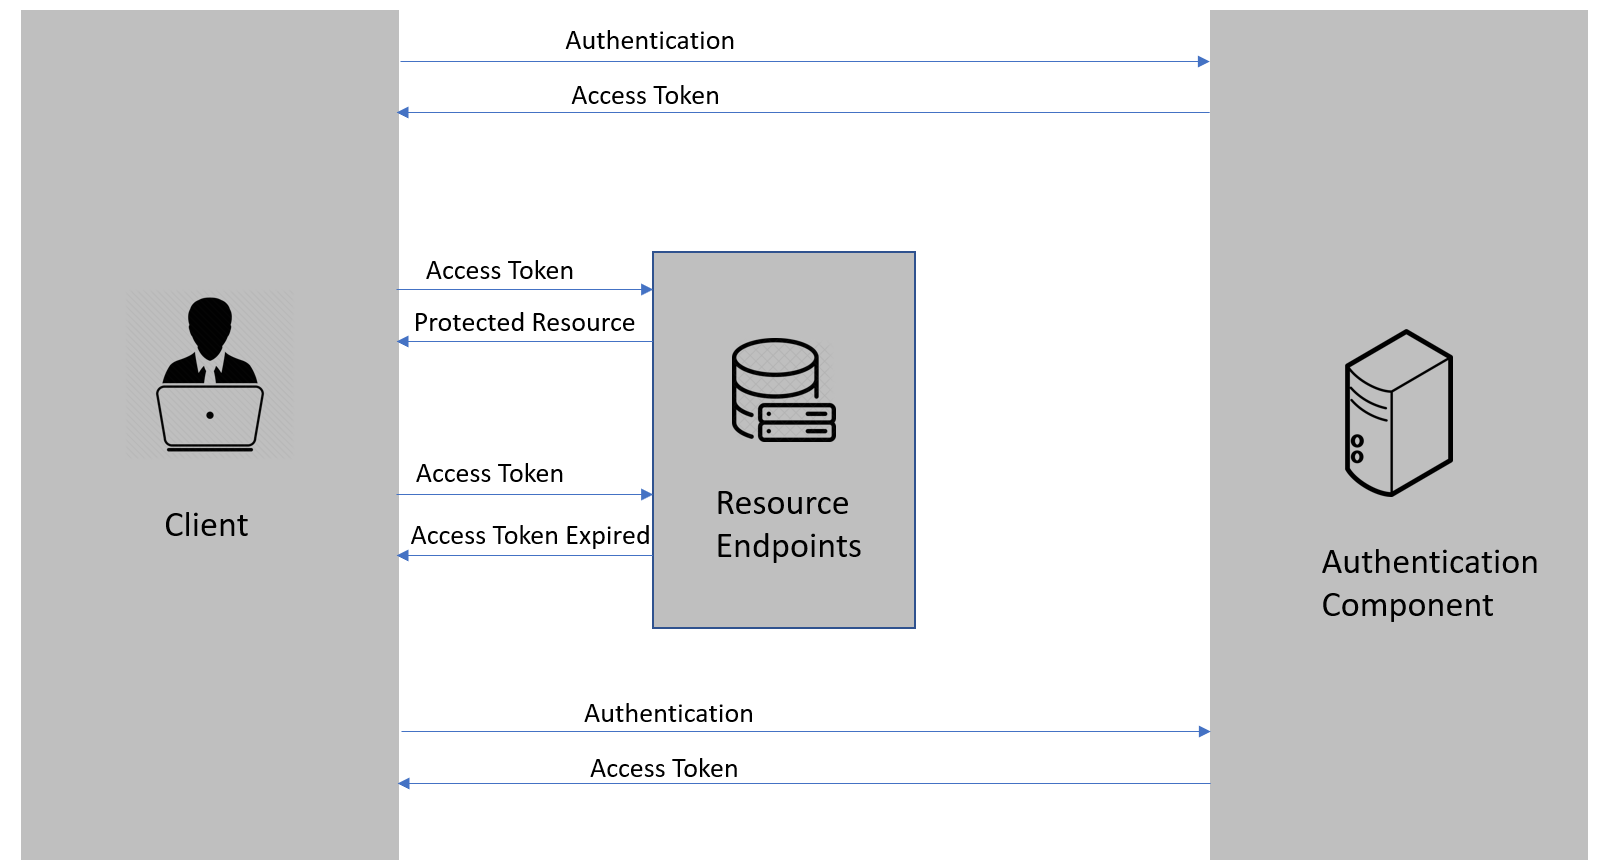
- First, the client authenticates with the authentication component by providing the credentials
- Then, the authentication component issues the access token
- After that, the client requests the resource endpoint for a protected resource by providing the access token
- The resource endpoint validates the access token and provides a protected resource
- Steps 3 & 4 keep on repeating until the access token expires
- Once the access token expires, the client needs to authenticate with the authentication component once again and the flow repeats from step 1
Let’s see how we can extend this flow.
Refresh token-based authentication workflow
Refresh tokens are credentials that can be used to acquire new access tokens. When access tokens expire, we can use refresh tokens to get a new access token from the authentication component. The lifetime of a refresh token is usually set much longer compared to the lifetime of an access token.
Now, we are going to introduce the refresh token to our authentication workflow:
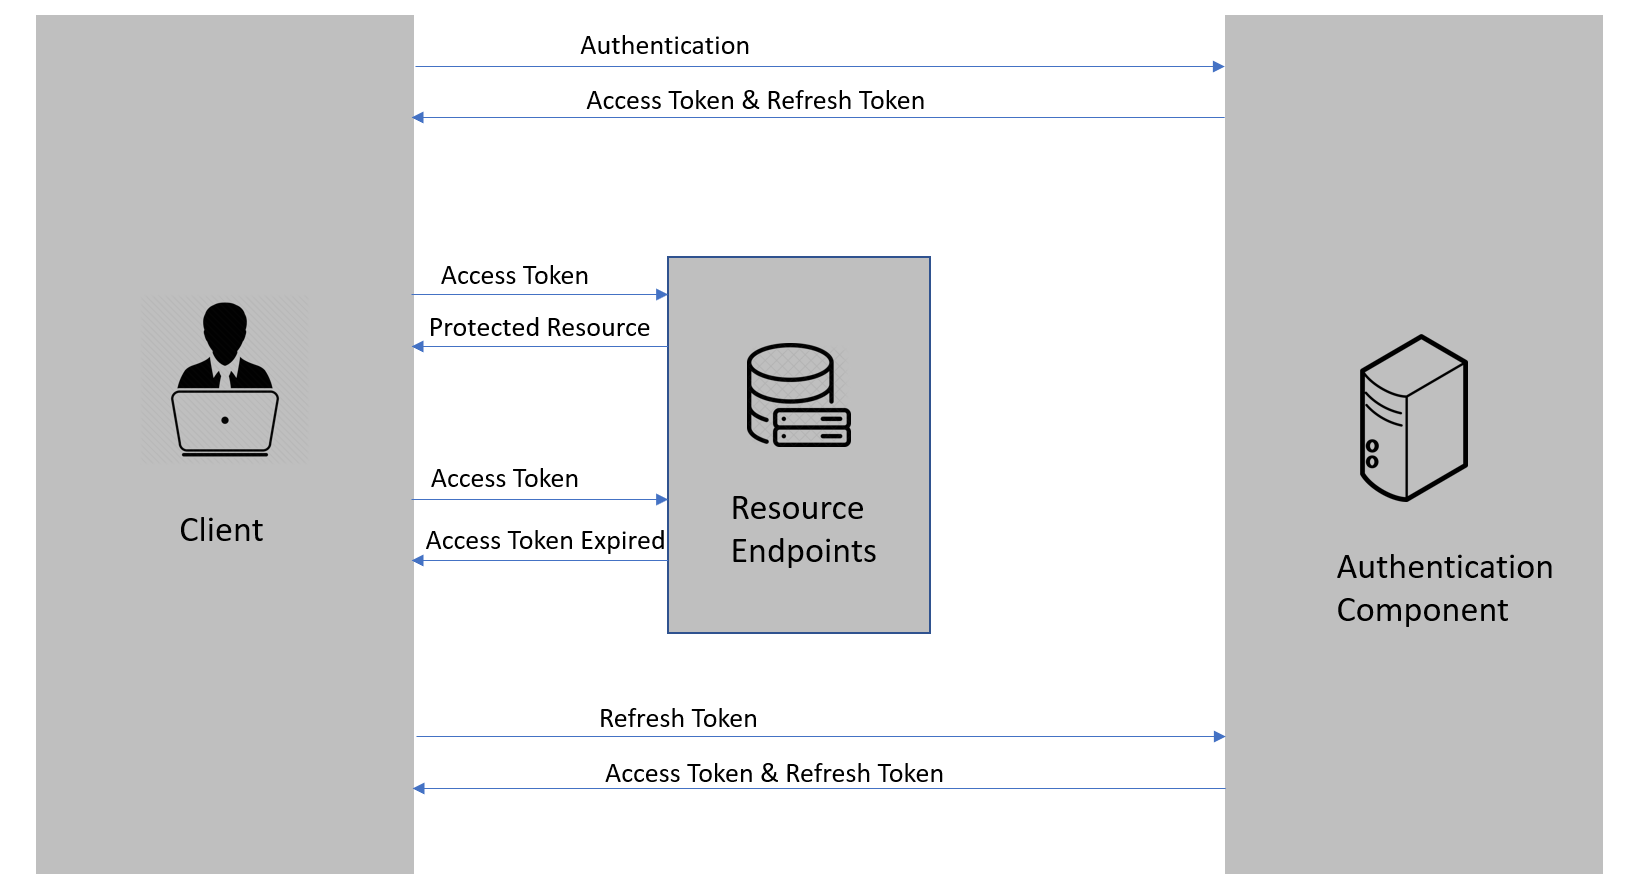
- First, the client authenticates with the authentication component by providing the credentials
- Then, the authentication component issues the access token and the refresh token
- After that, the client requests the resource endpoints for a protected resource by providing the access token
- The resource endpoint validates the access token and provides a protected resource
- Steps 3 & 4 keep on repeating until the access token expires
- Once the access token expires, the client requests a new access token by providing the refresh token
- The authentication component issues a new access token and refresh token
- Steps 3 through 7 keep on repeating until the refresh token expires
- Once the refresh token expires, the client needs to authenticate with the authentication server once again and the flow repeats from step 1
Now, let’s discuss why we actually need refresh tokens.
The Need for Refresh Tokens
So, why do we need both access tokens and refresh tokens? Why don’t we just set a long expiration date, like a month or a year for the access tokens? Because, if we do that and someone manages to get hold of our access token they can use it for a long period, even if we change our password!
The idea of refresh tokens is that we can make the access token short-lived so that, even if it is compromised, the attacker gets access only for a shorter period. With refresh token-based flow, the authentication server issues a one-time use refresh token along with the access token. The app stores the refresh token safely.
Every time the app sends a request to the server it sends the access token in the Authorization header and the server can identify the app using it. Once the access token expires, the server will send a token expired response. Once the app receives the token expired response, it sends the expired access token and the refresh token to obtain a new access token and refresh token.
If something goes wrong, the refresh token can be revoked which means that when the app tries to use it to get a new access token, that request will be rejected and the user will have to enter credentials once again and authenticate.
Thus, refresh tokens help in a smooth authentication workflow without the need for users to submit their credentials frequently, and at the same time, without compromising the security of the app.
Implementation
So far we have learned the concept of refresh tokens. Now without any delay, let’s dig into the implementation part.
Web API
There are some changes that we need to make in our Web API project.
Data Modelling
We need to move the user details into the database to implement the refresh token-based flow. We have explained how to create a database from our models using the EF Core Code-First approach in our article ASP.NET Core Web API with EF Core Code-First Approach.
First, we need to modify the login model to include a refresh token and its expiry:
public class LoginModel
{
    [Key]
    [DatabaseGenerated(DatabaseGeneratedOption.Identity)]
    public long Id { get; set; }
    public string? UserName { get; set; }
    public string? Password { get; set; }
    public string? RefreshToken { get; set; }
    public DateTime RefreshTokenExpiryTime { get; set; }
}
We are going to follow the steps that we discussed in the linked article to create a database from our model and add some seed data.
For that, let’s add a user DB context file and specify seed data in it:
public class UserContext : DbContext
{
    public UserContext(DbContextOptions dbContextOptions)
        : base(dbContextOptions)
    {
    }

    public DbSet<LoginModel>? LoginModels { get; set; }

    protected override void OnModelCreating(ModelBuilder modelBuilder)
    {
        modelBuilder.Entity<LoginModel>().HasData(new LoginModel
        {
            Id = 1,
            UserName = "johndoe",
            Password = "def@123"
        });
    }
}
Now we need to register our db context in the Program class:
builder.Services.AddDbContext<UserContext>(opts =>
    opts.UseSqlServer(builder.Configuration["ConnectionString:UserDB"]));
Let’s also make sure that we move the database connection string into appsettings.json:
"ConnectionString": {
  "UserDB": "server=.;database=UserDB;Integrated Security=True"
},
The next step is generating the database from code using migrations:
PM> Add-Migration InitialUserData
PM> Update-Database
This will create the UserDB database and LoginModels table with seed data.
Now, we need to do the credential validation against the database. We are also going to refactor the code a little bit by moving all the token related logic into a separate TokenService class.
TokenService
The logic for generating the access token, refresh token, and getting user details from the expired token goes into the TokenService class.
First, let’s define the ITokenService interface in the Services folder:
public interface ITokenService
{
    string GenerateAccessToken(IEnumerable<Claim> claims);
    string GenerateRefreshToken();
    ClaimsPrincipal GetPrincipalFromExpiredToken(string token);
}
Then, we are going to implement the TokenService class in the same folder:
public class TokenService : ITokenService
{
    public string GenerateAccessToken(IEnumerable<Claim> claims)
    {
        var secretKey = new SymmetricSecurityKey(Encoding.UTF8.GetBytes("superSecretKey@345"));
        var signinCredentials = new SigningCredentials(secretKey, SecurityAlgorithms.HmacSha256);

        var tokeOptions = new JwtSecurityToken(
            issuer: "https://localhost:5001",
            audience: "https://localhost:5001",
            claims: claims,
            expires: DateTime.Now.AddMinutes(5),
            signingCredentials: signinCredentials
        );

        var tokenString = new JwtSecurityTokenHandler().WriteToken(tokeOptions);
        return tokenString;
    }

    public string GenerateRefreshToken()
    {
        var randomNumber = new byte[32];
        using (var rng = RandomNumberGenerator.Create())
        {
            rng.GetBytes(randomNumber);
            return Convert.ToBase64String(randomNumber);
        }
    }

    public ClaimsPrincipal GetPrincipalFromExpiredToken(string token)
    {
        var tokenValidationParameters = new TokenValidationParameters
        {
            ValidateAudience = false, //you might want to validate the audience and issuer depending on your use case
            ValidateIssuer = false,
            ValidateIssuerSigningKey = true,
            IssuerSigningKey = new SymmetricSecurityKey(Encoding.UTF8.GetBytes("superSecretKey@345")),
            ValidateLifetime = false //here we are saying that we don't care about the token's expiration date
        };

        var tokenHandler = new JwtSecurityTokenHandler();
        SecurityToken securityToken;
        var principal = tokenHandler.ValidateToken(token, tokenValidationParameters, out securityToken);
        var jwtSecurityToken = securityToken as JwtSecurityToken;
        if (jwtSecurityToken == null || !jwtSecurityToken.Header.Alg.Equals(SecurityAlgorithms.HmacSha256, StringComparison.InvariantCultureIgnoreCase))
            throw new SecurityTokenException("Invalid token");

        return principal;
    }
}
Here, we create 3 methods.
GenerateAccessToken() contains the logic to generate the access token. This is a familiar logic that we already have in the AuthController (from a previous article), which we are going to remove from there.
GenerateRefreshToken() contains the logic to generate the refresh token. We use the RandomNumberGenerator class to generate a cryptographic random number for this purpose.
GetPrincipalFromExpiredToken() is used to get the user principal from the expired access token. We make use of the ValidateToken() method of JwtSecurityTokenHandler class for this purpose. This method validates the token and returns the ClaimsPrincipal object.
Let’s also make sure to register the TokenService for dependency injection in Program.cs:
builder.Services.AddTransient<ITokenService, TokenService>();
AuthController
Before we modify the AuthController, we have to modify the AuthenticatedResponse class:
public class AuthenticatedResponse
{
    public string? Token { get; set; }
    public string? RefreshToken { get; set; }
}
We add one additional property here.
Now, let’s modify the AuthController:
[Route("api/[controller]")]
[ApiController]
public class AuthController : ControllerBase
{
    private readonly UserContext _userContext;
    private readonly ITokenService _tokenService;

    public AuthController(UserContext userContext, ITokenService tokenService)
    {
        _userContext = userContext ?? throw new ArgumentNullException(nameof(userContext));
        _tokenService = tokenService ?? throw new ArgumentNullException(nameof(tokenService));
    }

    [HttpPost, Route("login")]
    public IActionResult Login([FromBody] LoginModel loginModel)
    {
        if (loginModel is null)
        {
            return BadRequest("Invalid client request");
        }

        var user = _userContext.LoginModels.FirstOrDefault(u =>
            (u.UserName == loginModel.UserName) && (u.Password == loginModel.Password));
        if (user is null)
            return Unauthorized();

        var claims = new List<Claim>
        {
            new Claim(ClaimTypes.Name, loginModel.UserName),
            new Claim(ClaimTypes.Role, "Manager")
        };
        var accessToken = _tokenService.GenerateAccessToken(claims);
        var refreshToken = _tokenService.GenerateRefreshToken();

        user.RefreshToken = refreshToken;
        user.RefreshTokenExpiryTime = DateTime.Now.AddDays(7);

        _userContext.SaveChanges();

        return Ok(new AuthenticatedResponse
        {
            Token = accessToken,
            RefreshToken = refreshToken
        });
    }
}
First, we inject the UserContext and TokenService. Then, we validate the user credentials against the database. Once validation is successful, we need to generate a refresh token in addition to the access token and save it along with the expiry date in the database:
TokenController
Before we implement the TokenController, we are going to add one more class in the Models folder:
public class TokenApiModel
{
    public string? AccessToken { get; set; }
    public string? RefreshToken { get; set; }
}
Next is the implementation of the TokenController:
[Route("api/[controller]")]
[ApiController]
public class TokenController : ControllerBase
{
    private readonly UserContext _userContext;
    private readonly ITokenService _tokenService;

    public TokenController(UserContext userContext, ITokenService tokenService)
    {
        this._userContext = userContext ?? throw new ArgumentNullException(nameof(userContext));
        this._tokenService = tokenService ?? throw new ArgumentNullException(nameof(tokenService));
    }

    [HttpPost]
    [Route("refresh")]
    public IActionResult Refresh(TokenApiModel tokenApiModel)
    {
        if (tokenApiModel is null)
            return BadRequest("Invalid client request");

        string accessToken = tokenApiModel.AccessToken;
        string refreshToken = tokenApiModel.RefreshToken;

        var principal = _tokenService.GetPrincipalFromExpiredToken(accessToken);
        var username = principal.Identity.Name; //this is mapped to the Name claim by default

        var user = _userContext.LoginModels.SingleOrDefault(u => u.UserName == username);

        if (user is null || user.RefreshToken != refreshToken || user.RefreshTokenExpiryTime <= DateTime.Now)
            return BadRequest("Invalid client request");

        var newAccessToken = _tokenService.GenerateAccessToken(principal.Claims);
        var newRefreshToken = _tokenService.GenerateRefreshToken();

        user.RefreshToken = newRefreshToken;
        _userContext.SaveChanges();

        return Ok(new AuthenticatedResponse()
        {
            Token = newAccessToken,
            RefreshToken = newRefreshToken
        });
    }

    [HttpPost, Authorize]
    [Route("revoke")]
    public IActionResult Revoke()
    {
        var username = User.Identity.Name;

        var user = _userContext.LoginModels.SingleOrDefault(u => u.UserName == username);
        if (user == null) return BadRequest();

        user.RefreshToken = null;

        _userContext.SaveChanges();

        return NoContent();
    }
}
Here, we implement a refresh endpoint, which gets the user information from the expired access token and validates the refresh token against the user. Once the validation is successful, we generate a new access token and refresh token and the new refresh token is saved against the user in DB.
We also implement a revoke endpoint that invalidates the refresh token.
Our Web API project is now ready.
Angular App Refresh Token Implementation
We need to make some changes in our Angular client app as well.
First, we have to modify the AuthenticatedResponse interface:
export interface AuthenticatedResponse{
  token: string;
  refreshToken: string;
}
Then, in the LoginComponent, we need to save the refresh token into the local storage along with the access token:
login = ( form: NgForm) => {
  if (form.valid) {
    this.http.post<AuthenticatedResponse>("https://localhost:5001/api/auth/login", this.credentials, {
      headers: new HttpHeaders({ "Content-Type": "application/json"})
    })
    .subscribe({
      next: (response: AuthenticatedResponse) => {
        const token = response.token;
        const refreshToken = response.refreshToken;
        localStorage.setItem("jwt", token);
        localStorage.setItem("refreshToken", refreshToken);
        this.invalidLogin = false;
        this.router.navigate(["/"]);
      },
      error: (err: HttpErrorResponse) => this.invalidLogin = true
    })
  }
}
Now, let’s modify the AuthGuard service:
import { AuthenticatedResponse } from './../_interfaces/authenticated-response.model';
import { HttpClient, HttpHeaders } from '@angular/common/http';
import { Injectable } from '@angular/core';
import { ActivatedRouteSnapshot, CanActivate, Router, RouterStateSnapshot } from '@angular/router';
import { JwtHelperService } from '@auth0/angular-jwt';

@Injectable({
  providedIn: 'root'
})
export class AuthGuard implements CanActivate  {

  constructor(private router:Router, private jwtHelper: JwtHelperService, private http: HttpClient){}

  async canActivate(route: ActivatedRouteSnapshot, state: RouterStateSnapshot) {
    const token = localStorage.getItem("jwt");

    if (token && !this.jwtHelper.isTokenExpired(token)){
      console.log(this.jwtHelper.decodeToken(token))
      return true;
    }

    const isRefreshSuccess = await this.tryRefreshingTokens(token);
    if (!isRefreshSuccess) {
      this.router.navigate(["login"]);
    }

    return isRefreshSuccess;
  }
}
We add some additional imports that we are going to use for the refresh token logic, and also if the token has expired, we call the tryRefreshingTokens function.
Now, let’s implement that function below the canActivate function:
private async tryRefreshingTokens(token: string): Promise<boolean> {
  const refreshToken: string = localStorage.getItem("refreshToken");
  if (!token || !refreshToken) {
    return false;
  }

  const credentials = JSON.stringify({ accessToken: token, refreshToken: refreshToken });
  let isRefreshSuccess: boolean;

  const refreshRes = await new Promise<AuthenticatedResponse>((resolve, reject) => {
    this.http.post<AuthenticatedResponse>("https://localhost:5001/api/token/refresh", credentials, {
      headers: new HttpHeaders({
        "Content-Type": "application/json"
      })
    }).subscribe({
      next: (res: AuthenticatedResponse) => resolve(res),
      error: (_) => { reject; isRefreshSuccess = false;}
    });
  });

  localStorage.setItem("jwt", refreshRes.token);
  localStorage.setItem("refreshToken", refreshRes.refreshToken);
  isRefreshSuccess = true;

  return isRefreshSuccess;
}
Here, once the access token is expired, we try refreshing it using the refresh token. If the refresh is successful, we store the new set of tokens in the local storage. If the refresh action does not work, we return false and redirect the user back to the login page.
Finally, in the HomeComponent, we need to remove the refresh token along with the access token during logout:
logOut = () => {
  localStorage.removeItem("jwt");
  localStorage.removeItem("refreshToken");
}
That’s it. We have implemented refresh tokens in our application. In the next section, we are going to test the functionality.
Testing
First, we are going to test the Web API using Postman. Let’s invoke /api/auth/login by supplying the user credentials:
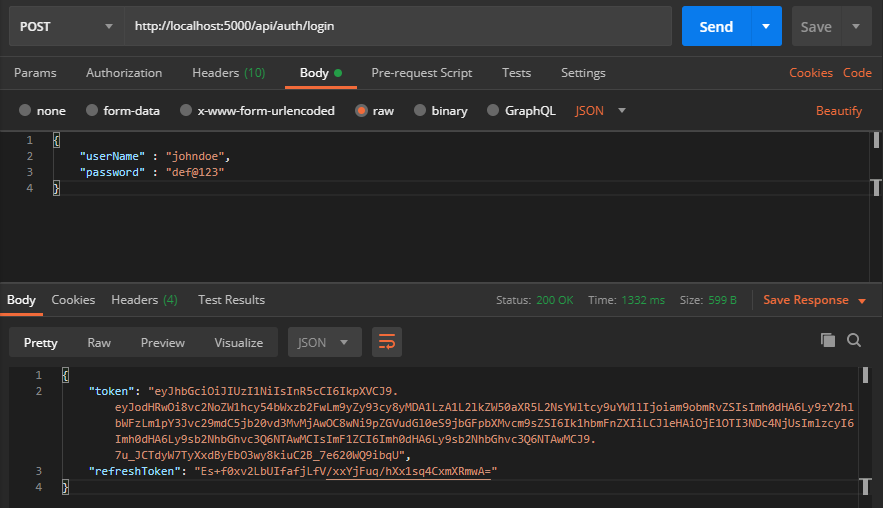
We can see that now the endpoint returns both access token and refresh token.
This updates both refresh token and expiry time in the database:

Now, let’s wait till the access token expires. Remember, we had set the access token expiry as 5 minutes.
Once the access token is expired, we can see our protected endpoints return 401- Unauthorized response. We can verify that by accessing /api/customers.
Now, we are going to refresh our access token using the refresh token. For that let’s do a POST request to /api/token/refresh with both the tokens that we received earlier:
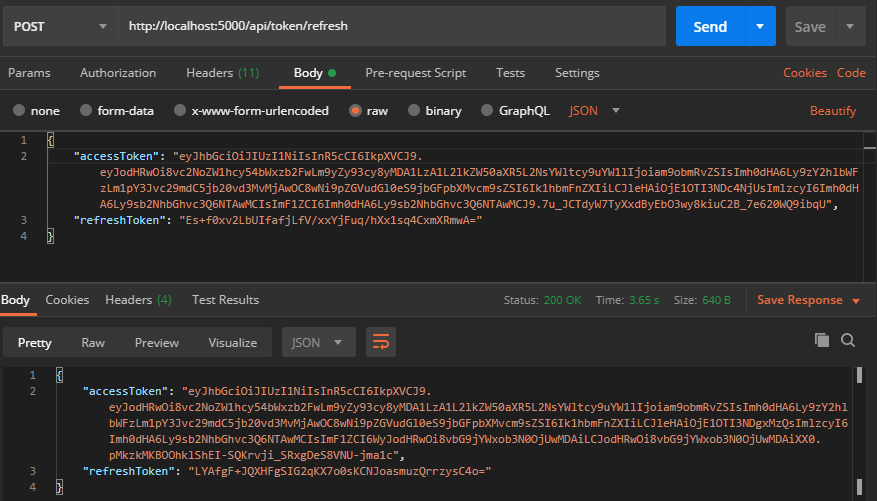
This will return a new set of tokens that can be used further.
We can continue this cycle until the refresh token expires. In case we want to revoke the refresh token, we can do so by invoking the /api/token/revoke endpoint. This will require users to provide credentials once the current access token is expired. This endpoint is implemented as a security measure and we can make use of this in case current tokens are compromised.
Now, let’s test the client app.
Earlier, the client app used to redirect us to the login page once the access token expired. Now, we can see that once the access token is expired, the app automatically refreshes the token and keeps the session alive. Users don’t have to know about these steps happening in the background and they can continue working on the app without any interruptions. They will need to log in again only once the refresh token expires, which gives them a longer window to work with.
By using an access token with a short expiry (typically, a few minutes) and a refresh token with a longer expiry (typically, a few days), we can make our application secure and at the same time give our users a seamless experience. If something goes wrong, we always have the option to revoke refresh tokens.
Conclusion
In this article, we have learned the following topics:
- The concept of refresh tokens
- Why do we need refresh tokens in our application
- How to implement refresh tokens in an ASP.NET Core Web API application with an Angular client app
- How to revoke refresh tokens, if required

