

In this article, we’re going to talk about dependency injection, one of the most frequently used design patterns out there. There are many tutorials about dependency injection, but in this one, we’re going to focus on understanding why the dependency injection is used and how to use it properly in ASP.NET Core.
So, let’s start.
What is Dependency Injection?
Dependency Injection (often called just DI) is a software design pattern that helps us create loosely coupled applications. It is an implementation of the Inversion of Control (IoC) principle, and Dependency Inversion Principle (D in SOLID).
The Inversion of Control principle is a design pattern in which the control flow of the application is reversed. We can use it to our benefit to decouple the parts of our application. This might sound a bit odd, but we’ll see how it works in a moment. Dependency Injection is just one way of implementing the Inversion of Control principle. Inversion of Control can be achieved via other means like delegates, events, or other design patterns like factory method for example.
The Inversion of Control also states that objects should not create other objects they depend on. These should be injected via external service or container.
You can read more about the Dependency Inversion Principle in our SOLID principles series.
Normal Flow vs Dependency Inversion
In a more graphical way, here’s how the typical workflow looks like:

In a lot of applications, the compile-time dependencies flow in the same direction as the runtime execution. This is wrong because dependencies should be oriented towards the abstraction and not implementation. Class A is referencing a method from Class B, and Class B is referencing the method from Class C. This creates a direct dependency graph that should be avoided at all costs.
This can be corrected by using interfaces, or rather coding to interfaces:
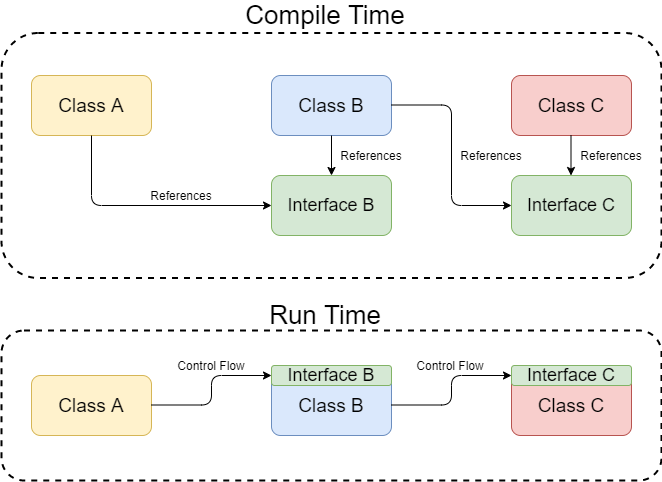
This time around, Class A calls a method from an abstraction – Interface B that Class B implements. Similarly, Class B calls a method from an Interface C instead of Class C directly. Thus, Class B is no longer a dependency of Class A, and Class A and Class B remain loosely coupled. Class B depends on the interface controlled by Class A and therefore the compile-time dependencies are inverted. At the same time, runtime flow remains the same.
Inversion of Control with the Constructor Injection
Constructor injection is by far the most used type of Dependency Injection. Dependency injection is built in ASP.NET Core, and we’re encouraged by the framework to use it. Actually, we might even find it hard not since it’s deeply integrated into the framework.
But let’s put all this theory to practice. We are going to create an example of a control flow without a DI first to see how it looks like.
We’ll create a simple PlayerGenerator for a potential game. Let’s create a simple model first. We can create a Player class and some enums to determine the gender and the hair color of that player:
public class Player
{
    public string Name { get; set; }
    public Gender Gender { get; set; }
    public int Age { get; set; }
    public HairColor HairColor { get; set; }
    public int Strength { get; set; }
    public string Race { get; set; }
}

public enum Gender
{
    Male = 0,
    Female = 1
}

public enum HairColor
{
    Blue = 0,
    Black = 1,
    Brown = 2,
    Green = 3,
    Pink = 4,
    White = 5,
    Orange = 6
}
Now, we need to create a PlayerGenerator service in the Services folder:
public class PlayerGenerator
{
    private readonly string[] _maleNames = { "Jon Irenicus", "Kagain", "Minsc", "Xzar", "Drizzt Do'Urden", "Sarevok", "Elminster" };
    private readonly string[] _femaleNames = { "Imoen", "Jaheira", "Dynaheir", "Branwen", "Bodhi", "Shar-Teel", "Safana" };

    public Player CreateNewPlayer()
    {
        string playerName;
        var random = new Random();

        var playerNameIndex = random.Next(7);
        var playerGenderIndex = random.Next(2);
        var playerHairColorIndex = random.Next(7);
        var playerAge = random.Next(18, 100);
        var strength = random.Next(8, 18);

        if (playerGenderIndex == 0)
            playerName = _maleNames[playerNameIndex];
        else
            playerName = _femaleNames[playerNameIndex];

        return new Player
        {
            Name = playerName,
            Gender = (Gender)playerGenderIndex,
            HairColor = (HairColor)playerHairColorIndex,
            Age = playerAge,
            Strength = strength,
            Race = "Human"
        };
    }
}
This piece of code creates a random male or female human player character and uses some randomly generated values to determine character details. It’s a really simple generator that has only one method, and its only purpose is to create new players.
Now we can go to our GameController (renamed HomeController) and modify the Index() method:
public IActionResult Index()
{
    var playerGenerator = new PlayerGenerator();
    var newPlayer = playerGenerator.CreateNewPlayer();

    return View(newPlayer);
}
We’re simply creating a new instance of the PlayerGenerator and calling the CreateNewPlayer() method to create a new player and send it to the view.
The only thing remaining is to change the Index view a bit to show our new player details:
@{
    ViewData["Title"] = "Game Page";
}

<div>
    <h2>New Player Info</h2>
    <p>Name: @Model.Name</p>
    <p>Gender: @Model.Gender</p>
    <p>Race: @Model.Race</p>
    <p>Age: @Model.Age</p>
    <p>Hair Color: @Model.HairColor</p>
    <p>Strength: @Model.Strength</p>
</div>
Now if we run the application we should get a randomly created player character:
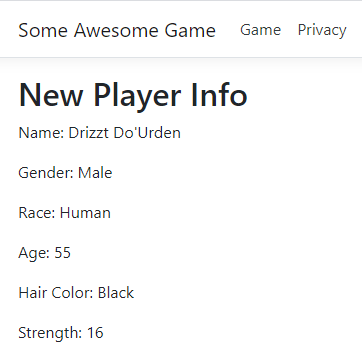
Excellent. Drizzt Do’Urden is ready to play his turn.
The Problem(s)
Since our controller is directly creating a PlayerGenerator instance, we’ve created several huge problems.
Our controller is no longer just the controller, so we’ve violated the Single Responsibility Principle. Controllers should not create instances of other classes.
We’ve also produced a tightly coupled source code. Say for example we want to change the PlayerGenerator class with another one, like BetterPlayerGenerator class which creates players in a completely different way. We would need to change our controller too:
public IActionResult Index()
{
    var playerGenerator = new BetterPlayerGenerator();
    var newPlayer = playerGenerator.CreateNewPlayer();

    return View(newPlayer);
}
This is not ideal, and you see how this can propagate through the many different layers of applications easily.
We’ve also made the GameController harder to test. Since the PlayerGenerator is created inside the Index() method, we can’t mock it. This would make our unit tests unreliable. We aren’t able to test the unit in this case, so the tests wouldn’t even be the real unit tests. This would make them more like integration tests since we would be testing the integration of PlayerGenerator and GameController.
Lastly, we’re creating dirty and unreadable code in the long run. Imagine if every dependency in the project is created this way. We would have a lot of redundant code, and we would have to change an entire application whenever the slightest change in logic is made.
So what can we do to improve this situation?
We can use dependency injection.
Let’s see how.
Making the Solution More Flexible with Dependency Injection
First, we need to create an interface IPlayerGenerator. We can do that manually, or we can go to PlayerGenerator class and press Ctrl + . on the class name and click on the Extract Interface. The latter approach is faster, and it automatically adds an inheritance to our classes:
public class PlayerGenerator : IPlayerGenerator
{
...
}
And we can manually add it to the BetterPlayerGenerator class:
public class BetterPlayerGenerator : IPlayerGenerator
{
..
}
And the interface is generated:
public interface IPlayerGenerator
{
    Player CreateNewPlayer();
}
Now both our classes implement the IPlayerGenerator class.
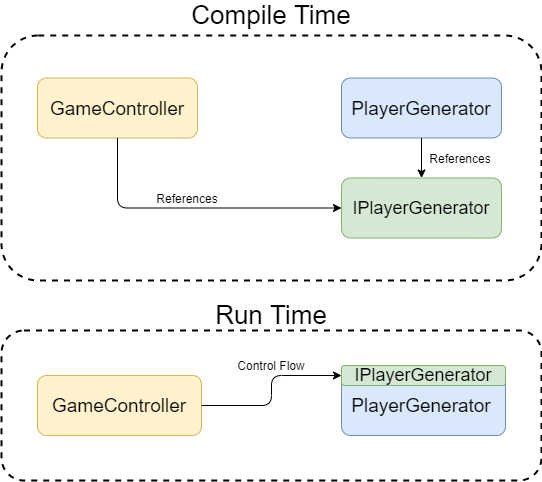
Now we need to go to our GameController and use the Dependency Injection to add our dependency:
private readonly ILogger<GameController> _logger;
private readonly IPlayerGenerator _playerGenerator;

public GameController(ILogger<GameController> logger, IPlayerGenerator playerGenerator)
{
    _logger = logger;
    _playerGenerator = playerGenerator;
}

public IActionResult Index()
{
    var newPlayer = _playerGenerator.CreateNewPlayer();

    return View(newPlayer);
}
We’ve added our dependency via constructor injection, and we’ve assigned it to a private readonly field. This is a good practice, as we’re preventing accidental assignment anywhere else outside the constructor.
Now we can simply call the _playerGenerator.CreateNewPlayer() method in the Index() method.
Great, but what happens now if we run the application?

We get a nice big InvalidOperationException, stating that the service cannot be activated.
But why does this happen?
It happens because we haven’t registered our service yet with our dependency injection container. It’s only logical because the container is not aware of which interface resolves to which class, yet.
Let’s see how we can register our service.
Registering the Service with Dependency Injection Container
In order to get rid of that InvalidOperationException, we need to register our service.
We can do that in our Startup class, by adding a single line in the ConfigureServices() method:
public void ConfigureServices(IServiceCollection services)
{
    services.AddScoped<IPlayerGenerator, PlayerGenerator>();

    services.AddControllersWithViews();
}
We’ve added the PlayerGenerator service to the service collection with AddScoped() method.
In short, scoped lifetime means that the instance is created on every request. For now, let’s leave it like this, but we’ll talk more about dependency injection lifetimes.
The important thing is that the service registration is necessary and that we can add it as a transient, scoped or singleton service to our IServiceCollection.
If we run the application again, it should work just fine.
How does Dependency Injection Help?
So what happens now if we want to introduce the BetterPlayerGenerator class now in our controller?
We don’t need to change a thing in the GameController itself!
We just need to change the registration in the Startup.cs:
public void ConfigureServices(IServiceCollection services)
{
    services.AddScoped<IPlayerGenerator, BetterPlayerGenerator>();

    services.AddControllersWithViews();
}
That’s it!
Although the BetterPlayerGenerator has a completely different player generation logic, it doesn’t affect our controller.
That’s a much better way of doing it!
So we’ve completed several goals with this approach:
- Made the code cleaner
- Decoupled controller from the service implementation
- Made the controller easier to test
- Created a more robust foundation for our solution (using abstractions over concrete classes)
Different Service Registration Lifetimes
As we’ve already mentioned, there are three different registration lifetimes we can choose from when registering our services.
These are:
- Transient – We can use this for lightweight, stateless services. Each time the service is called, the new instance is created
- Scoped – The instance of the service is created once per request and within that request (scope) it is reused
- Singleton – The instance is created only once
We’ll talk more about these DI lifetimes.
Conclusion
In this article, we’ve covered concepts like Dependency Injection, Inversion of Control, and Dependency Inversion principle. We’ve learned how they are related and how the application control flow can be inverted by using dependency injection.
We’ve also created a small example to see how we can apply dependency injection in ASP.NET Core application, and we’ve seen how beneficial this approach can be.
Next time, we’ll talk more about different dependency injection lifecycles.

Thank you Vladimir, I didn’t understand DI the way I understand it now in this article
Glad to hear that Abeer.
“Similarly, Class C calls a method from an Interface C instead of Class C directly.”
Great article, just C should be B I think.
Hey Hasan, thank you for the heads up! It’s indeed class B in that sentence.