

Updated on
In this introductory article, we are going to learn how ASP.NET Core configuration works, the basic configuration concepts, and a few different ways we can use to configure our application. Even by default, the configuration mechanism in .NET is pretty powerful, but it has a lot of advanced mechanisms that make it even more so.
Once we go through the basic concepts, we’ll tackle some of the advanced ones, but for now, let’s just see what comes out of the box when we create an ASP.NET Core project.
Let’s dive in.
What is Configuration?
Application configuration is a way of providing the initial settings to our application on its startup. We use configuration to easily set up our application in different ways, usually depending on the environment that it’s deployed on.
Configuration may come from multiple different sources and in a wide variety of forms like files, environment variables, or some kind of store like Azure Key Vault, or even from in-memory storage or as command-line arguments.
Whichever way(s) we choose, the configuration mechanism exists to help us create flexible applications, without the need to recompile our source code. By using the configuration data we determine the behavior of our applications at runtime.
Configuration in .NET Core is pretty powerful and it can be easily installed and used. The NuGet package containing the configuration is Microsoft.Extensions.Configuration and you can easily add it to any .NET Core project by typing:
PM> Install-Package Microsoft.Extensions.Configuration in the Package Manager Console in Visual Studio or
dotnet add package Microsoft.Extensions.Configuration if you prefer the dotnet CLI.
If you create an ASP.NET Core application, you don’t have to worry about it since it’s referenced by default.
Configuration in .NET Core is even more powerful with the use of sections, configuration providers, and the Options pattern. We’ll talk about all of these concepts in this article, as well as later on.
How do We Define Configuration Data?
Configuration data is defined as a set of key-value pairs.
Values can be:
- integers – can be any integer number, used when we need a numerical value, like the maximum number of items, or a default temperature for example
DefaultRoomTemperature = 21 - booleans – can be true or false. Used often to determine if a behavior should be triggered or not within our application
TurnOnDetailedReports = true - strings – if we need a specific string value. Typical examples, but not limited to these are connection strings and URLs
sqlConnection = "server=.; database=AccountOwnerDatabase; Integrated Security=true"
These are just examples and besides a value, each key contains information about which level of the hierarchy it’s in.
Let’s see what that means.
Hierarchical Data Organization and Data Flattening
The Configuration API reads the hierarchical data by flattening the structure using delimiters.
This means we can write something like this in our configuration file:
{
	"Logging": {
		"LogLevel": {
			"Default": "Information",
			"Microsoft": "Warning",
			"Microsoft.Hosting.Lifetime": "Information"
		}
	},
	"AllowedHosts": "*"
}
And later on, access it in our code by using the semicolon delimiter “:”.
Examples:
"Logging:LogLevel:Default" – We can get the Default logging level
"AllowedHosts" – We’ll get “*” (any host) in this case
This means we can have multiple keys named “Default” since the organization is hierarchical.
Let’s extend our example:
{
	"Logging": {
		"LogLevel": {
			"Default": "Information",
			"Microsoft": "Warning",
			"Microsoft.Hosting.Lifetime": "Information"
		}
	},
	"OtherLoggingProvider": {
		"LogLevel": {
			"Default": "Debug"
		}
	},
	"AllowedHosts": "*"
}
Now we can access the same key within the different hierarchy:
"Logging:LogLevel:Default" – returns “Information”
"OtherLoggingProvider:LogLevel:Default" – returns “Debug”
If the value doesn’t exist, we’ll get a null as a result.
Instead of accessing the values directly, using delimiters, we can use the options pattern, and GetSection() and GetChildren() methods to get sections and children of a section. These mechanisms make the configuration much easier to use. We’ll see how to use them later on.
Let’s see what we get out of the box when we create an ASP.NET Core application.
Default ASP.NET Core Configuration
When we create a new ASP.NET Core application, our Program.cs file looks like this:
public class Program
{
    public static void Main(string[] args)
    {
        CreateHostBuilder(args).Build().Run();
    }

    public static IHostBuilder CreateHostBuilder(string[] args) =>
        Host.CreateDefaultBuilder(args)
            .ConfigureWebHostDefaults(webBuilder =>
            {
                webBuilder.UseStartup<Startup>();
            });
}
While it may not look that spectacular, this does a few things for us. The CreateDefaultBuilder() method is particularly interesting to us.
It creates an instance of a HostBuilder, which implements IHostBuilder and that’s our program initialization utility. Besides that, it populates it with some default values, some of which are the default values gathered from different sources.
The CreateDefaultBuilder() method adds the default configuration values to the application in this particular order:
- ChainedConfigurationProvider – adds the host
IConfigurationto the appIConfiguration - appsettings.json file – this is the default file we get when creating an ASP.NET Core template
- appsettings.{EnvironmentName}.json files – for the environment-specific overrides
- App Secrets when the
EnvironmentNamevariable is set to “Development” - Environment variables
- Command-line arguments
These key-value pairs are stored inside the IConfiguration, and it plays a big role in our application later on.
Now that we know how the default configuration is populated in our application, let’s see how we can read it at runtime.
Reading Values at Runtime
After a bit of theory, let’s do some coding.
First of all, we need a way to access our values.
Since dependency injection is turned on by default in our application we can do it simply by injecting our IConfiguration interface in our controller (or anywhere else). So let’s do exactly that. Let’s inject IConfiguration into the HomeController class.
When we open the HomeController, we can immediately see that the ILogger is already injected into the constructor:
private readonly ILogger<HomeController> _logger;

public HomeController(ILogger<HomeController> logger)
{
    _logger = logger;
}
We can inject IConfiguration in exactly the same manner:
private readonly ILogger<HomeController> _logger;
private readonly IConfiguration _configuration;

public HomeController(ILogger<HomeController> logger, IConfiguration configuration)
{
    _logger = logger;
    _configuration = configuration;
}
Now we can use the _configuration variable to access our values in the entire controller. Let’s create a dummy model first to populate it with our data. Let’s navigate to the Model folder and create a HomeModel class. This will be a simple class with a single property DefaultLogLevel:
public class HomeModel
{
    public string DefaultLogLevel { get; set; }
}
Let’s return to our controller, read our configuration, and send the data to our Home Index view:
public IActionResult Index()
{
    var homeModel = new HomeModel
    {
        DefaultLogLevel = _configuration.GetValue<string>("Logging:LogLevel:Default")
    };
    return View(homeModel);
}
And change our Home Index.html a bit:
@{
    ViewData["Title"] = "Home Page";
}

<div class="text-center">
    <h1 class="display-4">Welcome</h1>
    <span>Our default logging level is </span><strong>@Model.DefaultLogLevel</strong>
    <p>Learn about <a href="https://docs.microsoft.com/aspnet/core">building Web apps with ASP.NET Core</a>.</p>
</div>
Sure enough, our application now displays our configuration value:
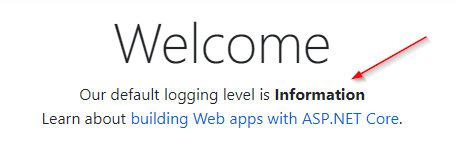
As you can see, we’ve used a strongly typed GetValue() method to read our default logging level, using the same principle as before to navigate the hierarchy.
It’s as easy as that.
Configuration Sections
The GetSection() method helps us further by isolating separate sections or subsections of our configuration. To put that into perspective let’s look at our example once again:
{
	"Logging": {
		"LogLevel": {
			"Default": "Information",
			"Microsoft": "Warning",
			"Microsoft.Hosting.Lifetime": "Information"
		}
	},
	"OtherLoggingProvider": {
		"LogLevel": {
			"Default": "Debug"
		}
	},
	"AllowedHosts": "*"
}
In this case, “Logging” would be a section, and “LogLevel” is a subsection. Since we need just the LogLevel data, we can isolate it by returning just the LogLevel subsection in our HomeController Index action:
public IActionResult Index()
{
    var logLevelSection = _configuration.GetSection("Logging:LogLevel");

    var homeModel = new HomeModel
    {
        DefaultLogLevel = logLevelSection.GetValue<string>("Default")
    };

    return View(homeModel);
}
The result is the same as before.
Although this is a small example, imagine more complex settings file like we see every day in a real-world project. It contains a lot of different sections, for various parts of our application. Getting sections and organizing them logically would be a crucial task to make our application more readable, and less dependent on hard coded strings.
A common usage of the GetSection() method can be seen in the extension method GetConnectionString().
Let’s load it from the assembly:
public static string GetConnectionString(this IConfiguration configuration, string name)
{
    return configuration?.GetSection("ConnectionStrings")?[name];
}
We can see that it’s just the implementation of the GetSection() method. It takes a name of the connection string and then tries to find it within the “ConnectionStrings” section.
That’s why our connection strings should be located within that section inside our appsettings.json file:
{
	"Logging": {
		"LogLevel": {
			"Default": "Information",
			"Microsoft": "Warning",
			"Microsoft.Hosting.Lifetime": "Information"
		}
	},
	"ConnectionStrings": {
		"sqlConnection": "server=.; database=CodeMazeCommerce; Integrated Security=true"
	},
	"OtherLoggingProvider": {
		"LogLevel": {
			"Default": "Debug"
		}
	},
	"AllowedHosts": "*"
}
We can get the string as easy as this now:
Configuration.GetConnectionString("sqlConnection");
Awesome!
We recommend that you use a similar pattern to get other sections of your configuration. If you are not familiar with extension methods check out our article on them to learn how they work.
Binding Configuration
We’ve seen how we can extract our configuration data by using IConfiguration. But it does have its flaws.
Having to type sections and keys to get the values can be really repetitive and error-prone. We risk introducing errors to our code, and these kinds of errors can cost us a lot of time until we discover them since someone else can introduce them, and we won’t notice them since a null result is returned when values are missing.
To overcome this problem, we can bind the configuration data to strongly typed objects. To do that, we can use the Bind() method.
We can quickly create a simple container class for the configuration called LoggingLevelConfiguration, inside our Model folder:
public class LoggingLevelConfiguration
{
    public string Default { get; set; }
}
And now, let’s make some changes to our HomeController Index() method:
public IActionResult Index()
{
    var logLevelConfiguration = new LoggingLevelConfiguration();

    _configuration.Bind("Logging:LogLevel", logLevelConfiguration);

    var homeModel = new HomeModel
    {
        DefaultLogLevel = logLevelConfiguration.Default
    };

    return View(homeModel);
}
And once again, we can run the project and make sure that result is the same.
As you can see, instead of using GetValue() or GetSection() methods we’ve bound our configuration data to the LoggingLevelConfiguration section directly, and we’re accessing the configuration data by calling the Default property of that class.
Pretty neat, huh?
There are two things to note here though. First is that the names of the configuration data keys and class properties must match. The other is that if you extend the configuration, you need to extend the class as well, which can be a bit cumbersome, but it beats getting values by typing strings.
Creating an Environment Specific Configuration
Any application that is meant to go to the production has at least two environments – development and production. Besides that, we can have other environments, like staging which is an environment where we can check if the application is working correctly before we deploy it to production.
Check out our article about using multiple environments in ASP.NET Core to learn about it in more detail.
As you might have noticed, our project template has two appsettings files. One is the default appsettings.json file, and another is appsettings.Development.json. In this file, we can override any value from the appsettings.json file and it will be used when we are working in the development environment.
The practical example of the usage would be having different configuration strings for production and development since we don’t want to mess up the production database during development.
For example, this would be a connection string for the development:
{
	"Logging": {
		"LogLevel": {
			"Default": "Information",
			"Microsoft": "Warning",
			"Microsoft.Hosting.Lifetime": "Information"
		}
	},
	"ConnectionStrings": {
		"sqlConnection": "server=.; database=CodeMazeCommerce; Integrated Security=true"
	},
	"OtherLoggingProvider": {
		"LogLevel": {
			"Default": "Debug"
		}
	},
	"AllowedHosts": "*"
}
And now we can create an appsettings.Production.json file in which we will change the connection string to something else:
{
	"ConnectionStrings": {
		"sqlConnection": "server=ProductionServerName; database=CodeMazeCommerce; Integrated Security=true"
	}
}
That’s it. Once the application is running in the production environment (indicated by the ASPNETCORE_ENVIRONMENT environment variable), the production string from the apsettings.Production.json will be used instead of the default one.
Conclusion
In this article, we’ve gone through some basic concepts of ASP.NET Core application configuration. We’ve learned how to use change configuration settings for our application, use sections to logically group our configuration data, and read the hierarchical configuration structures.
We still haven’t touched upon the options pattern or configuration providers, which are our next topics of this series.

Why this tutorial does not follow the previous tutorial “Advanced ASP.NET Core Web API Concepts”
Hey Roy, this is not the next article in the series, although these concepts are easily applicable to that project or any other.