

In this article, we’re going to cover how to set up and manage multiple environments in ASP.NET Core. If we expect our project to become large and complex, it is a good idea for us to separate our environments. For example, we don’t want to develop software on the same server that hosts our live application. Similarly, we don’t want to run tests on our live application. These bad practices could cause our users to see debugging pages, dummy data, altered data, etc. To help us avoid these issues, we’ll look at how to set up multiple environments to manage what kind of error page is displayed for an ASP.NET Core application.
To download the source code, visit our Multiple Environments repository.
Let’s dive in.
Creating a Project
Before we continue, let’s create a new MVC project using the ASP.NET Core CLI. This command will create a project with all the basic project and frontend files we are going to use in this example:
dotnet new mvc
Our project should now have the following project structure:
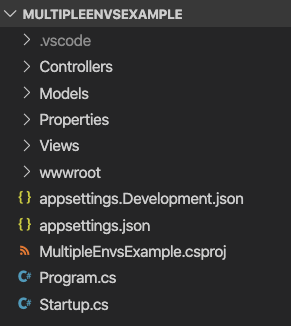
Now that we’ve created the project, let’s go through some of the key files that we are going to visit in this article.
The Program.cs file is the starting point of the ASP.NET Core application. We are going to modify this file later, but for now, let’s make sure that this is the code that was generated:
public class Program
{
    public static void Main(string[] args)
    {
        CreateHostBuilder(args).Build().Run();
    }

    public static IHostBuilder CreateHostBuilder(string[] args) =>
        Host.CreateDefaultBuilder(args)
            .ConfigureWebHostDefaults(webBuilder =>
            {
                webBuilder.UseStartup<Startup>();
            });
}
The Program class uses the Startup.cs file to configure the application. To configure the application, let’s modify the Configure method inside Startup.cs.
public class Startup
{
    public Startup(IConfiguration configuration)
    {
        Configuration = configuration;
    }

    public IConfiguration Configuration { get; }

    public void ConfigureServices(IServiceCollection services)
    {
        services.AddControllersWithViews();
    }

    public void Configure(IApplicationBuilder app)
    {
        app.UseDeveloperExceptionPage();

        app.UseHttpsRedirection();
        app.UseStaticFiles();

        app.UseRouting();

        app.UseAuthorization();

        app.UseEndpoints(endpoints =>
        {
            endpoints.MapControllerRoute(
                name: "default",
                pattern: "{controller=Home}/{action=Index}/{id?}");
        });
    }
}
The UseDeveloperExceptionPage method configures the application to call the debugging page whenever an error occurs.
To test this feature out we are going to modify the Privacy action inside the HomeController class:
public class HomeController : Controller
{
    private readonly ILogger<HomeController> _logger;

    public HomeController(ILogger<HomeController> logger)
    {
        _logger = logger;
    }

    public IActionResult Index()
    {
        return View();
    }

    public IActionResult Privacy()
    {
        throw new Exception();
    }
}
Whenever we attempt to go to the privacy page, our controller will simulate an error by throwing an exception.
Before we do a test run, let’s modify the launchSettings.json file inside the Properties directory. We are going to remove all the environmentVariables key-value pairs under all the profiles. Later, we will talk about what those lines of code do, but for now, let’s remove them:
{
  "iisSettings": {
    "windowsAuthentication": false,
    "anonymousAuthentication": true,
    "iisExpress": {
      "applicationUrl": "http://localhost:34078",
      "sslPort": 44321
    }
  },
  "profiles": {
    "IIS Express": {
      "commandName": "IISExpress",
      "launchBrowser": true
    },
    "MultipleEnvsExample": {
      "commandName": "Project",
      "launchBrowser": true,
      "applicationUrl": "https://localhost:5001;http://localhost:5000"
    }
  }
}
Let’s run it to make sure it works:
dotnet run
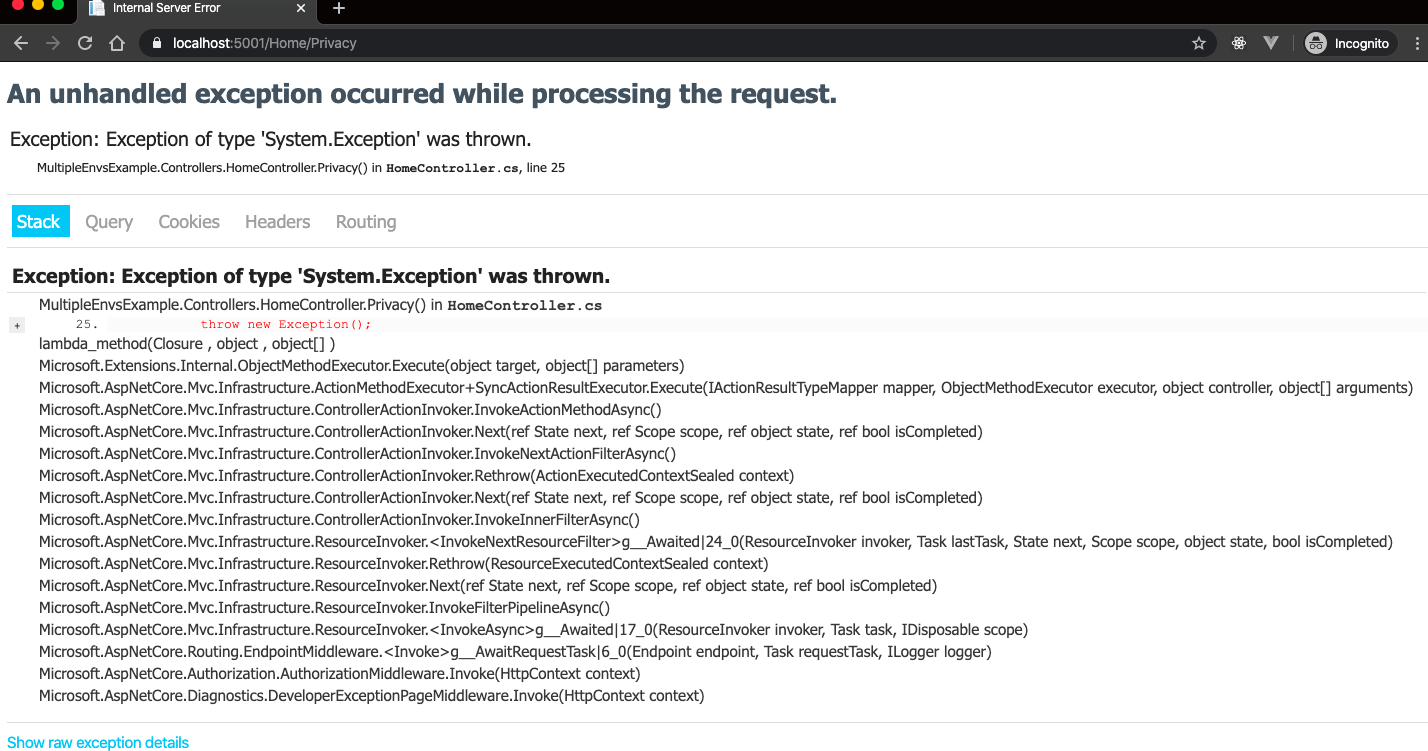
As soon as we navigate to https://localhost:5001/Home/Privacy, we are going to see the debugging page:
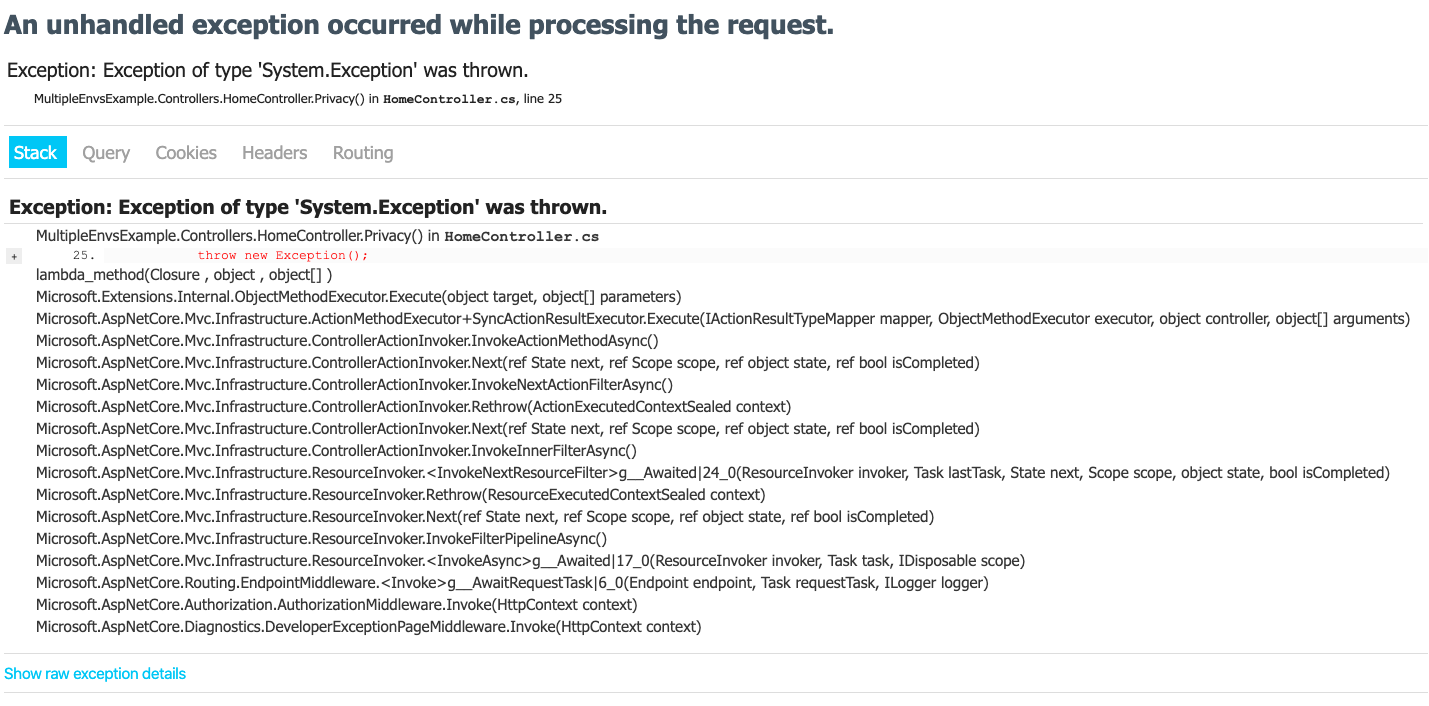
Of course, this is a great resource when we need to know what went wrong. However, we don’t want our users to see this page.
So, how do we deal with this problem?
We are going to solve this problem by using multiple environments.
The Environments
A hosting environment consists of OS-level definitions that the application uses to determine how it’s going to run. Let’s take a look at the three most common environments:
- Development – We can use this environment to write code, commit code, fix bugs, etc. For example, we want our error page to give us some debugging information to help us write code.
- Production – We can use this environment to publish our application to our end users. For example, instead of debugging information, we want our error to display generic error information to alert our user that something went wrong.
- Staging – We can use this environment to test our application using automated or manual tests. Staging environments are often very similar to the production environment. For example, if a test fails while requesting a page, we want the tester to see the same generic error information that a user would see. Because it a staging environment, we may also want an additional message displaying the name of the failed test.
The Environment Variables
The way we are going to control which environment we want to use is through the environment variables. All modern operating systems offer a way to define environment variables.
So, what exactly is an environment variable?
An environment variable is a variable whose value is set outside of the application, hence the term “environment.” ASP.NET Core relies on several environment variables, but the one we are going to look at in this article is ASPNETCORE_ENVIRONMENT. ASP.NET Core reads this environment variable at startup and stores the value to allow us to write code that is dependent on this value.
Now, let’s talk about case sensitivity:
Environment variable values are not case sensitive on Windows and macOS but are case sensitive on Linux. This means that on Linux the value of Development would not be the same as development. It is good practice to keep all references to environment values consistent throughout the project. For the sake of this project, we are going to use the following values: Development and Production.
Setting the Environment Variable
There are multiple ways of setting a value to the environment variable that may vary by the operating system. For the sake of this project, we are going to work on a UNIX-based operating system.
Setting the Environment Variable with UNIX
We are going to open a terminal window and run:
export ASPNETCORE_ENVIRONMENT=Development
To see if it worked, we are going to run:
echo $ASPNETCORE_ENVIRONMENT
When we run the command we should see the value stored in that variable:
Development
When we run the application we are going to see that the application is running on the development environment:
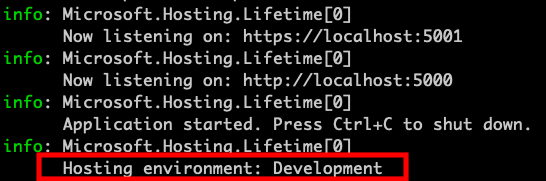
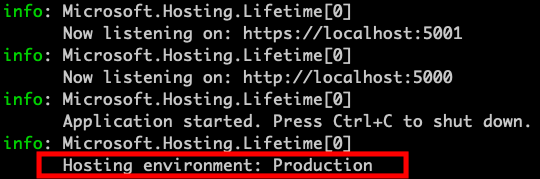
However, it’s important to note that the default environment in ASP.NET Core is Development. So, now we are going to change it to Production:
export ASPNETCORE_ENVIRONMENT=Production
dotnet run
When we run the application we are going to see that application is running on the production environment:
Now we know how to set the environment variable through the OS!
Using CLI Arguments to Set the Environment Variable
Another way to set the environment variable is by feeding the value directly to the dotnet run command as an argument.
To set this up, let’s modify Program.cs:
public static IHostBuilder CreateHostBuilder(string[] args) =>
    Host.CreateDefaultBuilder(args)
        .ConfigureHostConfiguration(configHost =>
        {
            configHost.AddCommandLine(args);
        })
        .ConfigureWebHostDefaults(webBuilder =>
        {
            webBuilder.UseStartup<Startup>();
        });
In the CreateHostBuilder method, we are setting up the builder’s configuration using ConfigureHostConfiguration. We are configuring the configuration with the AddCommandLine method to allow it to read configuration values from the command line.
By default, the host builder will add the ASPNETCORE_ prefix to the argument key that is provided. For example, if we run dotnet run --environment Development then the application will set ASPNETCORE_ENVIRONMENT to Development. When we try it out we are going to see that the application will override the variable’s previous value (Production) with Development:
Using Launch Settings to Set the Environment Variable
Now that we know how to set the environment variable through the OS and through CLI arguments, let’s take a look at another way. In this section, we are going to set it through the launchSettings.json file. This method will override every other configuration.
This is a useful way of setting environments because it allows us to organize multiple profiles with their respective project settings and environment variables.
Now, we are going to define profiles that can be used when we run our application. Let’s begin by modifying the profiles section of launchSettings.json:
{
  "iisSettings": {
    "windowsAuthentication": false,
    "anonymousAuthentication": true,
    "iisExpress": {
      "applicationUrl": "http://localhost:34078",
      "sslPort": 44321
    }
  },
  "profiles": {
    "IIS Express": {
      "commandName": "IISExpress",
      "launchBrowser": true
    },
    "Development": {
      "commandName": "Project",
      "launchBrowser": true,
      "applicationUrl": "https://localhost:5001;http://localhost:5000",
      "environmentVariables": {
        "ASPNETCORE_ENVIRONMENT": "Development"
      }
    },
    "Production": {
      "commandName": "Project",
      "launchBrowser": true,
      "applicationUrl": "https://localhost:5001;http://localhost:5000",
      "environmentVariables": {
        "ASPNETCORE_ENVIRONMENT": "Production"
      }
    }
  }
}
Within the Development profile, we are defining the ASPNETCORE_ENVIRONMENT with a value of Development. When we execute the dotnet run command, the value in the launch profile will overwrite the environment variable we define through the terminal. By default, the command will launch the first profile it finds with a commandName value of Project.
So we are expecting the application to run in the Development environment when we execute the dotnet run command:
To run the application in the production environment, we are going to add an argument --launch-profile Production.
Now, let’s try to run the application in the production environment:
dotnet run --launch-profile Production
On Visual Studio for Mac, we are going to see that modifying the launchSettings.json file will give us the option to choose between our launch profiles:

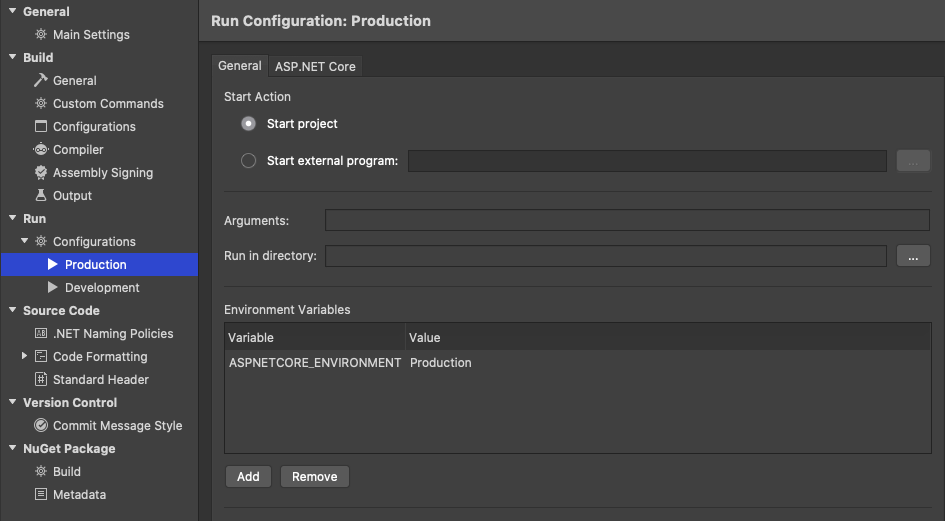
Additionally, we can define the value of the environment by navigating to the “Project” menu and selecting “MultipeEnvsExample Options”:
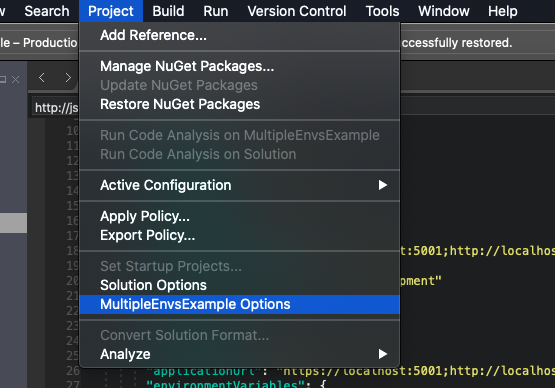
Then, under the “Configurations” menu, we can choose the profile we want to configure:
Now, we know how to define and organize multiple environments!
So far, so good!
Accessing the Environment in the Startup Class
Now, we are going to see how to use our environments to manipulate our application. Currently, our application displays a debugging page whenever there is an error. This is great while we’re working in the development environment.
But, what about the production environment?
For the production environment, we want to display a custom error page. To do this, we are going to explore two methods: dependency injection and method conventions in the Startup class.
But first, we are going to create our custom error page.
Let’s create the ErrorViewModel class under the Models directory if we don’t already have one:
public class ErrorViewModel
{
    public string RequestId { get; set; }

    public bool ShowRequestId => !string.IsNullOrEmpty(RequestId);
}
We are defining the ErrorViewModel with a property of type string and a property of type boolean. We are going to use this model in our error page.
Let’s create the Error.cshtml file under the Views/Shared directory if we don’t already have one:
@model ErrorViewModel
@{
    ViewData["Title"] = "Error";
}

<h1 class="text-danger">Error.</h1>
<h2 class="text-danger">An error occurred while processing your request.</h2>

@if (Model.ShowRequestId)
{
    <p>
        <strong>Request ID:</strong> <code>@Model.RequestId</code>
    </p>
}
When the error view is requested, we are going to see a generic message and the id associated with that request.
Now, let’s create an action method that returns the error view by adding a new action to the HomeController.cs:
public IActionResult Error()
{
    return View(new ErrorViewModel { RequestId = Activity.Current?.Id ?? HttpContext.TraceIdentifier });
}
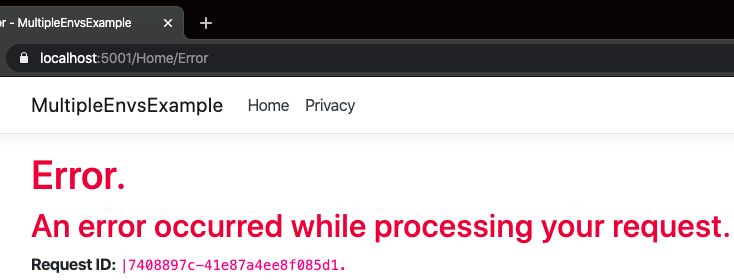
After we start our application and navigate to https://localhost5001/Home/Error and we should see our error page:
By Dependency Injection in the Startup Class
However, we want our error page to display when an error occurs in the production environment. The simplest way to do this by taking advantage of dependency injection in the Startup class.
Let’s go ahead and modify Startup.cs:
public void Configure(IApplicationBuilder app, IHostEnvironment env)
{
    if (env.IsEnvironment("Development"))
    {
        app.UseDeveloperExceptionPage();
    }
    else
    {
        app.UseExceptionHandler("/Home/Error");
        app.UseHsts();
    }
    // more code below
}Using the DI we supply an argument of type IHostEnvironment into the Configure method. Then we use a simple if-else structure to determine which page is displayed by using the IsEnvironment method. This method checks which environment we are using. If it is set to Development then we use the developer exception page. For any other environment, we use an exception handler pointing to the custom error page.
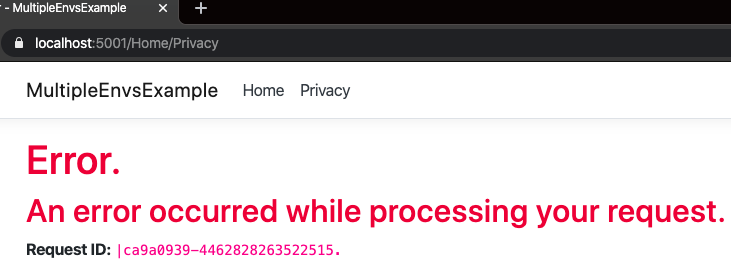
After starting the application in the production environment and clicking on Privacy, an error is simulated and we see our custom error page:
It’s also possible to use the DI in the Startup class itself rather than just in the Configure method for a wider-scoped IHostEnvironment variable:
private readonly IHostEnvironment _env;
public Startup(IConfiguration configuration, IHostEnvironment env)
{
    Configuration = configuration;
    _env = env;
}
Now, it’s accessible throughout the entire class!
By Startup Method Conventions
As our project gets more complicated our if-else structure will get bloated and difficult to maintain. To avoid this, we are going to use the Startup method conventions.
How does this convention work?
There are two key methods in the Startup class: Configure and ConfigureServices. However, in the Startup class, these methods support environment-specific versions. For example, in the development environment, ASP.NET Core would look for the ConfigureDevelopment and the ConfigureDevelopmentServices methods before the default Configure and ConfigureServices methods.
Let’s try to implement this convention by rewriting Startup.cs:
public class Startup
{
    public Startup(IConfiguration configuration)
    {
        Configuration = configuration;
    }

    public IConfiguration Configuration { get; }

    public void SharedConfigureServices(IServiceCollection services){
        services.AddControllersWithViews();
    }
    public void ConfigureDevelopmentServices(IServiceCollection services)
    {
        SharedConfigureServices(services);
    }
    public void ConfigureServices(IServiceCollection services)
    {
        SharedConfigureServices(services);
    }

    public void SharedConfigure(IApplicationBuilder app)
    {
        app.UseHttpsRedirection();
        app.UseStaticFiles();

        app.UseRouting();

        app.UseAuthorization();

        app.UseEndpoints(endpoints =>
        {
            endpoints.MapControllerRoute(
                name: "default",
                pattern: "{controller=Home}/{action=Index}/{id?}");
        });
    }
    public void ConfigureDevelopment(IApplicationBuilder app)
    {
        app.UseDeveloperExceptionPage();
        SharedConfigure(app);
    }

    public void Configure(IApplicationBuilder app)
    {
       app.UseExceptionHandler("/Home/Error");
       app.UseHsts();
       SharedConfigure(app);
    }
}
There’s a lot of changes that were made, but we are going to work our way through them slowly.
First, we define the SharedConfigureServices method. This method contains the common configuration related to the application’s services across all environments. The application calls the ConfigureDevelopmentServices method when we are in the development environment. In any other environment, the application calls the ConfigureServices method.
Next, we define the SharedConfigure method. This method contains the common configurations related to the application’s request pipeline across all environments. The application calls the ConfigureDevelopment method when it is set to development. In any other environment, the application calls the Configure method. The default Configure method configures the application with the custom error page. The ConfigureDevelopment method configures the application with the debugging page.
When we run the application in the production environment and navigate to the privacy page, we are going to see our custom error page:
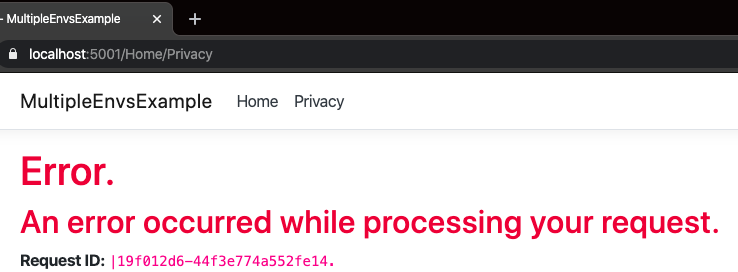
When we run the application in the development environment and navigate to the privacy page, we are going to see the debugging page:
Accessing the Environment with the Tag Helper
There’s one more way to use our environments. Using them in the Startup class is great for making project-wide changes.
But what if we only want to make small changes?
Now, we come to the tag helper.
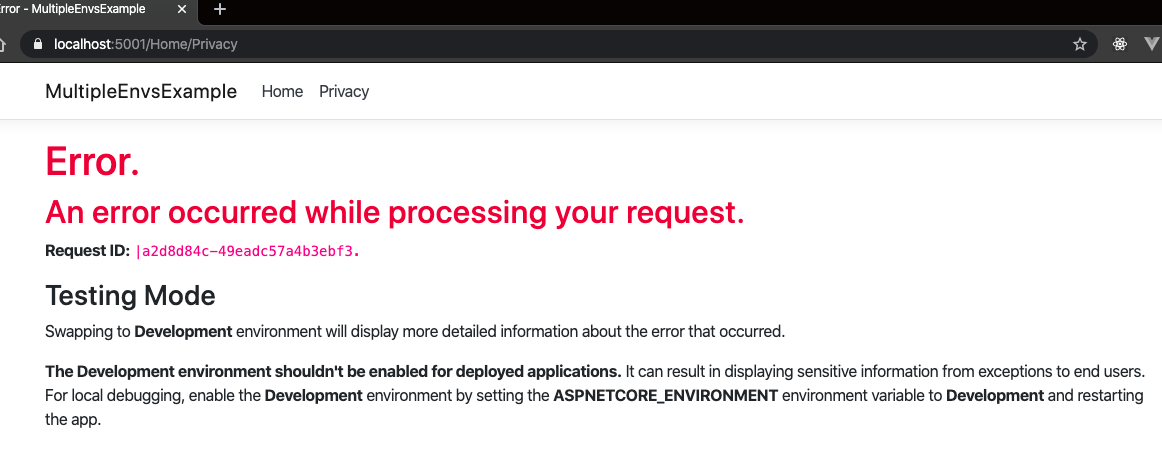
This is a great way to take advantage of our environment to make small changes to our code. For example, we want to display a little extra information on the error page when the environment is set to Testing.
To do this, let’s modify Error.cshtml by adding this code to the bottom of the file:
<environment names="Testing,">
<h3>Testing Mode</h3>
<p>
    Swapping to <strong>Development</strong> environment will display more detailed information about the error that occurred.
</p>
<p>
    <strong>The Development environment shouldn't be enabled for deployed applications.</strong>
    It can result in displaying sensitive information from exceptions to end-users.
    For local debugging, enable the <strong>Development</strong> environment by setting the <strong>ASPNETCORE_ENVIRONMENT</strong> environment variable to <strong>Development</strong>
    and restarting the app.
</p>
</environment>
The environment tag checks if the environment variable is set to one of the values in the names attribute. When we are in the testing environment all the content within the tag is going to be rendered.
To test this, let’s go ahead and add a testing profile to launchSetting.json:
"Testing": {
      "commandName": "Project",
      "launchBrowser": true,
      "applicationUrl": "https://localhost:5001;http://localhost:5000",
      "environmentVariables": {
        "ASPNETCORE_ENVIRONMENT": "Testing"
      }
}
And that’s it!
After we start our application with the testing profile and navigate to the privacy page, we should see our custom error page with the additional content unique to the testing environment:
Conclusion
We have successfully defined, organized, and implemented environments in our ASP.NET Core application. These are useful tools when you start deploying your application to testing, staging, or production servers. Remember, you can define as many environments as needed and name them whatever you think is most convenient.
In summary, we have covered how to use:
- Environments
- Environment variables
- CLI arguments to read environments at runtime
- Environments via the Startup class
- Environments via tag helpers

