

In this article, we are going to show what we consider to be the best practices in Angular while develop the client side project in this framework. During the development process it is really easy to forget about some rules or recommendations in Angular, so having the reference to look at from time to time is a good way to refresh memory.
Without further ado, let’s dive right into it.
In this blog post, we are going to go through the following sections:
- Angular CLI
- Files and Folders in Angular Project
- Angular Coding Practices
- Module Organization and Lazy Loading
- Components, Decorators, Directives, and Lifecycle
- Services
- HTTP
- Environment Variables
- Conclusion
Angular CLI
We would always recommend using the Angular CLI tool while working with the Angular project.
Why is that?
Well, it will increase our productivity for sure. Angular CLI has its own set of commands for creating the Angular project, creating components, modules, services etc…
Not only that we are creating our components faster with Angular CLI, but it will reference those components into their own modules and will comply to the naming convention as well, so we don’t have to worry about it.
We can use a basic set of commands to generate our components but every command has its own options. For example, if we want to generate a component we would type:
ng g component example_component
It is going to generate 4 files for us. The component file, html file, css file, and the spec file. The last one is for testing purposes. If we don’t want to have that last one created we can just add the flag:
--skipTests(don’t use --spec false because it is depreciated). By doing this Angular CLI will not generate the spec file at all. This is just one of the options.
We may find more about Angular CLI on https://github.com/angular/angular-cli
Files and Folders in Angular Project
Let’s see how to name our files and classes and how to organize the folder structure in an Angular project.
File Naming
While creating our files, we should pay attention to the file names. Names should be consistent with the same pattern in which we mention the file’s feature first and then the type, dot separated.
For example home.component.ts or home.component.html or auth.service.ts …
If we want to add more descriptive names to our files we should use a dash(-) to separate the words in the name: menu-admin-user.component.ts…
Class Names
When we add names to our classes, we should use upper camel case style with the added suffix that represents the type of our file:
export class DatepickerDirective
export class HomeComponent
export class RepositoryService
Folder Structure
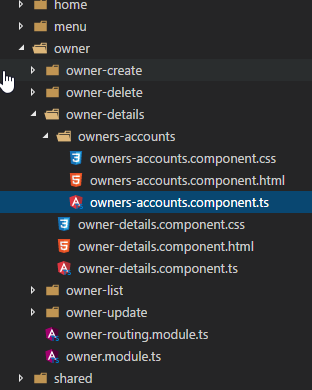
Our files should reside in the folders named by the feature they represent. This is very important because we can easily identify which business logic we have implemented in those files inside our descriptive folders:
Angular Coding Practices
In this part, we are going to explain how to organize components in a single file and what are the benefits of using interfaces, immutability and writing clean and small functions.
Single Responsibility Principle
It is very important not to create more than one component, service, directive… inside a single file. Every file should be responsible for a single functionality. By doing this, we are keeping our files clean, readable and maintainable.
Using Interfaces
If we want to create a contract for our class we should always use interfaces. By using them we can force the class to implement functions and properties declared inside the interface. Let’s take for example OnInit interface and its implementation:
export interface OnInit {
    ngOnInit(): void;
}
export class HomeComponent implements OnInit {

  constructor() { }

  ngOnInit() {

}
Using interfaces is a perfect way of describing our object literals. If our object is of an interface type, it is obligated to implement all of the interface’s properties. We shouldn’t name our interfaces with the starting capital I letter as we do in some programming languages.
export interface User {
    name: string;
    age: number;
    address: string;
}
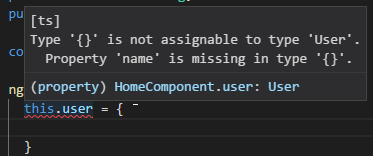
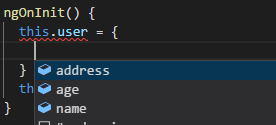
The TypeScript will show an error if an object doesn’t contain all of the interface’s properties, and light up intellisense for us while populating that object:
public user: User;
We can specify optional properties, by using the question mark (?) inside an interface as well. We don’t need to populate those properties inside an object:
additionalData?: string;
Using Immutability
Objects and arrays are the reference types in javascript. If we want to copy them into another object or an array and to modify them, the best practice is to do that in an immutable way.
By modifying reference types immutably, we are preserving the original objects and arrays and modifying only their copies.
The easiest way to modify objects and arrays immutably is by using the es6 spread operator (…) :
this.user = {
  name: 'Dzon',
  age: 25,
  address: 'Sunny street 34'
}
let updatedUser = {
  ...this.user,
  name: 'Peter'
}
We are deep copying the user object and then just overriding the name property.
Let’s take a look at how to use the spread operator with arrays:
public results = [10, 12, 14];

let newNumbers = [...this.numbers, 45, 56];
Now if we remove or modify any of the numbers from the newNumbers array, the original array is going to be preserved with all of its values.
Small Functions and Access Modifiers
Whenever we create our functions to execute some business logic, we should keep them small and clean. Small functions are easier to test and reuse. Furthermore, it is much easier to understand and maintain functions with fewer lines of codes. If we notice that our function is becoming too crowded it is a time to create a new one.
It is very important to distinguish the functions and properties that we are going to use only in our components from those that we are going to call from our template file. Those properties and functions, which we are going to reference from the template should always have the public access modifier. The private ones will be visible to the HTML template as well, but it is not a good practice due to AoT compilation failure.
Constructor Usage
We should use the constructor method to set up Dependency Injection for our services and that is pretty much it. We shouldn’t be doing any work inside it, especially fetching the data from the server. For this type of actions, we have the lifecycle hooks in Angular.
Even though we can use the service injection inside the constructor:
private router: Router;

constructor(routerParam: Router) {
  this.router = routerParam;
}
The much better and the recommended way is:
constructor(private router: Router) {}
Safe Navigation Operator (?) in HTML Template
To be on the safe side we should always use the safe navigation operator while accessing a property from an object in a component’s template. If the object is null and we try to access a property, we are going to get an exception. But if we use the save navigation (?) operator, the template will ignore the null value and will access the property once the object is not the null anymore.
<div class="col-md-3">
  {{user?.name}}
</div>
Module Organization and Lazy Loading
Modules are very important in an Angular project, so let’s talk about that and lazy loading and shared modal features.
Multi Modules in Application
Even though an Angular application is going to work just fine if we create just one module, the recommendation is to split our application into multi-modules. There are a lot of advantages to this approach. The project structure is better organized, it is more maintainable, readable and reusable and we are able to use the lazy-loading feature.
Routing Module
The best practice for Angular application is to use a separate routing module for the router:
const appRoutes: Route[] = [
  { path: 'home', component: HomeComponent },
  { path: '404', component: NotFoundComponent }
]

@NgModule({
  imports: [
    CommonModule,
    RouterModule.forRoot(appRoutes)
  ],
  exports: [RouterModule]
})
export class AppRoutingModule { }
And then to register this new routing module in our app module:
import { AppRoutingModule } from './app-routing.module';

imports: [
  AppRoutingModule
]
Lazy Loading
If we have a multi-modular application, implementing a lazy loading feature is recommended. The great advantage of a lazy loading approach is that we can load our resources on demand and not all at once. This helps us in decreasing the startup time. Modules that we are loading in a lazy manner will be loaded as soon as a user navigates to their routes.
Let’s show how to set up lazy loading in our module:
const appRoutes: Route[] = [
  { path: 'home', component: HomeComponent },
  { path: 'owner', loadChildren: "./owner/owner.module#OwnerModule" },
]
In this code example, the
HomeComponent is loading eagerly but the OwnerModule and all the components registered in that module are loading in a lazy manner.
If you want to learn more about the lazy loading feature you may read our blog post about lazy loading.
Shared module
If we have components, directives or pipes in our project, which we want to share through the entire project, the best way to do that is to register them inside the shared module file. Then, we need to register the shared module inside the app module. It is important not to register services, that we want to use globally, in a shared module. We should register such services inside its own feature module or in the app module.
But, if we need any service registered inside a shared module, the best way is to provide it through the static forRoot() method that returns the ModuleWithProviders interface:
imports and @NgModule and exports part...

export class SharedModule {
  static forRoot(): ModuleWithProviders {
    return {
      ngModule: SharedModule,
      providers: [ AnyService ]
    };
  }
}
Now, we can register this shared module in our app module with the following syntax:
SharedModule.forRoot().
It is also important to export our components, directives, and pipes that we register in the shared module:
@NgModule({
  imports: [
    CommonModule
  ],
  declarations: [
    ErrorModalComponent,
    SuccessModalComponent,
    DatepickerDirective
  ],
  exports: [
    ErrorModalComponent,
    DatepickerDirective,
    SuccessModalComponent
  ]
})
export class SharedModule { }
Components, Decorators, Directives, and Lifecycle
Let’s explain how to structure the files in ou components and why to use directives and lifecycle hooks.
Component’s Files Separation
While creating our components, it is very important to separate the component, template and styling logic into the separate files. Even though we have the possibility to keep all of it inside the component file this is not a good idea.
So, we shouldn’t be doing something like this:
@Component({
  selector: 'app-home',
  template: `
  <div class="col-md-12">
    <p class="homeText">{{homeText}}</p\>
  </div>`,
  styles: [`
  .homeText{
    font-size: 35px;
    color: red;
    text-align: center;
    position: relative;
    top:30px;
    text-shadow: 2px 2px 2px gray;
}
  `]
})
Instead, we should separate styles and HTML in their own files and import them:
@Component({
  selector: 'app-home',
  templateUrl: './home.component.html',
  styleUrls: ['./home.component.css']
})
Reusable Components and Decorators
Creating reusable components is one of the best techniques we can use while developing our project. We can reuse those types of components inside any parent component and pass the data through the @Input decorator. Those components can emit events by using the @Output decorator and EventEmmiter class. Here is an example of the @Input and @Output decorators in action:
export class SuccessModalComponent implements OnInit {
  @Input() public modalHeaderText: string;
  @Input() public modalBodyText: string;
  @Input() public okButtonText: string;
  @Output() public redirectOnOK = new EventEmitter();

  constructor() { }

  ngOnInit() {
  }

  public emmitEvent(){
    this.redirectOnOK.emit();
  }
To learn more about decorators in angular and how to use them to create reusable components, you may read Child components, @Input, @Output Decorators.
Code Simplicity in Components
To keep our components readable and easy maintainable we should write a clean code inside them. We should limit the logic in the component to satisfy the template needs and nothing more. No additional complicated business logic is required. If we need additional logic, we should extract it into service. That way our component remains clean and the extra code could be reused in other components. Furthermore, the logic inside a service can be easily tested and it hides an implementation of the component, thus making a component more readable.
Using Directives
Whenever we have a situation where multiple HTML elements have the same behavior (for example: when we hover over the element it receives the blue color), we should consider using attribute directives. We shouldn’t repeat the hover logic every time we need it on some HTML element. A much better way would be to create a directive and then just reuse it on the particular element.
Directive creation is quite simple:
import { Directive, ElementRef, HostListener, Input } from '@angular/core';

@Directive({
  selector: '[appHover]'
})
export class HoverDirective {

  @Input() public hoverColor: string;

  constructor(private element: ElementRef){}

  @HostListener('mouseenter') onMouseEnter(){
    this.highlightElement(this.hoverColor);
  }

  @HostListener('mouseleave') onMouseLeave(){
    this.highlightElement(null);
  }

  private highlightElement(color: string){
    this.element.nativeElement.style.backgroundColor = color;
  }
}
We need to register this directive in a required module and to call it in HTML template file:
<p appHover [hoverColor]="'blue'">this is hoverable text</p>
Using Lifecycle Hooks
Lifecycle hooks play a very important part of Angular development. We should use them whenever we have an opportunity to. For example, if we need to fetch some data from a database as soon as our component is instantiated, we should use ngOnInit() lifecycle hook and not the constructor.
If we have some logic inside child components and we want to execute that logic as soon as decorator parameters are modified, we can use ngOnChanges() lifecycle hook.
If we need to clean up some resources as soon as our component is destroyed, we should use ngOnDestroy() lifecycle hook.
Even though we don’t have to implement interfaces to use the lifecycle hooks, we are better off implementing them.
So don’t do something like this:
export class OwnerListComponent {

  constructor() { }

  ngOnInit() {
    this.getAllOwners();
  }
Instead, implement it like this:
export class OwnerListComponent implements OnInit {

  constructor() { }

  ngOnInit() {
    this.getAllOwners();
  }
Services
Let’s talk a bit more about services, how to use them, why to use them and how to provide them.
Service Usage
Services provide a great way to connect two unrelated components. To configure services for this, the best way is to register them is as a singleton. Furthermore, services are a great way to extract the code from our components, thus making components more readable and maintainable. We may use a service to extract the code related to the component in which that service is provided or to share reusable code with that service between different components.
Single Responsibility
Services in Angular should be implemented with the single responsibility principle in mind. Service shouldn’t be responsible for multiple actions or features. Just the opposite. As soon as we notice that our service starts to exceed the singular purpose, we should create another service.
Just a simple example.
If we want to send the HTTP requests, we should create a service as a centralized place for that kind of actions. But we shouldn’t handle errors inside the same service. We should create another one for that error handling.
By creating services to concur to the single responsibility principle, we are making the code more readable, easier to test and to maintain.
Service Providing
If we want to use our service as a singleton, then we should provide that service at the root of our application. That way Angular creates a single, shared instance of our service, available for all components.
Since Angular v6, if we create a service with the Angular CLI command: ng g service service_name, it will create a service with the providedIn metadata with the “root” value:
import { Injectable } from '@angular/core';

@Injectable({
  providedIn: 'root',
})
export class HeroService {

  constructor() { }

}
By providing such a service means that we don’t have to import it in the
app.module file or to provide it in providers array inside the same file.Of course, if we need it, we can do it that way as well. We can register our service at different levels.
For example in a component level:
import { Component } from '@angular/core';
import { ErrorHandlerService } from './shared/services/error-handler.service';

@Component({
  selector: 'foo-root',
  templateUrl: './foo.component.html',
  styleUrls: ['./foo.component.css'],
  providers: [ErrorHandlerService]
})
Or in a module level:
import { TestserviceService } from './testservice.service';

@NgModule({
  declarations: [
    AppComponent,
    HomeComponent
  ],
  imports: [
    BrowserModule,
    HttpClientModule,
    AppRoutingModule
  ],
  providers: [
    TestserviceService
  ],
  bootstrap: [AppComponent]
})
export class AppModule { }
HTTP
Let’s talk more about HttpClient Module and how to use HTTP requests in our services.
Using the HttpClient Module
Since Angular v4.3, we have a new and better way to handle HTTP requests with the HttpClient library. Even though the old HttpModule library is working just fine, it is a recommendation to switch to HttpClient. From Angular v6 is even more recommended to switch to the HttpClient library.
The way of using the HttpClient library is the same as with the old one. First, we import it into your app module:
import { HttpClientModule } from '@angular/common/http';Then register it in the imports array in the same file:
imports: [
  HttpClientModule
]
After that, we need to import it into the service we want to use HttpClient in:
import { HttpClient } from '@angular/common/http';Finally, we need to register it inside the constructor method in that service:
constructor(private http: HttpClient) { }With the HttpClient library, we receive additional benefits. Error handling is much easier by using HttpErrorResponse class. Moreover, we have the ability to listen to the progress events and we have interceptors which allow us to intercept the HTTP requests.
Services to Work with HTTP Requests
Even though we can work with the HTTP requests inside our components, the recommended way is to do that by using a service. Sending HTTP requests isn’t always that simple. Many times we have to set up the headers of the request to track the progress of the request etc…
In such cases, we should transfer the HTTP handling responsibility from the component to the service. We may even create a service as a centralized place to handle the HTTP requests, and then to use that service in our application.
For more details on how we do that, you can read: https://code-maze.com/net-core-web-development-part9/#angularRepository
Environment Variables
If we develop an Angular application which will be deployed in the production environment, the environment variables inside the Angular project can be very helpful. We can set up those variables to distinguish the end-points between development and production environment.
For example, our endpoint in the development environment could be http://localhost:5000 and in production environment http://www.examplesite.com. Environment variables inside the Angular project help us with those endpoints while we work with the HTTP requests.
Once we set up those environment variables, we can use them in our repository service, and never worry which endpoint will our HTTP requests use for which environment again.
If you want to learn more about how to use and set up environment variables in Angular, you can read https://code-maze.com/net-core-web-development-part9/#environmentFiles.
Conclusion
In this article, we wanted to bring you closer to what the recommendations while developing our Angular project are. Of course, these are not all the Angular best practices but we tried to round up the most important ones in this article.
Are these the best practices you already use? We are eager to hear if we missed some practice you consider to be important, so leave us a comment below.
Thank you for reading the article and I hope you found something useful in it.

Thanks for sharing such amazing information and i hope you keep on share such kind of useful information daily
How to add meta title and meta description in Angular 6
Fantastic Article.. Thanks a lot
You are very welcome. Best regards.
Thanks for sharing! Angular is a bit new for me, and it is good to know some good practices ^^
You are welcome Drax. You can also give a try to our Angular Tutorial where we consume the ASP.NET Core Web API, maybe you find something useful in there too. Best regards.
Thanks for sharing
Thank you for reading
Good Article, Thanks for sharing
Thank you. I am glad you like it.
I do not understand what it means to not register the service in the shared module. Because if I have a shared Component with an shared service this shared service has to be registered in the shared module?
Hello Stephan. First of all, thank you for reading this post.
If you have a shared Component it is OK to register it inside shared module because this module will be registered inside your root module. But services, especially from angular v6, are now provided by creation in a root module so it will be available globally. So if you want your service to be shared globally in your app, you shouldn’t register it inside Shared module. But if you have a service needed in a Shared module, than you can register it there but the best way is to use ModuleWithProviders interface and to create forRoot static method in your shared service. Than you can register your your shared module in app module like this: ShareModule.forRoot(). By doing this, you will provide only one instance of your service.
I hope that I made clearer what I meant to say. But if you have any different idea, feel free to write it here, I am always eager to learn more. All the best Stephan.
For more code organization Can we wrap all the services in a ‘core’ module and import that core module in appmodule..?