

SingalR is a library that helps us provide real-time web functionality to our applications. This means that our server can push data to any connected client as soon as that data is provided, in real-time, and vice versa.
In this article, we are going to show you how to use SignalR with .NET Core and Angular through a practical example.
We are going to simulate a real-time data flow by using the Timer class in .NET Core and use that data to change the states of our Angular charts in real-time as well. For this example, we are going to use only one-way communication (from the server to the client), but we will add an additional feature to the example, to show the two-way communication as well (client-server-client).
If you want to watch a video on this topic, you can do that as well:
VIDEO: .NET Core with SignalR and Angular - Real-Time Charts video.
So, without further ado, let’s get started.
Creating Projects and Basic Configuration
First thing first.
Let’s create both the .NET Core and Angular projects. We are going to name them RealTimeCharts.Server and RealTimeCharts.Client respectively. For the .NET Core project, we are going to choose a Web API empty project and for the Angular side, we are creating an Angular project with no routings created and CSS for the styles. To learn more about .NET Core, you can read the .NET Core Web API Tutorial. For the detailed Angular development guide, you can read Angular Tutorial.
As soon as projects are created, we are going to switch to the server-side project and set up a basic configuration. To do that, let’s open the launchSettings.json file and modify it accordingly:
{
  "profiles": {
    "RealTimeCharts.Server": {
      "commandName": "Project",
      "dotnetRunMessages": true,
      "launchBrowser": false,
      "applicationUrl": "https://localhost:5001;http://localhost:5000",
      "environmentVariables": {
        "ASPNETCORE_ENVIRONMENT": "Development"
      }
    }
  }
}
Our server-side project will run on localhost:5001 and the client side will run on localhost:4200, so in order to establish communication between those two, we need to enable CORS. Let’s open the Program class and modify it:
builder.Services.AddCors(options =>
{
    options.AddPolicy("CorsPolicy", builder => builder
        .WithOrigins("http://localhost:4200")
        .AllowAnyMethod()
        .AllowAnyHeader()
        .AllowCredentials());
});

builder.Services.AddControllers();

var app = builder.Build();

// Configure the HTTP request pipeline.

app.UseHttpsRedirection();

app.UseCors("CorsPolicy");

app.UseAuthorization();
Please note that we are not using the AllowAnyOrigin() method to enable cors from any origin, but we explicitly say which origin to allow WithOrigins(“http://localhost:4200”). We are doing this because from .NET Core 3.0 the combination of AllowAnyOrigin and AllowCredentials is considered as an insecure CORS configuration. For a more detailed guide about the CORS in .NET Core, you can read Enabling CORS in ASP.NET Core.
One additional thing. It is important to call the UseCors method before the UseAuthorization method.
That is it regarding the configuration. Let’s move on to the next part.
SignalR Installation, Hub, and Configuration
We need to install the SignalR library for the client side. To do that, we are going to open the Angular project in the Visual Studio Code and type the following command in the terminal window:
npm install @microsoft/signalr --save
That is it for now regarding the client side.
Let’s switch back to the server-side project and create a new folder Models. In that folder, we are going to create a new class ChartModel and modify it:
public class ChartModel
{
    public List<int> Data { get; set; }
    public string? Label { get; set; }
    public string? BackgroundColor { get; set; }

    public ChartModel()
    {
        Data = new List<int>();
    }
}
This form of data is expected by the Angular Charts library (which is yet to be installed), thus the model properties Data and Label.
Having the model prepared, we are going to continue by creating a new folder HubConfig and inside a new class ChartHub:
public class ChartHub : Hub
{
}
As we can notice, our ChartHub class must derive from the Hub class, which is a base class for the SignalR hub. But why do we need this ChartHub?
Well, a Hub is a high-level pipeline that allows communication between client and server to call each other methods directly. So basically, a Hub is a communication foundation between client and server while using SignalR.
Right now our ChartHub class is empty because we don’t need any methods inside it, yet.
To complete the SignalR configuration, let’s modify the Program class again:
builder.Services.AddSignalR();

...

app.MapControllers();
app.MapHub<ChartHub>("/chart");
In the first part, we add SignalR to the IService collection using the AddSignalR method. And then, we add SignalR to the request pipeline by pointing to our ChartHub with the provided /chart path.
Timer Implementation with DataManager and ChartController
To simulate a real-time data flow from the server, we are going to implement a Timer class from the System.Threading namespace. Let’s create a new folder TimerFeatures and inside it a new class TimerManager:
public class TimerManager
{
    private Timer? _timer;
    private AutoResetEvent? _autoResetEvent;
    private Action? _action;
    public DateTime TimerStarted { get; set; }
    public bool IsTimerStarted { get; set; }

    public void PrepareTimer(Action action)
    {
        _action = action;
        _autoResetEvent = new AutoResetEvent(false);
        _timer = new Timer(Execute, _autoResetEvent, 1000, 2000);
        TimerStarted = DateTime.Now;
        IsTimerStarted = true;
    }

    public void Execute(object? stateInfo)
    {
        _action();

        if ((DateTime.Now - TimerStarted).TotalSeconds > 60)
        {
            IsTimerStarted = false;
            _timer.Dispose();
        }
    }
}
We are using an Action delegate to execute the passed callback function every two seconds. The timer will make a one-second pause before the first execution. Finally, we just create a sixty seconds time slot for execution, to avoid a limitless timer loop. If you want to learn more about delegates and how to use them to write better C# code, you can visit Delegates in C# article.
It is important to have a method that has one object parameter and returns a void result. The Timer class expects that kind of method in its constructor.
After the TimeManager implementation, let’s create a new DataStorage folder and inside it a new DataManager class. We are going to use this class to fake our data:
public class DataManager
{
    public static List<ChartModel> GetData()
    {
        var r = new Random();
        return new List<ChartModel>()
        {
            new ChartModel { Data = new List<int> { r.Next(1, 40) }, Label = "Data1", BackgroundColor = "#5491DA" },
            new ChartModel { Data = new List<int> { r.Next(1, 40) }, Label = "Data2", BackgroundColor = "#E74C3C" },
            new ChartModel { Data = new List<int> { r.Next(1, 40) }, Label = "Data3", BackgroundColor = "#82E0AA" },
            new ChartModel { Data = new List<int> { r.Next(1, 40) }, Label = "Data4", BackgroundColor = "#E5E7E9" }
        };
    }
}
Next, we have to register TimerManager as a service:
builder.Services.AddSingleton<TimerManager>();
Finally, to complete this section, we are going to create a new controller file ChartController inside the Controllers folder:
[Route("api/[controller]")]
[ApiController]
public class ChartController : ControllerBase
{
    private readonly IHubContext<ChartHub> _hub;
    private readonly TimerManager _timer;

    public ChartController(IHubContext<ChartHub> hub, TimerManager timer)
    {
        _hub = hub;
        _timer = timer;
    }

    [HttpGet]
    public IActionResult Get()
    {
        if (!_timer.IsTimerStarted)
            _timer.PrepareTimer(() => _hub.Clients.All.SendAsync("TransferChartData", DataManager.GetData()));
        return Ok(new { Message = "Request Completed" });
    }
}
In this controller class, we are using the IHubContext interface to create its instance via dependency injection. By using that instance object, we are able to access and call the hub methods. This is the reason why we don’t have any method in our ChartHub class. We don’t need any yet, because we are providing just one-way communication (the server is sending data to the client only), and we can access all the hub methods with IHubContext interface.
Furthermore, in the Get action, we are instantiating the TimerManager class and providing a callback function as a parameter. This callback function will be executed every two seconds.
Now, we have to pay attention to the _hub.Clients.All.SendAsync("transferchartdata", DataManager.GetData()) expression. With it, we are sending generated data to all subscribed clients to the transferchartdata event. This means that every client if it has a listener on the transferchartdata event, will receive data generated by the DataManager class. And that is exactly what we are going to do in the next section.
Angular Chart and SignalR Listener
We have currently finished our work on the server side, so let’s switch to the client side.
To use charts in Angular, we are going to install two required libraries. First ng2-charts:
npm install ng2-charts --save
And then chart.js:
npm install chart.js --save
And finally, let’s modify the app.module.ts file:
import { NgModule } from '@angular/core';
import { BrowserModule } from '@angular/platform-browser';
import { NgChartsModule } from 'ng2-charts';
import { HttpClientModule } from '@angular/common/http';

import { AppComponent } from './app.component';

@NgModule({
  declarations: [
    AppComponent
  ],
  imports: [
    BrowserModule,
    NgChartsModule,
    HttpClientModule
  ],
  providers: [],
  bootstrap: [AppComponent]
})
export class AppModule { }
Of course, the HttpClientModule is not required for the charts to work, but we are going to send the HTTP request to our server, so we need it.
To continue, we are going to create a service file for the sole purpose to wrap the SignalR logic:
ng g service services/signalr --skip-tests
Additionally, we are going to create an interface ChartModel:
export interface ChartModel {
  data: [],
  label: string
  backgroundColor: string
}
Having done that, let’s modify our service file:
import { Injectable } from '@angular/core';
import * as signalR from "@microsoft/signalr"
import { ChartModel } from '../_interfaces/chartmodel.model';

@Injectable({
  providedIn: 'root'
})
export class SignalrService {
  public data: ChartModel[];

  private hubConnection: signalR.HubConnection
    public startConnection = () => {
      this.hubConnection = new signalR.HubConnectionBuilder()
                              .withUrl('https://localhost:5001/chart')
                              .build();
      this.hubConnection
        .start()
        .then(() => console.log('Connection started'))
        .catch(err => console.log('Error while starting connection: ' + err))
    }

    public addTransferChartDataListener = () => {
      this.hubConnection.on('transferchartdata', (data) => {
        this.data = data;
        console.log(data);
      });
    }
}
First of all, we create the data array which will hold the data fetched from the server and will provide a data source for the chart. In the startConnection function, we build and start our connection as well as log the message in the console. Finally, we have the addTransferChartDataListener function in which we subscribe to the transferchardata event and accept the data from the server with the data parameter. If we take a look at the Get action in the ChartController file, we are going to see that we broadcast the data on the same transferchartdata event: (_hub.Clients.All.SendAsync("transferchartdata", DataManager.GetData())).
And yes, those must match.
All we have left to do, for now, is to modify the app.component.ts file:
import { Component, OnInit } from '@angular/core';
import { SignalrService } from './services/signalr.service';
import { HttpClient } from '@angular/common/http';

@Component({
  selector: 'app-root',
  templateUrl: './app.component.html',
  styleUrls: ['./app.component.css']
})
export class AppComponent {
  constructor(public signalRService: SignalrService, private http: HttpClient) { }

  ngOnInit() {
    this.signalRService.startConnection();
    this.signalRService.addTransferChartDataListener();
    this.startHttpRequest();
  }

  private startHttpRequest = () => {
    this.http.get('https://localhost:5001/api/chart')
      .subscribe(res => {
        console.log(res);
      })
  }
}
This logic is straightforward. We just start the connection, add our listener, and send a request towards the Get action on our server.
This should be our current result:
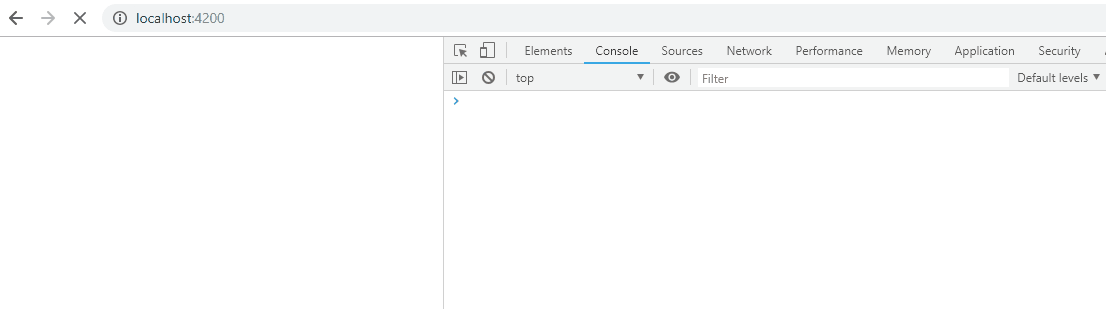
Excellent. We can see that our data is received in real-time and logged in the console window.
Of course, this is just part of our goal, so let’s get to the finish line.
To do that, let’s modify the app.component.html file:
<div style="display: block" *ngIf='signalRService.data'>
  <canvas baseChart
          [datasets]="signalRService.data"
          [labels]="chartLabels"
          [options]="chartOptions"
          [legend]="chartLegend"
          [chartType]="chartType"
</div>
And the app.component.ts file:
import { Component, OnInit } from '@angular/core';
import { SignalrService } from './services/signalr.service';
import { HttpClient } from '@angular/common/http';
import { ChartConfiguration, ChartType } from 'chart.js';


@Component({
  selector: 'app-root',
  templateUrl: './app.component.html',
  styleUrls: ['./app.component.css']
})
export class AppComponent {
  chartOptions: ChartConfiguration['options'] = {
    responsive: true,
    scales: {
      y: {
        min: 0
      }
    }
  };

  chartLabels: string[] = ['Real time data for the chart'];
  chartType: ChartType = 'bar';
  chartLegend: boolean = true;

  constructor(public signalRService: SignalrService, private http: HttpClient) { }

  ngOnInit() {
    this.signalRService.startConnection();
    this.signalRService.addTransferChartDataListener();
    this.startHttpRequest();
  }

  private startHttpRequest = () => {
    this.http.get('https://localhost:5001/api/chart')
      .subscribe(res => {
        console.log(res);
      })
  }
}
Now, our result should look like this:
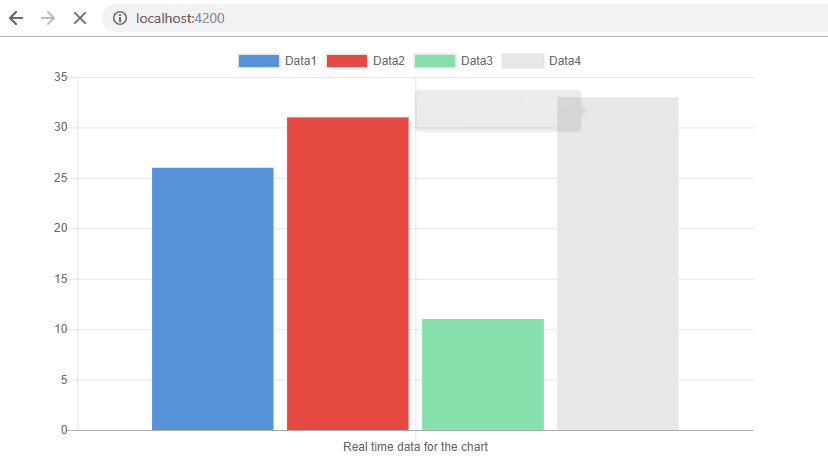
This looks great. Our application is working as intended.
Sending Data via SignalR from the Client to the Server and Back
Until now, we’ve broadcasted data only from the server to the client (one-way communication). But what if we want to send some data from the client to the server and then broadcast it to all the subscribed clients (all of that via SignalR)? Well, we can do that as well.
So let’s imagine that we want to send the current data to some API as soon as we click on our chart, and then display them on any other client. To cover that example, we could create another Angular app, but for the sake of simplicity, we are going to implement all of that in our current app.
So, the first thing we want to do is to modify the ChartHub class in .NET Core:
public class ChartHub : Hub
{
    public async Task BroadcastChartData(List<ChartModel> data) =>
        await Clients.All.SendAsync("broadcastchartdata", data);
}
Because we are starting the SignalR communication from the client, we need a hub endpoint to Invoke our data. This BroadcastChartData method will receive the message from the client and then broadcast that same message to all the clients that listen to the bradcastchratdata event.
The second step is to modify the service file in Angular:
import { Injectable } from '@angular/core';
import * as signalR from "@microsoft/signalr"
import { ChartModel } from '../_interfaces/chartmodel.model';

@Injectable({
  providedIn: 'root'
})
export class SignalrService {
  public data: ChartModel[];
  public bradcastedData: ChartModel[];

  private hubConnection: signalR.HubConnection
    public startConnection = () => {
      this.hubConnection = new signalR.HubConnectionBuilder()
                              .withUrl('https://localhost:5001/chart')
                              .build();
      this.hubConnection
        .start()
        .then(() => console.log('Connection started'))
        .catch(err => console.log('Error while starting connection: ' + err))
    }

    public addTransferChartDataListener = () => {
      this.hubConnection.on('transferchartdata', (data) => {
        this.data = data;
        console.log(data);
      });
    }

    public broadcastChartData = () => {
      const data = this.data.map(m => {
        const temp = {
          data: m.data,
          label: m.label
        }
        return temp;
      });

      this.hubConnection.invoke('broadcastchartdata', data)
      .catch(err => console.error(err));
    }

    public addBroadcastChartDataListener = () => {
      this.hubConnection.on('broadcastchartdata', (data) => {
        this.bradcastedData = data;
      })
    }
}
The first function will send data to our Hub endpoint and the second function will listen on the braodcastchartdata event.
The third step is to modify the app.component.ts file by adding a new function:
public chartClicked = (event) => {
  console.log(event);
  this.signalRService.broadcastChartData();
}
And finally, let’s provide the chartClicked event for our chart:
ngOnInit() {
  this.signalRService.startConnection();
  this.signalRService.addTransferChartDataListener();
  this.signalRService.addBroadcastChartDataListener();
  this.startHttpRequest();
}

private startHttpRequest = () => {
  this.http.get('https://localhost:5001/api/chart')
    .subscribe(res => {
      console.log(res);
    })
}

public chartClicked = (event) => {
  console.log(event);
  this.signalRService.broadcastChartData();
}
After all of the changes, we can inspect the result:
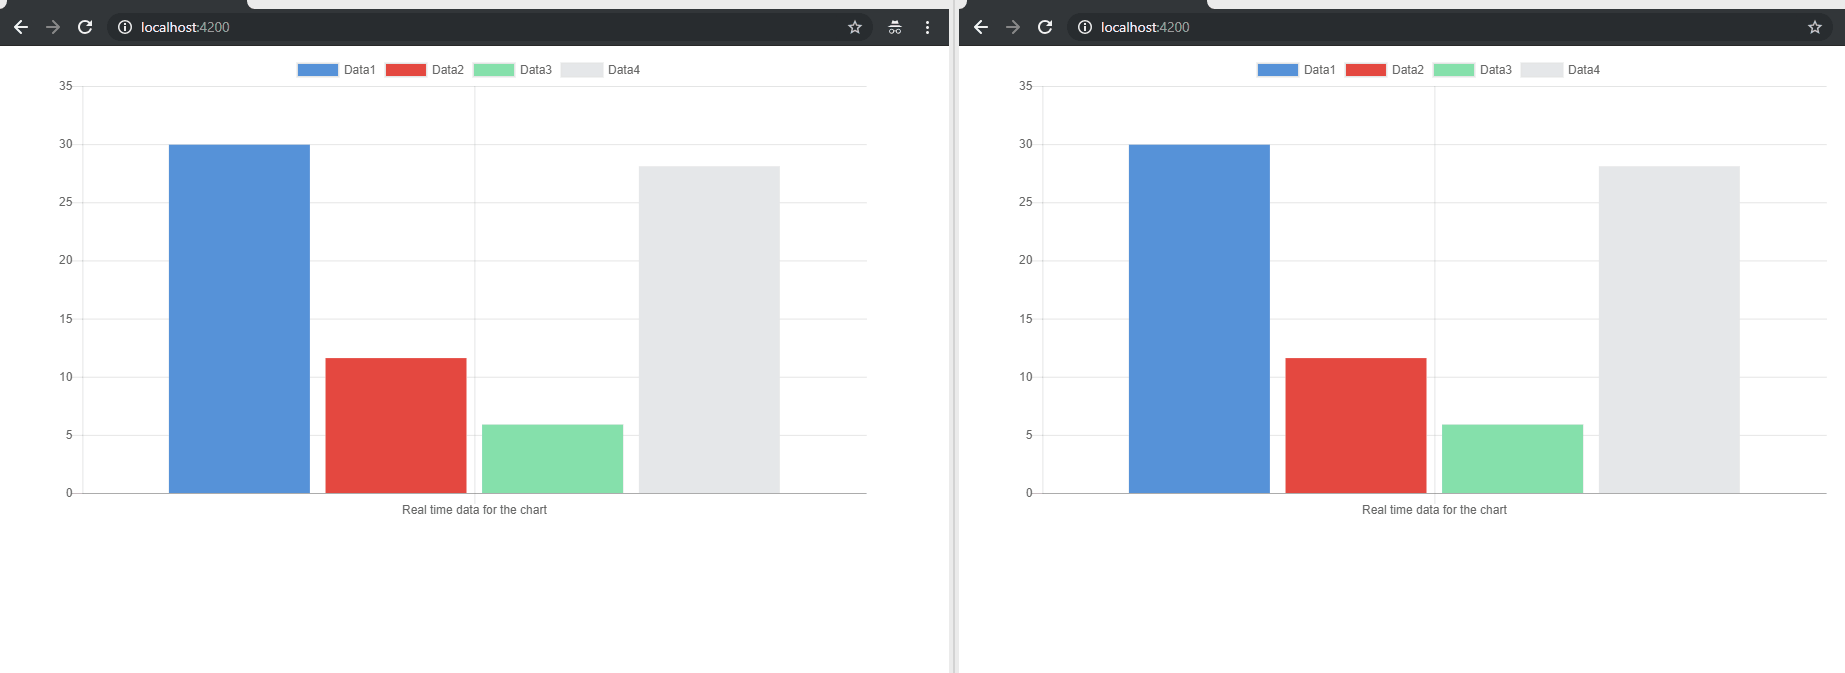
Excellent work. Everything works like a charm.
Of course, we can accomplish a lot more with SignalR and cover a whole load of features, but this is a good starting point for sure.
Conclusion
By reading this article, we’ve learned:
- How to install SignalR and prepare a basic configuration
- The way to use Timer in .NET Core
- How to provide a SignalR implementation on the client and server-side
- The way to use charts to consume real-time data sent via SignalR

Hi sir,
I follow the article it’s working on local but when I try to run it on my server (xxxx.azurewebsites.net) it is not working
Have any clue to find out what not working
Many tks.
I really can’t be sure what is the problem there. Maybe you can try reading this article: https://code-maze.com/net-core-web-development-part16/ since there we publish Angular with ASP.NET Core Web API app.
I am getting this error on the console:
am I missing something? Thank you for the article btw
Hello Semih. I really can’t tell like this. But that’s why we provide a source code. Just download it and inspect it (compare to yours). I am pretty sure you will find the issue that way pretty fast.
Found the issue, thanks Marinko.
I really get value from your site and have purchased your products. Both have been great learning tools. Thanks.
Thank you John. It’s really great to hear that especially when it comes from our readers. It means a lot to us.
change the import import * as signalR from “@aspnet/signalr”;
to import * as signalR from ‘@microsoft/signalr’;
Good job
Thank you very much.
I have a kind suggestion.. it would be great if you share your project github as well..
You have the source code at the top of the article. Link to our GitHub repo.
No words!! This is what called perfection… You deserves a best teacher award
Thanks a lot. I’m glad you like it.
You are an EXCELLENT lecturer with a fine presentation style. Thanks for this.
You are very welcome. Thank you too, for reading the article.
Hi,
timerManager is local variable. Why after finish Get method timer still work? It should be dispose as part of TimerManager.
Timer will be exposed after the 60 seconds from the start. Please check the implementation of the Execute method.
I see but …. My question is if controller method “Get” exit then TimerManager and timer in it should be disposed at some time because this is local variable. I see that timer continue to call delegate.
In a real-world application yes, you are right. But this was just an example to have something streaming data for 60 seconds. Basically, with this implementation, we are going to finish the get request in a milisecond and if we dispose the timer at that time, we won’t be able to see any data on the client side. So, as I said, this was just a simulation/test to help us show how SignalR works on both Server and Client side.
can i request hub over http not https
You can. But the https is recommended for security reasons.
Marinko,
Thanks for an awesome article! I tried running it on my end and the initial load is great: SignalR streaming data and chart is showing the right values; however, when I refresh on the page, the initial values are gone. Upon reading, it looks like SignalR does not keep the connection when a page is refreshed. Do you happen to know a fix for that?
Thank you!
I am not sure what do you mean about initial values are gone. When you refresh your app, the entire Angular application will restart, SingalR connection will be established again and stream data to the UI. But it will continue streaming the data, since you refreshed only the client app and not the server app.
hello thank you for the tutorial ..did the same think with some live data from sql server and it worked but i have one problem , i have added sidebar (angular material)and tried to call sql data but its refreshing automatically after every one second i don’t want that .. i just it should show the variation only when my sql data changes or new data has been added .. how to achieve this pls help me with this sir
I am really not aware of how the side navigation can have any influence on the SignalR services. This all depends on the way you implmented things in your project. Basically, SignalR calls should’nt refresh anything on the page. It should update only data sent through the channel. As you can see in our final example, once we click the bar on the chart, the data stay fixed on the screen even though the chart bars change. I am sorry, but I can’t help you since I don’t now anything about your implementation.
thank you for the reply.. i will try some different approach .. also this is my data manager class where im fetching loaded and unloaded with respect to line number from database… i have 12 lines in my database so basically 10 loaded and unloaded data .. i tested my sql query its correct and shows all the information but chart displays only last record(row) from database i want every row data on the chart … pls can you check where im doing the mistake https://uploads.disquscdn.com/images/112a48eb47a3b3582fe1f137ac847489c70b348e50ea8d2f080c55d0c64a4f52.png
hello.. now i’m storing the data in an array (as shown in the pic) objects which works fine .. but i have to add {LOADED[1]},Label=”Total Loaded”}, {UNLOADED[1]},Label=”Total Unloaded”}, for every record … how i can display existing records at a time … i’m array concepts freaking me out pls help if you know 😉 thank you
new ChartModel { Data = new List
new ChartModel { Data = new List
https://uploads.disquscdn.com/images/58a1e06e7bc0d8a7bb68815b139aa9eb739ff6e72c53737e4c766fa4d0865e2c.png
Well you have to send to the client a single number for each chart’s bar. So maybe you can get all of your data from the db and then create some custom logic to iterate through that list of data and every 100ms send the data to the client. Just saying… This is your custom solution and I can’t implement it here localy.
Hi Marinko, I am getting one issue. As it is visible in this demo also that we are getting the same data many times. Although the endpoint on the API hits only once i am getting the same data until i sto the server.
I want to get the data only once when i hit the API endpoint.
Please help.
Hello. I am sorry but I’m not following you. You are not getting a same data every time, you are getting different data (between 1 and 40) for all bars in the chart (4 of them). But that data is hardcoded just for the example purpose and in your real project you would fetch them from some other api or another resource. Regarding the “data only once when I hit the API” – well, don’t use SignalR then, just use a normal HTTP data transmission.
https://uploads.disquscdn.com/images/aa17da8c312b06a730bb33892028b0bec91797d3716a51b7e157728fc337f169.png
in the above link if you see we are getting stream of data and it is hitting this method
public addTransferChartDataListener = () => {
debugger;
this.hubConnection.on(‘transferchartdata’, (data) => {
this.data = data; // over here it is hitting multiple times
console.log(data);
this.hubConnection
.stop();
});
}
You are right. That function is subscriber on the transferchardata topic. SingalR sterams data from the server to that topic and this function subscribes to it. As I said, if you want just one respons from the server, you can remove the SignalR logic and just use the HTTP request response. Or just remove the timer from the server side and stream data only once. As I said, this project was created with the timer to simulate constant data flow from some external source.
Thanks Marinko. That really helped. I did not notice the timer and removing it worked. I am going with SignalR instead of HTTP request because I have to notify my Client whenever there is any change from the server side API(which is being used by other applications too) to the database.
Nice. I’m glad I could help.
Hi Marinko, Perfect walk throughs, thank you. I am learning SignalR and this tutorial what i was looking for.
I have built an app based on your other tutorials with angular and .net core and tried to combine this signal r code with my current web api which directly calls the repository via dependency injection into my controller.
I am facing one problem with TimeManager, my api is paging where i am only fetching 10 records per call. the problem is
When I call first GET, I create a TimerManager. That TimeManager only knows about the first query params. It then executes on a timer with those parameters.
When I call second GET, a second TimeManager will get created. That second manager will also start executing on a timer with the 2nd set of parameters, but it does not affect the first one at all.
I am not sure whey the old values even getting executed. How can i resolve this.
Hello Trushar. I am not sure that I understood you well, but you should always make sure that the first timer object is disposed before sending another GET request and create another timer object. I have only one GET request to start the timer and it gets executed as soon as Angular part starts. No more calls. And as you can see it will be disposed after 60 seconds. So if you want to use the timer in a safe manner, you have to dispose one prior to creating another one.
Thanks Marinko for your direction, I have disposed timer when i received new request and its working fine. 🙂
I am so glad I could help you. Thank you for reading our articles. Best regards.
Can you share the code?
How can I dispose timer first?? Because we have to create new Object???
Help me please!!!
This evening I found a solution to omit the impossibility of using AllowAnyOrigin() together with AllowCredentials() while defining our CORS policy.
If we want both: allowing credentials and allowing connections from any origin, we can do this, but we need to replace AllowAnyOrigin() with .SetIsOriginAllowed(isOriginAllowed: _ => true). Then the framework will allow putting also AllowCredentials() and will not throw any exceptions during our app’s lifetime.
I got this solution from one of the comments on https://github.com/aspnet/AspNetCore/issues/4483 by @dylanvdmerwe.
Hello mm1992. Thank you for your comment and for the advice it is good to know something like that. I would just like to point that I never wrote that AllowAnyOrigin can’t be used at all, just that it is found unsecure thus it is better to use WithOrigins. Anyhow, thank you again for the comment, we always apreciate that. Best regards.
Hello mm1992. Thank you for your comment and for the advice it is good to know something like that. I would just like to point that I never wrote that AllowAnyOrigin can’t be used at all, just that it is found unsecure thus it is better to use WithOrigins. Anyhow, thank you again for the comment, we always apreciate that. Best regards.
Hi Marinko,
These are excellent walthroughs, thank you. I have a quick question.
I have built an app based on your other tutorials with angular and .net core.
I have tried to combine this signal r code with my current web api which uses the repository via dependency injection into my controller.
When the repository is called from the timer however, it is giving me a disposed object error.
Am I using the wrong approach here? I’m wondering if the web api controller creates and disposes its dependencies after each call or something?. Hope I’m making some sense..
Hello Olivier. I understand what are you asking. Your DbContext class is registered into the IOC which means that your context object (if you registered it as I did in the Web Api Tutorial) has a Scoped lifetime. This means that your context object will be created when the request arrives into the controller and will be disposed as soon as request is finished. It is quite possible that .NET Core disposes your object because your timer is working as a delegate which triggers on a certain period of time. I am not aware of your compete implementation, but this could be a reason.
Ah ok. Thanks for your quick repsonse. How would you suggest I implement this code with a repository then? a seperate service to deal with the SignalR timer maybe?.
Well there are couple solutions for this.
So, just to repeat one thing. If you have implemented solution (SingalR) as I did, then your problem is related to the finished request. As soon as your initial request finishes, context object will be disposed and you will get your error. In my implementation this is happening because I’ve sent a request to the controller first just to start transferring data via SingalR, and while the data is being sent, my request is finished. In that moment your context will be disposed.
To solve this you can register your context as Singleton (By default UseSqlServer method registers it as Scoped).
The second solution is to remove timer and use some infinite loop where you would pool your data from the database, with some pauses (Thread.Sleep) and transfer them to the client via SignalR.
The third solution would be to use timer but to stop your request from finishing until you finish with the SignalR and timer actions.
I have tried now all three solutions, and all work, but I consider them as hacks. For me the best solution is a second one. Hope this helps.
I see. I may just poll with angular for now, I liked the idea of pushing new data but I’m not too keen on using a hack.. Is Entity Framework generally not used with a SignalR server then? Again, thanks for your help.
Well no, there is no problem with SignalR and EF Core. The main problem is with Timer (which runs in threads) and while it’s doing that if your request is finished in a different thread, then your context will be exposed. And that has nothing to do with SignalR or EF Core, it is related to the life cycle of your registered context object. SignalR is very useful whatsoever. Imagine this, you have a public API and some user sends you a request every 5 seconds with a data that you wont to publish on the client, how can you do that? You have nothing to reply to, because your client didn’t send a request. Well, SignalR 😀 If your request has a lots of operations and it will take a while to finish (which is a quite common scenario) but in a meantime you want to notify your client about different stages of the request process, how can you do it, well SignalR… So, I think you get a point here. Even what you are trying to do makes perfect sense, just the solution needs to be modified a bit. But of course, your app, your solution 😀
The dbcontext should never be a singleton, as asp.net is multi-threaded and each request can be considered to be executing on a separate thread. With a singleton dbcontext you’ll have cross-threaded calls to the same instance of a dbcontext… which will totally pork your dbcontext the second you call SaveChanges with multiple users calling your API.
Hello Steve. I couldn’t agree more with you. Everything you said is 100% true and correct. But as you can see, I have emphasized that it is a hack and it will solve just his problem. If you search through our artilces, related to the database connection, you will find all of the dbContext registered as scoped. Anyhow, thank you for the suggestion, that information is always useful.
Hi
The article is very helpful. Thank you.
i was able to start both server and client. But when i go to localhost:4200
i get this error GET https://localhost:5001/api/chart net::ERR_CONNECTION_REFUSED
OPTIONS https://localhost:5001/chart/negotiate net::ERR_CONNECTION_REFUSED
Hello. Have you tried to download the source code and to run it. You shouldnt be having this error. Then you can compare your solution with ours. Maybe is something with your CORS configuration or some other thing. I think this is easiest way for you to solve your problem. Several readers had the similar problem, but when I download our source code all is ok. So try to do that and if you find a solution please write it here in a comment section. Thank you so much. Best regards.
I downloaded the source code and ran it. The issue was i started the server using iis express. So, the server was listening on localhost:44342 but the client code is configured to connect to server on localhost:5001. Once i ran the server on “RealTimeCharts_Server” profile it started listening on localhost:5001 and the client started working.
Thank You
Thank you for this explanation. It will help other readers for sure. Best regards.
Sorry i figured out. I was using IIS express to start the server it worked after i switched to dotnet run –launch-profile RealTimeCharts_Server
Thank You
I have implemented the same but not working so i downloaded the source code but even that’s not working for me !
Error: Failed to complete the negotiation with the server Any suggestions?
Hello Richa. I really don’t know what to say about that. I just downloaded our source code on the PC which was not involved into the project development and it works without any modification. Maybe to try to run it in Incognito mode, if your browser cached something.
connection = new signalR.HubConnectionBuilder().configureLogging(signalR.LogLevel.Debug)
.withUrl("http://localhost:5000/decisionHub", {
skipNegotiation: true,
transport: signalR.HttpTransportType.WebSockets
})
.build();
Try this, solved my problem
Hello Jacques. What problem did you have? We have updated this article recently and everything should work without a problem. That’s the main reason why I’m asking.
Below written lines are wrongly mentioned in the article. Configue method and ConfigureServices method perform vice-versa functionalities. Configure does what is been mentioned in ConfigureServices.
Hello Richa, all I can say to this is “I can’t believe I wrote that” 😀 It is obvious spelling error because as you could see I wrote this: “And in a ConfigureServices method, we are adding SignalR to the request pipeline by pointing to our ChartHub with the provided /chart path.” But it is clear that the ChartHub is called in the Configure method. Thank you for this suggestion, someone might get confused with that.
Hello, Thanks for the article, I am getting error WebSocket connection to ‘ws://localhost:5000/api/chart’ failed: Error during WebSocket handshake: Unexpected response code: 200.
Can you help on this ?
I am using dotnet core 2.2 and angular 7. looks like it is working on .net side, but for angular JavaScript it gives an error.
Hi. As much as I can see, you have ws:// instead of the http or https. Your server URL starts with http or https. That is probably the reason for the failed connection.
Excellent article, I’ve learned a lot! I’m getting a circular reference error as well cause I tweaked the code a little bit but other than that it’s working great, thanks for writing !
Thank you Ihor. I’m glad this article helped you. Hope you will find our other articles useful as well. Best regards.
Hello, everything has worked great for me except that when invoking ‘broadcastchartdata’ I’m getting:)
TypeError: Converting circular structure to JSON
at JSON.stringify (
at JsonHubProtocol.push../node_modules/@aspnet/signalr/dist/esm/JsonHubProtocol.js.JsonHubProtocol.writeMessage
(JsonHubProtocol.js:75)
at HubConnection.js:259
at new ZoneAwarePromise (zone.js:910)
Thanks in advance for your inputs on this. Great work.
Hello Miguel. I really don’t know why you have that error, it is obvious that you have created a circular reference but how, I can’t tell. Basically it means that your JSON.stringify can’t do its job on the certain object because it has a property that points on another object which has a property pointing on the previous one and so on i circle. If you have followed all the steps from our example, than please download our source code and try to compare it.
When it’s refreshing the ChartModel array in angular, a new property to the object called _meta is added, this property indeed has a reference to the same array of ints, so when it tries to stringify the array the error happens.
what’s the fix for this issue, i am getting the same error.
chart.service.ts:40 TypeError: Converting circular structure to JSON)
–> starting at object with constructor ‘Array’
| index 0 -> object with constructor ‘Object’
| property ‘_meta’ -> object with constructor ‘Object’
| …
| property ‘data’ -> object with constructor ‘Object’
— property ‘datasets’ closes the circle
at JSON.stringify (
at JsonHubProtocol.push../node_modules/@aspnet/signalr/dist/esm/JsonHubProtocol.js.JsonHubProtocol.writeMessage (JsonHubProtocol.js:75)
at HubConnection.js:259
at new ZoneAwarePromise (zone.js:931)
at HubConnection.push../node_modules/@aspnet/signalr/dist/esm/HubConnection.js.HubConnection.invoke (HubConnection.js:237)
at ChartService.broadcastChartData (chart.service.ts:38)
at ChartComponent.chartClicked (chart.component.ts:54)
at Object.eval [as handleEvent] (ChartComponent.html:4)
at handleEvent (core.js:27329)
at callWithDebugContext (core.js:28399)
Had the same issue, for other people seeing this my answer (not beautiful since i am new to this topic, this tutorial was very helpful but the circle thing was little bit difficult as a beginner)
ChartModel
export interface ChartModel {
data: number[],
label: string
}
and inside SignalRService
public broadcastChartData = () => {
let label1: string = “Data1”
let label2: string = “Data2”
let label3: string = “Data3”
let label4: string = “Data4”
let data1: number[] = [this.transferData[0].data[0]]
let data2: number[] = [this.transferData[1].data[0]]
let data3: number[] = [this.transferData[2].data[0]]
let data4: number[] = [this.transferData[3].data[0]]
let tmpData: ChartModel[] = [
{label: label1, data: data1},
{label: label2, data: data2},
{label: label3, data: data3},
{label: label4, data: data4},
]
this.hubConnection.invoke(‘broadcastchartdata’, tmpData)
.catch(err => console.error(err));
}
This approach worked for me to solve the circular json issue. But the underlying problem is that chart.js mutates the data and adds its own properties, such as _meta, and _chartjs.
I have exactly the same error, any updates for resolving the issue?
Hey there,when I try to display my JSON data using signal r it’s throwing an error in basechart in appcomponent.ts saying the length of the type chart is undefined.its because the data from service is not correctly going to the dataset of the base chart.Im trying to display my mongo db data thru API as a chart in angular.please help
Hello. Check if your array, required to populate chart with data, is initialized with empty array prior the http request. It seems as the chart is using a variable as a data source, which is not initialized as an empty array at a beginning.
Hi, Thank you for sharing. Great work! I’m getting Cannot GET / error when I run my client. My port number for my client is 44372 and server is 52445. I’m getting errors when i try to change my launchSettings.json file.
Hello Reagan. Could you check our source code and try comparing it with your solution, that way you can see what is wrong. It is really hard for me, based on your comment, to assume what is wrong with your code. Maybe it has something to do with the HttpClient module, because you have only one Get request in your project.
Wonderful article. wondering if you can add interaction with db etc? How do u address disconnect issue?
Hello Jason, thank you for your comment. About db interaction, we can add something like that, but we would gain nothing. Simply because SignalR has nothing with db, it should be a tool to notify a client in a real time (when ever you think this is necessary) and that is all. I believe this is well explained in this article. Addressing disconnecting issue is a good idea though.
Don’t think I understood the timer section… In a real world scenario, how would the pooling work?
Like… In your example, you close the connection after 1 minute with _timer.Dispose(), should I, in the client try to reconnect every 1 minute too, to keep the connection alive?
Loved the article btw
The timer is only here to simulate data provision nothing more, I disposed it just for example sake nothing more. In a real world example you would probably have an API that would provide you with data. Or your app will notify the client as soon as something changes. There are a various situations to use signalr. And no, you don’t need to reconnect your client.
Thank you so much for this article! It was very helpful.
I have the first half of the app working (client receiving chart data from service). When I refresh the page though, I’m getting twice as many chart data notifications. I think this is because, even after a refresh, some kind of connection between the service and app is not terminated. Refresh 3 or 4 times, and the app is receiving 4 separate events for the same data change. How might this be resolved so that, even when the client is reloaded in the browser, it only receives one event notification per chart data change?
Hello Aundra. Thank you, we are glad this article helped you. About your issue, it is related to the timer implementation on the server side. You shouldn’t worry about it, because I have used timer just to simulate data provision and nothing more. In a real world app, you will fetch your data in a different way for sure. So, there is no ongoing connections after you refresh the client side, SignalR reconnects for sure. Kind regards.
What a relief! Thank you for the prompt reply.
Hi,I have created an dashboard application using signalr, .net core and angular to fetch data from the database for every 20 seconds using your article. But my timer action is throwing error like( cannot access a disposed object. you should let the dependency injection ). if i’m using the static data it’s working fine. But if i try to get the updated data from the database. it throwing error. How can i solve this issue?
I am pretty sure that your problem lies in the fact that you are manually disposing your context. Don’t do that. Register it in the IOC in the Startup class and remove any manual disposing. .NET Core is going to do disposing for you, that’s why you are getting such an error message.
Thanks for the reply. I’m not disposing this manual. I’m already
using startup class to register.
Ok, so could you try then one more thing. Timer works in threads and if you are working with IEnumerable data then this could be a problem as well. Try to use ToList() on your returned data, to see if this solves the problem.
It’s a real interesting article and it covers a lot of useful aspects of SignalR. However, and since I’m new to this, I was wondering how the conversation between specific users work. In this example, anyone will receive the same data whenever it changes, but what if I want to send that to a specific logged in user for example? Where should the logic stand?
Hello. Well the SignalR works on top of sockets, which means that any client subscribed on a topic will receive data from a server on that topic. But if you don’t want your user to receive that data, you just don’t allow him access to the certain page in your app (client side), where the data is shown. In this article, we have done it all in the app component, due to the sake of simplicity, but in a real word app, you would just open connection in the app component, and subscribe to the topic in some other component.
Thanks for a very Good article. I’ve enjoy read it and code along…… 5-stars!!
Miko
Thank you very much Miko. And thank you for helping other readers as well.
Hello there. Just wandering. I am not going to use .Net Core but the regular .Net 4.6.2 with the ASP.NET SignalR. Will this work the same?
Hello Joel. Well to be honest, haven’t used the SignalR with regular .NET for a long time, but I am sure that it is not going to be big difference, but will be difference for sure. Fore example the SingalR library is already installed inside .NET Core project but not inside the .NET and I believe the configuration is a little different. But if you still gonna do it with regular .NET, I would appreciate you share your experience with us 😀
I tried this example
At Server side I am getting http 404 error
At client side in developers tool I am getting this error – Utils.js:204 [2019-03-15T09:41:44.733Z] Error: Failed to complete negotiation with the server: SyntaxError: Failed to execute ‘open’ on ‘XMLHttpRequest’: Invalid URL
Hey,
in the angular service file (signal-r.service.ts) change the ‘transferchartdata’ to ‘TransferChartData’ it worked for me….
Miko
Check connection started and try with this code
this._hubConnection = new HubConnectionBuilder()
.configureLogging(signalR.LogLevel.Debug)
.withUrl(url, {
skipNegotiation: true,
transport: signalR.HttpTransportType.WebSockets
})
.build();
I tried this example , and when i run the server it shows 404 error.
Hello. Please go back to the article and follow it thoroughly. Even though I wrote this code and checked so many times, I did it one more time now, and everything works as it supposed and as it was stated in the article. Check your launchSettings file as well. Also pay attention to the way you enable CORS on the server side.
The angular files at github do not seem to match this article at all, think they are missing a commit or something.
The server side seems correct though.
Hello JT NIchols. Thank you for your suggestion, you were right, I haven’t committed the final change on the client side project. Now all should be fine. Sorry for this issue, it happens. Thank you one more time.
the best article. Thank you
Thank you too Jonatan.
it doesn’t work because of CORS for me. I am getting the below error
Access to XMLHttpRequest at ‘https://localhost:44336/api/chat/negotiate’ from origin ‘https://localhost:44374’ has been blocked by CORS policy: Response to preflight request doesn’t pass access control check: The value of the ‘Access-Control-Allow-Origin’ header in the response must not be the wildcard ‘*’ when the request’s credentials mode is ‘include’. The credentials mode of requests initiated by the XMLHttpRequest is controlled by the withCredentials attribute.
Hello. Well, this is the CORS error for sure, but it is very strange that you are having one if you have followed all the instructions from this article. Please double check the CORS implementation in the ConfigureServices method and in the Configure method. For example, when I comment out the app.UserCors(“CorsPolicy”) line from the Configure method, I am getting the same error as you are having, and this is expected. But as soon as the comment is removed, communication works as it supposed to do. If you keep getting the same error, try to use our source code (just pay attention to the launcSettings.json file), apply it as in the article.
Hello mate. If you still having the same problem and you are using .NET Core 2.2 version, then the problem is because we are configuring CORS with the AllowAnyOrigin and WithCredentials methods. This is now fixed in this article as well. In all the previous versions this would work without any problem, but in 2.2 version, they have decided that combination of those two methods are security risk while working with the SignalR. So, what you need to do is to replace the AllowAnyOrigin with the WithOrigins() method. Please take a look, how we did it in the article. Hope this will help. All the best.
Hi modify the following code and check
this._hubConnection = new HubConnectionBuilder()
.configureLogging(signalR.LogLevel.Debug)
.withUrl(url, {
skipNegotiation: true,
transport: signalR.HttpTransportType.WebSockets
})
.build();
I had this issue, but it was because I had the client app set up for https, and in the tutorial above, they add .WithOrigins(“http:…”). So I updated that to point to “https://…” instead and it worked.
Thanks Jim for the comment.
When writing clean code, should my SignalR project be included in the presentation layer?
Hello Michael. Well, when you work with the signalR (as you can see that from this article) you have different layers involved into complete logic. When you have .NET Core Web API as a server side and Angular as a client side project, your presentation layer is angular components and templates together and this is no place for signalR logic. As you can see from this article all the signalR logic is placed inside a service which is a service layer together with controllers from .NET Core. So to answer your question, no you shouldn’t place signalR logic into the Presentation layer. That layer should only receive required data and show it to the user or collect users input and provide it to the service layer to be sent towards the server side.
Thanks, Marinko!
This is the best article that I needed to be posted in years. Thanks for the effort.
Thank you a lot David. It is always great to hear something like that from a reader. Hope you will find some of our other articles useful as well. All the best.