

In this article, we’ll take a look at the EF Core Database-First approach. In this approach, we create our database first. We then model our entities. This approach is useful when we work with an existing database. This is also useful when we migrate from existing applications.
A relational database deals with related data. So, we’ll also take a look at different types of relationships in the database and how we can represent those while modeling our entities.
There are 3 types of relationships in relational database design:
One-to-One – A row in Table A can have only one matching row in Table B, and vice versa.
One-to-Many (or Many-to-One) – A row in Table A can have many matching rows in table B, but a row in table B can have only one matching row in Table A.
Many-to-Many– A row in Table A can have many matching rows in Table B, and vice versa.
You can download the source code for this article, on the EF DB First Approach Source Code repo.
We have divided this article into the following sections:
- Creating a Database and Tables
- Data Modelling
- Creating the Repository
- Creating an API
- Testing the API
Creating a Database and Tables
As the first step, we are going to create the database and tables.
So for example, let’s create a database to manage books. We are going to create tables for storing information about Books, Authors, Publishers etc. and establish relationships between them.
This is the complete SQL script for creating database tables and relationships.
CREATE DATABASE BookStore
GO
USE BookStore
GO
CREATE TABLE Author
(
Id BIGINT IDENTITY(1, 1) NOT NULL,
NAME NVARCHAR(50) NOT NULL,
PRIMARY KEY (Id)
)
GO
CREATE TABLE AuthorContact
(
AuthorId BIGINT NOT NULL,
ContactNumber NVARCHAR(15) NULL,
Address NVARCHAR(100) NULL,
PRIMARY KEY (AuthorId),
FOREIGN KEY (AuthorId) REFERENCES Author(Id)
)
GO
CREATE TABLE BookCategory
(
Id BIGINT IDENTITY(1, 1) NOT NULL,
NAME NVARCHAR(50) NOT NULL,
PRIMARY KEY (Id)
)
GO
CREATE TABLE Publisher
(
Id BIGINT IDENTITY(1, 1) NOT NULL,
NAME NVARCHAR(100) NOT NULL,
PRIMARY KEY (Id)
)
GO
CREATE TABLE Book
(
Id BIGINT IDENTITY(1, 1) NOT NULL,
Title NVARCHAR(100) NOT NULL,
CategoryId BIGINT NOT NULL,
PublisherId BIGINT NOT NULL,
PRIMARY KEY (Id),
FOREIGN KEY (CategoryId) REFERENCES BookCategory(Id),
FOREIGN KEY (PublisherId) REFERENCES Publisher(Id)
)
GO
CREATE TABLE BookAuthors
(
BookId BIGINT NOT NULL,
AuthorId BIGINT NOT NULL
PRIMARY KEY (BookId, AuthorId),
FOREIGN KEY (BookId) REFERENCES Book(Id),
FOREIGN KEY (AuthorId) REFERENCES Author(Id)
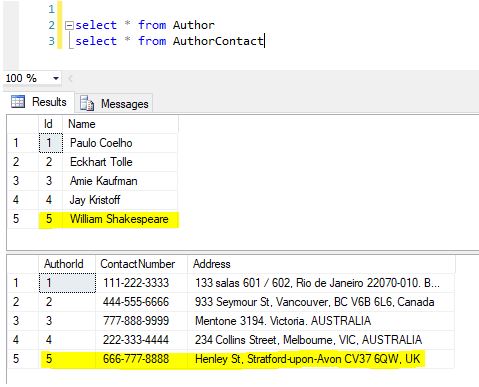
)After running the script, we can see the tables and relationships created as below:
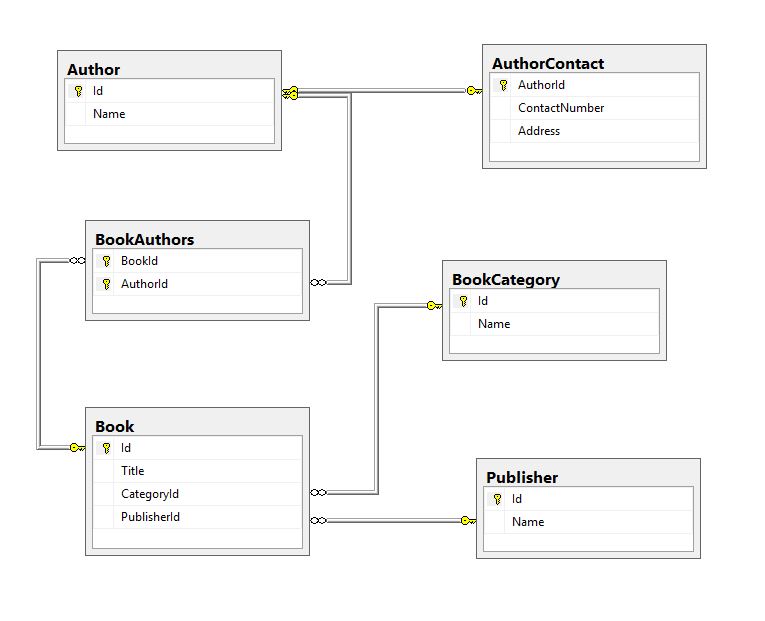
Database design explained
Tables:
Author– Stores the information about the authors.
AuthorContact– Contains the contact information about the authors.
Book– Stores the information about the books.
Publisher– Keeps the information about the publishers.
BookCategory– Keeps the master list of all the categories.
BookAuthors– Represents the mapping between the books and the authors.
Relationships:
Let’s take a look at how we implement the different types of relationships in our database design.
One-to-One(1:1)
In the above design, AuthorandAuthorContact have a 1:1 relationship between them. Each entry in theAuthor table has a corresponding entry in theAuthorContact table. They are related by theAuthorId foreign key.
This type of relationship is not very common. We could also keep the author contact information in theAuthor table. But in certain scenarios, there could be some valid reasons to split out information into different tables like security, performance etc.
One-to-Many(1:N)
In the above design, PublisherandBook have a 1:N relationship between them. A publisher can publish many books, but a book can have only one publisher. They are related by thePublisherId foreign key.
This is the most common type of relationship in any database.
Many-to-Many(M:N)
In the above design, BookandAuthor have an M:N relationships between them. A book can have many authors and at the same time, an author can write many books. They are related by an intermediate tableBookAuthors. This is also called an associative or junction table.
We can translate an M:N relationship to two 1:N relationships, but linked by an intermediary table.
Inserting Test Data
Now that we have created our tables and established relationships between them, let’s insert some test data into them. Let’s use the below DB script to insert data:
INSERT INTO BookCategory
VALUES
('Fantasy Fiction'),
('Spirituality'),
('Fiction'),
('Science Fiction')

INSERT INTO Publisher
VALUES
('HarperCollins'),
('New World Library'),
('Oneworld Publications')

INSERT INTO Author
VALUES
('Paulo Coelho'),
('Eckhart Tolle'),
('Amie Kaufman'),
('Jay Kristoff')

INSERT INTO AuthorContact
VALUES
(1, '111-222-3333', '133 salas 601 / 602, Rio de Janeiro 22070-010. BRAZIL'),
(2, '444-555-6666', '933 Seymour St, Vancouver, BC V6B 6L6, Canada'),
(3, '777-888-9999', 'Mentone 3194. Victoria. AUSTRALIA'),
(4, '222-333-4444', '234 Collins Street, Melbourne, VIC, AUSTRALIA')

INSERT INTO Book
VALUES
('The Alchemist', 1, 1),
('The Power of Now', 2, 2),
('Eleven Minutes', 3, 1),
('Illuminae', 4, 3)

INSERT INTO BookAuthors
VALUES
(1,1),
(2,2),
(3,1),
(4,3),
(4,4)
After running the above insert script, our database tables will look like this

Data Modelling – Creating Models and a Context
So, now we have our database tables with data. Let’s model our entities based on those.
As a first step, let’s set up an ASP.NET Core Web API Project. We have explained this in detail in one of our other articles: Creating and configuring a new ASP.NET Core Web API project.
The article linked above covers a lot of additional topics. You may go through the entire article if you want to, but the section linked above is quite enough to follow along with this article.
Following the article linked above, let’s create a new project calledEFCoreDatabaseFirstSample.
Creating Models
Now it’s time to create the EF model based on our existing database.
Go to Tools –> NuGet Package Manager –> Package Manager Console
First, we need to install the following packages :
Install-Package Microsoft.EntityFrameworkCore.Tools
Install-Package Microsoft.EntityFrameworkCore.SqlServer
Then, we can create the models from the existing database using Scaffold-DbContext command:
Scaffold-DbContext "Server=.;Database=BookStore;Trusted_Connection=True;"
Microsoft.EntityFrameworkCore.SqlServer -OutputDir Models
The above command will generate the following classes:
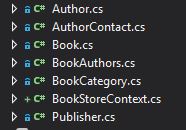
BookStoreContext is the DB context class and other classes are the models.
Now, let’s look at how EF Core represents the relationships.
One-to-One(1:1)
Let’s take a look at the Author class:
public partial class Author
{
    public Author()
    {
        BookAuthors = new HashSet<BookAuthors>();
    }

    public long Id { get; set; }
    public string Name { get; set; }

    public virtual AuthorContact AuthorContact { get; set; }
    public virtual ICollection<BookAuthors> BookAuthors { get; set; }
}
Remember that theAuthor has a 1:1 relationship with theAuthorContact. To represent this we have anAuthorContactproperty in theAuthor class. This is called the Navigation Property.
One-to-Many(1:N)
Let’s take a look at the Publisher & Book classes:
public partial class Publisher
{
    public Publisher()
    {
        Books = new HashSet<Book>();
    }

    public long Id { get; set; }
    public string Name { get; set; }

    public virtual ICollection<Book> Books { get; set; }
}

public partial class Book
{
    public Book()
    {
        BookAuthors = new HashSet<BookAuthors>();
    }

    public long Id { get; set; }
    public string Title { get; set; }
    public long CategoryId { get; set; }
    public long PublisherId { get; set; }

    public virtual BookCategory Category { get; set; }
    public virtual Publisher Publisher { get; set; }
    public virtual ICollection<BookAuthors> BookAuthors { get; set; }
}
Remember that thePublisherhas a 1:N relationship with theBook.
Here, the Publisher is called the Principal Entity and the Book is called Dependent Entity.
Publisher.PublisherId is the Principal Key and Book.PublisherId is the Foreign Key.
Publisher.Books is the Collection Navigation property.
Book.Publisher is the Reference Navigation property.
Many-to-Many(M:N)
Note: As of now, EF Core does not support many-to-many relationships without using an entity class for representing the join table. However, we can represent it by using an entity class for the join table. We could then map two separate one-to-many relationships.
Let’s take a look at the Book, Author & BookAuthors classes. (Book and Author classes are already shown above):
public partial class BookAuthors
{
    public long BookId { get; set; }
    public long AuthorId { get; set; }

    public virtual Author Author { get; set; }
    public virtual Book Book { get; set; }
}
We can see that both the Book and the Author has a collection navigation propertyBookAuthors. We have established the M:N relationship between theBook and the Author by these two 1:N relationships.
Recommendation: For an even better understanding of Entity Framework Core, we strongly suggest reading our Entity Framework Core Series. There, you can find a lot of information related to different EF Core features.
Creating a Repository
Now that we have successfully created the models and context, let’s implement a simple data repository using the repository pattern. We have explained this pattern in detail in one of our other articles: Implementing the repository pattern. If you get stuck with the code, you can always refer to the mentioned article and to our source code for this article, as well.
Let’s add a new folder under Models and name it Repository. We’ll then create a new interface called IDataRepository:
public interface IDataRepository<TEntity, TDto>
{
    IEnumerable<TEntity> GetAll();
    TEntity Get(long id);
    TDto GetDto(long id);
    void Add(TEntity entity);
    void Update(TEntity entityToUpdate, TEntity entity);
    void Delete(TEntity entity);
}
We will later inject this interface into our controller. Then the API will communicate with the data context using this interface. Of course, we are going to register all the repo services in the Startup class, as you can find out by your self in our source code.
Next, let’s create concrete classes that implement theIDataRepository interface. We’ll add a new folder under Models called DataManager.
Let’s keep things simple and focus on implementing only the required functions.
Querying & Loading Related Data
EF Core uses navigation properties in our model to load related entities. We use three common ORM patterns for loading related data.
When we use eager loading, we load the related data from the database as part of the initial query.
Explicit loading means that we load the related data explicitly from the database at a later time.
Lazy loading is a way of loading the related data from the database when we access the navigation property.
Eager loading
We can use theIncludemethod to specify related data that need to be included in the query results. In the following example, the Authors that are returned in the results will have their AuthorContacts property auto-populated.
Let’s add a new class AuthorDataManager which implements theIDataRepository in the DataManager folder, and register it in the Startup class.
We’ll then implement the GetAll():
public IEnumerable<Author> GetAll()
{
    return _bookStoreContext.Author
        .Include(author => author.AuthorContact)
        .ToList();
}
The above code loads all the authors with their contact details at once since we are using eager loading. We shall verify this later when we test it.
Explicit loading
We can explicitly load a navigation property using the DbContext.Entry().
Let’s add a new class BookDataManager which implements the IDataRepository interface and register it in the Startup class as well.
We’ll then implement the Get()method:
public Book Get(long id)
{
    _bookStoreContext.ChangeTracker.LazyLoadingEnabled = false;

    var book = _bookStoreContext.Book
          .SingleOrDefault(b => b.Id == id);

    if (book == null)
    {
       return null;
    }

    _bookStoreContext.Entry(book)
        .Collection(b => b.BookAuthors)
        .Load();

    _bookStoreContext.Entry(book)
        .Reference(b => b.Publisher)
        .Load();

    return book;
}
The above code is used to get the details of a Book. See how we are explicitly loading the list of BookAuthors and Publisher later. We’ll verify the explicit loading behavior later when we test this functionality.
Lazy loading
The simplest way to use lazy-loading is by installing the Microsoft.EntityFrameworkCore.Proxies package and enabling it with a call to UseLazyLoadingProxies.
This is shown in the below code
protected override void OnConfiguring(DbContextOptionsBuilder optionsBuilder)
{
    if (!optionsBuilder.IsConfigured)
    {
        optionsBuilder
            .UseLazyLoadingProxies()
            .UseSqlServer("Server=.;Database=BookStore;Trusted_Connection=True;");
    }
}
EF Core will then enable lazy loading for any navigation property that can be overridden. Only thing is that it must be virtual and on a class that can be inherited from.
For example, in the below Authorclass, the BookAuthors navigation property will be lazy-loaded:
public partial class Author
{
    public long Id { get; set; }
    public string Name { get; set; }

    public virtual AuthorContact AuthorContact { get; set; }
    public virtual ICollection<BookAuthors> BookAuthors { get; set; }
}
Let’s then disable lazy-loading at a context level. This helps to avoid circular referencing issues:
public BookStoreContext(DbContextOptions<BooksStoreContext> options)
    : base(options)
{
    ChangeTracker.LazyLoadingEnabled = false;
}
We’ll enable lazy-loading explicitly when we need to utilize it.
Let’s implement the GetDto() method in the AuthorDataManagerclass:
public AuthorDto GetDto(long id)
{
    _bookStoreContext.ChangeTracker.LazyLoadingEnabled = true;

    using (var context = new BookStoreContext())
    {
	var author = context.Author
           .SingleOrDefault(b => b.Id == id);
	return AuthorDtoMapper.MapToDto(author);
    }
}

public class AuthorDto
{
    public AuthorDto()
    {
    }

    public long Id { get; set; }

    public string Name { get; set; }

    public AuthorContactDto AuthorContact { get; set; }
}

public static class AuthorDtoMapper
{
    public static AuthorDto MapToDto(Author author)
    {
        return new AuthorDto()
        {
            Id = author.Id,
            Name = author.Name,

            AuthorContact = new AuthorContactDto()
            {
                AuthorId = author.Id,
                Address = author.AuthorContact.Address,
                ContactNumber = author.AuthorContact.ContactNumber
            }
        };
    }
}
In the code above, since we are using lazy loading, only the Author entity will be loaded initially. Later the AuthorContact property will be loaded only when we reference it inside the DTO mapper. We’ll verify this behavior later when we test this.
Note: The referenced property can be lazy-loaded only inside the scope of the data context class. Once the context is out of scope, we will no longer have access to those.
Saving Related Data
In this section, we’ll explain how we can Add, Update and Delete related entities.
Add
If we create several new related entities, adding one of them to the context will cause the others to be added too.
For example, in the below code, let’s implement the Add() method in AuthorDataManager.
This will cause both Author and AuthorContact entities to be created:
public void Add(Author entity)
{
    _bookStoreContext.Author.Add(entity);
    _bookStoreContext.SaveChanges();
}
Update
Now let’s implement the update. The below code implements the Update() method in AuthorDataManager class:
public void Update(Author entityToUpdate, Author entity)
{
    entityToUpdate = _bookStoreContext.Author
        .Include(a => a.BookAuthors)
        .Include(a => a.AuthorContact)
        .Single(b => b.Id == entityToUpdate.Id);

    entityToUpdate.Name = entity.Name;

    entityToUpdate.AuthorContact.Address = entity.AuthorContact.Address;
    entityToUpdate.AuthorContact.ContactNumber = entity.AuthorContact.ContactNumber;

    var deletedBooks = entityToUpdate.BookAuthors.Except(entity.BookAuthors).ToList();
    var addedBooks = entity.BookAuthors.Except(entityToUpdate.BookAuthors).ToList();

    deletedBooks.ForEach(bookToDelete =>
        entityToUpdate.BookAuthors.Remove(
            entityToUpdate.BookAuthors
                .First(b => b.BookId == bookToDelete.BookId)));

    foreach (var addedBook in addedBooks)
    {
        _bookStoreContext.Entry(addedBook).State = EntityState.Added;
    }

    _bookStoreContext.SaveChanges();
}
The above code will cause the Author,AuthorContactand BookAuthors entities to be updated. We’ll verify this later when we test this.
Delete
Delete operation can be tricky with related entities. There are three actions EF can take when a parent entity is deleted.
- The child can be deleted
- The child’s foreign key values can be set to null
- The child remains unchanged
We should configure the DeleteBehavior appropriately based on our application logic. In the below example, let’s say when a publisher is deleted, we need the publisher’s book also to be deleted.
First, let’s configure this in the OnModelCreating method in our context:
modelBuilder.Entity<Book>(entity =>
{
    entity.Property(e => e.Title)
        .IsRequired()
        .HasMaxLength(100);

    entity.HasOne(d => d.Publisher)
        .WithMany(p => p.Books)
        .HasForeignKey(d => d.PublisherId)
        .OnDelete(DeleteBehavior.Cascade)
        .HasConstraintName("FK_Books_Publishers");

    entity.HasOne(d => d.Category)
        .WithMany(p => p.Book)
        .HasForeignKey(d => d.CategoryId)
        .OnDelete(DeleteBehavior.ClientSetNull)
        .HasConstraintName("FK_Books_BookCategory");
});
Now let’s implement the Delete() method in PublisherDataManager class:
public void Delete(Publisher entity)
{
    _booksStoreContext.Remove(entity);
    _booksStoreContext.SaveChanges();
}
The above code will delete the Publisherand any related Book entities. We’ll verify this later when we test this functionality.
Now we have to register our DataManager classes inside the IOC and configure JSONOptions to ignore circular reference loops.
For that, first, we have to install the NewtonSoftJson package:
Install-Package Microsoft.AspNetCore.Mvc.NewtonsoftJson
Then, we can configure the services:
public void ConfigureServices(IServiceCollection services)
{
    services.AddDbContext<BookStoreContext>(opts => opts.UseSqlServer(Configuration["ConnectionString:BooksDB"]));
    services.AddScoped<IDataRepository<Author, AuthorDto>, AuthorDataManager>();
    services.AddScoped<IDataRepository<Book, BookDto>, BookDataManager>();
    services.AddScoped<IDataRepository<Publisher, PublisherDto>, PublisherDataManager>();

    services.AddControllers()
        .AddNewtonsoftJson(
            options => options.SerializerSettings.ReferenceLoopHandling = Newtonsoft.Json.ReferenceLoopHandling.Ignore
        );
}
This is the appsettings.json file:
{
  "Logging": {
    "LogLevel": {
      "Default": "Warning"
    }
  },
  "ConnectionString": {
    "BooksDB": "Server=.;Database=BookStore;Trusted_Connection=True"
  },
  "AllowedHosts": "*"
}
Excellent. Now we can move on.
Creating the API Controller
Now that our DataManager is all set, let’s create the API Controller and create the endpoints for handling CRUD operations. This is described in detail in one of our other articles: Creating a .NET Core Web API Controller
Following the above article, let’s create the AuthorsController,BooksController and PublishersController class in the Controllers folder as shown below.
For keeping things simple and focused, we’ll implement only those endpoints required to understand the concepts we discuss in this article.
Let’s implement the GetAll,Get,Post and Put method in the AuthorsControllerclass:
[Route("api/authors")]
[ApiController]
public class AuthorsController : ControllerBase
{
    private readonly IDataRepository<Author, AuthorDto> _dataRepository;

    public AuthorsController(IDataRepository<Author, AuthorDto> dataRepository)
    {
        _dataRepository = dataRepository;
    }

    // GET: api/Authors
    [HttpGet]
    public IActionResult Get()
    {
        var authors = _dataRepository.GetAll();
        return Ok(authors);
    }

    // GET: api/Authors/5
    [HttpGet("{id}", Name = "GetAuthor")]
    public IActionResult Get(int id)
    {
        var author = _dataRepository.GetDto(id);
        if (author == null)
        {
            return NotFound("Author not found.");
        }

        return Ok(author);
    }

    // POST: api/Authors
    [HttpPost]
    public IActionResult Post([FromBody] Author author)
    {
        if (author is null)
        {
            return BadRequest("Author is null.");
        }

        if (!ModelState.IsValid)
        {
            return BadRequest();
        }

        _dataRepository.Add(author);
        return CreatedAtRoute("GetAuthor", new { Id = author.Id }, null);
    }

    // PUT: api/Authors/5
    [HttpPut("{id}")]
    public IActionResult Put(int id, [FromBody] Author author)
    {
        if (author == null)
        {
            return BadRequest("Author is null.");
        }

        var authorToUpdate = _dataRepository.Get(id);
        if (authorToUpdate == null)
        {
            return NotFound("The Employee record couldn't be found.");
        }

        if (!ModelState.IsValid)
        {
            return BadRequest();
        }

        _dataRepository.Update(authorToUpdate, author);
        return NoContent();
    }
}
Then let’s implement the Get() method in the BooksController:
[Route("api/books")]
[ApiController]
public class BooksController : ControllerBase
{
    private readonly IDataRepository<Book, BookDto> _dataRepository;

    public BooksController(IDataRepository<Book, BookDto> dataRepository)
    {
        _dataRepository = dataRepository;
    }

    // GET: api/Books/5
    [HttpGet("{id}")]
    public IActionResult Get(int id)
    {
        var book = _dataRepository.Get(id);
        if (book == null)
        {
            return NotFound("Book not found.");
        }

        return Ok(book);
    }
}
Finally, let’s implement the Delete() method in the PublisherController:
[Route("api/publishers")]
[ApiController]
public class PublishersController : ControllerBase
{
    private readonly IDataRepository<Publisher, PublisherDto> _dataRepository;

    public PublishersController(IDataRepository<Publisher, PublisherDto> dataRepository)
    {
        _dataRepository = dataRepository;
    }

    // DELETE: api/ApiWithActions/5
    [HttpDelete("{id}")]
    public IActionResult Delete(int id)
    {
        var publisher = _dataRepository.Get(id);
        if (publisher == null)
        {
            return NotFound("The Publisher record couldn't be found.");
        }

        _dataRepository.Delete(publisher);
        return NoContent();
    }
}
Recommendation
If you want to learn in great detail about Entity Framework Core and many of its features, we recommend going through our Entity Framework Core series. Through the entire series, we talk about different EF Core features, from the Context classes and DbSet properties, relationships and none-relational configurations, additional migration information and querying the database. If you want, you have a place to learn a lot more on this topic.
Testing the API
Now we’ll test the controller methods using Postman. We’ll also verify the results in the database. Later, we’ll inspect the actual SQL queries executed in the database using the SQL Server Profiler.
Loading the Data
First, let’s test the GetAll endpoint of Authors:
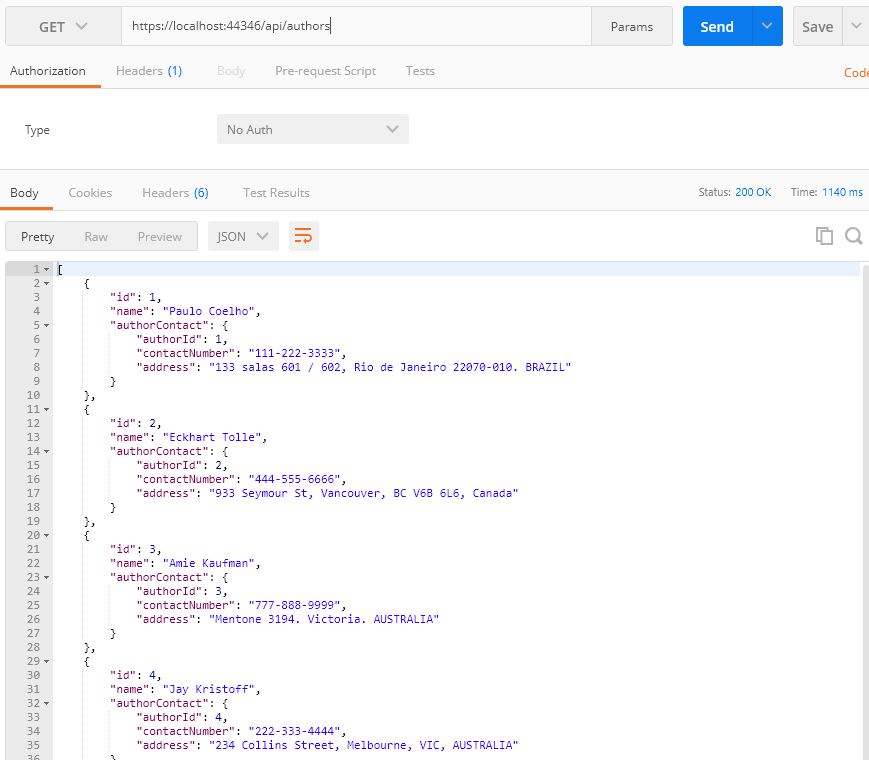
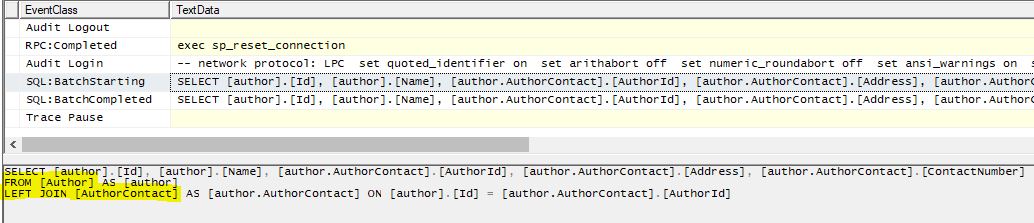
Remember that we used eager loading for implementing this functionality. If we look at the Profiler, we can see that the query fetches data by joining Author and AuthorContact tables:
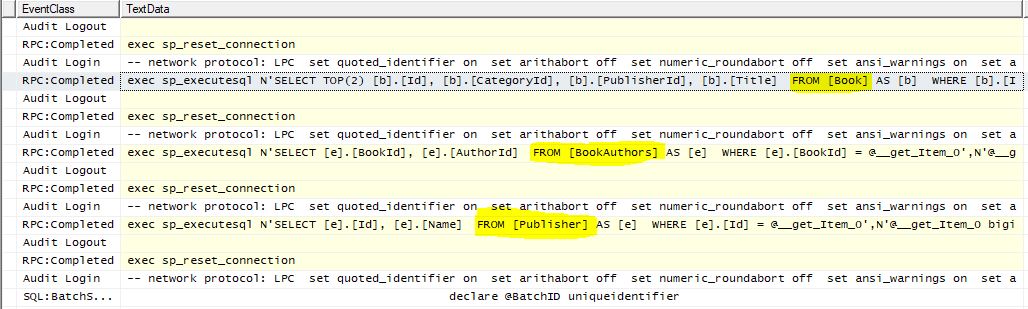
Next, let’s test the Get endpoint of the Book:
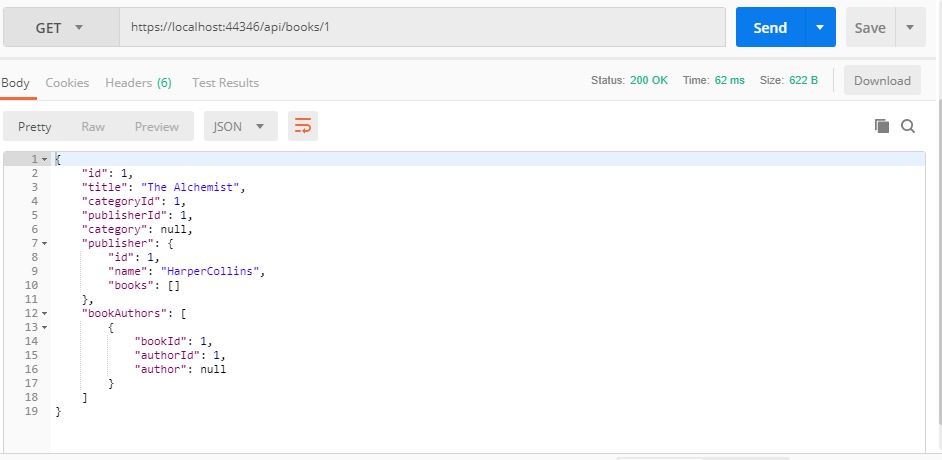
Remember that we used explicit loading to implement this functionality. Here note that only those properties that we chose to load explicitly have data. Other related properties are empty.
In the Profiler, we can see that initially, an SQL query fetches data from the Book table. Later, queries are generated to fetch data from other tables when we explicitly load data from other entities.
Now, let’s test the Get endpoint of Author:
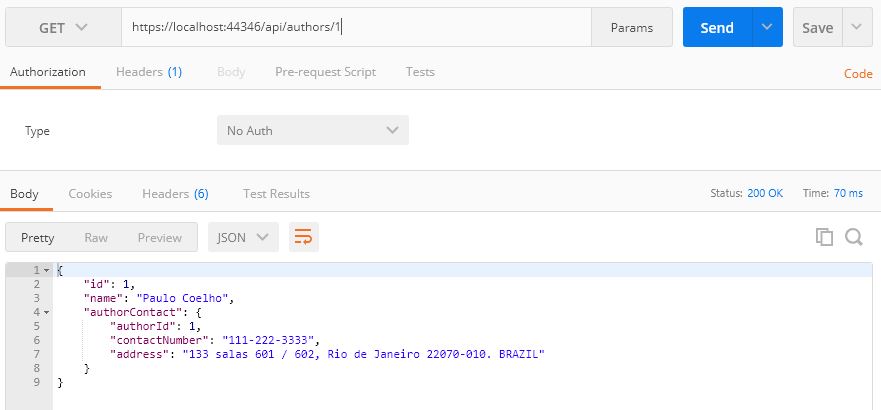
Remember that we used lazy loading to implement this functionality. In the Profiler, we can see that initially only data from the Author table is loaded. Later, when we refer the AuthorContact entity inside the DTO Mapper class, another query loads data from the AuthorContact table:

Updating Data
Now, let’s test the Add endpoint of Author:
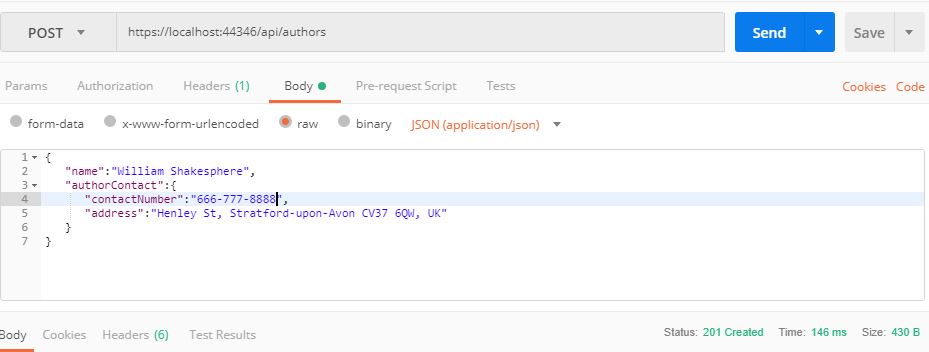
We can see that two INSERT queries are generated to insert data into tables Author and AuthorContact:

We can verify that our Add endpoint inserts data in both tables:
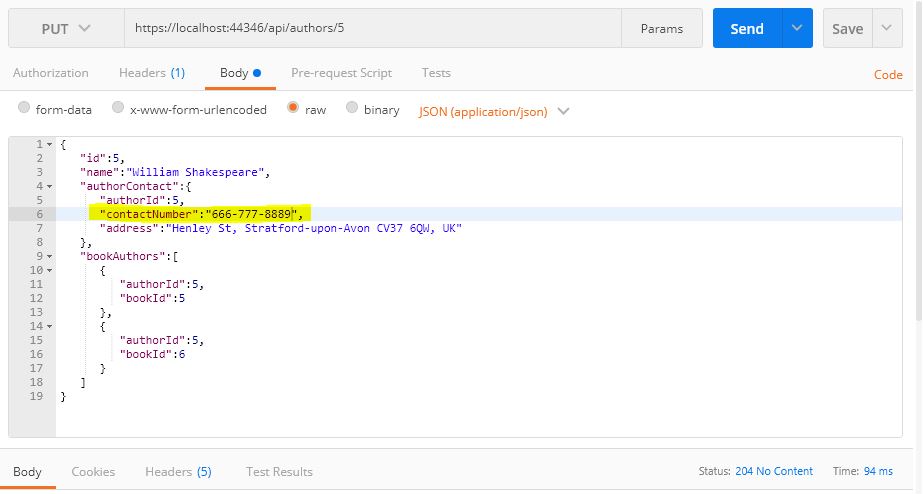
Now let’s test the Update endpoint of Authors.
We’ll insert some data into Publisher,BookCategory and Book table:
INSERT INTO Publisher
VALUES
('Simon & Schuster'),
('Oxford University Press')


INSERT INTO BookCategory
VALUES
('Tragedy'),
('Romance')


INSERT INTO Book
VALUES
('Hamlet', 5, 4),
('Romeo and Juliet', 6, 5)
Let’s modify the
Author we just inserted. Let’s edit the ContactNumber and map the newly added Books to this author:
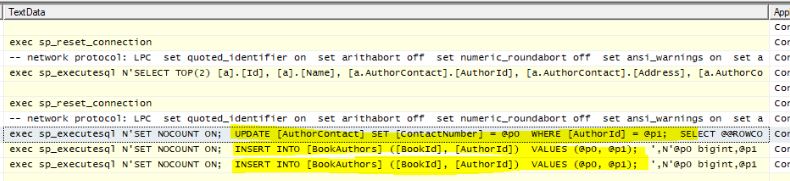
In the Profiler, we can see an UPDATE query for the AuthorContact table and two INSERT queries for the BookAuthors table:
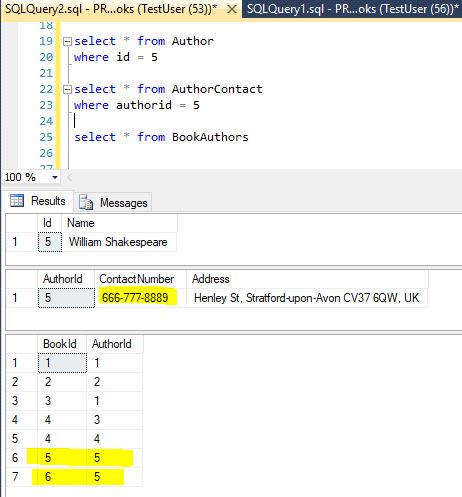
Let’s verify the results in the database:
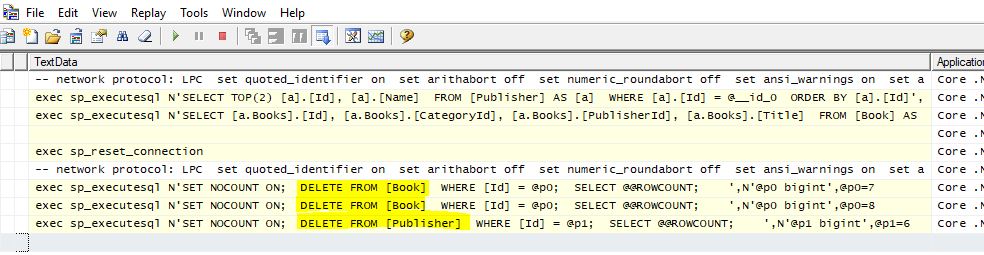
Finally, let’s test the Delete endpoint of Publisher.
We’ll insert a test publisher and two related books:
INSERT INTO Publisher
VALUES
('My Publisher')

INSERT INTO Book
VALUES
('My Publisher Book 1', 5, 6),
('My Publisher Book 2', 4, 6)
Now let’s test the Delete endpoint.
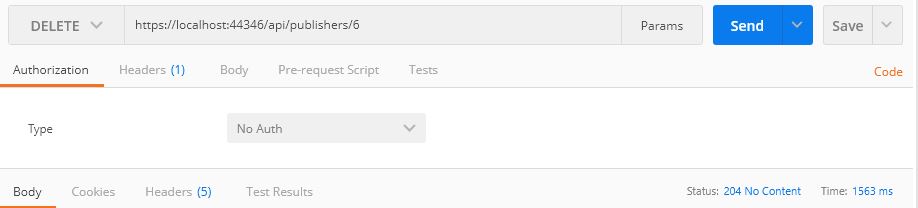
In the Profiler, we can see that the related data is first removed from theBook table. Then the publisher record is deleted from thePublisher table.
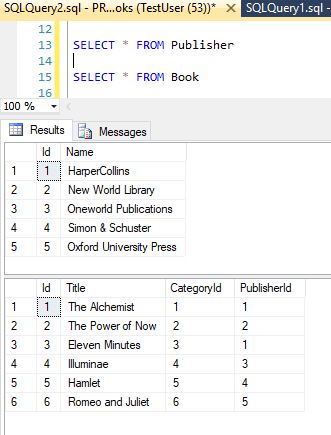
Let’s verify the changes in the database.
Conclusion
In this article, we have covered the following topics.
- EF Core Database-First approach and when to use it.
- Different types of relationships in a database.
- Creating a database and tables with relationships.
- Modeling the entities with relationships.
- Loading and saving related data using the repository pattern.
- Different patterns for loading related data.
- Creating API endpoints for operating on related data.
- Testing the endpoints and inspecting the generated database queries.
Hope you enjoyed the article. Happy programming!

Need Full source code
You have it at the beginning of the article. All our articles have a source code at the beginning. You can find this sentence: You can download the source code for this article, on the EF DB First Approach Source Code repo.
What should i do if i should only get few selected columns from selected tables.plzzz help me out.
I don’t know about the columns. But if you want only specific tables you can include the -t flag in front of the table name in the command. Something like this: Scaffold-DbContext “Server.;Database=MyDB;Trusted_Connection=True;” Microsoft.EntityFrameworkCore.SqlServer -OutputDir Models -t User, Role
Plx provide the post method Raw data because it give error null entry for Author
If you referring to a source code, you have a link at the top of the article.
I really like how you explain these examples. Do you have any articles on how you would structure these different types of objects created in an API in relation to how a client application would interact w/ it through multi layered architecture?
Well, we don’t have a specific article. But in our Angular series, we consume our Web API so there you can see how we organized these entities nad DTOs in the client app.
DTO classes how we are creating?
https://code-maze.com/net-core-web-development-part5/ You can read this article. There you will find information valuable to you. Also you can read the next one to see how to use DTOs with Create and Update. Or… you can read entire series 😀 😀
Your artical is toogood but can you share complete code . i am beginner it helps me in understaing well .. share zip solution please
Hi Sagar. You have a link to the source code at the top of the article. Also you have a couple of linked articles that can help you better understand the topics covered in this one.
Nice article, some feedback
1. For those of us running 3.0 or 3.1 this will not work, since 3.0 made breaking changes in JSON:
services.AddMvc().AddJsonOptions(
options => options.SerializerSettings.ReferenceLoopHandling = Newtonsoft.Json.ReferenceLoopHandling.Ignore
).SetCompatibilityVersion(CompatibilityVersion.Version_2_2);
I replaced this with:
services.AddMvc().SetCompatibilityVersion(CompatibilityVersion.Version_3_0);And it work in my application
I notice that loophandling is not part of my fix. Maybe someone can come up with a better solution?
2. would have saved me some time if the the article had listed the NuGets that are needed to make it work in Core 3.x
Hello Esben. Thanks for reading the article and all of your suggestions. And yes there are some differences from 3.0 version but the logic is the same and that’s what matters. Of course, we will update the article, just couldn’t get free time to do it. Regarding the ReferenceLoopHandling (which is related to solve the circular reference problem) you can use this code:
.AddNewtonsoftJson( o => o.SerializerSettings.ReferenceLoopHandling = Newtonsoft.Json.ReferenceLoopHandling.Ignore)
And the libraries were included in the 2.2 version, but from 3.0 we have to include it manually.
Hi Marinko,
Great article – but getting stuck with the Repository code part. Trying to understand Interfaces and how to implement them etc. Do you have the complete source code I could download anywhere?
Simon
Hello Simon. Plese take a look at the article’s introduction. You are going to find a link to the source code repository.
Hi Marinko!
Didn’t see that link there! – Sorry for being stupid! – Thanks for getting back to me so quickly too!
Perfect – Thanks!
Simon
You are welcome Simon. And you just didn’t see the link, it happens.
al realizar la accion:
Scaffold-DbContext "Server=.;Database=BookStore;Trusted_Connection=True;"Microsoft.EntityFrameworkCore.SqlServer -OutputDir Models
me aparece el error
Scaffold-DbContext : No se puede enlazar el argumento con el parámetro 'Provider' porque es una cadena vacía.

En línea: 1 Carácter: 1

+ Scaffold-DbContext "Server=.(localdb)ProjectsV13;Database=DataBaseF ...

+ ~~~~~~~~~~~~~~~~~~~~~~~~~~~~~~~~~~~~~~~~~~~~~~~~~~~~~~~~~~~~~~~~~~~~~

    + CategoryInfo          : InvalidData: (:) [Scaffold-DbContext], ParameterBindingValidationException

    + FullyQualifiedErrorId : ParameterArgumentValidationErrorEmptyStringNotAllowed,Scaffold-DbContext
Lo solucione instalando
all
Install-Package Microsoft.EntityFrameworkCore.SqlServer -Version 3.0.1y adicionalmente en el xml del proyecto(doble clic en en el proyecto, NO en la solucion) se adiciona:
volver a ejecutar el comando
Scaffold-DbContext "Server=.;Database=BookStore;Trusted_Connection=True;"Microsoft.EntityFrameworkCore.SqlServer -OutputDir Models
y listo
espero les sirva
Hello Camilo. We haven’t updated this article to 3.0 version yet. But you are right, from the 3.0 version you have to install EF Core manualy with the design as well.
Why did you not show the complete code? The linked article honestly implements it very differently and makes it a frikkin’ pain to go back and forth to get it working with this project. Especially if you’re new to this (like anybody reading this article). Other than that, it is great.
The Repository Code that is.
Hello Will. We didn’t want to repeat ourselves and Repository in this article is just a basic example. But with the linked article you get a real example of how repository should look like. Additionally, we have provided a source code, and there you may find a complete code for the entire article. Thank you for reading this one. Feel free to explore our site, we are sure that you can find very useful articles. We have a great EF Core series which will bring the EF Core logic even closer to you.
Thanks a lot for this wonderful article.
But found some issue on getting response of the API’s and the response looks like below attached image,
https://uploads.disquscdn.com/images/31c18a030a69b56ee24732d74a1014c210cf03a739e7c6097e502ed3ef10ead4.png
Hello Yash, we are going to check this out.
Thanks for this, very helpful.
One question – trying to understand all the bits, what does TDto mean? I get what it does, but what is the meaning of ‘TD’ in this variable? I get that it’s out object, etc, just trying to grok what the heck that variable is suppose to represent because it’s not clear to me what TD is in this instance (type data?).
Hello.
Dto is short for Data Transfer Object and additional T is here because this param is generic one, and usually the “T” letter is used for the generic parameters (for example if you take a look at the implementation of generic List in C# you will see the List). That’s the reason why the “T” letter is placed in front of each parameter TEntity and TDto.
Hello, thanks for the article.
Please pay attention on table names in deploy script and on DB name in connection string.
Hello Alexander. Thank you for reading this article and for your suggestions. It is going to be fixed.
Great article to start, thank you very much.I do have a couple comments.
First, the Scaffold-DbContext has no option to make the classes singular, classes are named exactly as the table is named.
Second thing is that there is no way ( that I know off) that, if adding a new table, to scaffold the table without loosing the existing table classes.
A tool for database first to select tables and have a singular/plural option is overdue for EF core.
Yes, the solution is using the partial classes or create the additional layer of Entities for business logic to do not touch the generated models. DB first approach is not the best choice in real projects.