

Having a good understanding of how to configure your project and how to configure the services, that you will use until the end of the development process, is a must.
In this article, we will explain how to use the configuration methods in the Startup class. Also, we will learn how to register different services and use extension methods to help us in the process.
If you want to see all the basic instructions and complete navigation for this series, please check the Introduction page for this tutorial.
Let’s start.
Creating a New Project and Modifying the launchSettings.json File
After we have finished creating and populating the database, in the previous post, we are going to create a Visual Studio project for our server part of the application.
Let’s open Visual Studio and create a new ASP.NET Core Web API project and in the next window name it AccountOwnerServer.
Then in the next window, we have to provide a couple of information:
- Framework – for this series, we are going to choose .NET 9.0, but you can choose any previous version as well if you want to
- Authentication type – we’ll leave it at None
- Configure for HTTPS – we will leave it checked
- We are not going to enable Docker
- Use controllers – we want to check this since we will use controllers in our API
- Enable OpenAPI support – we are going to uncheck this since we don’t want OpenAPI or the Swagger implementation now (depending on which .NET version you are using)
After the project creation, we are going to modify the launchSettings.json file which is quite an important file for the .NET configuration. Let’s change the applicationUrl property to a new value and the launchBrowser property to false, to prevent a web browser from starting when the project starts.
In the Solution Explorer, let’s expand the Properties and double-click on the launchSettings.json file:
{
  "$schema": "https://json.schemastore.org/launchsettings.json",
  "iisSettings": {
    "windowsAuthentication": false,
    "anonymousAuthentication": true,
    "iisExpress": {
      "applicationUrl": "http://localhost:40700",
      "sslPort": 44360
    }
  },
  "profiles": {
    "http": {
      "commandName": "Project",
      "dotnetRunMessages": true,
      "launchBrowser": false,
      "applicationUrl": "http://localhost:5000",
      "environmentVariables": {
        "ASPNETCORE_ENVIRONMENT": "Development"
      }
    },
    "https": {
      "commandName": "IISExpress",
      "launchBrowser": false,
      "launchUrl": "weatherforecast",
      "environmentVariables": {
        "ASPNETCORE_ENVIRONMENT": "Development"
      }
    }
  }
}
For the sake of simplicity, we are using just http://localhost:5000 without the HTTPS URI. Feel free to leave the HTTPS address as well on 5001.
Program.cs Class Explanation
Let’s inspect the Program.cs class, to see the code it contains:
var builder = WebApplication.CreateBuilder(args);

// Add services to the container.

builder.Services.AddControllers();

var app = builder.Build();

// Configure the HTTP request pipeline.

app.UseHttpsRedirection();

app.UseAuthorization();

app.MapControllers();

app.Run();
When we compare this class to the same one from the .NET 5 version:
public static void Main(string[] args)
{
    CreateHostBuilder(args).Build().Run();
}

public static IHostBuilder CreateHostBuilder(string[] args) =>
    Host.CreateDefaultBuilder(args)
        .ConfigureWebHostDefaults(webBuilder =>
        {
            webBuilder.UseStartup<Startup>();
        });
We can see three main changes:
- Top-level statements
- Implicit using directives
- And there is no usage of the Startup class
“Top-level statements” means the compiler generates the namespace, class, and method elements for the main program in our application. You can read more about this in our Top Level Statements article.
“Implicit using directives” means the compiler automatically adds a different set of using directives based on a project type, so we don’t have to do that manually. We can find those using directives stored inside the obj/Debug/net6.0 folder with the ...GlobalUsings.g.cs name part.
Finally, we can see that now in the Program class, we can add services to the service collection right below the comment that states exactly that. In .NET 5, we would have to do this in the ConfigureServices() method. Also, we have a section (also marked with a comment) where we can add different middleware components to the application’s pipeline. In .NET 5, we had the Configure() method for this purpose.
Creating Extension Methods
An extension method is inherently the static method. They play a great role in .NET configuration because they increase the readability of our code for sure. What makes it different from the other static methods is that it accepts “this” as the first parameter, and “this” represents the data type of the object that uses that extension method. An extension method must be inside a static class. This kind of method extends the behavior of the types in .NET.
So, let’s start writing some code.
Let’s create a new folder Extensions in the main project and a new class inside with the name ServiceExtensions. We are going to make that class static and it will consist of our service extension methods:
namespace AccountOwnerServer.Extensions
{
    public static class ServiceExtensions
    {
    }
}
CORS Configuration
First, we need to configure CORS in our application. CORS (Cross-Origin Resource Sharing) is a mechanism that gives rights to the user to access resources from the server on a different domain. Because we will use Angular as a client-side on a different domain than the server’s domain, configuring CORS is mandatory. So, let’s add this code to the ServiceExtensions class:
public static void ConfigureCors(this IServiceCollection services)
{
      services.AddCors(options =>
      {
          options.AddPolicy("CorsPolicy",
              builder => builder.AllowAnyOrigin()
              .AllowAnyMethod()
              .AllowAnyHeader());
      });
}
We are using the basic settings for adding CORS policy because for this project allowing any origin, method, and header is quite enough. But we can be more restrictive with those settings if we want. Instead of the AllowAnyOrigin() method that allows requests from any source, we could use the WithOrigins("http://www.something.com") method that will allow requests just from the specified source. Also, instead of AllowAnyMethod() allowing all HTTP methods, we can use WithMethods("POST", "GET") one that will allow only specified HTTP methods. Furthermore, we can make the same changes for the AllowAnyHeader() method by using, for example, the WithHeaders("accept", "content-type") method to allow only specified headers.
IIS Configuration as Part of .NET Configuration
Additionally, we need to configure an IIS integration that will help us with the IIS deployment. So, let’s modify the ServiceExtensions class:
public static void ConfigureIISIntegration(this IServiceCollection services)
{
      services.Configure<IISOptions>(options =>
      {

      });
}
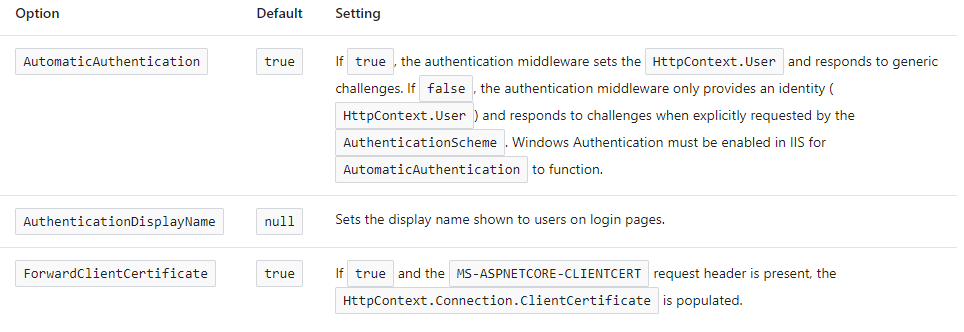
We do not initialize any properties inside the options because we are fine with the default values. For more information about those properties, let’s check out the details:
To call these extension methods, we are going to modify the Program class:
using AccountOwnerServer.Extensions;
using Microsoft.AspNetCore.HttpOverrides;

var builder = WebApplication.CreateBuilder(args);

// Add services to the container.

builder.Services.ConfigureCors();
builder.Services.ConfigureIISIntegration();

builder.Services.AddControllers();

var app = builder.Build();

// Configure the HTTP request pipeline.
if (app.Environment.IsDevelopment())
    app.UseDeveloperExceptionPage();
else
    app.UseHsts();

app.UseHttpsRedirection();

app.UseStaticFiles();

app.UseForwardedHeaders(new ForwardedHeadersOptions
{
    ForwardedHeaders = ForwardedHeaders.All
});

app.UseCors("CorsPolicy");

app.UseAuthorization();

app.MapControllers();

app.Run();
In the first part, CORS, and IIS configuration have been added. Furthermore, the CORS configuration has been added to the application’s pipeline inside the second part of the class reserved for adding components to a pipeline. The important thing to notice here is that we call the UseCors() method above the UseAuthorization() method.
This is the best practice, that Microsoft recommends.
As you may have noticed, there is more code:
app.UseForwardedHeaders()will forward proxy headers to the current request. This will help us during the Linux deployment.app.UseStaticFiles()enables using static files for the request. If we don’t set a path to the static files, it will use awwwrootfolder in our solution explorer.
Conclusion
Concerning the .NET configuration, we could say that this is quite enough. Now you know how to modify the launchSetting.json file, the purpose of the Program class, how to configure services, and finally how to create and use extension methods.
Thank you for reading and do check out the next part in which we will create our first service, logger service, and use it for logging our messages.

