

If you wonder is it hard to manipulate the MySql database by using Workbench, well let me tell you that it is not that hard at all but quite opposite. Creating schemas, tables, relations, and populating those tables is very easy, once you are familiar with the MySql Workbench tool.
By following instructions from this post, you will master skills for creating a database, creating and populating tables, creating relations between those tables, and having the backup of your data. Later on, we will use this database to connect the .NET Core project to it.
If you want to see all the basic instructions and complete navigation for this tutorial, please click on the following link: Introduction page for this tutorial.
So, let’s start.
MySQL, Creating Schema Model Diagram
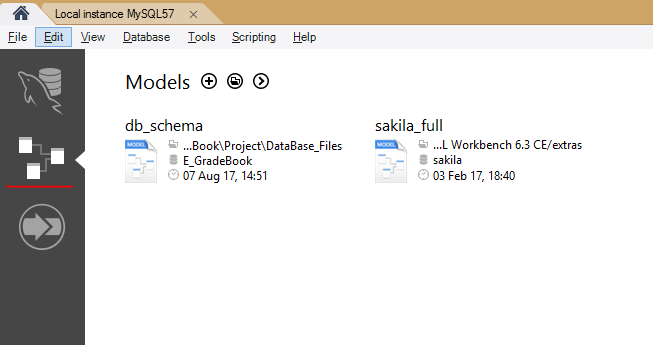
After the MySQL server has been installed, we will start the MySQL Workbench, which will be our tool for creating tables. When you open the Workbench, click on the existing connection, add a password and you will be redirected to the database view. Go back on the home screen and click on the Models icon:
By clicking on the plus button, next to the Models text, we will enter into the model view which will allow us to create our new schema:
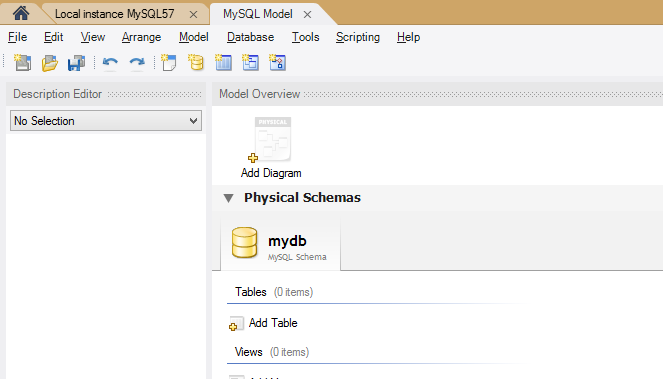
Click twice on the Add Diagram button and you’ll see the screen for creating a schema. Here we will create our tables and the relationships between them:
Creating Tables in Schema Model Diagram
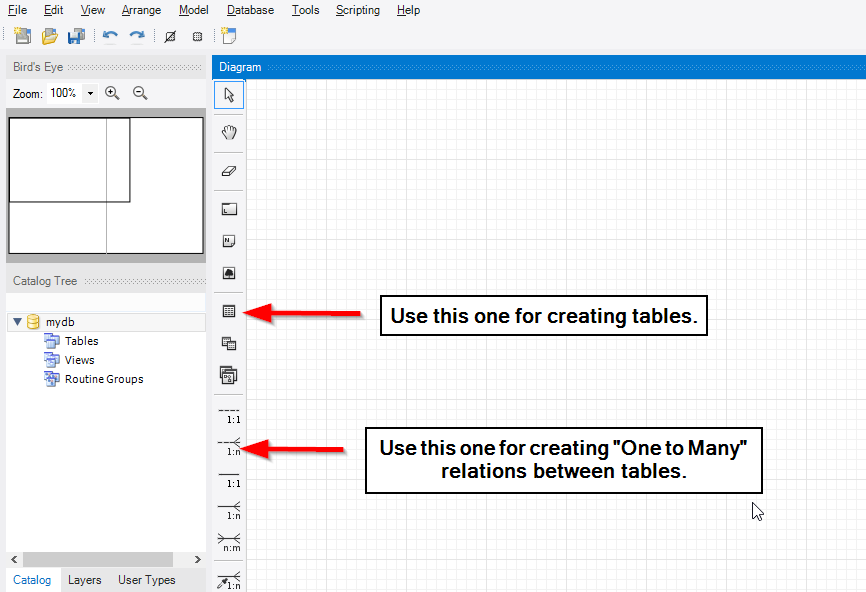
We will create two tables. Click on the icon for the table and then click again on the work ground. Repeat this step one more time to create another table. After, click twice on the first table so we can create columns and give a name to the table:
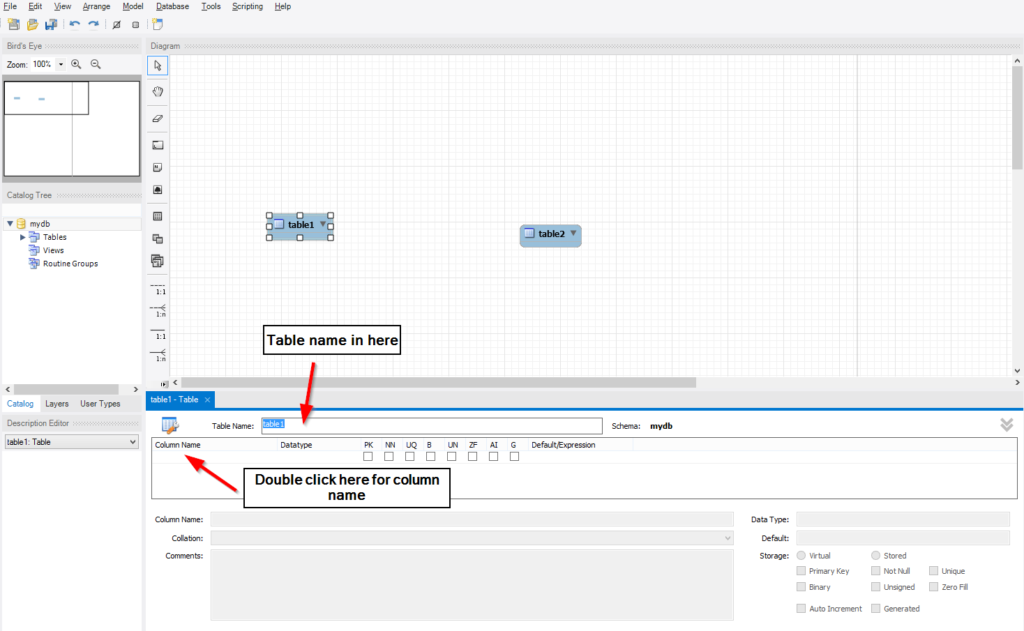
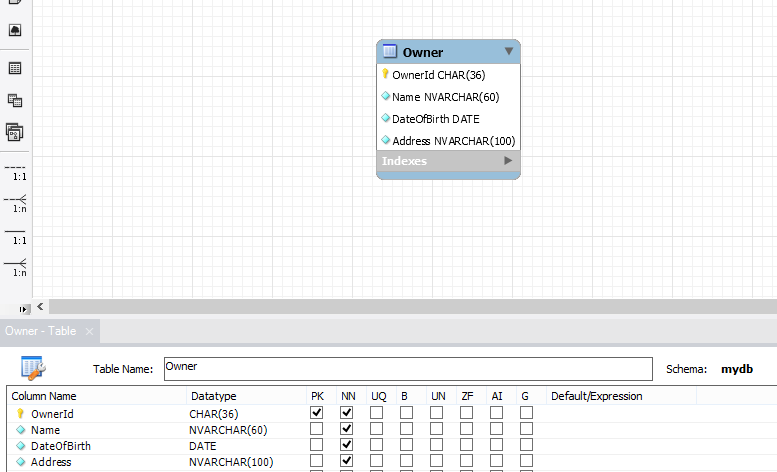
Name the first table Owner and add the columns:
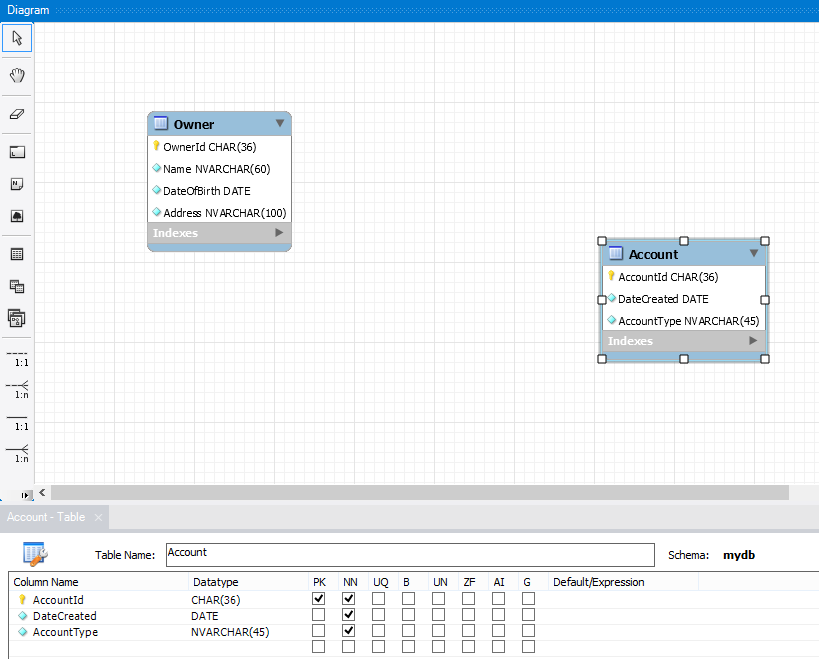
Double-click on the second database table, name it Account and add the columns:
We want to explain why the value Char(36) for the Primary Keys in our tables. This is because we will use GUIDs for our keys, and the representation of a GUID in MySQL is the Char(36).
Adding Table Relations
You can save your model by pressing CTRL+S and after that, we will add the relation to our tables. We will assume that one owner can have multiple accounts (Domestic, Foreign currency, Savings…), therefore we are seeing a relation one-to-many between owner and account. Taking this knowledge into consideration, we want to connect two tables by making the OwnerId foreign key in the Account table, so it could provide us with the relationship between those two tables.
Click on the 1:N relation, one marked in the previous image, then first click on the Account table and then click on the Owner table. Right after that action, you will see the new column inside the Account table. That is our foreign key. Double-click on that new column to change its name. Name it OwnerId.
Now if you look all the way down, you will see several tabs. We are currently in the Columns tab. If you go right and click on the foreign keys tab you will see information about our foreign key in the Account table:
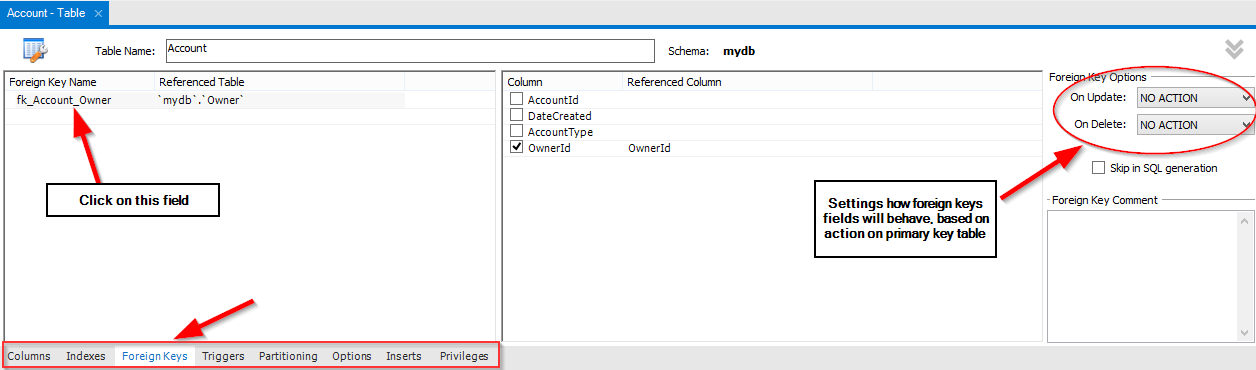
Let’s change the default settings for OnUpdate and OnDelete. For the OnUpdate, we will choose the Cascade option. That means if a row with a primary key, in the Owner table, is updated automatically, update a row with the corresponding foreign key in the Account table. Also, for the OnDelete, we will choose the Restrict option. That’s because we don’t want to allow deleting a row with a primary key, from the Owner table, without previously removing the row with the corresponding foreign key. That way we are preserving the referential integrity of our database.
If you look in the Catalog Tree, which is part of the schema view, you will see “mydb” as the database name. We don’t want to call our database like that, so to change it, right-click on mydb and choose edit schema. Give it the name AccountOwner and just save your model.
Exporting Schema to the Script File
We are finished with the create schema actions. Now, we want to export our database schema to a script file, which will provide us with a code to create our database with the tables, by simply executing our generated script.
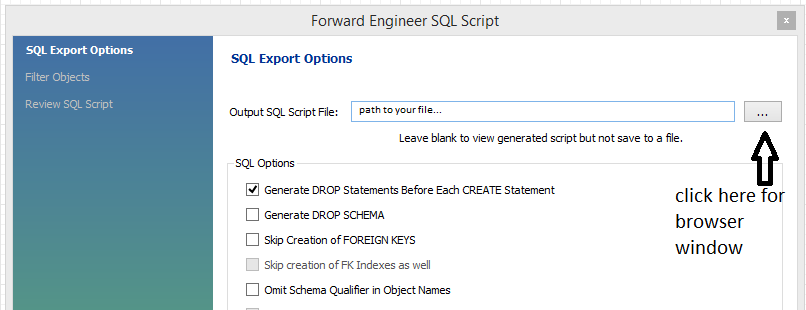
Click on the File menu, then hover over the Export and choose the Forward Engineering SQL Create Script. You will see a new window, in which you have to add the name of the script file and the other options for generating scripts. In the field “Output SQL Script File”, write the name of the script, if left blank, you will just view the generated script and be able to copy it but not save it. Also, click on the “Generate DROP Statements Before Each CREATE Statement” option. This option will drop any existing table, prior to the creation of a new one with the same name. This way you’ll avoid errors if any table already exists inside the database while starting the script file.
Click the Next button. You will see the SQL Object Explorer Filter and in that window just check the first option: Export MySQL Table Objects. Click Next again. Here you will notice the way your script looks. Just click the finish and the script will be exported to your desired location.
Creating the Database from the Script File
If your database view is still open, redirect yourself to that view. If it is not open, click on the home tab, then click the first icon from the top (one with a Dolphin on it), and then click on the Local Instance part to enter the database view:

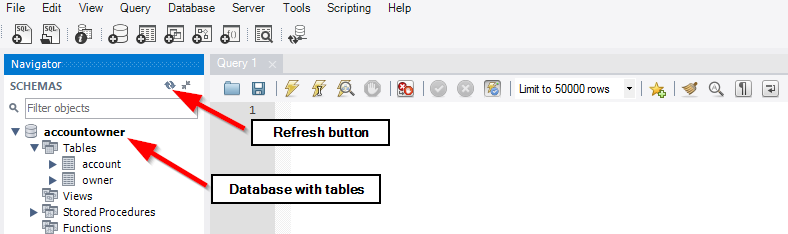
In the database view, choose the Schemas tab in the Navigator part of the page. There you will find some default databases created.
Go to the File menu and choose the option Run SQL Script. Select the saved script and then just click the run button. This will create a database. If you refresh your schemas view, you will be able to see our database.
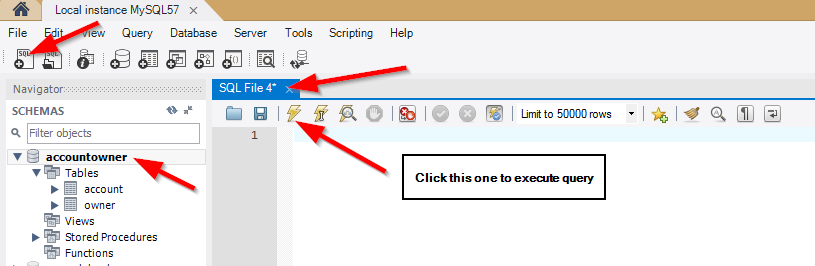
If you get an error that the process is already used, you can do this another way.
Just go to the File menu and click the Open SQL Script selection. Then, simply find the created script and once it is loaded, just hit the execute button.
Because the account table depends on the owner table, we need to populate the owner table first and the account table next. Right-click on the owner table, choose the first option: Select Rows – Limit …, and you will see the query window:
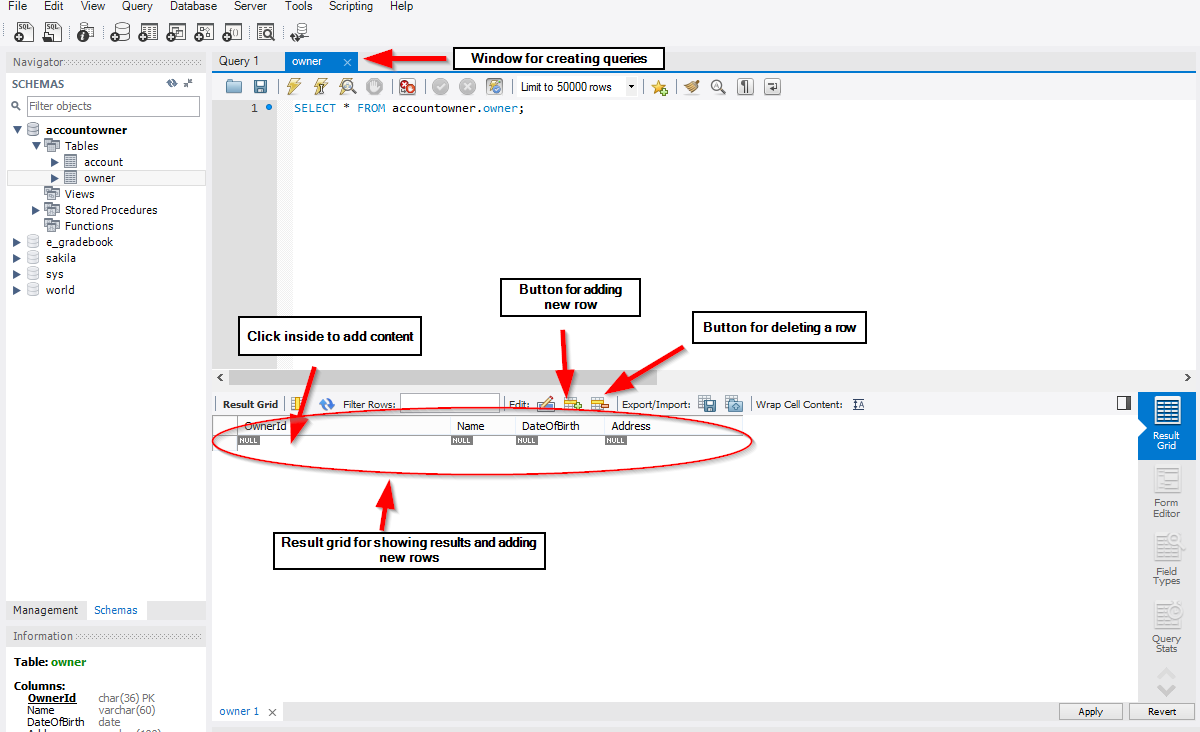
Populating Tables With the Data
Now we want to populate our tables, and for that open a new SQL tab for executing the queries:
And execute the code:
INSERT INTO `accountowner`.`owner`
VALUES ('24fd81f8-d58a-4bcc-9f35-dc6cd5641906','John Keen','1980-12-05','61 Wellfield Road'),
('261e1685-cf26-494c-b17c-3546e65f5620','Anna Bosh','1974-11-14','27 Colored Row'),
('a3c1880c-674c-4d18-8f91-5d3608a2c937','Sam Query','1990-04-22','91 Western Roads'),
('f98e4d74-0f68-4aac-89fd-047f1aaca6b6','Martin Miller','1983-05-21','3 Edgar Buildings');
INSERT INTO `accountowner`.`account`
VALUES ('03e91478-5608-4132-a753-d494dafce00b','2003-12-15','Domestic','f98e4d74-0f68-4aac-89fd-047f1aaca6b6'),
('356a5a9b-64bf-4de0-bc84-5395a1fdc9c4','1996-02-15','Domestic','261e1685-cf26-494c-b17c-3546e65f5620'),
('371b93f2-f8c5-4a32-894a-fc672741aa5b','1999-05-04','Domestic','24fd81f8-d58a-4bcc-9f35-dc6cd5641906'),
('670775db-ecc0-4b90-a9ab-37cd0d8e2801','1999-12-21','Savings','24fd81f8-d58a-4bcc-9f35-dc6cd5641906'),
('a3fbad0b-7f48-4feb-8ac0-6d3bbc997bfc','2010-05-28','Domestic','a3c1880c-674c-4d18-8f91-5d3608a2c937'),
('aa15f658-04bb-4f73-82af-82db49d0fbef','1999-05-12','Foreign','24fd81f8-d58a-4bcc-9f35-dc6cd5641906'),
('c6066eb0-53ca-43e1-97aa-3c2169eec659','1996-02-16','Foreign','261e1685-cf26-494c-b17c-3546e65f5620'),
('eccadf79-85fe-402f-893c-32d3f03ed9b1','2010-06-20','Foreign','a3c1880c-674c-4d18-8f91-5d3608a2c937');
If you want to back up your data, all you have to do is click on the Server menu, choose the Data Export, select your database, and check Export to Self-Contained File. Choose the destination for your backup file and click Start Export.
Conclusion
That is all for Part 1 of this tutorial. We have learned how to create MySQL schema, how to create tables and table relationships. Furthermore, we now know how to create database scripts and insert data into our tables.
Even though we covered the basics of MySQL, you have enough knowledge to start creating your own relational database schemas.
Thank you for reading and check out the next part, where we start diving into the .NET Core world.

