


Updated on
Enabling CORS in an ASP.NET Core Web API takes two calls. builder.Services.AddCors() registers the policies, and app.UseCors() puts the middleware in the pipeline so those policies reach the response.
A policy is the whole configuration: which origins may call us, which methods and headers they may send, and which response headers their JavaScript is allowed to read. We can register one default policy, or several named ones and pick per controller, per action or per endpoint.
A correct policy can still fail if app.UseCors() sits in the wrong place in the pipeline, so that question gets its own section below.
VIDEO: Implement CORS in ASP.NET Core Web API.
What Is CORS?
CORS, Cross-Origin Resource Sharing, is a set of HTTP response headers through which a server tells a browser that a page from another origin is allowed to read its responses.
Two URLs share an origin when their scheme, host and port all match. Change any one of them and the browser treats the second URL as a different origin.
The browser enforces this. Our Web API runs a simple request and returns the response either way, and the browser then decides whether the JavaScript that asked for it may see the result.
It also means CORS does not protect the API. Microsoft’s documentation says so plainly: “An API is not safer by allowing CORS.”
Each origin we allow is one more site whose scripts can read our responses, so we should name the origins we trust and keep that list short.
The quote comes from Microsoft’s CORS documentation for ASP.NET Core. Now, let’s learn what the term same-origin actually means.
About Same-Origin and What It Means
Two URLs are considered to have the same origin if they have the same URL scheme (HTTP or HTTPS), same hostname (domain name), and same port number (the endpoint at which applications talk to each other).
What Is the Same-Origin Policy?
The Same-origin policy states that a Web browser will only allow a page to read responses from a URL that belongs to the same origin. That is, the client app (https://example.com) cannot read responses from the server app (https://example.net) as they belong to a different origin. This policy exists to isolate potentially malicious scripts from harming other documents on the web.
But there are some cases where Cross-Domain scripting is desired and the idea of the open web makes it compelling.
Cross-Origin Resource Sharing is a mechanism to bypass the Same-Origin policy of a Web browser. Specifically, a server app uses additional HTTP headers to tell a browser that it is fine to load documents (from its origin) in a few selected client apps (of different origin).
But how does CORS actually work?
Let’s have a look at the image. There is a client app (https://example.com) sending a GET request to a server app (https://example.net) for some resource:

All modern browsers set the Origin header automatically, which indicates the origin of the site that is making the request.
If the server allows Cross-origin requests from the Origin (https://example.com), it sets the Access-Control-Allow-Origin header with its value matching the origin header’s value from the request.
In another way, if the server doesn’t include this header, the request fails. The browser shall receive the response data, but this data shall not be accessible to the client.
That’s how a simple CORS request works.
Preflight Requests
Sometimes, instead of a simple GET request, a client may need to send requests like PUT, DELETE, etc. For such requests, the browser sends an additional request (an OPTIONS request) called a Preflight request. This is done just before the actual request to make sure that the server allows the original request. If it does, the browser sends the actual request.
This diagram illustrates such a scenario:
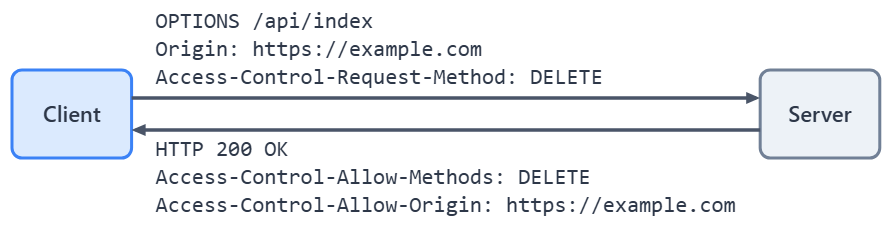 A preflight request
 Actual request
How Do We Set Up a Client and a Server on Different Origins?
In the demo, let’s create two projects. The first one is going to be a Web API project, and the second one is going to be a Blazor WebAssembly project.
Let’s create a Web API project that will be our server. We name it Api and turn the controllers option on (--use-controllers with the .NET CLI), because we use the WeatherForecastController later. Once we create this project, we are going to modify the launchSettings.json file:
{
  "profiles": {
    "Api": {
      "commandName": "Project",
      "dotnetRunMessages": true,
      "launchBrowser": false,
      "launchUrl": "weatherforecast",
      "applicationUrl": "https://localhost:5001;http://localhost:5000",
      "environmentVariables": {
        "ASPNETCORE_ENVIRONMENT": "Development"
      }
    }
  }
}
As you can see, this app will run on the https://localhost:5001 URI.
Next, let’s create a Client app. We are going to create a new Blazor WebAssembly standalone project named Client. Of course, we have to modify the launchSettings.json file as well:
{
  "profiles": {
    "Client": {
      "commandName": "Project",
      "dotnetRunMessages": true,
      "launchBrowser": true,
      "inspectUri": "{wsProtocol}://{url.hostname}:{url.port}/_framework/debug/ws-proxy?browser={browserInspectUri}",
      "applicationUrl": "https://localhost:5011;http://localhost:5010",
      "environmentVariables": {
        "ASPNETCORE_ENVIRONMENT": "Development"
      }
    }
  }
}
Okay. We have both a client and the server app running and they belong to different origins. The server app will run on port 5001 and the client app on port 5011.
To make cross-origin requests, we first have to modify the Program.cs file of the client’s app:
using Microsoft.AspNetCore.Components.WebAssembly.Hosting;
using Client;

var builder = WebAssemblyHostBuilder.CreateDefault(args);
builder.RootComponents.Add<App>("#app");

builder.Services.AddScoped(_ => new HttpClient { BaseAddress = new Uri("https://localhost:5001") });

await builder.Build().RunAsync();
Here, we just set up the base address for the HttpClient, which is the URI of our Web API. Our article on consuming a Web API from a Blazor WebAssembly client covers the HttpClient side in more depth.
Then, we have to open the Pages/FetchData.razor file (newer templates name it Pages/Weather.razor), and modify the @code part:
@code {
    private WeatherForecast[]? forecasts;

    protected override async Task OnInitializedAsync()
    {
        forecasts = await Http.GetFromJsonAsync<WeatherForecast[]>("/weatherforecast");
    }

    ...
}
Since we already modified the base address of the HttpClient, by adding this change, we want to send our GET request to the https://localhost:5001/weatherforecast URI, which is the exact address of the GET action inside the WeatherForecast controller in the server app.
Since we haven’t enabled CORS on the server app, the server app doesn’t set any CORS headers and the browser rejects the response.
So, if we start both applications, navigate to the client app, and open the Fetchdata page, we are going to see the error message:

So, we can see that the request is blocked by CORS policy and our client app is not allowed to fetch the data from the required resource.
How Do We Enable CORS With Middleware in ASP.NET Core?
Enabling CORS through middleware is two registrations and one pipeline call.
builder.Services.AddCors() takes an options delegate. Inside it, AddPolicy(name, policy => ...) registers a named policy, and AddDefaultPolicy(policy => ...) registers the one that applies when nothing names a policy explicitly.
app.UseCors(policyName) then adds the middleware and applies that policy to every endpoint that has no CORS setting of its own. Calling app.UseCors() with no argument applies the default policy instead, or the policy an endpoint names through [EnableCors] or RequireCors().
The policy itself is built by chaining calls: WithOrigins() for who may call us, WithMethods() and WithHeaders() for what they may send, and WithExposedHeaders() for what their JavaScript may read back.
A parameterless app.UseCors() fails silently when no default policy is registered and the endpoint names no policy: it writes no CORS headers at all. The middleware runs, finds no policy and lets the request through, and no exception is thrown, so nothing in the response tells us that CORS is off.
Microsoft’s CORS documentation says the same about this case: “Because a default policy hasn’t been configured, app.UseCors() alone doesn’t enable CORS.”
Let’s open the Program.cs file in the server app and modify it:
var builder = WebApplication.CreateBuilder(args);

const string policyName = "CorsPolicy";

builder.Services.AddCors(options =>
{
    options.AddPolicy(name: policyName, builder =>
    {
        builder.AllowAnyOrigin()
            .AllowAnyHeader()
            .AllowAnyMethod();
    });
});

builder.Services.AddControllers();

...

app.UseCors(policyName);

app.UseAuthorization();

app.MapControllers();

app.Run();
First, we create a constant to hold the name of our CORS policy. Then, we call the AddCors method that adds cross-origin resource-sharing services to the service collection. This method accepts an Action delegate as a parameter where we can configure the CORS options. For the CORS options, we call the AddPolicy method, which adds a new policy to the configuration and also accepts an Action delegate as a parameter where we can set up the methods to build our policy.
With this policy, we enable access from any origin AllowAnyOrigin, allow any header in a request AllowAnyHeader, and allow any method AllowAnyMethod.
We can agree that this policy is not the strict one, but it is a basic setup that will remove the CORS issue for our client application.
Also, we call the UseCors method and pass the policy name to add the CORS middleware to the application’s pipeline. We must call this method after the UseRouting method and before the UseAuthorization method.
Now, with these changes in place, we can start both of our apps and navigate to the FetchData page:
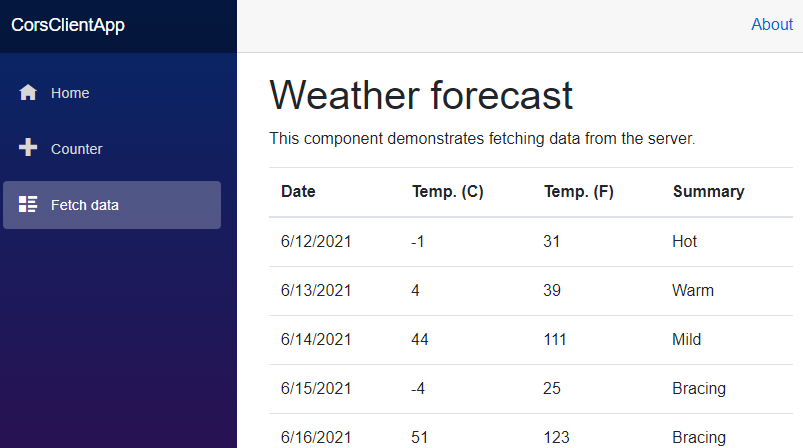
There we go. We have enabled CORS in our application and removed the issue we were facing before.
Default Policies for CORS in ASP.NET Core
In the case where we don’t want to use multiple named policies but a single default policy, we can replace the AddPolicy method with the AddDefaultPolicy method:
builder.Services.AddCors(options =>
{
    options.AddDefaultPolicy(builder =>
    {
        builder.AllowAnyOrigin()
            .AllowAnyHeader()
            .AllowAnyMethod();
    });
});
As you can see, we are not providing the name of the policy. Additionally, we don’t have to provide the policy name in the UseCors method:
app.UseCors();

app.UseAuthorization();

app.MapControllers();
For the rest of the article, we are going to stick with the named CORS policy configuration.
How Do We Enable CORS With the EnableCors Attribute?
Instead of enabling CORS at the entire application level, we can also enable CORS at the controller level or the action level. To be able to do that, we have to use the [EnableCors] attribute:
- We can use just the
[EnableCors]attribute on top of the controller or the action, and it will apply the default CORS policy - Or we can use the
[EnableCors("Policy name")]attribute, to apply a named CORS policy
By using the named policy with the [EnableCors] attribute, we can apply different policies to different controllers or actions.
So, in our example, if we want, we can add one more named policy for the CORS configuration:
const string policyName = "CorsPolicy";
const string anotherPolicyName = "AnotherCorsPolicy";

builder.Services.AddCors(options =>
{
    options.AddPolicy(name: policyName, builder =>
    {
        builder.AllowAnyOrigin()
            .AllowAnyHeader()
            .AllowAnyMethod();
    });
    options.AddPolicy(name: anotherPolicyName, builder =>
    {
        builder.AllowAnyOrigin()
            .AllowAnyHeader()
            .AllowAnyMethod();
    });
});
Also, we have to modify:
app.UseCors();

app.UseAuthorization();

app.MapControllers();
This time, we leave the policy name off because the attributes name the policy for each action. We still need the parameterless app.UseCors(), since it runs the middleware that reads the policy name from the endpoint. Without the attributes, this configuration writes no CORS headers and raises no error.
Finally, to see the [EnableCors] attribute in action, we are going to modify the WeatherForecastController. Its Get action and, later, a minimal API endpoint return the same data, so we replace the template’s WeatherForecast class with one record at the bottom of Program.cs and delete the WeatherForecast.cs file:
public record WeatherForecast(DateOnly Date, int TemperatureC, string? Summary)
{
    public int TemperatureF => 32 + (int)(TemperatureC / 0.5556);
}
The attribute lives in the Microsoft.AspNetCore.Cors namespace, so the controller file needs a using Microsoft.AspNetCore.Cors; directive. Then we change the actions:
[EnableCors("CorsPolicy")]
[HttpGet]
public IEnumerable<WeatherForecast> Get()
{
    var rng = new Random();
    return Enumerable.Range(1, 5).Select(index => new WeatherForecast
    (
        DateOnly.FromDateTime(DateTime.Now.AddDays(index)),
        rng.Next(-20, 55),
        Summaries[rng.Next(Summaries.Length)]
    ))
    .ToArray();
}

[EnableCors("AnotherCorsPolicy")]
[HttpGet("anotherPolicyExample")]
public IActionResult GetTempAboveLimit()
{
    return Ok("This action is protected with another named CORS policy");
}
As you can see for the first action, we are enabling CORS using the old named policy, CorsPolicy. But for the other action, we are using a new policy, AnotherCorsPolicy.
Okay, now we know how to apply different policies while enabling CORS. However, it is not a good practice to use two different named policies that apply the same policy options. In this situation, only one policy would be sufficient.
So, let’s see how we can configure different policy options and make sense of using different named policies in our application.
Configuring CORS Policy
We can use various options while adding policies to the CORS configuration.
Right now, for both policies, we are allowing any origin, any header, and any method. But let’s say, we want to allow only our client application to access the first GET action from the WeatherForecast controller, and some other client (on port 5021) to access the second action:
builder.Services.AddCors(options =>
{
    options.AddPolicy(name: policyName, builder =>
    {
        builder.WithOrigins("https://localhost:5011")
            .AllowAnyHeader()
            .AllowAnyMethod();
    });
    options.AddPolicy(name: anotherPolicyName, builder =>
    {
        builder.WithOrigins("https://localhost:5021")
            .AllowAnyHeader()
            .AllowAnyMethod();
    });
});
This time, we are using the WithOrigins method, which accepts a params string[] origins as a parameter. This means, if we want to allow access to multiple origins for a single policy, we can just add multiple comma-separated URIs as an argument: WithOrigins("First URI", "Second URI").
Configuring CORS for Multiple Subdomains
One more thing. When we want to allow access for a client that has a main domain and multiple subdomains, we don’t have to add all the URIs with subdomains as arguments. What we can do is use the wildcard in the WithOrigins method followed by the SetIsOriginAllowedToAllowWildcardSubdomains method:
options.AddPolicy(name: policyName, builder =>
{
    builder.WithOrigins("https://*.code-maze.com")
        .SetIsOriginAllowedToAllowWildcardSubdomains();
});
By using the SetIsOriginAllowedToAllowWildcardSubdomains method, we allow origins to match a configured wildcard domain when evaluating if the origin is allowed.
Enabling CORS for Specific Methods
If we take a look at our controller, we can see that we have only GET actions inside. Well, we can specify that as well in the CORS configuration:
builder.Services.AddCors(options =>
{
    options.AddPolicy(name: policyName, builder =>
    {
        builder.WithOrigins("https://localhost:5011")
            .AllowAnyHeader()
            .WithMethods("GET");
    });
    options.AddPolicy(name: anotherPolicyName, builder =>
    {
        builder.WithOrigins("https://localhost:5021")
            .AllowAnyHeader()
            .WithMethods("GET");
    });
});
Now, instead of AllowAnyMethod, we are using WithMethods, which accepts params string[] methods as a parameter. Of course, this means if we want to allow access to multiple methods, we need to add them as multiple comma-separated strings: WithMethods("PUT", "DELETE", "GET").
Enabling CORS for Specific Headers
In the same way that we use the WithMethods method to specify access for single or multiple methods, we can use the WithHeaders method to allow specific headers to be sent in a CORS request:
options.AddPolicy(name: anotherPolicyName, builder =>
{
    builder.WithOrigins("https://localhost:5021")
        .WithHeaders(HeaderNames.ContentType, HeaderNames.Accept)
        .WithMethods("GET");
});
The HeaderNames class lives in the Microsoft.Net.Http.Headers namespace, so Program.cs needs a using Microsoft.Net.Http.Headers; directive at the top.
Additionally, when we want to expose some headers, we can use the WithExposedHeaders method. For example, in our Blazor WebAssembly Pagination with ASP.NET Core Web API article, we create a pagination functionality on the Web API’s side and add the required information inside the X-Pagination header:
[HttpGet]
public async Task<IActionResult> Get([FromQuery] ProductParameters productParameters)
{
    var products = await _repo.GetProducts(productParameters);
    Response.Headers.Append("X-Pagination", JsonSerializer.Serialize(products.MetaData));

    return Ok(products);
}
But for our client application to be able to access that information inside the header, we have to expose it in the CORS configuration:
options.AddPolicy(name: anotherPolicyName, builder =>
{
    builder.WithOrigins("https://localhost:5021")
        .WithHeaders(HeaderNames.ContentType, HeaderNames.Accept)
        .WithMethods("GET")
        .WithExposedHeaders("X-Pagination");
});
And that’s it for our CORS configuration.
Additional read: You can see CORS configured for an Angular client in our Service Configuration in ASP.NET Core Web API With Extension Methods article.
Which Options Can We Set on a CORS Policy?
Every CORS policy is built by chaining methods on the policy builder that AddPolicy() hands us, and twelve of those methods are worth knowing.
Three decide the origin: WithOrigins() for a named list, AllowAnyOrigin() for everything, and SetIsOriginAllowed() when the decision needs code. A fourth, SetIsOriginAllowedToAllowWildcardSubdomains(), makes https://*.example.com match subdomains as a wildcard. Without it, the policy compares that string literally and allows none of the subdomains.
Four decide what the request may carry: WithMethods() and AllowAnyMethod() for the HTTP methods, WithHeaders() and AllowAnyHeader() for the request headers.
WithExposedHeaders() works on the response. It decides which response headers the browser lets our JavaScript read, because a cross-origin response exposes only a short list of headers by default, and a custom header such as X-Pagination is not on it.
AllowCredentials() and DisallowCredentials() decide whether cookies and authentication headers are allowed, and SetPreflightMaxAge() decides how long a browser may cache a preflight answer before it sends another OPTIONS request.
Here is each option with the response header it sets:
| To do this | Call on the policy builder | Response header it sets |
|---|---|---|
| Allow named origins | WithOrigins("https://a.com", "https://b.com") | Access-Control-Allow-Origin |
| Allow every origin | AllowAnyOrigin() | Access-Control-Allow-Origin: * |
| Allow a wildcard subdomain | WithOrigins("https://*.a.com") plus SetIsOriginAllowedToAllowWildcardSubdomains() | Access-Control-Allow-Origin |
| Decide the origin in code | SetIsOriginAllowed(origin => ...) | Access-Control-Allow-Origin |
| Allow named methods | WithMethods("GET", "PUT") | Access-Control-Allow-Methods |
| Allow every method | AllowAnyMethod() | Access-Control-Allow-Methods |
| Allow named request headers | WithHeaders("Content-Type", "Accept") | Access-Control-Allow-Headers |
| Allow every request header | AllowAnyHeader() | Access-Control-Allow-Headers |
| Let the client read a response header | WithExposedHeaders("X-Pagination") | Access-Control-Expose-Headers |
| Allow cookies and auth headers | AllowCredentials() | Access-Control-Allow-Credentials |
| Refuse cookies and auth headers | DisallowCredentials() | none |
| Cache the preflight response | SetPreflightMaxAge(TimeSpan.FromSeconds(2520)) | Access-Control-Max-Age |
A policy cannot pair AllowAnyOrigin() with AllowCredentials(), and our article on how to fix the CORS error with AnyOrigin and AllowCredentials shows what to do instead.
Using CORS With Minimal API
So far, we have applied CORS policies to the controller’s action. We can use CORS with minimal APIs as well.
Let’s add a minimal API endpoint to our Program.cs:
app.MapControllers();

var summaries = new[]
{
    "Freezing", "Bracing", "Chilly", "Cool", "Mild", "Warm", "Balmy", "Hot", "Sweltering", "Scorching"
};

app.MapGet("/minimal/weatherforecast", () =>
    {
        var forecast = Enumerable.Range(1, 5).Select(index =>
                new WeatherForecast
                (
                    DateOnly.FromDateTime(DateTime.Now.AddDays(index)),
                    Random.Shared.Next(-20, 55),
                    summaries[Random.Shared.Next(summaries.Length)]
                ))
            .ToArray();
        return forecast;
    })
    .WithName("GetWeatherForecast");

app.Run();

public record WeatherForecast(DateOnly Date, int TemperatureC, string? Summary)
{
    public int TemperatureF => 32 + (int)(TemperatureC / 0.5556);
}
Here, we define a new endpoint /minimal/weatherforecast that would respond to the GET request and return some random weather data.
We can apply our (previously defined) policies to this endpoint:
app.MapGet("/minimal/weatherforecast", () =>
    {
        var forecast = Enumerable.Range(1, 5).Select(index =>
                new WeatherForecast
                (
                    DateOnly.FromDateTime(DateTime.Now.AddDays(index)),
                    Random.Shared.Next(-20, 55),
                    summaries[Random.Shared.Next(summaries.Length)]
                ))
            .ToArray();
        return forecast;
    })
    .WithName("GetWeatherForecast")
    .RequireCors(policyName);
All we have to do is to use the RequireCors method.
Where Do We Call UseCors in the Middleware Pipeline?
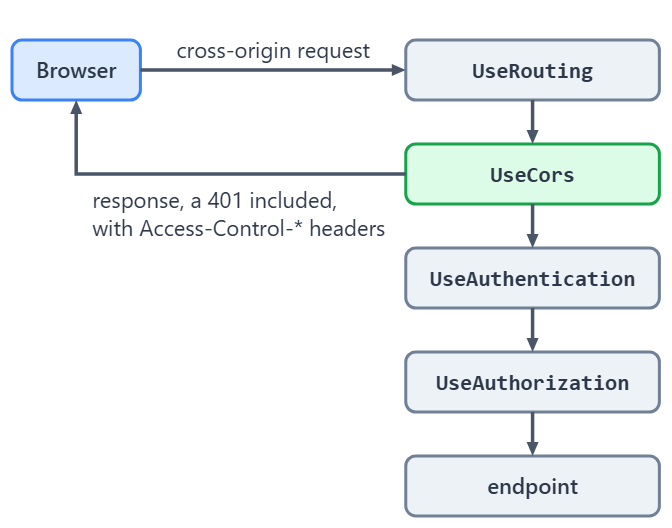
app.UseCors() goes after app.UseRouting() and before app.UseAuthentication() and app.UseAuthorization().
The order decides what a refused request looks like. Put app.UseAuthentication() and app.UseAuthorization() ahead of app.UseCors(), and a request the authorization middleware rejects returns its 401 before the CORS middleware ever runs. That 401 carries no Access-Control-Allow-Origin header, so the browser reports a CORS failure instead of the status the server sent, and our JavaScript never learns that the problem was authentication. When the endpoint carries its own CORS setting, as ours do, the preflight gets that 401 too.
The same thing happens when we register authentication and authorization services but never call app.UseAuthentication() or app.UseAuthorization() ourselves. WebApplication then adds both right after routing, ahead of our app.UseCors().
Static files are the other pairing to remember. app.UseStaticFiles() normally comes before app.UseCors(), and it goes after only when JavaScript on another origin fetches those files.
The rule is short enough to keep in mind: route, then decide who may talk to us, then decide who they are, then decide what they may do.
Microsoft’s middleware documentation gives the order directly: “UseCors should be called before UseAuthentication and UseAuthorization.” The CORS documentation adds the static-files pairing: “Typically, UseStaticFiles is called before UseCors. Apps that use JavaScript to retrieve static files cross site must call UseCors before UseStaticFiles.” Our article on ASP.NET Core middleware covers middleware order in general.
The pipeline looks like this:
How to Disable CORS
Finally, a small note on disabling CORS. Sometimes we need to disable CORS on the action or the controller level.
To do that, we can use the [DisableCors] attribute:
[DisableCors]
[HttpGet]
public async Task<IActionResult> Get([FromQuery] ProductParameters productParameters)
{
    var products = await _repo.GetProducts(productParameters);
    Response.Headers.Append("X-Pagination", JsonSerializer.Serialize(products.MetaData));
    return Ok(products);
}
That’s it for now. Let’s recap what we’ve learned.
Conclusion
Think of CORS as a relaxation attempt to the more restrictive Same-Origin policy. On one side, there is a growing need for security on the web. And on the other, there is a need to integrate web services. CORS provides rich tools for our need for an open and secure web, and ASP.NET Core allows us to take advantage of CORS in our cross-platform web applications.
Tested with .NET 10.0.10.