

Let’s imagine that we have a .NET Core Web API project in which we need to generate a PDF report. Even though it shouldn’t suppose to be too hard to do something like that, we could end up losing too much time if we don’t know how to do it properly.
In this article, we are going to show how to use the DinkToPDF library to easily generate PDF documents while working on the .NET Core Web API project.
So, without further ado, let’s dive right into the fun part.
VIDEO: How to Easily Create a PDF Document in ASP.NET Core Web API video.
You can download the source code for this article at Creating PDF Document Source Code.
In this post, we are going to cover:
- Basic Project Preparations
- DinkToPdf Library Configuration
- Preparing Data for the PDF Document
- Saving the PDF Document on the Local Storage
- Showing a PDF Document in a Browser
- Using Existing HTML Page to Generate PDF Content
- Enabling Download Mode
- Update Project For Deployment
- Conclusion
Basic Project Preparations
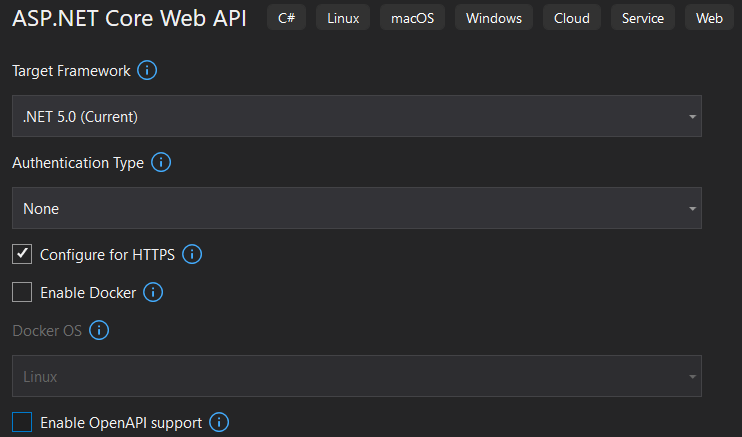
Let’s start, by creating a brand new .NET Core 3.0 Web API project named PDF_Generator:
After the project creation, we are going to modify the launchSettings.json file to disable our browser to start automatically:
{
  "profiles": {
    "PDF_Generator": {
      "commandName": "Project",
      "launchBrowser": false,
      "applicationUrl": "https://localhost:5001;http://localhost:5000",
      "environmentVariables": {
        "ASPNETCORE_ENVIRONMENT": "Development"
      }
    }
  }
}
DinkToPdf Library Configuration
DinkToPdf is a cross-platform oriented library which is the wrapper for the Webkit HTML to PDF library. It uses the WebKit engine to convert HTML to PDF.
It will allow us to create a PDF document from our HTML string that we generate in the .NET Core project, or to create a PDF document from an existing HTML page. Furthermore, we can download the created PDF document or save it on a certain location or return a new HTML page with the PDF content.
We are going to cover all these features in this article.
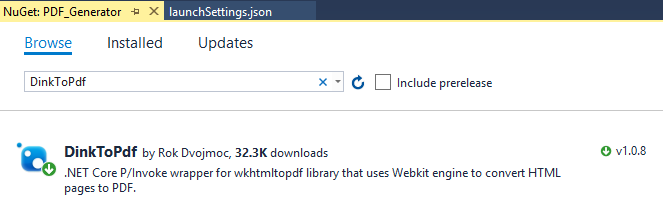
So, let’s install the DinkToPdf library first:
PM> Install-Package DinkToPdf
Or search for DinkToPdf inside the Nuget Package window:
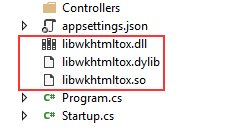
After the installation completes, we need to import native library files to our root project. We can find those files in our source project in the NativeLibrary folder. Inside we will find two folders 32bit and 64bit, so we need to choose the appropriate library for our OS. We are going to choose the files from the 64bit folder:
Finally, we need to register this library with our IoC container in the StartUp class:
public void ConfigureServices(IServiceCollection services)
{
    services.AddSingleton(typeof(IConverter), new SynchronizedConverter(new PdfTools()));

    services.AddControllers();
}
To learn in more detail about service registration in .NET Core and how to keep Startup methods cleaner, you can read the .NET Core Service Configuration.
Excellent.
We have everything in place and we are ready to proceed.
Preparing Data for the PDF Document
In a real-world project, we can collect data from the database or receive it from other API. But for the sake of simplicity, we are going to collect data for our PDF document from the local storage. Then we are going to create an HTML template and store it in the PDF document.
So let’s first create a new folder Models and inside it the Employee.cs file:
namespace PDF_Generator.Models
{
    public class Employee
    {
        public string Name { get; set; }
        public string LastName { get; set; }
        public int Age { get; set; }
        public string Gender { get; set; }
    }
}
To continue, we are going to create a new folder Utility and two class files inside it DataStoage.cs and TemplateGenerator.cs. A complete structure should look like this:

Now, let’s modify the DataStorage.cs file:
using PDF_Generator.Models;
using System.Collections.Generic;

namespace PDF_Generator.Utility
{
    public static class DataStorage
    {
        public static List<Employee> GetAllEmployees() =>
            new List<Employee>
            {
                new Employee { Name="Mike", LastName="Turner", Age=35, Gender="Male"},
                new Employee { Name="Sonja", LastName="Markus", Age=22, Gender="Female"},
                new Employee { Name="Luck", LastName="Martins", Age=40, Gender="Male"},
                new Employee { Name="Sofia", LastName="Packner", Age=30, Gender="Female"},
                new Employee { Name="John", LastName="Doe", Age=45, Gender="Male"}
            };
    }
}
In this code, we just return a list of employees that will be displayed inside the HTML template.
HTML Template Generation
We want to generate an HTML template, so we need to modify the TemplateGenerator.cs file:
using System.Text;
namespace PDF_Generator.Utility
{
public static class TemplateGenerator
{
public static string GetHTMLString()
{
var employees = DataStorage.GetAllEmployess();
var sb = new StringBuilder();
sb.Append(@"
<html>
<head>
</head>
<body>
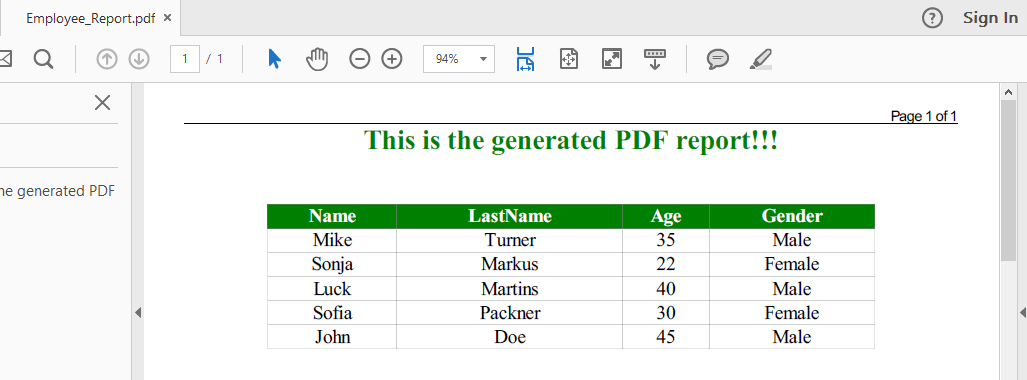
<div class='header'><h1>This is the generated PDF report!!!</h1></div>
<table align='center'>
<tr>
<th>Name</th>
<th>LastName</th>
<th>Age</th>
<th>Gender</th>
</tr>");
foreach (var emp in employees)
{
sb.AppendFormat(@"<tr>
<td>{0}</td>
<td>{1}</td>
<td>{2}</td>
<td>{3}</td>
</tr>", emp.Name, emp.LastName, emp.Age, emp.Gender);
}
sb.Append(@"
</table>
</body>
</html>");
return sb.ToString();
}
}
}
So, we are fetching data from our static DataStorage class and fill our template with it. The HTML template is nothing more than a pure HTML code.
But we want to style our table and h1 tag as well, so let’s create the new folder assets and inside it the new styles.css file and modify it:
.header {
    text-align: center;
    color: green;
    padding-bottom: 35px;
}

table {
    width: 80%;
    border-collapse: collapse;
}

td, th {
    border: 1px solid gray;
    padding: 15px;
    font-size: 22px;
    text-align: center;
}

table th {
    background-color: green;
    color: white;
}
This CSS file is going to be loaded later in the Controller class.
That is it, we have our HTML template to use for the PDF creation. Now, we can continue to the Controller logic.
Saving the PDF Document on the Local Storage
In the Controllers folder, we are going to create a new empty API controller PdfCreatorController:
namespace PDF_Generator.Controllers
{
    [Route("api/pdfcreator")]
    [ApiController]
    public class PdfCreatorController : ControllerBase
    {
    }
}
Now, let’s modify the PdfCreatorController class to support the creation and saving a PDF document to a local drive:
using DinkToPdf;
using DinkToPdf.Contracts;
using Microsoft.AspNetCore.Mvc;
using PDF_Generator.Utility;
using System.IO;

namespace PDF_Generator.Controllers
{
    [Route("api/pdfcreator")]
    [ApiController]
    public class PdfCreatorController : ControllerBase
    {
        private IConverter _converter;

        public PdfCreatorController(IConverter converter)
        {
            _converter = converter;
        }

        [HttpGet]
        public IActionResult CreatePDF()
        {
            var globalSettings = new GlobalSettings
            {
                ColorMode = ColorMode.Color,
                Orientation = Orientation.Portrait,
                PaperSize = PaperKind.A4,
                Margins = new MarginSettings { Top = 10 },
                DocumentTitle = "PDF Report",
                Out = @"D:\PDFCreator\Employee_Report.pdf"
            };

            var objectSettings = new ObjectSettings
            {
                PagesCount = true,
                HtmlContent = TemplateGenerator.GetHTMLString(),
                WebSettings = { DefaultEncoding = "utf-8", UserStyleSheet =  Path.Combine(Directory.GetCurrentDirectory(), "assets", "styles.css") },
                HeaderSettings = { FontName = "Arial", FontSize = 9, Right = "Page [page] of [toPage]", Line = true },
                FooterSettings = { FontName = "Arial", FontSize = 9, Line = true, Center = "Report Footer" }
            };

            var pdf = new HtmlToPdfDocument()
            {
                GlobalSettings = globalSettings,
                Objects = { objectSettings }
            };

            _converter.Convert(pdf);

            return Ok("Successfully created PDF document.");
        }
    }
}
Code Explanation
In the code above we first inject our registered Converter with the Dependency Injection inside our constructor by using IConverter interface. Then we create two objects globalSettings and objectSettings and use them as a configuration in the HtmlToPdfDcoumentproperty. Finally, we convert our pdf configuration into a real PDF Document on our local machine.
Now let’s talk about the GlobalSettings and ObjectSettings classes.
About the GlobalSettings Class
The GlobalSettings class consists of the overall configuration properties for the PDF document. We use just a couple of those properties to set up the color mode, orientation, paper size, document title, etc… but if we go to the implementation of the GlobalSettings class we can find more of those properties.
The Out property is very important if we want to save our files on a local machine. So we need to set it to the path where we want our document to. If we set the Out property then we can use _converter.Convert(pdf); to convert our document. We will see how this will change once we try to show our PDF document inside a browser.
One more important note is that all the folders from the Out path should be previously created or the conversion won’t work. So in our example where we create a PDF document in the D: drive in the PDFCreator folder, we had to create the PDFCreator folder prior to PDF document creation.
About the ObjectSettings Class
The ObjectSettings class consists of the properties related to the contents of the PDF document. So, we can configure the visibility of the page counter, formatting of headers and footers, the body content of our document (HtmlContent property) or the web settings for our document.
Of course, these are not all of the configuration properties but that’s all we need for this article.
The HtmlContent property is the very important property of this class. It contains our generated HTML template and shows the main body of a PDF document.
WebSettings is pretty important as well, especially if we have an external CSS file for the styling as we do. In this property, we can configure the encoding of our document and provide the path to our CSS file. If we inspect this property, we are going to find out more settings that we can configure like the background of a PDF document or if we should load images or what the minimum font size is, etc…
Inspecting Results
Let’s start our app, open our browser and send a simple request towards our PDF creator endpoint:

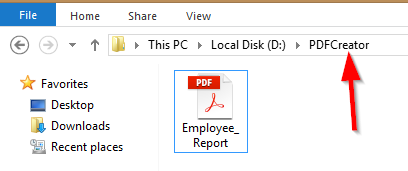
As a result, we have our document created in the PDFCreator folder:
And let’s inspect the content of the document:
That is awesome.
We can now continue on.
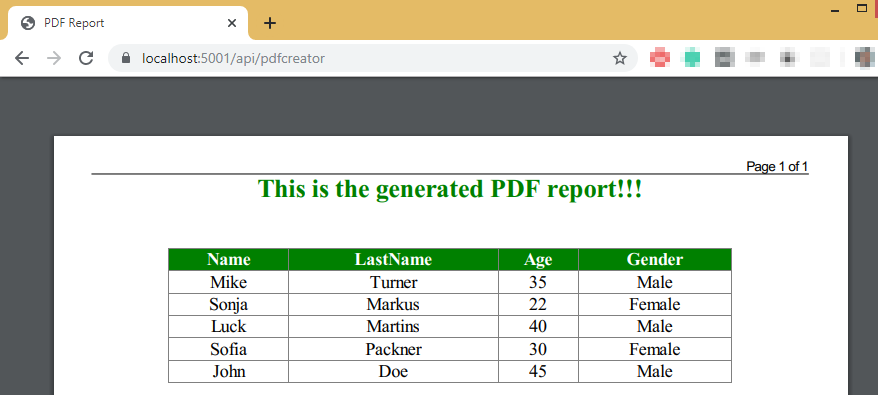
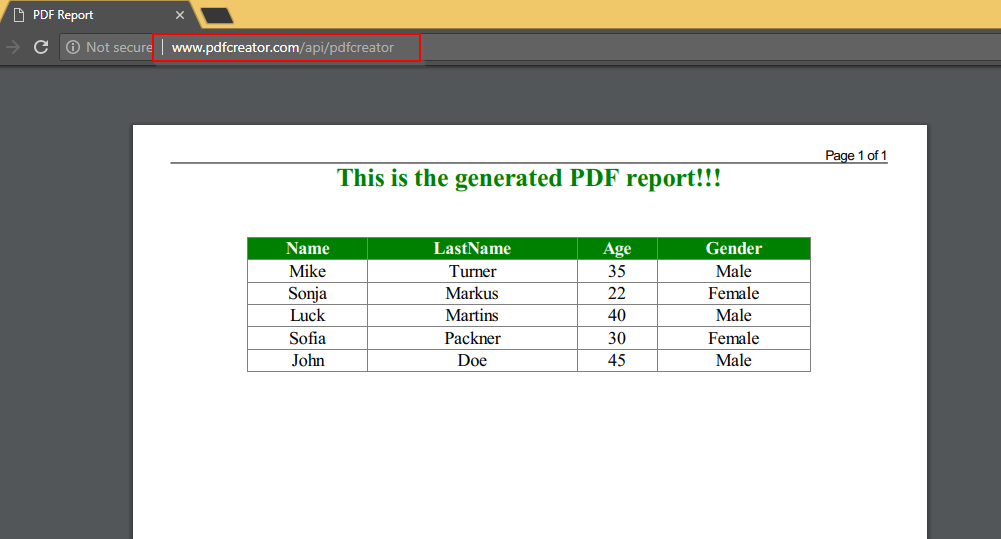
Showing a PDF Document in a Browser
If we want to show our document in a browser instead, we can configure that quite easily.
First, we need to remove the Out property from the globalSettings object.
Then instead of this type of conversion:
_converter.Convert(pdf);
We are going to use this type:
var file = _converter.Convert(pdf);
Why is that?
Well as we said if we use the Out property then the file is sent to stdout and saved to our local machine. But without the Out property, our output will be stored in a buffer. While converting we need to create a byte array and store it inside the file variable.
Finally, we are using that file variable and return it to the requester with a content type.
This is our CreatePDF() method after modification:
[HttpGet]
public IActionResult CreatePDF()
{
    var globalSettings = new GlobalSettings
    {
        ColorMode = ColorMode.Color,
        Orientation = Orientation.Portrait,
        PaperSize = PaperKind.A4,
        Margins = new MarginSettings { Top = 10 },
        DocumentTitle = "PDF Report"
    };

    var objectSettings = new ObjectSettings
    {
        PagesCount = true,
        HtmlContent = TemplateGenerator.GetHTMLString(),
        WebSettings = { DefaultEncoding = "utf-8", UserStyleSheet =  Path.Combine(Directory.GetCurrentDirectory(), "assets", "styles.css") },
        HeaderSettings = { FontName = "Arial", FontSize = 9, Right = "Page [page] of [toPage]", Line = true },
        FooterSettings = { FontName = "Arial", FontSize = 9, Line = true, Center = "Report Footer" }
     };

     var pdf = new HtmlToPdfDocument()
     {
        GlobalSettings = globalSettings,
        Objects = { objectSettings }
     };

     var file = _converter.Convert(pdf);
     return File(file, "application/pdf");
}
And this is the result:
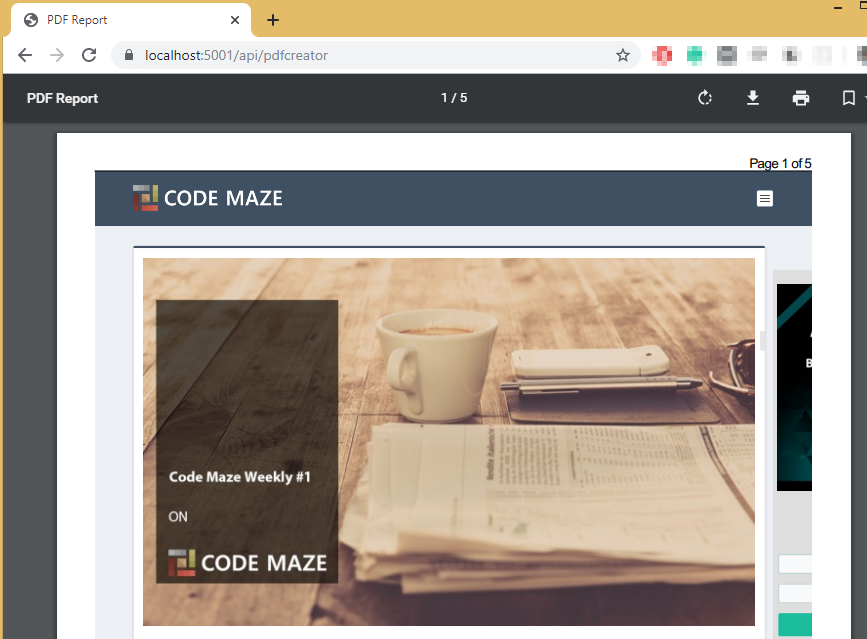
Using Existing HTML Page to Generate PDF Content
We don’t have to use our custom HTML template to generate PDF content, we can use an existing HTML page. The effort is minimal. All we have to do is to remove the HtmlContent property and add the Page property of the ObjectSettings class.
So instead of this code:
HtmlContent = TemplateGenerator.GetHTMLString()
let’s add this code:
Page = "https://code-maze.com/"
And let’s inspect the result:
Enabling Download Mode
If we want to enable the download feature for the PDF document we need to modify our return statement in our action method. All we have to do is simply add the name of the file with its extension to the return statement:
return File(file, "application/pdf", "EmployeeReport.pdf");
As a result, we are going to have our file downloaded:

And there it is.
Everything is working as it supposed to.
Update Project For Deployment
If we want to deploy this application, we have to make some changes. Let’s do that step by step.
First, in the Utility folder we are going to add a new class CustomAssemblyLoadContext and modify it:
internal class CustomAssemblyLoadContext : AssemblyLoadContext
{
    public IntPtr LoadUnmanagedLibrary(string absolutePath)
    {
        return LoadUnmanagedDll(absolutePath);
    }
    protected override IntPtr LoadUnmanagedDll(string unmanagedDllName)
    {
        return LoadUnmanagedDllFromPath(unmanagedDllName);
    }

    protected override Assembly Load(AssemblyName assemblyName)
    {
        throw new NotImplementedException();
    }
}
After that, let’s modify the ConfigureServices method in the StartUp class:
public void ConfigureServices(IServiceCollection services)
{
    var context = new CustomAssemblyLoadContext();
    context.LoadUnmanagedLibrary(Path.Combine(Directory.GetCurrentDirectory(), "libwkhtmltox.dll"));

    services.AddSingleton(typeof(IConverter), new SynchronizedConverter(new PdfTools()));

    services.AddControllers();
}
In here, we are creating an instance of the CustomAssemblyLoadContext class and just call the LoadUnmanagedLibrary method with the path of the libwkhtmltox.dll file.
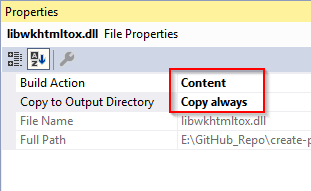
We need to do one more thing. When we publish our application, we need to have the libwkhtmltox.dll file and the styles.css file in the published directory. To ensure that, right-click on the dll file in Solution Explorer and choose properties. For the Build Action we are going to choose Content and for the Copy to Output Directory, we are going to choose Copy always. We need to repeat these steps for the CSS file as well:
Now, all we have to do is to publish our application by following one of these tutorials or both of them:
.NET Core Application IIS Deployment
.NET Core Application Linux Deployment
This is the result of the IIS deployment:
Conclusion
In this article, we have used the DinkToPdf library to create PDF documents while working with the .NET Core Web API project. We have created our PDFs in different ways to show many different features of this library.

Hi,
I need an option to add images and custom fonts and CSS inline styles in html. And header and footer as customized way. I need seperate header for first page and other page in pdf. Is it possible to process my requirement. Please give me a suggestion. Here I used .net core 2.2 version asp.net Web API core 2.2.8
i am getting an extra blank page as i download. can you please suggest how to remove extra blank page from created pdf.
Hi @Team,
Thanks for nice article and I have created pdf on localhost and it is working perfectly in localhost but when publishing to IIS getting following errors
Error NU1605: Detected package downgrade: System.IO.FileSystem.Primitives from 4.3.0 to 4.0.1. Reference the package directly from the project to select a different version.
PB.Server -> DinkToPdf 1.0.8 -> NETStandard.Library 1.6.0 -> System.Console 4.0.0 -> runtime.win.System.Console 4.3.0 -> System.IO.FileSystem.Primitives (>= 4.3.0)
PB.Server -> DinkToPdf 1.0.8 -> NETStandard.Library 1.6.0 -> System.IO.FileSystem.Primitives (>= 4.0.1)
I am using .net 6.
Could you please help me to solve this error
Hello Rashid. I am not sure, but maybe this can help: https://stackoverflow.com/questions/50286990/error-nu1605-detected-package-downgrade
Hello @Marinko,
Thanks for your quick reply. I have gone through above link and now i am getting below error while publishing to IIS. I can successfully build application but getting error while publishing.
Error “dotnet.exe” exited with code 1
https://github.com/dotnet/sdk/issues/26061
above link helps me to solve mentioned error.
Successfully published to IIS as well.
Thanks @marinko
Hi @Team,
This article is very useful and I have tried it and successfully run/create the pdf on localhost but when I publish it it to IIS server it does not seem to work.
I am using the .Net 6.0 and also I have added the CustomAssemblyLoadContext funtion to the program.cs file.
Could you please guide me. where i am doing wrong.
Hello Dev. Well, there is no way for us to know what is going wrong only from the message you’ve posted. Also, I didn’t test this with .NET 6 but the IIS publish article is written on top of .NET 6 app, so I believe there shouldn’t be a lot of issues with this project.
Hi Marinko,
Thank you for your quick response.
Could you please explain why we need to change the
“ “launchBrowser”: false,“.
You don’t have. I like doing that during the development phase when I want to call my endpoints at a certain point and not when the app starts.
Hi Marinko,
Thank you for your quick response.
I have found the error and resolved it. Now the PDF creation method is working well.
Thanks. Really Helpful
how can i make the pdf password protected.
Thanks for this great tutorial! I have a problem implementing this. I have a database to be exported to pdf including images of the users in a table for each user. Images are saved locally and they are called by ImageName property for each user. only JPEG-Typed images are allowed. The problem is that a few pictures are shown and the others aren’t.
foreach (var user in users) { var picAddress = Path.Combine(wwwRootPath + "/image/", user.ImageName); sb.Append(@" <html dir='rtl' lang='fa-IR'> <head> </head> <body dir='rtl'>"); sb.AppendFormat(@"<table align ='center'> <tbody> <tr> <td></td> <td><img src={0} width='110px' height='130px' /></td> </tr> <tr> <td>{1}</td> <td>{2}</td> </tr> <tr> <td>{3}</td> <td>{4}</td> </tr> <tr> <td>{5}</td> <td>{6}</td> </tr> <tr> <td>{7}</td> <td>{8}</td> </tr>", picAddress, user.FullName, user.FatherName, user.IdCardNumber, user.DateOfBirth, user.MaritalStatus, user.MilitaryServiceStatus, user.CallNumber, user.Address); sb.Append(@" </table> </body> </html>"); }Thanks a lot ! It works !!!
very nice . the problem is that the package is old and has not been updated since 2017 . get issue with Docker . is there any newer package ?
Hi, thanks for the great solution!
I Implemented this in my solution and everything works perfectly locally. But whenever i deploy it to Azure Web App Service, the pdf-file changes format. Like everything is zoomed in and text is getting out of view. Do you have any experience with this?
Hello Frederik. I didn’t publish this app on Azure Web App Service, but maybe you can check in the comment section since as I remember, there are a lot of comments regarding Azure deployment.
I have successfully implemented this tool in my project but facing an issue where 20-25 files are converted and downloaded at a same time using this DLL’s then some HTML contents of those files are interchanged but when re-converted/re-downloaded then all is perfect. I m trying to find out the issue but no success yet. Can you help me in this.
Well, to be honest, there is no way for me to know why is this happening. I didn’t face situations like that one.
Don’t you think that it would be much better to create dynamic pdf files using razor pages? It would be much more understandable. We just need to render page and get it as a string
Hello DaniilTS. It is completely up to you how do you want to implement your solution. We’ve shown here how things can be done and you can adapt it to your project. Of course, if anything can be generic/reusable it is always a better solution.
Great Article , it works fine with me on localhost but not working on iis, could you help me ?
Hello Mohamed. I am not sure what is wrong there. It should be working as you see that in the article. Also, maybe to go over the comments, a lot of publishing problems were solved there.
Hi. is there anyway to password encrypt the pdf stream before it is sent to the browser for download?
Well, I can’t say that there is no way, but not that I know of.
Ok so I assume this library is written on the wkhtmltopdf library?
If so you will have to use another library to encrypt the stream/file?
But when i run on my local it work as well, but i deploy on azure, it throw error: The specified CGI application encountered an error and the server terminated the process.
Please help to resolve it.
Not working when publish in Azure. Any idea?
An error occurred while starting the application.BadImageFormatException: An attempt was made to load a program with an incorrect format. (Exception from HRESULT: 0x8007000B)
System.Runtime.Loader.AssemblyLoadContext.InternalLoadUnmanagedDllFromPath(string unmanagedDllPath)
BadImageFormatException: An attempt was made to load a program with an incorrect format. (Exception from HRESULT: 0x8007000B)
Could you check the comments on this post. I believe Andrei Iovan had the same issue and it was solved. It was explained how in his comment.
Thank you. It is worked! Another issue is how to specify out parameter in GlobalSettings object to download to local machine from server. In sample code, it was var globalSettings = new GlobalSettings
{
………….
Out = @”D:\PDFCreator\Order_Summary.pdf”
};
If we download from local it is okay. But in server how to specify the local path?
Hi, how can I add an image as a background (watermark) to the generated pdf file?
Well the first thing that comes to my mind is using a css. You can add a class on your image and add some opacity and all the stuff you want.
I am trying to deploy in linux server in azure, after deployment, it gives me Application Error.
This is what I get in my output when i try to publish:
Installation of Web App Site extension Microsoft.AspNetCore.AzureAppServices.SiteExtension is in progress…
Unable to install Web App extension Microsoft.AspNetCore.AzureAppServices.SiteExtension
Hello!
DinkToPdf it works like magic on my local workspace! Really grateful for it.
However, when I deploy it on the Azure Server, it does not work. After few hours of investigation I ask for your help, if you can give me a hand. The exception/error I get is this:
This happens when I start the IIS server – and I want to mention I got the error from the Event Viewer / Application Logs. The application won’t start at all, but just give this error.
Application: w3wp.exe
CoreCLR Version: 4.700.20.36602
.NET Core Version: 3.1.7
Description: The process was terminated due to an unhandled exception.
Exception Info: System.DllNotFoundException: Unable to load DLL ‘MY_PATHlibwkhtmltox.dll’ or one of its dependencies: The specified module could not be found. (0x8007007E)
at System.Runtime.Loader.AssemblyLoadContext.InternalLoadUnmanagedDllFromPath(String unmanagedDllPath)
at System.Runtime.Loader.AssemblyLoadContext.LoadUnmanagedDllFromPath(String unmanagedDllPath)
I want to mention I used the x64 version and my OS on Azure Server is also on 64 bit (windows), and I followed the setup steps described in this article very closely.
Did somebody have this issue and resolved it?
PS. I also tried to use 32 bits version of the library with no luck.
Any advise will be greatly appreciated!
Thank you!
Hi. I didn’t deploy it on Azure, so I can’t be more of a help. But if I remember correctly, we had comments about similar or the same problem on this article, so maybe you can find something helpful here – in the comment section.
The solution for me was to install Microsoft Visual C++ Redistributable for Visual Studio 2015 as MONKS described below.
Thanks everyone!
I am having the same issue on Centos Server Required Libraries are not found i have tried the CustomAssemblyLoadContext() too. anyone here who successfully run this on Centos server ? my project is not dockized and its Asp .net Core 3.1
another language is not able to convert HTML to PDF.
Like I try to convert HTML to PDF. In the HTML file Gujarati language is showing perfect. But after conversation that is showing like symbol. You can check image
Hello, this deployment works in Windows, but if I run in Linux it says all the time that can’t load the library.
Hi Alexandro. I must say I am not sure why you have that error message. It is pretty clear that the library can’t be found, but I am not sure why. Have you tried checking somehow the path generated on the linux, maybe it targets something wrong… Maybe to search through the comments, I believe we had comments regarding the linux deployment.
I fixed moving the dll manually to bin folder, but… How can I tell in dotnet command to publish like VS does? because we have edited the build action and copy to output directory properties, that is saved to the project file.
I am glad you solved it. But I am not sure why dotnet command didn’t copy that file. To be honest I usually use the VS for the job.
Me too, but this time sysadmin gets the source and publish in the linux machine… Thanks.
Hello, this is really great in explaining it all. I am running into a little bump, when i insert a url for the Page attribute, I’m getting:
“http” does not exist in this current context.
I then tried the url for code maze and get a near identical error except it says https instead. I’m assuming I’m missing a library of sorts, but I’m not sure what. I looked it up but couldnt find anything. I did include the dll files. I’m able to produce the pdf from the htmlcontent, but not an outside url
Hello Xavier. The URL must be a string, so you have to enclose it in the quotation marks: Page = “https://code-maze.com”
Thank you for your prompt response. I have tried that before with the resulting pdf being empty. I’m assuming this means it either didnt resolve and pull from the url or I’m missing a service to keep it from pulling. When I looked into that issue, I got references for web requests which didn’t align with the dinktopdf usage. For context, I’m running with IIS which results in a localhost that outputs a downloadable with return file. I rewrote global settings and object settings to match the above tutorial as well, if it helps. I understand this is a stackoverflow or github forum question, but any help is appreciated.
Thank you!
Update: There wasn’t a missing service. I removed the websettings, header and footer as the page is already formatted. It returned exactly what I needed. I suspect it’s due to a possible overwrite of some blank html content since websettings and such were used.
Thank you, anyways!
This is great. I came across this website and I’m really impressed with the solution I got. Very easy to understand and implement.
But please, how do I insert a Logo at the top of my PDF generated. Thank you.
As I said, your explanation of how to use your library is seamlessly easy to understand. I went to the bottom of this page and I found the solution to my question.
var picAddress = Path.Combine(Directory.GetCurrentDirectory(), “Images”, “CodeMaze.png”);![]() “, picAddress);
“, picAddress);
sb.AppendFormat(@”
In the case of my project, MVC Core 3.0, I derived my image path as below:
string imagesPath = _env.WebRootPath + Path.DirectorySeparatorChar.ToString() + “Images” + Path.DirectorySeparatorChar.ToString() + “Logo.png”;![]() “, imagesPath);
“, imagesPath);
sb.AppendFormat(@”
I applied it and it worked. Thank you very much.
Please, do you have a complete online tutorial of the PDF converter library?
Hello Isaac. There is one more thing you could do if you want to use the Logo in the header:
HeaderSettings = { FontName = “Arial”, FontSize = 9, Line = false, HtmUrl = @”……header.html”},
So, you can create an html file and inject it in the HeaderSettings.
But I am so glad you solved it on your own. And one more ting, this is not my library, or our library (Code Maze), I am just showing how this library can be used to generate PDF. You can look at this link: https://github.com/rdvojmoc/DinkToPdf
Marinko, thank you.
Hi! I am using this PDF creation method in my web app (asp.net core 3.1) But when I deploy to Azure, I have the error:
Exception Info: System.BadImageFormatException: An attempt was made to load a program with an incorrect format. (0x8007000B)
at System.Runtime.Loader.AssemblyLoadContext.InternalLoadUnmanagedDllFromPath(String unmanagedDllPath)
at System.Runtime.Loader.AssemblyLoadContext.LoadUnmanagedDllFromPath(String unmanagedDllPath)
at AdminTool.PDFUtility.CustomAssemblyLoadContext.LoadUnmanagedDll(String unmanagedDllName) in D:DotnetAdminToolAdminToolPDFUtilityCustomAssemblyLoadContext.cs:line 18
at AdminTool.PDFUtility.CustomAssemblyLoadContext.LoadUnmanagedLibrary(String absolutePath) in D:DotnetAdminToolAdminToolPDFUtilityCustomAssemblyLoadContext.cs:line 14
Hello Zoltan. Well, I didn’t have a chanse to deploy this app on the Azure but maybe this link can help you: https://github.com/rdvojmoc/DinkToPdf/issues/5 . I can see a lot of advices there even Azure related.
Thanks for replying to my question. If I deploy to another IIS host (interserver.net), it works fine as it is 64 bit server. Using the 32 bit library, at least it works on Azure too, but when I load the pdf document on azure, I get characters like [][][][] or so instead of normal letters on the pdf file. Maybe you know something I missed?
Hey Zoltan. I’m glad that helped. Regarding your issue, please read the comment from the NELSON FIGUEROA. He had a similar problem and solved it by installing additional stuff to his machine, so maybe you can find a solution for your problem as well. It seems to me that your machine is missing a font support or anything like that.
Thanks… it seems he has a Linux example, whereas at Azure is Windows, with 32 bits (the F1 tier). And the machine has already the arial font which I used in the html before conversion. So… I don’t know. The thing works perfectly on a 64 bit server, Interserver.net.
Ok, my solution was to use a 64 bit instance of App Service with Asp.Net core 3.1 on Azure. Now it works, as the library used locally is for 64 bits (works on my cheap asp.net host also). The 32 bit version did not work on my Azure account.
Can we use this DinkToPdf to merge pdf files?
If yes then please share the sample code
Can we use this for merging the pdf?
If yes then share the sample code
Marinko, this is such a great article. Precise & complete. Well done.
Thank you!
Do you have a “buy me a coffee” page?
Thank you very much William. I am so glad to hear that. I hope you like our other articles as well. And yes we do have buy us a coffee page, but it’s just not promoted on the site: https://code-maze.com/buy-us-a-coffee/ . We’ve published a book as well so, fell free to chek it out (https://code-maze.com/ultimate-aspnet-core-3-web-api/) . Anyhow, thank you very much for your support. It means a world to us. Best regards and stay safe and healthy.
HI
Great article. But I encountered on a problme on Debian 9. I changed CustomAssemblyLoadConext to load the .so file like this
string filePath = $@”{Path.GetDirectoryName(Assembly.GetExecutingAssembly().Location)}libwkhtmltox.so”; Now it is reading the linux library. But when I hit the controller to get a pdf file I got an error:
Unable to load shared library ‘Shell32.dll’ or one of its dependencies. In order to help diagnose loading problems, consider setting the LD_DEBUG environment variable: libShell32.dll: cannot open shared object file: No such file or directory
Kindly i need to repeat table header in all pages if table content more than one page
Did you find a solution for this, I have the same problem!
Great post! I have implemented and it works great! One question, I have received a request from a user to place a barcode on the generated PDF. Using your method for implementing do you have any advise on how I could implement a barcode font and display on the PDF? Any help is appreciated!
Hello Tim. I haven’t added a bar code in the project but, there are some libraries you can google out and apply them through the java script. Again, I haven’t done anything similar but it might work.
Hi Marinko. Thank you for your response. I thought of using JS, but that is where I am struggling. I do all my string manipulation and building in the TemplateGenerator.cs class which I can’t use JS libraries I have found. They are built for front end views which in my project doesn’t use the view to build the PDF. Any other suggestions?
Well if JS is no go for you, you can trie some of the libraries for ASP.NET Core. There are those as well. Again, I haven’t been using this feature, but different libs can be googled out.
Worked like a charm on my local machine , but when I deployed on azure app service it is showing 502 error
if i want to make an image to pdf , what do in need to do ?
Hello Sheikh Sayed. This is not a problem. Just create another folder Images in your solution and place some picture inside. Than in the code where we generate the HTML content add these lines:
var picAddress = Path.Combine(Directory.GetCurrentDirectory(), "Images", "CodeMaze.png");
sb.AppendFormat(@"
My test result was like this:
https://uploads.disquscdn.com/images/514e2106b8830d60703b51436e321d2fce79c5f914ef73703177c826bfce2e1d.png
As you can see, the picture is right below the table.
Best regards.
Thanks nice article and hope it’s will work, I am getting:
System.DllNotFoundException: ‘Unable to load DLL ‘libwkhtmltox’ or one of its dependencies: The specified module could not be found. (Exception from HRESULT: 0x8007007E)’ but I have copied the files to the solution
sorry I saw the solution just I have to change the debug profile becasue it was IIS
That is correct. Best regards.
thanks for the articule, excelent work. but i have an issue; in windows local work perfect, but in my deploy on an amazon centos machine, when i generate the pdf, i get rare characters. https://uploads.disquscdn.com/images/abadd67d13ba087ebb13002e9aeb736fbe10c962f3fa346f312d1a9901a324f2.png
I installed the libgdiplus on the centos michine, but continue withe de problem.
I would appreciate your help or any suggestion?
I am sorry, but as stated in article, I have tested this locally and on IIS. Didn’t use it anywhere else, so, your error is strange to me as much as it is strange to you. My guess is that Amazon machine is lacking a support for something required by your PDF doc, but what… I really don’t know.
Hi, thank you. I found the solution, i just had to install this in my centos michine
First I had to enable an extra repository:
sudo amazon-linux-extras install epel
afther
sudo yum install urw-fonts libXext openssl-devel
I hope it helps someone else.
Thank you Nelson, for sharing the solution with us.
Your article is excellent on the PDF generation using DinkToPdf. It works perfectly in my development environment. However after deploying to Azure, I am getting a page not Found Error. I am using the returning as follows
:
objectSettings.Page = “https://localhost:44316/Sales/OpenQuotes/IndexPdf/” + id ;
var file = _converter.Convert(pdf);
return this.File(file, “application/pdf”);
Hello David. I haven’t worked with azure, but just a question: Are you sure that localhost:44316 is visible once deployed on Azure? Because the error is clear enough that the page can’t be found. Again, this is just a question, as I said, I am not familiar with the Azure deployment.
Hi ! Thanks for the article, very useful.
I have an issue tho : it seems I can’t use every properties of CSS with this, as grid-display is totally ignored.
Do you have any idea/hints as to why and/or how I could correct this ?
thank you
Hello Mika. I didn’t use CSS grid with this project, but have you tried to use css-flex system? Maybe that will work.
Hi
No, I haven’t tested any other way yet, I’m not a CSS expert at all, which is also why I tested grid, since it seems easy.
Do you know how it works under the blackbox of dinkto ? Is it possible that wkhtml for instance uses IE to render the HTML, which would make the CSS have to be compatible with IE instead of the latest browsers ?
My most basic css commands (like background-color) are executed, so I know the file is read, but apparently it has issue generating the template as it should.
Hello Mika. I am sorry, but I am not familiar with that at all. Never gone that deep into the dll. But I can only tell, related to CSS complexity, that css flex is not complex at all, in other words it is pretty easy to use, so you can try it for sure.
Thanks for your article.
But when i run on my local it work as well, but i deploy on azure, it throw error: The specified CGI application encountered an error and the server terminated the process.
Please help to resolve it.
This is my site: https://oneteamapp2019.azurewebsites.net/api/values/export-pdf?id=112eb418-5c5b-451f-1332-08d6add9607d
Regard…
Hello. I haven’t deployed this app on azure, and don’t know much about that part, so can’t help you with that, sorry. But maybe any of our readers did it, and they could help you. All the best.
Thanks for your help.
I fixed my bug when i create html file, but when render to pdf, my content not correctly.
Please check my site:
https://oneteamapp2019.azurewebsites.net/api/values/export-pdf
This is my html code:
public static string GetHTMLString()
{
var sb = new StringBuilder();
sb.Append(@”
This is the generated PDF report!!!
“);
return sb.ToString();
}
}
How can i fix that?.
Regard.
This code looks fine. But I see your result is not. So maybe if you can share your code with us, then I can have a better look. If you have a good result on your local machine, then it is maybe something on the azure side. I really can’t tell more for now.
Hello. I haven’t deployed this app on azure, and don’t know much about that part, so can’t help you with that, sorry. But maybe any of our readers did it, and they could help you. All the best.
Hello and thank you for a great article!
I did follow your tutorial but I get the following error:Qt: Could not initialize OLE (error 80010106). This happens while executing converter.Convert(pdf)
Now, I don’t even know where to start. I see alot of people with the same error regarding generating PDFs and I could use your help. Thanks in advance
Hello David. I would suggest to look at our source code and to compare it. If you can’t solve it, you can send us your project, so we could look at it. This has to work, it is tested by many users, as you can see from the comments, but we can check it. All the best.
Thank you for a fast reply. I worked on this a little bit and it’s strange. I choose to save the generated PDF on disk and it actually works. However, the project console contains the before mentioned error. I am currently testing different PDF generation options and have not tested it in live environment. This is actually my concern. The solution that you posted is pretty simple and straightforward and I think I implemented it ok. Unfortunately, my final solution won’t be able to follow your setup completely (the return types will differ) and that is the only change I had. Also, I haven’t made another configuration in launch.json. But those should be the only 2 differences.
Hi David. Well, as I can recall, I had the same error when I was starting this project, but it was due to the wrong IConverter registration (can’t remember exactly what I did wrong, but I think it was about that). Once I registered it as a singleton inside the IOC, the error message disappeared. Again, I am not 100% sure but I believe it was something like that.
Hmm, yeah, I read through the comments and I see most people made that mistake. However, it seems I didn’t. Although, I do have a slight difference: my IConverter is called in another project, and not in WebApi. I’m using it in Business, which WebApi is using. Could that be the problem? Should I register it in some other way? I already tried to copy the Dink files in both WebApi and Business roots, but still the same.
Well now, it is really strange. Have you tried, just for example sake, to create a test ptoject and to implement pdf logic, just to see whether the error is going to repeat. I really can’t figure out what is wrong with that.
I struggled with the “Unhandled Exception: System.DllNotFoundException: Unable to load shared library ‘/app/libwkhtmltox.dll’ or one of its dependencies” error for much longer than I’d like to admit. The problem was not in the code, but on the server. This post illustrates the solution that worked for me. All I did was install MS Visual C++ 2015 redistributable package on the server. The dependencies were part of this distribution.
This was the solution for me also. Thanks mate!
I am trying to deploy this code in cloud (PCF) and getting dll not found error.
“Unhandled Exception: System.DllNotFoundException: Unable to load shared library ‘/home/vcap/app/libwkhtmltox.dll’ or one of its dependencies.” Has anyone come across this scenario?
Hi, if I will deploy in a linux ec2 instance which runs on ubuntu, do I need to add this CustomAssemblyLoadContext and in the configure services? and if so, do i include the .dll or .so file of the library. thank you and ill wait for your reply.
Hello. I didn’t try to deploy it on Linux, but I think you have to use the CustomAssemblyLoadContext and to point to dll file. (But please take this with reserve because, as I said, I didn’t do it). But try it, and if it works, be so kind and write your experience in the comment, it can help a lot to other readers and me too 😀
Tried this and it works just fine, but (this may be a dumb question…), why is it that if I type in the address bar in the browser
localhost:5000/api/pdfcreatorit works as expected, while if I typelocalhost:5000/api/pdfcreator/CreatePDF(i.e. appending the controller’s action) it returns an error? The reason is: I would like to call the action (and possibly create different actions in the same controller as well) and provide parameters to them in order to generate different reports and formatting depending on the parameters.What would be the proper way of dealing with this scenario? Thanks
Helo Joe. Thank you for reading this article. Let me answer your question. To enable such a route you need to create a proper [HttpGet] attribute for another action. So the current action (CreatePDF) is on the localhost:5000/api/pdfcreator route. But if you want another one you must write something like this:
[HttpGet(“createpdf”)]
public IActionResult CreatePdf1()
{
//code goes here
}
and call it with http:\localhost:5000apipdfcreatorcreatepdf.
And if you have params maybe, you must include them to the route and HttpGet attribute as well.
If you are not so familiar with routing and Actions in .NET Core, I recommend you reading our .NET Core tutorial, it will help you a lot for sure: http://34.65.74.140/net-core-series/
All the best.
Are there any known issues with using POST instead? I have a report that is dynamically generated on the front-end which then the HTML of that is sent to the Controller (via HttpPost). But when I return the file or stream back to the front-end, I will receive a blank (but correct number of pages) PDF file with a corrupted title. Using the ‘out’ property with POST works fine though.
Took a while (since one issue just led to another), but I got it. I ended up having to create 2 different POST controllers, one to store the HTML string (since it was too long to be sent through XMLHTTPRequest) and the other returns the generated PDF file. In the Javascript I have an AJAX call to the ‘StoreHtmlController’ which sends the HTML as a string. OnSuccess of that AJAX, it then calls the other controller through XMLHttpRequest and the file is returned to the front end without corruption.
Great Article using it. Doing Great. I have been asked to create a second page for all the pdf’s. Would you be willing to assist with how to create a second page – It is fixed data on the second page?
Hello Byron. First of all, thank you for commendation it is always nice to read that kind of comments from the reader. About your task, I am not sure that I got it quite right. Do you have the content on the first page and more space to fill on that page but now you want to start another page and to leave the first one as it is? Another question: is your content on the first page fixed size or it can vary in length?
Marinko – Thanks for your response. The situation is I have data that doesn’t fill the whole first page, but that’s OK. However, the client wants to provide fixed information about a training class as a second page on all the pdf’s that take up less than a page. This they want so they can print the a 2 sided document. I hope this clarifies your question. Thanks.
Great Article. It works ideal for me. I now have been tasked with adding a second page to each .pdf. Could you assist with this requirement or point me to an article on how to add a second page to the pdf?
Hi Byron. I have replied on your previous comment. Check it out.
Thanks
You should move this libwkhtmltox.dll in nuget package.
Because it’s very hard to keep in separate file.
Can you move this
HI Ramprit,
It’s packed into one Nuget here https://www.nuget.org/packages/Bee.HtmlToPdf/
Works as explained in the article. Thanks @disqus_GtEeIZUUDN:disqus.
Have to add below code and CustomAssemblyLoadContext.cs file to solve “”Unable to load DLL ‘libwkhtmltox’ or one of its dependencies” error.
have you tried to deploy in linux? do i set the path directory file to point to the .dll file or .so file? thanks
Hello, can you help me in my project need qr code in pdf file. i dont have idea how to do it. Need dinamic create in pdf qr code.
P.S. sorry my english, i hope you understand me and can help me )
Hello. To create qr code, you can look at this link https://github.com/codebude/QRCoder it seems pretty simple. This library creates image qr code, so you can save it to disk. Once you have it created and saved you can transfer it to the pdf document by following this article. Just in your html code add the and all should be just fine.
I apologize for my impulsivity, but I think to turn the qr code into base64
For this, try to search little bit on the internet, I haven’t work with such a task.
it possible?
thank you for link ti github
how i can to remove footer and header ?
Just remove HeaderSettings and Footer ones from the object settings. That is all.
Great article. Thank you!
it is possible know the pdf number of pages from code?
Thank you Alvaro. About the page count, I think there is no possibility to know that or at least not that I know. You pages are created during run-time so I don’t know how we could know that. Maybe we can perform some calculations, to count the length of the byte array and then approximately to calculate number of pages… So, I am sure that some kind of algorithm can be written but there is no such a property or method to calculate that for you (at least I don’t know for such a thingy).
Great article. Thank you!
You are very welcome. I hope you will find our other articles useful as well. All the best.
Great article! I case someone is develping project on Windows machine and deploying on Linux Docker and receiving an error like “Unhandled Exception: System.DllNotFoundException: Unable to load shared library ‘/app/libwkhtmltox.so’ or one of its dependencies”.
Try to follow this answer: https://github.com/rdvojmoc/DinkToPdf/issues/3#issuecomment-319008350, so basically add
RUN [“apt-get”, “update”]
RUN [“apt-get”, “-y”, “install”, “libgdiplus”]
to dockerfile. It helped me.
Hello Mateusz. First of all, thank you very much for reading this article. Especially, thank you so much for that information you provided in your comment. It is quite normal that we can’t cover all the cases in a single article, thus your comment has a great importance, not only for us but to all who read this article. One more time, thank you very much. All the best.
No problem! I’ve spent a few hours searching for solution so I decided to save other developers’ time 🙂
did you follow the CustomAssemblyLoadContext and in the configure services? did you point it to the dll file or the .so? i did not add those yet. thanks
Yes, of course I followed. But beacause I run the app on Windows during development and in release mode I run it on Linux container, I added some lines like these
#if DEBUG
context.LoadUnmanagedLibrary(Path.Combine(Directory.GetCurrentDirectory(), “libwkhtmltox.dll”));
#else
context.LoadUnmanagedLibrary(Path.Combine(Directory.GetCurrentDirectory(), “libwkhtmltox.so”));
#endif
CPTribbon yu I got an error on Debian 9. Did you had this kind of error:
Unable to load shared library ‘Shell32.dll’ or one of its dependencies.In order to help diagnose loading problems, consider setting the LD_DEBUG environment variable: libShell32.dll: cannot open shared object file: No such file or directory
Thanks for giving such useful information on show how to use the Dink To PDF library to easily generate PDF documents while working on the .NET Core Web API project.
You are very welcome Ankusha Rana. Hope you enjoy our other articles as well.
Hi,
Thanks for the post we are able to generate pdf from html but after converting we are getting a masked text saying “Word to PDF Converter Converted By BCLTechnologies”, how to remove this.
do we need to purshase licence for it?
How could this be implemented on a real server(IIS or nginx)? It needs permission, so i’m curious how I would go about it, especially on linux?
Hello AwhiteCat. Well I haven’t deployed this app to the real server. But we have two articles about deployment .net core app to the IIS and Linux (nginx) so if you want you can read them here: http://34.65.74.140/net-core-web-development-part16/ and http://34.65.74.140/net-core-web-development-part17/ , and then you can help us all with your experience 😀
I got it to work on IIS on a shared hosting site(webwiz). I published the app as self-contained. I also used the 32bit .dlls. Then I turned off managed code (“no managed code”) in their webadmin panel for the site. I will try on linux next week or so
Hi. Did it work for you? I tried to implement it on IIS, but the PDF isn’t returned by the api, unfortunately. Though it works fine on visual studio IIS express.
Hello Gustavo, I just want to notify you that I have updated this article with the IIS deployment, so feel free to try it and reply to us as well if you wish so.
All the best.
Hello AWhiteCat, I just want to notify you that I have updated this article with the IIS deployment, so feel free to try it and reply to us as well if you wish so.
All the best.
Where do i find the native library DLL’s?
Hello Leuan. On the top of this article, you can find a link to the source code. It leads to our GitHub repository and there you will find the NativeLibrary folder. Inside it you can find zipped native files.
All the best.
@disqus_GtEeIZUUDN:disqus Thanks for the fast response. I have now added the DLL’s to the root of my project. But I’m still getting the following error “Unable to load DLL ‘libwkhtmltox’ or one of its dependencies: The specified module could not be found. (Exception from HRESULT: 0x8007007E)”
Hello Leuan. This seems to me as the IOC configuration problem. Have you registered your library inside the IOC as a singletom? This line of code:
services.AddSingleton(typeof(IConverter), new SynchronizedConverter(new PdfTools()));
All you have to do is to install DinkToPDF, to copy dll’s to the root of your app and to register it inside the IOC.
If you still have the same problem, you can upload your code, and then we can check it out. Of course, you can always compare my code with yours as well.
@disqus_GtEeIZUUDN:disqus Thanks but ye, i have compared it and its largly the same. Here is a link to the repo – https://github.com/IeuanWalker/PdfWebApi
I will look at it in more detail, and get you back. I see you have implemented Swagger but that shouldn’t be the problem. It can’t find the dll file even though it is in the root of your project. For now, don’t know what is the problem. But I just took a glance at it, today will look in more detail.
Great, thank you 🙂
Well, I am just typing you. I have gone through entire article on completely new machine (not my own), and everything works fine. So just for my clarification, there is nothing wrong with the code in article. I am sorry to tell you that I can’t find what is wrong in your code. My suggestion is to start again, but to follow complete example form the article, and then if that works, to modify and add your own features. As I said, this works for me on two different machines, so something is scrambled in your project but I can’t find it. If you start it again, I would appreciate your reply is it working or not.
Hey Leuan, in case you are still struggling with this: I had the exact same problem but was able to solve it after all.
What you want to to is adjust some settings: (right-click) Project -> Properties -> Debug. There set the “Profile” to PDF_Generator (‘cos default is IIS Express). Finally, toggle the dropdown right to the green play button in the navigation and change “IIS Express” to “PDF_Generator”. That should do the trick. Open your browser at the defined localhost port and there the path “api/pdfcreator”.
Hope this helps, otherwise reply to my comment! 🙂