

ASP.NET Core Middleware is software integrated inside the application’s pipeline that we can use to handle requests and responses. When we talk about the ASP.NET Core middleware, we can think of it as a code section that executes with every request. In this article, we are going to learn more about the ASP.NET Core middleware and how to use different methods (Run, Map, Use) during the configuration. Additionally, we are going to explain the process of creating custom middleware.
Let’s get started.
More About the ASP.NET Core Middleware and Pipeline
Usually, we have more than a single middleware component in our application. Each component can:
- Pass the request to the next middleware component in the pipeline and also
- It can execute some work before and after the next component in the pipeline
To build a pipeline, we are using request delegates, which handle each HTTP request. To configure request delegates, we use the Run, Map, and Use extension methods. In this article, we are going to see that we can configure request delegate as an anonymous method, or as a separate reusable class. Whether we use anonymous methods or separate classes, we are creating middleware components.
Inside the request pipeline, an application executes each component in the same order they are placed in the code – top to bottom:
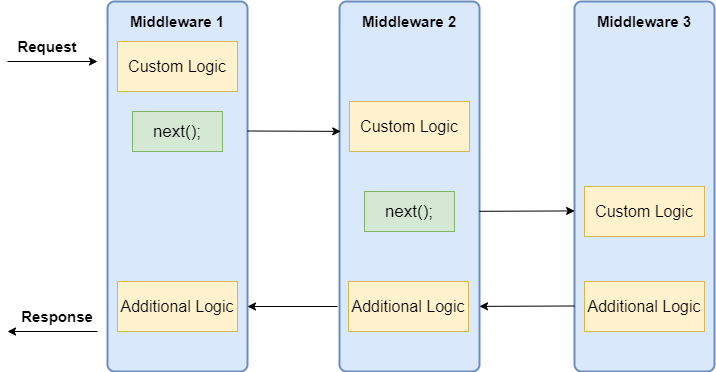
Additionally, we can see that each component can execute custom logic before using the next delegate to pass the execution to another component. The last middleware component doesn’t call the next delegate, which means that this component is short-circuiting the pipeline. This is a terminal middleware because it stops further middleware from processing the request. Basically, it executes the additional logic and then returns the execution to the previous middleware components.
Middleware Order in ASP.NET Core
Before we start with examples, it is quite important to know about the order in which we should register our middleware components. The order is important for the security, performance, and functionality of our applications:
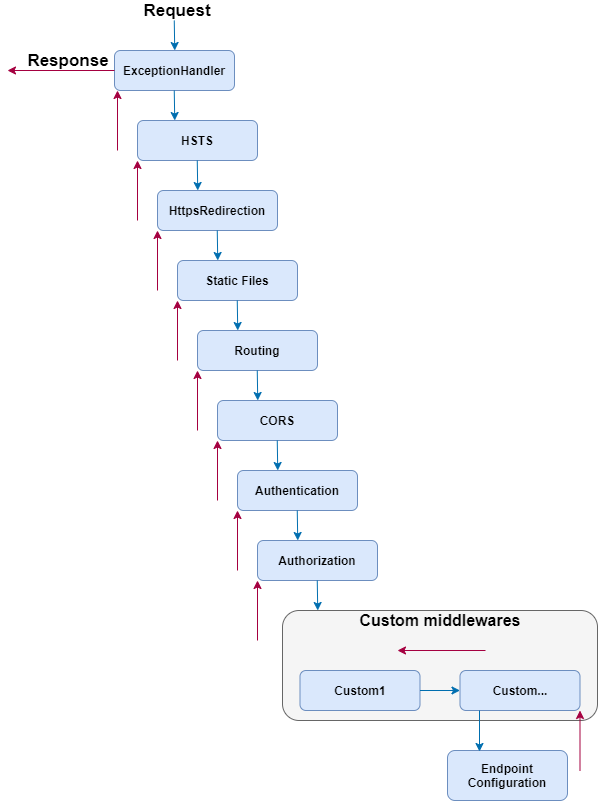
As we can see, we should register the exception handler in the early stage of the pipeline flow so it could catch all the exceptions that can happen in the later stages of the pipeline. When we create a new ASP.NET Core app, many of the middleware components are already registered in the order from the diagram. We have to pay attention to register additional existing components or the custom ones to fit this recommendation.
For example, when adding CORS to the pipeline, the app in the development environment will work just fine if you don’t add it in this order. But we have received several questions from our readers stating that they face the CORS problem once they deploy the app. But once we suggest moving the CORS registration to the required place, the problem disappears.
We can visualize this diagram in the code as well:
public void Configure(IApplicationBuilder app, IWebHostEnvironment env)
{
    if (env.IsDevelopment())
    {
        app.UseDeveloperExceptionPage();
    }

    app.UseHttpsRedirection();
    app.UseStaticFiles();
    app.UseCookiePolicy();

    app.UseRouting();
    app.UseCors();

    app.UseAuthentication();
    app.UseAuthorization();
    app.UseSession();
    app.UseResponseCaching();

    //Custom middleware components

    app.UseEndpoints(endpoints =>
    {
       ...
    });
}
As you can see, we are using the Configure method in the Startup class to add components to the pipeline.
Creating a First Middleware Component in ASP.NET Core
Let’s start by creating a new ASP.NET Core Web API application.
In the launchSettings.json file, we are going to add some changes regarding the launch profiles:
{
  "profiles": {
    "MiddlewareExample": {
      "commandName": "Project",
      "dotnetRunMessages": "true",
      "launchBrowser": false,
      "launchUrl": "weatherforecast",
      "applicationUrl": "https://localhost:5001;http://localhost:5000",
      "environmentVariables": {
        "ASPNETCORE_ENVIRONMENT": "Development"
      }
    }
  }
}
Now, inside the Configure method, we are going to use an anonymous method to create a first middleware component:
public void Configure(IApplicationBuilder app, IWebHostEnvironment env)
{
    ...
    app.UseAuthorization();

    app.Run(async context =>
    {
        await context.Response.WriteAsync("Hello from the middleware component.");
    });

    app.UseEndpoints(endpoints =>
    {
        endpoints.MapControllers();
    });
}
We use the Run method, which adds a terminal component to the app pipeline. We can see we are not using the next delegate because the Run method is always terminal and terminates the pipeline. This method accepts a single parameter of the RequestDelegate type. If we inspect this delegate we are going to see that it accepts a single HttpContext parameter:
namespace Microsoft.AspNetCore.Http
{
    public delegate Task RequestDelegate(HttpContext context);
}
So, we are using that context parameter to modify our requests and responses inside the middleware component. In this specific example, we are modifying the response by using the WriteAsync method. For this method, we need the Microsoft.AspNetCore.Http namespace.
Let’s start the app and inspect the result:
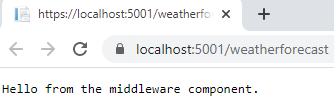
There we go.
Working with the Use Method
To chain multiple request delegates in our code, we can use the Use method. This method accepts a Func delegate as a parameter and returns a Task as a result:
public static IApplicationBuilder Use(this IApplicationBuilder app, Func<HttpContext, Func<Task>, Task> middleware);
So, this means when we use it, we can make use of two parameters, context and next:
app.Use(async (context, next) =>
{
    Console.WriteLine($"Logic before executing the next delegate in the Use method");

    await next.Invoke();

    Console.WriteLine($"Logic after executing the next delegate in the Use method");
});
app.Run(async context =>
{
    Console.WriteLine($"Writing the response to the client in the Run method");

    await context.Response.WriteAsync("Hello from the middleware component.");
});
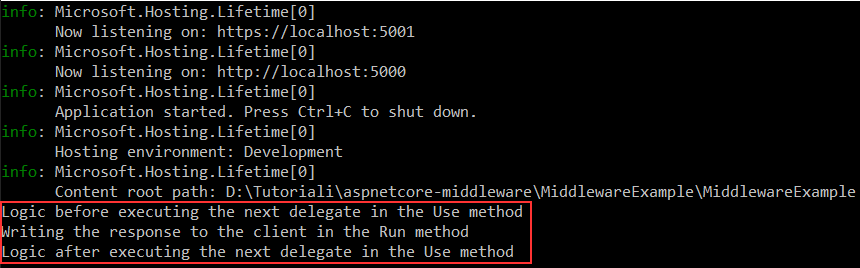
As you can see, we add several logging messages to be sure what the order of executions inside middleware components is. First, we write to a console window, then we invoke the next delegate passing the execution to another component in the pipeline. In the Run method, we write a second message to the console window and write a response to the client. After that, the execution is returned to the Use method and we write the third message (the one below the next delegate invocation) to the console window.
The Run method doesn’t accept the next delegate as a parameter, so without it to send the execution to another component, this component short-circuits the request pipeline.
Now, let’s start the app and inspect the result, which proves our execution order:
Important Note
We shouldn’t call the next.Invoke after we send the response to the client. This can cause exceptions if we try to set the status code or modify the headers of the response.
For example:
app.Use(async (context, next) =>
{
    await context.Response.WriteAsync("Hello from the middleware component.");

    await next.Invoke();

    Console.WriteLine($"Logic after executing the next delegate in the Use method");
});
app.Run(async context =>
{
    Console.WriteLine($"Writing the response to the client in the Run method");
    context.Response.StatusCode = 200;

    await context.Response.WriteAsync("Hello from the middleware component.");
});
Here we write a response to the client and then call next.Invoke. Of course, this passes the execution to the next component in the pipeline. There, we try to set the status code of the response and write another one. But let’s inspect the result:

We can see the error message, which is pretty self-explanatory.
Using the Map and MapWhen Methods for Branching
To branch the middleware pipeline, we can use both Map and MapWhen methods.
The Map method is an extension method that accepts a path string as one of the parameters:
public static IApplicationBuilder Map(this IApplicationBuilder app, PathString pathMatch, Action<IApplicationBuilder> configuration);
When we provide the pathMatch string, the Map method will compare it to the start of the request path. If they match, the app will execute the branch.
So, let’s see how we can use this method by modifying the Configure method:
app.Use(async (context, next) =>
{
    Console.WriteLine($"Logic before executing the next delegate in the Use method");

    await next.Invoke();

    Console.WriteLine($"Logic after executing the next delegate in the Use method");
});

app.Map("/usingmapbranch", builder =>
{
    builder.Use(async (context, next) =>
    {
        Console.WriteLine("Map branch logic in the Use method before the next delegate");

        await next.Invoke();

        Console.WriteLine("Map branch logic in the Use method after the next delegate");
    });
    builder.Run(async context =>
    {
        Console.WriteLine($"Map branch response to the client in the Run method");

        await context.Response.WriteAsync("Hello from the map branch.");
    });
});

app.Run(async context =>
{
    Console.WriteLine($"Writing the response to the client in the Run method");

    await context.Response.WriteAsync("Hello from the middleware component.");
});
By using the Map method, we provide the path match, and then in the delegate, we use our well-known Use and Run methods to execute middleware components.
Now, if we start the app and navigate to /usingmapbranch, we are going to see the response in the browser:

But also, if we inspect console logs, we are going to see our new messages:
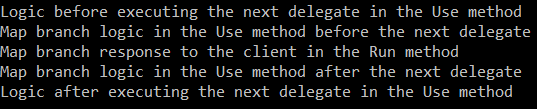
Here, we can see the messages from the Use method before the branch, and the messages from the Use and Run methods inside the Map branch. We are not seeing any message from the Run method outside the branch. It is important to know that any middleware component that we add after the Map method in the pipeline won’t be executed. This is true even if we don’t use the Run middleware inside the branch.
Using the MapWhen Method
If we inspect the MapWhen method, we are going to see that it accepts two parameters:
public static IApplicationBuilder MapWhen(this IApplicationBuilder app, Func<HttpContext, bool> predicate, Action<IApplicationBuilder> configuration);
This method uses the result of the given predicate to branch the request pipeline.
So, let’s see it in action:
app.Map("/usingmapbranch", builder =>
{
    ...
});

app.MapWhen(context => context.Request.Query.ContainsKey("testquerystring"), builder =>
{
    builder.Run(async context =>
    {
        await context.Response.WriteAsync("Hello from the MapWhen branch.");
    });
});

app.Run(async context =>
{
    ...
});
Here, if our request contains the provided query string, we execute the Run method by writing the response to the client. So, as we said, based on the predicate’s result the MapWhen method branch the request pipeline.
Now, we can start the app and navigate to https://localhost:5001?testquerystring=test:

And there we go. We can see our expected message. Of course, we can chain multiple middleware components inside this method as well.
Creating a Middleware in a Separate Class
In this section, we are going to show you a simple example of creating a custom middleware in a separate class and using it in the application’s pipeline. After you understand everything from this example, feel free to read our Global Error Handling in ASP.NET Core article, to see the custom middleware implementation in action for handling all exceptions globally in ASP.NET Core applications.
So to start, let’s create a new CustomMiddleware class in the root of our app:
public class CustomMiddleware
{
    private readonly RequestDelegate _next;

    public CustomMiddleware(RequestDelegate next)
    {
        _next = next;
    }

    public async Task InvokeAsync(HttpContext context)
    {
        Console.WriteLine("Custom Middleware logic from the separate class.");

        await _next.Invoke(context);
    }
}
Here, we are injecting the RequestDelegate next parameter and use it inside the InvokeAsync method to pass the execution to the next component. It is important that our middleware contains a public constructor with the injected RequestDelegate parameter and the method named Invoke or InvokeAsync.
After this, we can create another class and place a single extension method inside:
public static class MiddlewareExtension
{
    public static IApplicationBuilder UseCustomMiddleware(this IApplicationBuilder builder)
        => builder.UseMiddleware<CustomMiddleware>();
}
We create a static method that returns an IApplicationBuilder as a result and extends the IApplicationBuilder interface. In the method’s body, we just call the UseMiddleware method to add our custom middleware to the application’s pipeline.
Finally, we have to modify the Configure method in the Startup class below the first Use method:
app.Use(async (context, next) =>
{
    ...
});

app.UseCustomMiddleware();
And that’s it. As soon as we start our app and navigate to https://localhost:5001, we are going to see a familiar response from the previous Run method. But once we inspect the console window, we are going to find our message from the custom middleware:

Excellent. As we said, feel free to read our Global Error Handling in ASP.NET Core article to learn more about the custom middleware implementation.
Working with Factory-Based Middleware with the IMiddleware Interface
In the previous example, in the MiddlewareExtension class, we’ve called the UseMiddleware method to add the custom middleware to the application’s pipeline. The UseMiddleware method checks if the middleware’s registered type implements the IMiddleware interface. If it does, it means that our app is going to use the IMiddlewareFactory instance to resolve the IMiddleware implementation instead of using the convention-based middleware activation logic (as we have it now in our app).
There are some benefits of this approach:
- The app activates our custom middleware per client request
- We can use strongly typing with our middleware
Since IMiddleware is activated per client request, we can inject other scoped services into the middleware’s constructor.
So, let’s see how we can use the IMiddleware interface.
Usage of the IMiddleware Interface
The first thing we are going to do is to create a new FactoryActivatedCustomMiddleware class:
public class FactoryActivatedCustomMiddleware : IMiddleware
{
    public async Task InvokeAsync(HttpContext context, RequestDelegate next)
    {
        Console.WriteLine("Factory Activated Custom Middleware logic from the separate class.");

        await next.Invoke(context);
    }
}
We can see that our class implements the IMiddleware interface. Additionally, we can see that we don’t have to use constructor injection to provide the RequestDelegate next parameter. In this case, we have that parameter inside the InvokeAsync method that we have to implement due to the IMiddleware’s contract implementation.
Next, we can add one more method inside the MiddleareExtension class:
public static class MiddlewareExtension
{
    public static IApplicationBuilder UseCustomMiddleware(this IApplicationBuilder builder)
        => builder.UseMiddleware<CustomMiddleware>();

    public static IApplicationBuilder UseFactoryActivatedCustomMiddleware(this IApplicationBuilder builder)
        => builder.UseMiddleware<FactoryActivatedCustomMiddleware>();
}
If you inspect the UseMiddleware method, you can see that it accepts the params object[] args parameter. But for the factory-activated middleware, passing any parameter to the UseMiddleware method will cause the NotSupportedException at runtime.
After this, we have to register our factory middleware in the ConfigureServices method:
public void ConfigureServices(IServiceCollection services)
{
    services.AddTransient<FactoryActivatedCustomMiddleware>();
    services.AddControllers();
}
Finally, we can call our extension method in the Configure method:
app.UseCustomMiddleware();
app.UseFactoryActivatedCustomMiddleware();
Excellent.
You can start the app, navigate to the required URI and inspect the console logs to see the message from the factory-activated custom middleware class.
Conclusion
In this article we have learned:
- About middleware components and the pipeline
- To add middleware components to the request pipeline in a proper order
- How to use different methods (Run, Use, Map, MapWhen)
- And how to create middleware components in a separate class
So, there we go. After this article, we should have great knowledge about the middleware configuration in ASP.NET Core applications.
Until the next one.
All the best.

Very well explained. Got to know more in deep about middlewares and their methods.
I have been reading code maze articles from past 2 years and i enjoy these a lot.
Thank you very much for the support. I am glad our content is useful to you.
How do we replace request/response body in the middleware?
Maybe this link can help. https://stackoverflow.com/questions/44508028/modify-middleware-response Bottom line is that you have to use a new memory stream because the body of the response is the stream itself.
i tried the above link… but the Seek() method throws exception…. ‘Specific Method not supported’ … if you have any article related to that…could you share?
Trust me, if we had something like that, I wouldn’t share the StackOverflow link with you 🙂
But it is very strange that you have that error. The Seek method is perfectly applicable on the Stream class and since the body of the response is of type Stream, I am not sure why you get such an error message.
This is a really good refresher on middleware. Thanks!
Thank you too, Brad, for reading.