

While working with the EF Core Code-First approach, we create the classes for our domain entities first. Later, we’ll create the database from our code by using migrations. This is the opposite of the Database-First approach where we design our database first and then create the classes which match our database design.
In the EF Core Code-First approach, we have full control over the code and the database is just a store without any logic. This approach is helpful in situations where we are starting with the development of a new project and we don’t have a clear picture of what our database should look like yet.
We don’t have to worry about creating and updating the database. We can just make the changes in our code and then sync everything easily with the database. The important thing to note is that the manual changes that we make to the database could be lost during migration. So we should make changes to the code only.
The source code for this blog post can be found on this Github repo.
Let’s have a look at how to create a .NET Core Web API application with the EF Core Code-First approach.
The article is divided into the following sections:
- Setting Up the ASP.NET Core Web API Project
- Configuring EF Core
- Seeding Data, Creating DB Script and Reverting Migrations
- Creating the Repository
- Creating the API Controller
- Testing the API
Setting Up the ASP.NET Core Web API Project
As a first step, let’s set up an ASP.NET Core Web API Project. We have explained this in detail in one of our other articles: Creating and configuring a new ASP.NET Core Web API project
The article linked above covers a lot of additional topics. You may go through the entire article if you want to, but the section linked above is quite enough to follow along with this article.
Following the article linked above, let’s create a new project called EFCoreCodeFirstSample
Configuring EF Core
Once we have set up the project, the next step is to set up the EF Core.
Following are the steps for configuring the EF Core:
Defining the Model
First, let’s define the model. We will start by creating a folderModels within the root of the application.
Let’s add a new class Employee.cs inside:
using System;
using System.ComponentModel.DataAnnotations;
using System.ComponentModel.DataAnnotations.Schema;

namespace EFCoreCodeFirstSample.Models
{
    public class Employee
    {
        [Key]
        [DatabaseGenerated(DatabaseGeneratedOption.Identity)]
        public long EmployeeId { get; set; }
        public string FirstName { get; set; }
        public string LastName { get; set; }
        public DateTime DateOfBirth { get; set; }
        public string PhoneNumber { get; set; }
        public string Email { get; set; }
    }
}
The code above defines the classEmployee with some properties. Additionally, we have decorated the EmployeeId property with Key and DatabaseGenerated attributes. We did this because we will be converting this class into a database table and the columnEmployeeId will serve as our primary key with the auto-incremented identity.
Creating a Context File
As the next step, let’s create a context class, define database connection and register the context. The process is explained in detail in one of our other articles: Context Class and the Database Connection
Following the above article, let’s define the context file EmployeeContext.cs(it requires installed Microsoft.EntityFrameworkCore 3.0.0 package):
using Microsoft.EntityFrameworkCore;

namespace EFCoreCodeFirstSample.Models
{
    public class EmployeeContext : DbContext
    {
        public EmployeeContext(DbContextOptions options)
            : base(options)
        {
        }

        public DbSet<Employee> Employees { get; set; }
    }
}
and let’s define the database connection in the appsettings.json file as:
{
  "Logging": {
    "LogLevel": {
      "Default": "Information",
      "Microsoft": "Warning",
      "Microsoft.Hosting.Lifetime": "Information"
    }
  },
  "ConnectionString": {
    "EmployeeDB": "server=MY_SERVER;database=EmployeeDB;User ID=MY_USER;password=MY_PASSWORD;"
  },
  "AllowedHosts": "*"
}
Of course, modify the ConnectionStringproperty to match with that of ours.
Then let’s install the Microsoft.EntityFrameworkCore.SqlServer package and register our context in the Startup.cs:
public void ConfigureServices(IServiceCollection services)
{
    services.AddDbContext<EmployeeContext>(opts => opts.UseSqlServer(Configuration["ConnectionString:EmployeeDB"]));
    services.AddControllers();
}
Generating the Database from Code Using Migrations
Our next step is to add Code-First Migrations. Migrations automate the creation of database based on our Model. The EF Core packages required for migration will be added with .NET Core project setup.
Let’s install the Microsoft.EntityFrameworkCore.Tools package and run the following command in the Package Manager console:
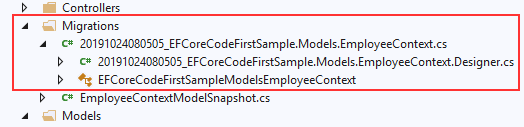
PM> Add-Migration EFCoreCodeFirstSample.Models.EmployeeContext
This will create the classes for supporting migrations.
Now let’s apply those changes to the database.
Run the following command:
PM> update-database
This will update the database based on our models.
Now let’s verify that the database and tables are created by opening SQL Server Management Studio or Visual Studio Server Explorer:
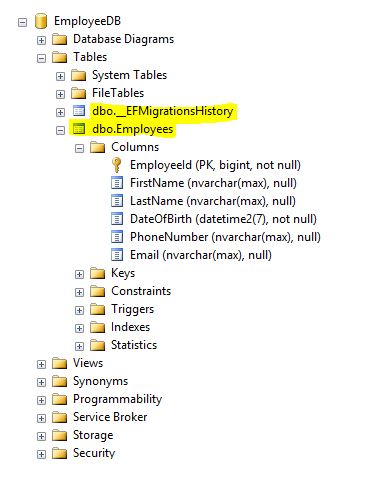
We can see the database EmployeeDBis created with a table Employeeswhich contains the columns based on the fields we defined in our model.
Each time we make changes to our entities and do a migration, we can see new migration files created in our solution and new entries in the table__EFMigrationsHistory.
When using the EF Core Code-First approach the best practice is to make all modifications to the database through the model and then update the database by doing the migration. Ideally, we should not make any manual changes to the database.
With that, the EF Core setup is complete.
Seeding Data, Reverting Migrations and Creating DB Scripts
Seeding Data
Data seeding allows us to provide initial data during the creation of a database. Then, EF Core migrations will automatically determine what insert, update or delete operations need to be applied when upgrading the database to a new version of the model.
So let’s create some seed data now. For this, we need to override the OnModelCreating method in the EmployeeContext class:
protected override void OnModelCreating(ModelBuilder modelBuilder)
{
    modelBuilder.Entity<Employee>().HasData(new Employee
    {
        EmployeeId = 1,
        FirstName = "Uncle",
        LastName = "Bob",
        Email = "[email protected]",
        DateOfBirth = new DateTime(1979, 04, 25),
        PhoneNumber = "999-888-7777"
    }, new Employee
    {
        EmployeeId = 2,
        FirstName = "Jan",
        LastName = "Kirsten",
        Email = "[email protected]",
        DateOfBirth = new DateTime(1981, 07, 13),
        PhoneNumber = "111-222-3333"
    });
}
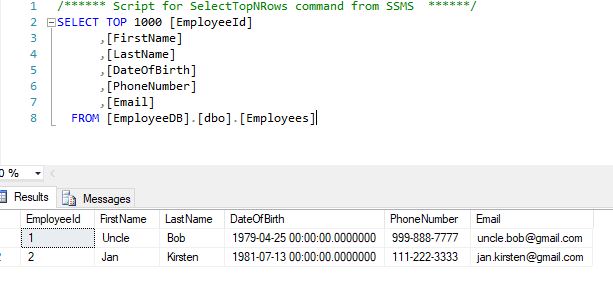
Here we have provided two Employee records that will be inserted into the database as part of the migration.
Let’s run the migration commands once again:
Add-Migration EFCoreCodeFirstSample.Models.EmployeeContextSeed
update-database
This will create a new migration file in our Migrations folder and update the database with the seed data we provided:
Now the Employee table in our database will look like this:
Reverting Migrations
After making changes to our EF Core model, the database schema will be out of sync. To bring it to sync with the model, let’s add another migration.
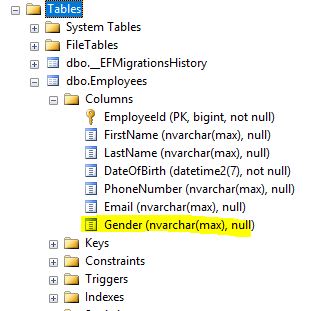
Let’s add a new property Gender in our employee model and then do a migration.
It is a good practice to give meaningful names to the migration like a commit message in a version control system. For example, if we add a new field Gender to the Employee model, we may give a name like AddEmployeeGender.
Add-Migration EFCoreCodeFirstSample.Models.AddEmployeeGender
Sometimes we add a migration and then realize we need to make additional changes to our model before applying it. To remove the last migration, we can use the command:
Remove-Migration
If we already applied a migration (or several migrations) to the database but need to revert it, we can use the same command to apply migrations, but specify the name of the migration we want to roll back to.
Let’s say we already applied the migration to add the Gender column to the database by using the below command.
update-database
Now we can see the new column Gender added to the Employee table:
Now let’s say we want to revert this migration. We can use the same command by specifying the name of the previous migration:
update-database EFCoreCodeFirstSample.Models.EmployeeContextSeed
Once this is executed, we can see that the column Gender is removed from the Employee table:

We should remove the Gender property from the Employee class as well.
Creating DB Scripts
While deploying our migrations to a production database, it’s useful to generate a SQL script. We can further tune the script to match the production database. Also, we can use the script along with various deployment tools.
The command to generate the script is:
Script-Migration
Once we apply this command, we can see a SQL script generated with all changes related to our migrations.
Recommendation
If you want to learn in great detail about Entity Framework Core and many of its features, we recommend going through our Entity Framework Core series. Through the entire series, we talk about different EF Core features, from the Context classes and DbSet properties, relationships and non-relational configurations, additional migration information and querying the database. If you want, you have a place to learn a lot more about this topic.
Creating the Repository
Now that we have configured the EF Core, we need a mechanism to access the data context from our API. Directly accessing the context methods from the API controller is a bad practice and we should avoid that.
So let’s implement a simple data repository using the repository pattern. We have explained this pattern in detail in one of our other articles: Implementing the repository pattern.
Let’s add a new folder under Models and name itRepository. Then let’s create a new interface calledIDataRepository:
namespace EFCoreCodeFirstSample.Models.Repository
{
    public interface IDataRepository<TEntity>
    {
        IEnumerable<TEntity> GetAll();
        TEntity Get(long id);
        void Add(TEntity entity);
        void Update(TEntity dbEntity, TEntity entity);
        void Delete(TEntity entity);
    }
}
We will later inject this interface into our API Controller and API will be communicating with the data context using this interface.
Next, let’s create a concrete class that implements the interfaceIDataRepository. Let’s add a new folder under Models calledDataManager. Then let’s create a new class EmployeeManager:
using System.Collections.Generic;
using System.Linq;
using EFCoreCodeFirstSample.Models.Repository;

namespace EFCoreCodeFirstSample.Models.DataManager
{
    public class EmployeeManager : IDataRepository<Employee>
    {
        readonly EmployeeContext _employeeContext;

        public EmployeeManager(EmployeeContext context)
        {
            _employeeContext = context;
        }

        public IEnumerable<Employee> GetAll()
        {
            return _employeeContext.Employees.ToList();
        }

        public Employee Get(long id)
        {
            return _employeeContext.Employees
                  .FirstOrDefault(e => e.EmployeeId == id);
        }

        public void Add(Employee entity)
        {
            _employeeContext.Employees.Add(entity);
            _employeeContext.SaveChanges();
        }

        public void Update(Employee employee, Employee entity)
        {
            employee.FirstName = entity.FirstName;
            employee.LastName = entity.LastName;
            employee.Email = entity.Email;
            employee.DateOfBirth = entity.DateOfBirth;
            employee.PhoneNumber = entity.PhoneNumber;

            _employeeContext.SaveChanges();
        }

        public void Delete(Employee employee)
        {
            _employeeContext.Employees.Remove(employee);
            _employeeContext.SaveChanges();
        }
    }
}
The classEmployeeManager handles all database operations related to the employee. The purpose of this class is to separate the actual data operations logic from our API Controller.
This class has the following methods for supporting CRUD operations:
GetAll() – Gets all employee records from the database.
Get() – Gets a specific employee record from the database by passing an Id.
Add() – Creates a new employee record in the database.
Update() – Updates a specific employee record in the database.
Delete() – Removes a specific employee record from the database based on the Id.
As a next step, let’s configure the repository using dependency injection. This can be done in the ConfigureServices method in the Startup.cs as below:
public void ConfigureServices(IServiceCollection services)
{
    services.AddDbContext<EmployeeContext>(opts => opts.UseSqlServer(Configuration["ConnectionString:EmployeeDB"]));
    services.AddScoped<IDataRepository<Employee>, EmployeeManager>();
    services.AddControllers();
}
Creating the API Controller
Now that our DataManager is all set, let’s create the API Controller and create the endpoints for handling CRUD operations. We have covered this in detail in one of our other articles: Creating a .NET Core Web API Controller.
Following the above article, let’s create the EmployeeController class in the Controllersfolder as below:
using System.Collections.Generic;
using EFCoreCodeFirstSample.Models;
using EFCoreCodeFirstSample.Models.Repository;
using Microsoft.AspNetCore.Mvc;

namespace EFCoreCodeFirstSample.Controllers
{
    [Route("api/employee")]
    [ApiController]
    public class EmployeeController : ControllerBase
    {
        private readonly IDataRepository<Employee> _dataRepository;

        public EmployeeController(IDataRepository<Employee> dataRepository)
        {
            _dataRepository = dataRepository;
        }

        // GET: api/Employee
        [HttpGet]
        public IActionResult Get()
        {
            IEnumerable<Employee> employees = _dataRepository.GetAll();
            return Ok(employees);
        }

        // GET: api/Employee/5
        [HttpGet("{id}", Name = "Get")]
        public IActionResult Get(long id)
        {
            Employee employee = _dataRepository.Get(id);

            if (employee == null)
            {
                return NotFound("The Employee record couldn't be found.");
            }

            return Ok(employee);
        }

        // POST: api/Employee
        [HttpPost]
        public IActionResult Post([FromBody] Employee employee)
        {
            if (employee == null)
            {
                return BadRequest("Employee is null.");
            }

            _dataRepository.Add(employee);
            return CreatedAtRoute(
                  "Get",
                  new { Id = employee.EmployeeId },
                  employee);
        }

        // PUT: api/Employee/5
        [HttpPut("{id}")]
        public IActionResult Put(long id, [FromBody] Employee employee)
        {
            if (employee == null)
            {
                return BadRequest("Employee is null.");
            }

            Employee employeeToUpdate = _dataRepository.Get(id);
            if (employeeToUpdate == null)
            {
                return NotFound("The Employee record couldn't be found.");
            }

            _dataRepository.Update(employeeToUpdate, employee);
            return NoContent();
        }

        // DELETE: api/Employee/5
        [HttpDelete("{id}")]
        public IActionResult Delete(long id)
        {
            Employee employee = _dataRepository.Get(id);
            if (employee == null)
            {
                return NotFound("The Employee record couldn't be found.");
            }

            _dataRepository.Delete(employee);
            return NoContent();
        }
    }
}
That’s it. We have successfully created a Web API controller with endpoints for handling CRUD operations.
Testing the API
Now let’s do a quick round of testing around our API endpoints using Postman.
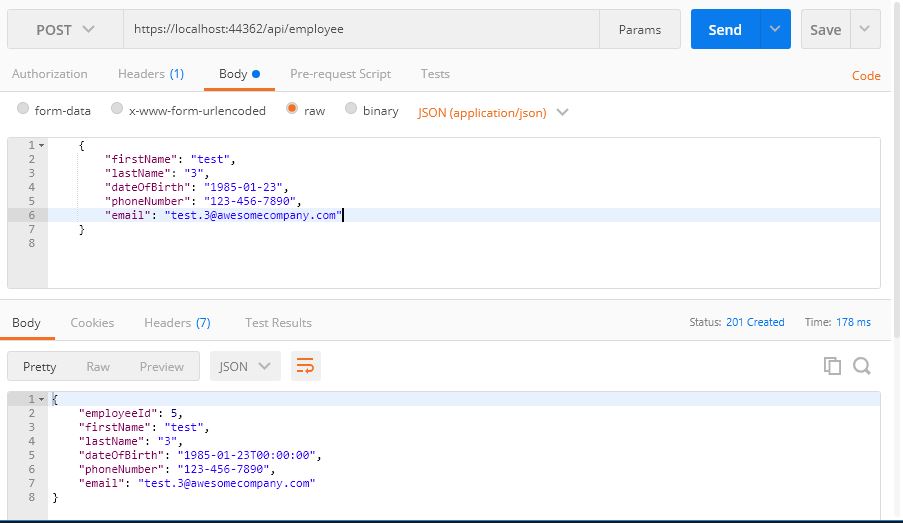
First, let’s create a new Employee using a Post request:
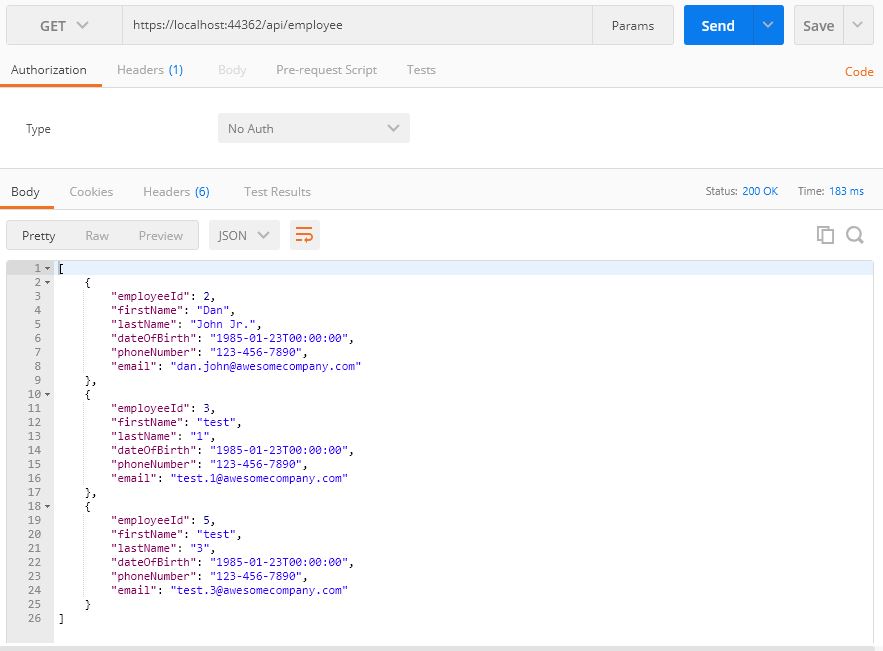
Next, let’s do a Get request to get all Employees. We can see the new Employee record which was created in the previous request:
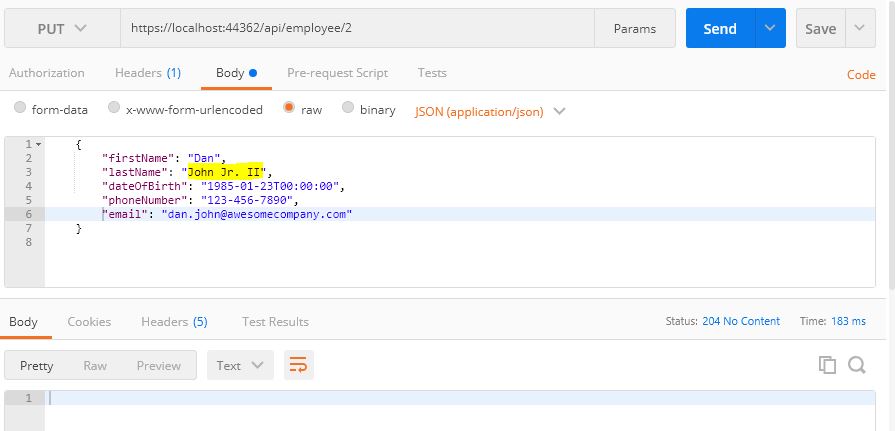
Now, let’s do a Put request to test the update functionality by changing the last name:
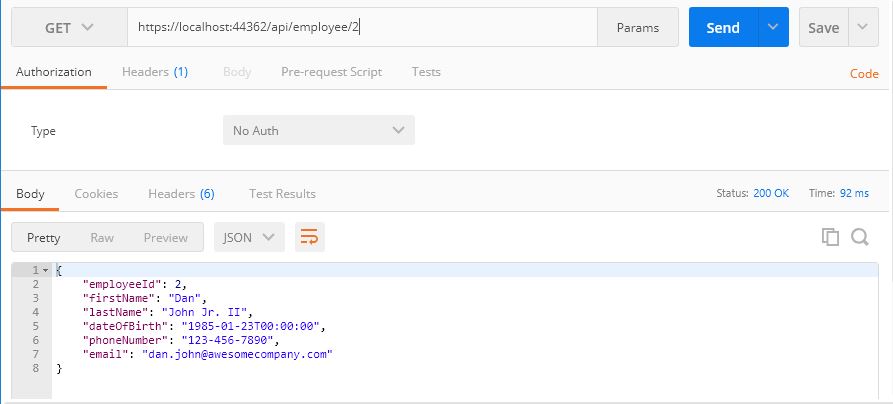
Once again let’s do a Get request and verify that the last name has changed:
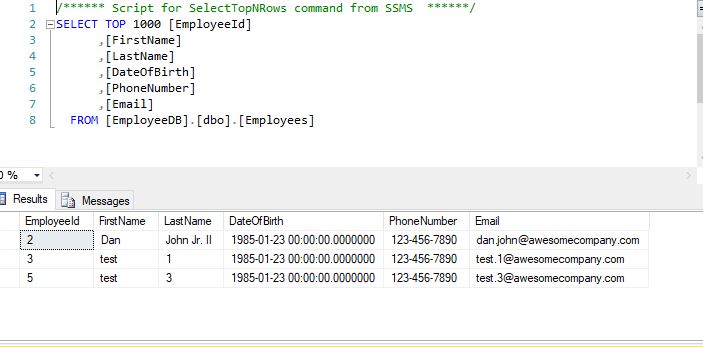
Now that we have successfully tested the API endpoints, let’s verify that the changes we made are actually persisted in the database. Let’s open the SQL Server management studio and verify that the record is created in the Employee table:
Conclusion
Well, that’s all for now. In this article, we have learned the following topics.
- EF Core Code-First approach and when to use it
- Setting up a .NET Core Web API project with EF Core Code-First approach
- Creating a database from code by using migrations
- Setting up a repository to handle communication between API and the data context
- Create API endpoints for handling CRUD operations and testing them
Hope you enjoyed the article. Happy programming!

