

Updated on
In this article, we are going to learn about the ASP.NET Core built-in data protection mechanism, IDataProtector, which we can use to encrypt and decrypt our sensitive data.
Encryption and decryption are not the only features we are going to cover. We will also show you how to create time-limited encryption and how to configure our protection mechanism in different ways.
You can find a starting project on our GitHub repo, which you can use to follow along with this article and the finished project if you get stuck.
Encrypting and Decrypting Data with IDataProtector
IDataProtector is an interface that provides data protection services. To be able to use its features, we have to add those data protection services to the specified IServiceCollection and then inject it using dependency injection.
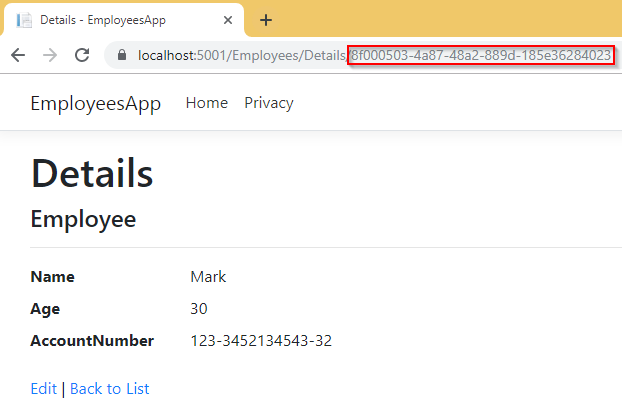
If we take a look at our starting project, we can see the Index action which lists all the employees from the database. There is also a Details link next to each employee which directs us to the Details page. Of course, if we take a look at the URI of a Details page, we can see the value of the employee’s Id property:
Now, let’s assume that we don’t want to show that Id value in the URI, or at least not in the Guid form. In other words, we want to protect our Id.
To do that, let’s modify the Startup.cs class, by registering protection services in IServiceCollection with the AddDataProtection method:
public void ConfigureServices(IServiceCollection services)
{
    services.AddDbContext<EmployeeContext>(opts =>
        opts.UseSqlServer(Configuration.GetConnectionString("sqlConnection")));

    services.AddScoped<IEmployeeRepository, EmployeeRepository>();

    services.AddDataProtection();

     services.AddControllersWithViews();
}
So, that is all it takes. Or at least for now.
Next, let’s create an IDataProtector object.
Creating a Data Protection Object with IDataProtector and DI
After the registration, we are going to create a data protection object to be able to protect and unprotect our data:
private readonly IDataProtector _protector;

public EmployeesController(IEmployeeRepository repo, IDataProtectionProvider provider)
{
    _repo = repo;
    _protector = provider.CreateProtector("EmployeesApp.EmployeesController");
}
We can see that we create an object of type IDataProtector. But additionally, we need an IDataProtectionProvider object with the CreateProtector method to accomplish this action successfully. Both interfaces are part of the Microsoft.AspNetCore.DataProtection namespace. Therefore, we have to include it as a using directive.
To continue, let’s modify the Employee model class and the Index action to protect Id values for each employee:
public class Employee
{
    public Guid Id { get; set; }

    [Required(ErrorMessage = "Name is required")]
    public string Name { get; set; }

    [Required(ErrorMessage = "Age is required")]
    public int Age { get; set; }

    [Required(ErrorMessage = "Account number is required")]
    public string AccountNumber { get; set; }
    [NotMapped]
    public string EncryptedId { get; set; }
}
public IActionResult Index()
{
    var employees = _repo.GetAll();

    foreach (var emp in employees)
    {
        var stringId = emp.Id.ToString();
        emp.EncryptedId = _protector.Protect(stringId);
    }

    return View(employees);
}
So, we just add a new EncryptedId property in the Employee class and in the Index method, we iterate through each employee and assign protected value to the newly created property.
Next, let’s modify the Index view file by changing the value of the asp-route-id attribute in a Details link:
<a asp-action="Details" asp-route-id="@item.EncryptedId">Details</a> |
Finally, let’s modify the Details action in the EmployeesController class:
public IActionResult Details(string id)
{
    var guid_id = Guid.Parse(_protector.Unprotect(id));
    var employee = _repo.GetEmployee(guid_id);

    return View(employee);
}
That’s it. We can test it now:
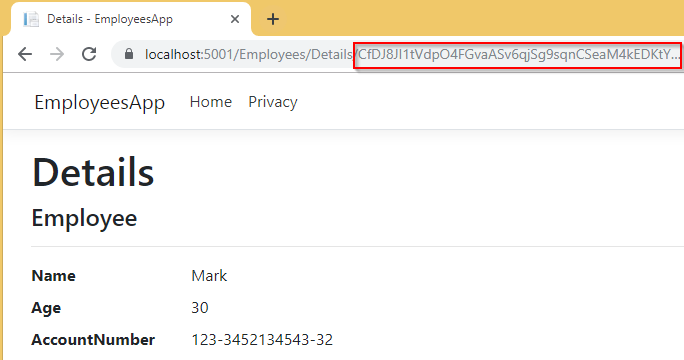
We have the same result as before, but this time with encrypted Id in URI.
Purpose String
Let’s take a look at the following code:
_protector = provider.CreateProtector("EmployeesApp.EmployeesController");
As explained, we need an object of type IDataProtectionProvider and CreateProtector method to create a protector object. But we can see an additional parameter in the CreateProtector method.
This is Purpose String.
Any protector must have its own unique purpose string and it provides isolation between cryptographic consumers. In other words, two IDataProtector instances (created with different purpose strings) can’t read each other’s payloads, only their own.
If one protector object tries to read the payload from a different protector, an exception will be thrown. We can test this with an example.
Let’s slightly modify our controller:
private readonly IEmployeeRepository _repo;
private readonly IDataProtector _protector;
private readonly IDataProtector _protectorTest;

public EmployeesController(IEmployeeRepository repo, IDataProtectionProvider provider)
{
    _repo = repo;
    _protector = provider.CreateProtector("EmployeesApp.EmployeesController");
    _protectorTest = provider.CreateProtector("TestProtector");
}

public IActionResult Index()
{
    var employees = _repo.GetAll();

    foreach (var emp in employees)
    {
        var stringId = emp.Id.ToString();
        emp.EncryptedId = _protector.Protect(stringId);
    }

    var testData = _protectorTest.Protect("Test");
    var unprotectedTest = _protector.Unprotect(testData);

    return View(employees);
}
In this example, we create another IDataProtector instance (_protectorTest) and use that instance to create protected data. Additionally, we try to unprotect it with the other IDataProtector instance (_protector).
Now, when we run our app:

As expected, CryptographicException was thrown.
Data Protection for Limited Time
There are situations where we want our protected payload to expire after a certain period of time. For that purpose, we can use the ITimeLimitedDataProtector interface. To create an instance of this mentioned interface, we have to have an instance of IDataProtector and then call the ToTimeLmitedDataProtector extension method.
So, let’s find out how we can create a time-limited payload with an example. We are going to modify the Index action just for the example purpose:
public IActionResult Index()
{
    //Previous code removed for the example clarity

    var timeLimitedProtector = _protector.ToTimeLimitedDataProtector();
    var timeLimitedData = timeLimitedProtector.Protect("Test timed protector", lifetime: TimeSpan.FromSeconds(2));

    //just to test that this action works as long as life-time hasn't expired
    var timedUnprotectedData = timeLimitedProtector.Unprotect(timeLimitedData);

    Thread.Sleep(3000);

    var anotherTimedUnprotectTry = timeLimitedProtector.Unprotect(timeLimitedData);

    return View(employees);
}
As you can see, there is nothing strange about this code.
We are using the _protector object to create a new instance of a time-limited protector with the help of the ToTimeLimitedDataProtector method. Then, we use the timeLimitedProtector object to protect our data and to define the expiration period for our payload. After that, we unprotect our protected data, just to prove that everything works well if the payload hasn’t expired.
Finally, we create a 3 seconds pause and then try to unprotect our protected data.
Once we start our application, we can see the result:

There we go, it is obvious which action failed and why.
Different Ways to Configure Data Protection in ASP.NET Core
When we register data protection services in the StartUp class, the default configuration is applied, but sometimes we want to change that.
That being said, let’s see how we can apply a different configuration for data protection in ASP.NET Core.
If we want to store the data protection configuration in a local custom file, we can use the PersistKeysToFileSystem method:
services.AddDataProtection()
     .PersistKeysToFileSystem(new DirectoryInfo(@"bin\debug\configuration"));
This is the result:
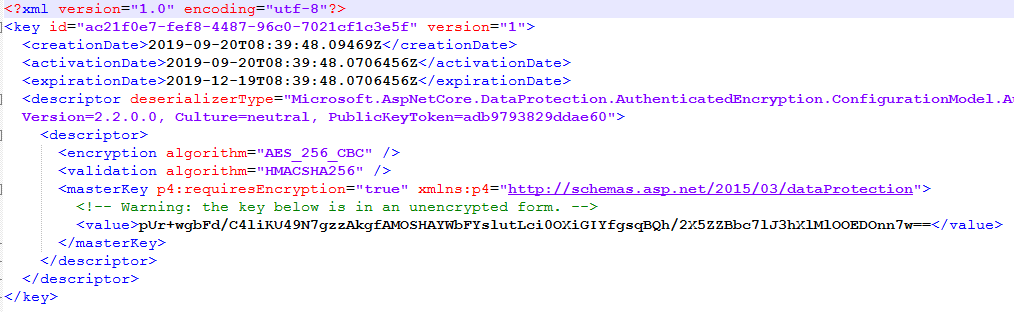
We can see the creation date, expiration date, validation algorithm used, and the value of the master key. Notice that we have a warning that our key is unencrypted, which is not that good. But, we can fix that:
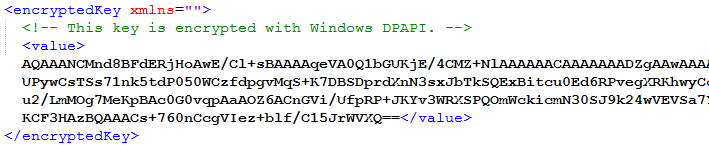
services.AddDataProtection()
    .PersistKeysToFileSystem(new DirectoryInfo(@"bin\debug\configuration"))
    .ProtectKeysWithDpapi();
Let’s delete this configuration file and run our app again.
Now if we take a look at our key, we are going to see that it is encrypted:
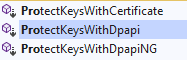
We don’t have to use just ProtectKeysWithDpapi method to encrypt our key. There are additional methods as well:
We can calculate, from the expirationDate and activationDate properties, that the expiration period is 90 days. If we want, we can modify that as well:
services.AddDataProtection()
      .PersistKeysToFileSystem(new DirectoryInfo(@"bin\debug\configuration"))
      .ProtectKeysWithDpapi()
      .SetDefaultKeyLifetime(TimeSpan.FromDays(10));
This is the result:

To check additional configuration options, you can visit the Data Protection configuration in ASP.NET Core.
Conclusion
We have covered many different features related to data protection in ASP.NET Core. This can be quite useful when protecting sensitive data in our application.
To sum up, we have learned:
- How to register data protection services in our application
- The way to encrypt and decrypt sensitive data in our app
- To protect the payloads for a limited time
- Different ways to configure data protection

Can you use Microsoft.AspNetCore.DataProtection to protect data from .net 6 web api RESTful since it is stateless? Would need to do this for ID params as well as IDs that are on an object which is passed back to the client.
The client needs to be able to select that ID (protected version) from say a ddl and then call the API to get the record passing the encrypted ID to the API.. There is no key so not sure how does this works and I also ran across an article that says the key is rotated automatically.. How would that work if a client retrieved data with the encrypted Ids and then the key rotates and the client then calls the API passing the ID that was encrypted with the previous key?
Thanks
Can we use this for two different web api applications? I mean if we protect data in one application and un-protect in other application.
I would have to test it to provide you with an answer. So, my advice, if you have time, is to test it yourself and make sure how it works. You can also share the answer with us if you want to, which would be awesome.
can you explain which method is the the best and safest please (DPAPI or certificate or DpapiNG)?
Hello Dony. Honestly, I can’t tell you more than the official docs do. So, please read these:
https://docs.microsoft.com/en-us/dotnet/api/microsoft.aspnetcore.dataprotection.dataprotectionbuilderextensions.protectkeyswithcertificate?view=aspnetcore-5.0#Microsoft_AspNetCore_DataProtection_DataProtectionBuilderExtensions_ProtectKeysWithCertificate_Microsoft_AspNetCore_DataProtection_IDataProtectionBuilder_System_String_
https://docs.microsoft.com/en-us/dotnet/api/microsoft.aspnetcore.dataprotection.dataprotectionbuilderextensions.protectkeyswithdpapi?view=aspnetcore-5.0
https://docs.microsoft.com/en-us/dotnet/api/microsoft.aspnetcore.dataprotection.dataprotectionbuilderextensions.protectkeyswithdpaping?view=aspnetcore-5.0
https://docs.microsoft.com/en-us/windows/win32/seccng/cng-dpapi?redirectedfrom=MSDN
I am pretty sure, these will help.
Informative article. I have just found out there is a topic about this. What are the performance implications encrypting/ decrypting every id? Would there be a certain scenario where a PK ID would need to be protected? I can understand with properties such as password and other sensitive data. But I haven’t faced a use case where I needed to protect PK ID … or any other identifier. Thank you.
About performance implications, I have seen none. This is very fast process. About the scenarion, there are some cases when you don’t want your ID to be seen in the URI, but this is just example, you can use this technique for many different cases.
Excelent article, thanks. Now i can protect primary key…
Thank you a lot. Hope seeing you back soon 😀 Best regards.
thank you for sharing this useful article
You are very welcome.
Never know about this… this is so awesome!!! I have long wondered how to protect primary keys like this.
I am glad this article helped you discover new useful features in .net core. Best regards and come back again 🙂