
As we did with the MVC client application in the fourth part of this series, we are going to show you how to use role-based access control with our Angular application to protect routes and restrict access to unauthorized users. As we already know, from the mentioned article, sometimes it’s not enough just to be authenticated – the user must have the right role to access some pages. So, implementing the role-based access control with angular and IS4 is going to be the main goal of this article.
Also, we are going to show you how to improve the protection actions by using guards in the Angular application.
If you want to read the entire IdentityServer4, OAuth2, and OIDC series, feel free to do that and learn a lot more about the application security in ASP.NET Core.
Let’s start.
Creating the Privacy Action on the Web API Side
As the title states, we are going to create a new Privacy action to support the Privacy navigation menu in our Angular application. Just to make things easier, we are going to use the Companies controller for that:
[HttpGet("Privacy")]
[Authorize]
public IActionResult Privacy()
{
    var claims = User.Claims.Select(c => new { c.Type, c.Value }).ToList();

    return Ok(claims);
}
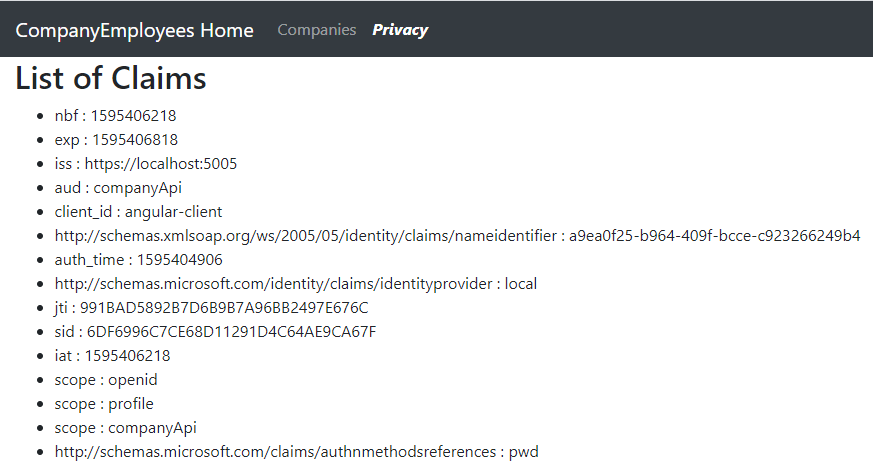
Just for the example sake, we create the Privacy action that iterates through all the Claims inside the User object and returns them as a list. Also, we can see only authorized users have access to this action.
Now, on the client side, we have to create our component:
ng g c privacy --skipTests
Before we modify this component, let’s just create a route for it:
RouterModule.forRoot([
  { path: 'home', component: HomeComponent },
  { path: 'company', loadChildren: () => import('./company/company.module').then(m => m.CompanyModule) },
  { path: 'signin-callback', component: SigninRedirectCallbackComponent },
  { path: 'signout-callback', component: SignoutRedirectCallbackComponent },
  { path: 'privacy', component: PrivacyComponent },
  { path: '404', component : NotFoundComponent},
  { path: '', redirectTo: '/home', pathMatch: 'full' },
  { path: '**', redirectTo: '/404', pathMatch: 'full'}
])
After that, we have to modify the privacy.component.ts file:
import { RepositoryService } from './../shared/services/repository.service';
import { Component, OnInit } from '@angular/core';

@Component({
  selector: 'app-privacy',
  templateUrl: './privacy.component.html',
  styleUrls: ['./privacy.component.css']
})
export class PrivacyComponent implements OnInit {
  public claims: [] = [];

  constructor(private _repository: RepositoryService) { }

  ngOnInit(): void {
    this.getClaims();
  }

  public getClaims = () =>{
    this._repository.getData('api/companies/privacy')
    .subscribe(res => {
      this.claims = res as [];
    })
  }
}
And the template file as well:
<section style="margin-left: 15px;">
    <h2>List of Claims</h2>

    <ul>
        <li *ngFor="let claim of claims">
            {{claim.type}} : {{claim.value}}
        </li>
    </ul>
</section>
Finally, we have to modify the Privacy link in the menu.component.ts file:
<li class="nav-item">
  <a *ngIf="isUserAuthenticated" class="nav-link" [routerLink]="['/privacy']" routerLinkActive="active"
    [routerLinkActiveOptions]="{exact: true}"> Privacy </a>
</li>
That’s it.
We can start our applications, log in with valid credentials and navigate to the Privacy page:
With this out of the way, we can move on.
Handling Authorization Errors
Right now, both navigation links are visible only for authenticated users. But if you think that anyone still can access these pages by typing the right URI in the browser, well you are partially right. As a matter of fact, let’s try it:

What we can see is that the user can navigate to the requested page, but because we have protected the Privacy endpoint, the server returns the 401 error message. So, we are protected, but we don’t want this type of behavior. The better way to handle this is to navigate the user to the Unauthorized page.
That said, let’s create a new component:
ng g c unauthorized --skipTests
Now, we can modify the unauthorized.component.ts file:
import { AuthService } from './../shared/services/auth.service';
import { Component, OnInit } from '@angular/core';

@Component({
  selector: 'app-unauthorized',
  templateUrl: './unauthorized.component.html',
  styleUrls: ['./unauthorized.component.css']
})
export class UnauthorizedComponent implements OnInit {
  public isUserAuthenticated: boolean = false;

  constructor(private _authService: AuthService) {
    this._authService.loginChanged
    .subscribe(res => {
      this.isUserAuthenticated = res;
    })
  }

  ngOnInit(): void {
    this._authService.isAuthenticated()
    .then(isAuth => {
      this.isUserAuthenticated = isAuth;
    })
  }

  public login = () => {
    this._authService.login();
  }

  public logout = () => {
    this._authService.logout();
  }
}
Here, we subscribe to the loginChanged observable to check if the user is authenticated or not. Also, we check the same thing in the ngOnInit function but by calling the isAuthenticated function. Then, we create the login and logout functions where we transfer the call to the functions with the same names in the Auth service.
After that, we have to modify the unauthorized.component.html file:
<section style="margin-left: 15px;">
    <h2>Unauthorized User</h2>
    <p *ngIf="isUserAuthenticated">
        You are unauthorized to see the requested page.
        <button class="btn btn-link" (click)="logout()">Please log out and log in with a different user.</button>
    </p>
    <p *ngIf="!isUserAuthenticated">
        You are unauthorized to see the requested page.
        <button class="btn btn-link" (click)="login()">Please log in first.</button>
    </p>
</section>
With this, we show different messages with different links to the users based on whether they are logged out or they are logged in with unsufficient rights (this will be of use once we use roles for the authorization).
Finally, let’s add the route in the app.module file:
{ path: 'unauthorized', component: UnauthorizedComponent },
Quick Testing
If we start our application and navigate to the unauthorized page without logging in first, we are going to see the second message with the login link:

Of course, if we log in and navigate to the same page, we are going to see the different message:

Feel free to click both links to test them.
Modifying Interceptor
Of course, we are not expecting our users to manually navigate to the unauthorized page. What we want to do is to navigate them automatically as soon as the unauthorized response comes from the server. To do that, let’s modify the auth-interceptor service:
constructor(private _authService: AuthService, private _router: Router) { }

intercept(req: HttpRequest<any>, next: HttpHandler): Observable<HttpEvent<any>> {
  if(req.url.startsWith(Constants.apiRoot)){
    return from(
      this._authService.getAccessToken()
      .then(token => {
        const headers = new HttpHeaders().set('Authorization', `Bearer ${token}`);
        const authRequest = req.clone({ headers });
        return next.handle(authRequest)
        .pipe(
          catchError((err : HttpErrorResponse) => {
            if(err && (err.status === 401 || err.status === 403)){
              this._router.navigate(['/unauthorized']);
            }
            throw 'error in a request ' + err.status;
          })
        ).toPromise();
      })
    );
  }
  else {
    return next.handle(req);
  }
}
We inject the router and use the catchError operator from the rxjs/operators location. Inside the catchError operator, we check the error response and if the value of the status property is 401 or 403, we redirect the user to the unauthorized page. Then we just throw an error message.
Now, if we start our application and try to navigate to the Privacy page without logging in, we are going to be automatically redirected to the unauthorized page.
Implementing Role-Based Access Control with Angular
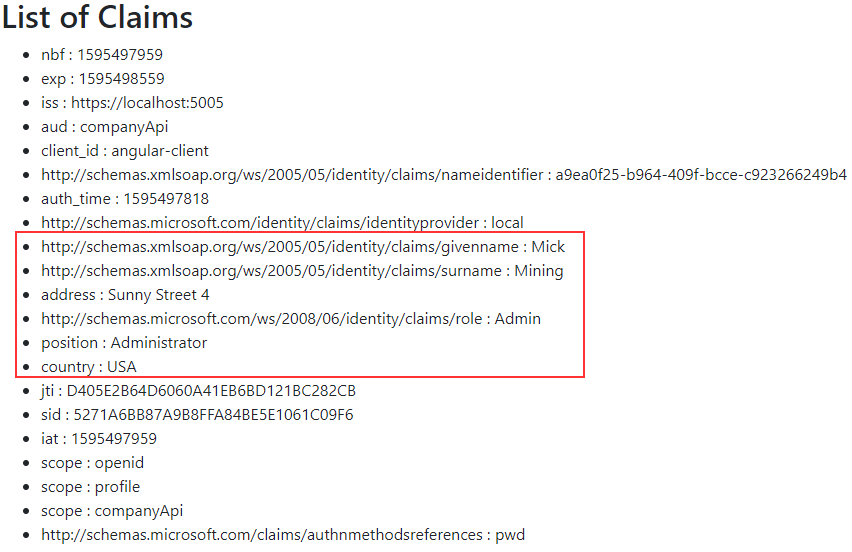
Let’s say, we want to allow only administrators to see the content of the Privacy page. In our IDP configuration, we have two users, Mick with the Admin role and Jane with the Visitor role. So, to support the role-based access control in our IDP application, we have to add another class to it:
public class CustomProfileService : IProfileService
{
    public Task GetProfileDataAsync(ProfileDataRequestContext context)
    {
        var sub = context.Subject.GetSubjectId();
        var user = InMemoryConfig.GetUsers()
            .Find(u => u.SubjectId.Equals(sub));

        context.IssuedClaims.AddRange(user.Claims);
        return Task.CompletedTask;
    }

    public Task IsActiveAsync(IsActiveContext context)
    {
        var sub = context.Subject.GetSubjectId();
        var user = InMemoryConfig.GetUsers()
            .Find(u => u.SubjectId.Equals(sub));

        context.IsActive = user != null;
        return Task.CompletedTask;
    }
}
This new class must inherit from the IProfileService interface and implement both GetProfileDataAsync and IsActiveAsync methods. In the first method, we create a logic to include required claims for a user using the context object. There, we fetch the SubjectId and use it to find a user from our InMemoryConfig class. Lastly, we just add claims to the context object. Of course, you can customize this method even further if you want to add different claims for different clients, etc.
In the second method, we determine if a user is currently allowed to obtain tokens. So, if we find a user based on the SubjectId, we return true, otherwise false.
Now, we have to register this service in the IdentityServer service list:
services.AddIdentityServer()
    .AddTestUsers(InMemoryConfig.GetUsers())
    .AddDeveloperSigningCredential() //not something we want to use in a production environment;
    .AddProfileService<CustomProfileService>()
    .AddConfigurationStore(opt => ...
That’s it regarding the IDP project.
After this, if we log in as Mick and open the Privacy page, we are going to see our scopes listed:
To make use of the roles in our application, we are going to modify the auth.srevice.ts file:
public checkIfUserIsAdmin = (): Promise<boolean> => {
  return this._userManager.getUser()
  .then(user => {
    return user?.profile.role === 'Admin';
  })
}
Then, let’s modify the menu.component.ts file:
public isAdmin = () => {
  return this._authService.checkIfUserIsAdmin()
  .then(res => {
    this.isUserAdmin = res;
  })
}
Here, we call the checkIfUserIsAdin function, which returns a promise, and we assign a result from that promise to the isUserAdmin property. Additionally, we have to call this function as soon as the login status change:
ngOnInit(): void {
  this._authService.loginChanged
  .subscribe(res => {
    this.isUserAuthenticated = res;
    this.isAdmin();
  })
}
Lastly, we have to modify the .html file:
<li class="nav-item">
    <a *ngIf="isUserAdmin" class="nav-link" [routerLink]="['/privacy']" routerLinkActive="active"
      [routerLinkActiveOptions]="{exact: true}"> Privacy </a>
</li>
Now, if we log in as Mick, we are going to see both navigation links, but if we log in as Jane, only the Companies link is available. We are going to get the same results even if we refresh the page.
Role-Based Access Control on the Web Api Side
As we saw, if we log in as Jane, we can’t see the Privacy link. But that doesn’t stop us from visiting the Privacy page by typing the URI in the browser. To prevent that, we have to modify the Authorize attribute on top of the Privacy action in the Companies controller:
[HttpGet("Privacy")]
[Authorize(Roles = "Admin")]
public IActionResult Privacy()
{
    var claims = User.Claims.Select(c => new { c.Type, c.Value }).ToList();

    return Ok(claims);
}
Now, if we try to navigate to the privacy page as Jane, we are going to be redirected to the unauthorized page:
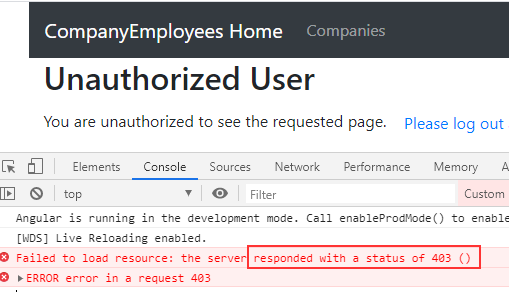
But this time, we have the 403 error and not the 401.
Improving the Route Protection with the Route Guards
Right now, unauthorized users can’t access the Companies or the Privacy page and also, the authorized users must have an Admin role to access the Privacy page. So, the security actions work great and the application redirects our users to the Unauthorized page. But, for our security logic to take place, we have to send the HTTP request to the Web API, process the response, and only then, we can redirect the user to the requested or unauthorized page.
Well, we can improve this logic a bit. We can prevent a request to even leave the client-side area if the user is unauthorized or if they have insufficient rights.
To do that, we are going to create another service in the shared folder:
ng g service shared/guards/auth-guard --skipTests
And modify it:
import { AuthService } from './../services/auth.service';
import { Injectable } from '@angular/core';
import { CanActivate, ActivatedRouteSnapshot, RouterStateSnapshot, Router } from '@angular/router';

@Injectable({
  providedIn: 'root'
})
export class AuthGuardService implements CanActivate {

  constructor(private _authService: AuthService, private _router: Router) { }

  canActivate(route: ActivatedRouteSnapshot, state: RouterStateSnapshot){
    const roles = route.data['roles'] as Array<string>;
    if(!roles) {
      return this.checkIsUserAuthenticated();
    }
    else {
      return this.checkForAdministrator();
    }
  }

  private checkIsUserAuthenticated() {
    return this._authService.isAuthenticated()
      .then(res => {
        return res ? true : this.redirectToUnauthorized();
      });
  }

  private checkForAdministrator() {
    return this._authService.checkIfUserIsAdmin()
      .then(res => {
        return res ? true : this.redirectToUnauthorized();
      });
  }

  private redirectToUnauthorized() {
    this._router.navigate(['/unauthorized']);
    return false;
  }
}
This service, as any route guard, inherits from the CanActivate interface and implements the canActivate function. In this function, we accept the roles parameter and if it doesn’t exist, we call the checkIsUserAuthenticated function, otherwise, we call the checkForAdministrator function. In the first function, we call the isAuthenticated function from the Auth service, and based on the result, we return true or redirect the user to the unauthorized page and return false. We do a similar thing in the second function, just there we check for the specific role.
Then, we have to modify the routes in the app.module.ts file:
RouterModule.forRoot([
  { path: 'home', component: HomeComponent },
  { path: 'company', loadChildren: () => import('./company/company.module').then(m => m.CompanyModule), canActivate: [AuthGuardService] },
  { path: 'signin-callback', component: SigninRedirectCallbackComponent },
  { path: 'signout-callback', component: SignoutRedirectCallbackComponent },
  { path: 'privacy', component: PrivacyComponent, canActivate: [AuthGuardService], data: { roles: ['Admin'] } },
  { path: 'unauthorized', component: UnauthorizedComponent },
As you can see, only for the privacy route, we send the roles parameter.
Now, this is ready for the testing.
We can try to access different routes if we are not logged in and the app is going to redirect us to the unauthorized page. Also, we can log in as Jane and we are going to find only the Companies link available. If we try to navigate to the Privacy page, the app is going to redirect us to the unauthorized page, but this time, there is no 403 error, since we never reached the Privacy endpoint:

Also, the message is the right one.
Conclusion
Excellent work.
We have learned:
- How to extract the claims on the server-side application
- The way to handle authorization errors
- How to implement the Angular role-based access control with and without Guards
In the next article, we are going to learn how to silently renew the access token in the Angular application.
So, see you there

