We can use claims to show identity-related information in our application but, we can use it for the authorization process as well. In this article, we are going to learn how to modify our claims and add new ones. Additionally, we are going to learn about the IdentityServer4 Authorization process and how to use Roles to protect our endpoints.
To navigate through the entire series, visit the IdentityServer4 series page.
So, let’s get down to business.
Modifying Claims
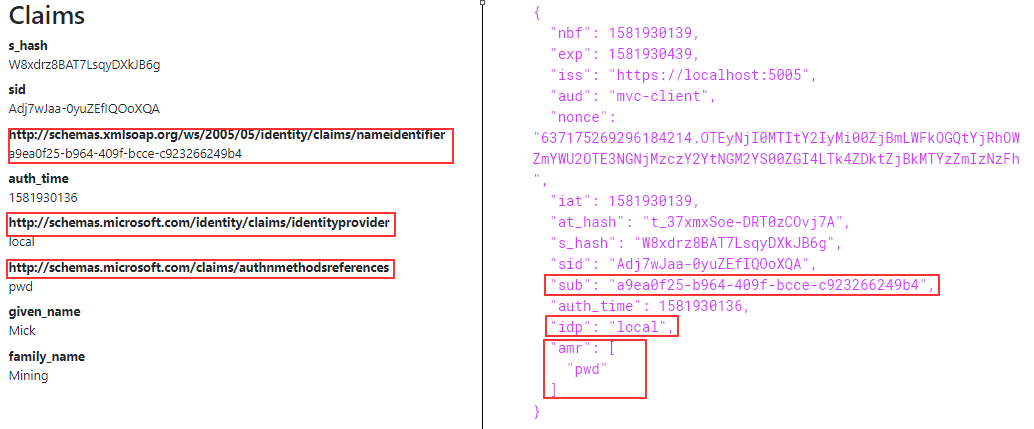
If we inspect our decoded id_token with the claims on the Privacy page, we are going to find some naming differences:
So, what we want to do is to ensure that our claims stay the same as we define them, instead of being mapped to different claims. For example, the nameidentifier claim is mapped from the sub claim, and we want it to stay the sub claim. To do that, we have to slightly modify the constructor in the client’s Startup class:
public Startup(IConfiguration configuration)
{
    Configuration = configuration;
    JwtSecurityTokenHandler.DefaultInboundClaimTypeMap.Clear();
}
For this to work, we have to add the System.IdentityModel.Tokens.Jwt using statement.
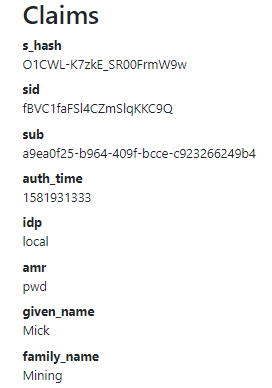
Now, we can start our application, log out from the client, log in again, and check the Privacy page:
We can see our claims are the same as we defined them at the IDP (Identity Provider) level.
If there are some claims we don’t want to have in the token, we can remove them. To do that, we have to use the ClaimActions in the OIDC configuration:
.AddOpenIdConnect("oidc", opt =>
{
    opt.SignInScheme = "Cookies";
    opt.Authority = "https://localhost:5005";
    opt.ClientId = "mvc-client";
    opt.ResponseType = "code id_token";
    opt.SaveTokens = true;
    opt.ClientSecret = "MVCSecret";
    opt.GetClaimsFromUserInfoEndpoint = true;

    opt.ClaimActions.DeleteClaim("sid");
    opt.ClaimActions.DeleteClaim("idp");
});
The DeleteClaim method exists in the Microsoft.AspNetCore.Authentication namespace. As a parameter, we pass a claim we want to remove. Now, if we start our client again and navigate to the Privacy page, these claims will be missing for sure (Log out and log in prior to checking the Privacy page).
If you don’t want to use the DeleteClaim method for each claim you want to remove, you can always use the DeleteClaims method:
opt.ClaimActions.DeleteClaims(new string[] { "sid", "idp" });
Let’s move on.
Adding Additional Claims
If we want to add additional claims to our token (address, for example), we can do that with a few simple steps. The first step is to support a new identity resource in the InMemoryConfig class in the IDP project :
public static IEnumerable<IdentityResource> GetIdentityResources() =>
    new List<IdentityResource>
    {
        new IdentityResources.OpenId(),
        new IdentityResources.Profile(),
        new IdentityResources.Address()
    };
Then, we have to add it to our client’s allowed scopes:
new Client
{
    ClientName = "MVC Client",
    ClientId = "mvc-client",
    AllowedGrantTypes = GrantTypes.Hybrid,
    RedirectUris = new List<string>{ "https://localhost:5010/signin-oidc" },
    AllowedScopes =
    {
       IdentityServerConstants.StandardScopes.OpenId,
       IdentityServerConstants.StandardScopes.Profile,
       IdentityServerConstants.StandardScopes.Address
    },
    ClientSecrets = { new Secret("MVCSecret".Sha512()) },
    PostLogoutRedirectUris = new List<string> { "https://localhost:5010/signout-callback-oidc" }
}
And lastly, we have to add the address claim for our users:
new TestUser
{
    SubjectId = "a9ea0f25-b964-409f-bcce-c923266249b4",
    Username = "Mick",
    Password = "MickPassword",
    Claims = new List<Claim>
    {
        new Claim("given_name", "Mick"),
        new Claim("family_name", "Mining"),
        new Claim("address", "Sunny Street 4")
    }
},
new TestUser
{
    SubjectId = "c95ddb8c-79ec-488a-a485-fe57a1462340",
    Username = "Jane",
    Password = "JanePassword",
    Claims = new List<Claim>
    {
        new Claim("given_name", "Jane"),
        new Claim("family_name", "Downing"),
        new Claim("address", "Long Avenue 289")
    }
}
And, that’s all it takes regarding the InMemoryConfig class.
One more thing. If we want to see the consent page for a specific client, we can enable that in the Client configuration in the OAuth project:
ClientSecrets = { new Secret("MVCSecret".Sha512()) },
PostLogoutRedirectUris = new List<string> { "https://localhost:5010/signout-callback-oidc" },
RequireConsent = true
Now, we have to modify the Client application, by adding the new scope to the OIDC configuration:
.AddOpenIdConnect("oidc", opt =>
{
    //previous code

    opt.ClaimActions.DeleteClaim("sid");
    opt.ClaimActions.DeleteClaim("idp");

    opt.Scope.Add("address");
});
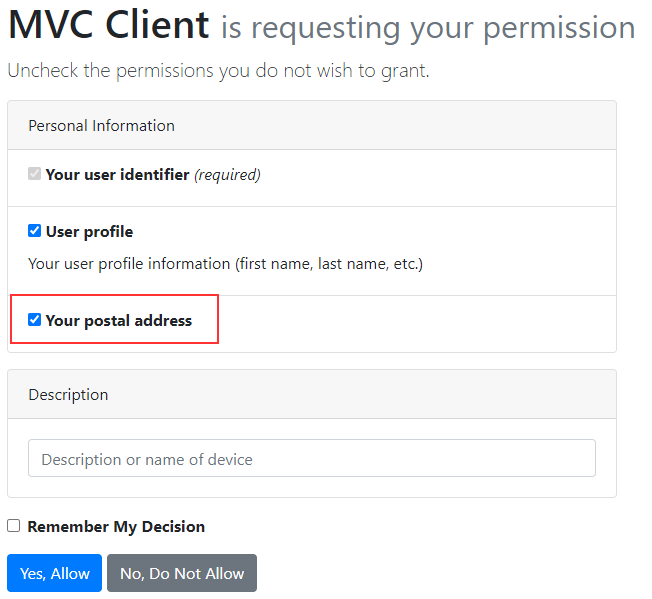
If we log out and log in again, we are going to see a new scope in the Consent screen:
But, if we inspect the Privacy page, we won’t be able to find the address claim there. That’s because we didn’t map it to our claims. Of course, we can inspect the console logs to make sure the IdentityServer returned our new claim:
But if we want to include it, we can modify the OIDC configuration:
opt.ClaimActions.MapUniqueJsonKey("address", "address");
After we log in again, we can find the address claim on the Privacy page.
We just want to mention if you don’t need all the additional claims for your entire application but just for one part of it, the best practice is not to map all the claims. You can always get them with the IdentityModel package by sending the request to the /userinfo endpoint. By doing that, we ensure our cookies are small in size and that we get always up-to-date information from the userinfo endpoint.
Getting Claims Manually from the UserInfo Endpoint
So, let’s see how we can extract the address claim from the /userinfo endpoint. The first thing we have to do is to remove the MapUniqueJsonKey(„address“, „address“) statement from the OIDC configuration.
Then, let’s install the required package:
After that, let’s modify the Privacy action in the Home controller:
public async Task<IActionResult> Privacy()
{
    var client = new HttpClient();
    var metaDataResponse = await client.GetDiscoveryDocumentAsync("https://localhost:5005");

    var accessToken = await HttpContext.GetTokenAsync(OpenIdConnectParameterNames.AccessToken);

    var response = await client.GetUserInfoAsync(new UserInfoRequest
    {
        Address = metaDataResponse.UserInfoEndpoint,
        Token = accessToken
    });

    if(response.IsError)
    {
        throw new Exception("Problem while fetching data from the UserInfo endpoint", response.Exception);
    }

    var addressClaim = response.Claims.FirstOrDefault(c => c.Type.Equals("address"));

    User.AddIdentity(new ClaimsIdentity(new List<Claim> { new Claim(addressClaim.Type.ToString(), addressClaim.Value.ToString()) }));

    return View();
}
So, we create a new client object and fetch the response from the IdentityServer with the GetDiscoveryDocumentAsync method. This response contains our required /userinfo endpoint’s address. After that, we extract the access token and use the UserInfo address and extracted token to fetch the required user information. If the response is successful, we extract the address claim from the claims list and just add it to the User.Claims list (this is the list of Claims we iterate through in the Privacy view).
Now, if we log in again, and navigate to the Privacy page, we are going to see the address claim again. But this time, we extracted it manually. So basically, we can use this code only when we need it in our application.
IdentityServer4 Authorization
Authorization is the process of determining what you are allowed to do once authenticated. The id_token helps us with the authentication process while the access_token helps us with the authorization process because it authorizes a web client application to communicate with the web api.
So, let’s start with the InMemoryConfig class modification, by adding roles to our users:
public static List<TestUser> GetUsers() =>
    new List<TestUser>
    {
        new TestUser
        {
	     //previous code

            Claims = new List<Claim>
            {
                new Claim("given_name", "Mick"),
                new Claim("family_name", "Mining"),
                new Claim("address", "Sunny Street 4"),
                new Claim("role", "Admin")
            }
        },
        new TestUser
        {
            //previous code

            Claims = new List<Claim>
            {
                new Claim("given_name", "Jane"),
                new Claim("family_name", "Downing"),
                new Claim("address", "Long Avenue 289"),
                new Claim("role", "Visitor")
            }
        }
   };
We have to create a new identity scope in the GetIdentityResources method:
public static IEnumerable<IdentityResource> GetIdentityResources() =>
    new List<IdentityResource>
    {
        new IdentityResources.OpenId(),
        new IdentityResources.Profile(),
        new IdentityResources.Address(),
        new IdentityResource("roles", "User role(s)", new List<string> { "role" })
    };
And, we have to add roles scope to the allowed scopes for our MVC Client:
AllowedScopes =
{
    IdentityServerConstants.StandardScopes.OpenId,
    IdentityServerConstants.StandardScopes.Profile,
    IdentityServerConstants.StandardScopes.Address,
    "roles"
},
With this, we have finished the modification of the IDP application. Let’s continue with the client application by modifying the OIDC configuration to support roles scope:
.AddOpenIdConnect("oidc", opt =>
{
    //previous code

    opt.Scope.Add("address");
    //opt.ClaimActions.MapUniqueJsonKey("address", "address");

    opt.Scope.Add("roles");
    opt.ClaimActions.MapUniqueJsonKey("role", "role");
});
So, we want to allow Create, Edit, Details, and Delete actions only to users with the Admin role. To do that, we are going to modify the Index view:
@if (User.IsInRole("Admin"))
{
    <p>
        <a asp-action="Create">Create New</a>
    </p>
}
<table class="table">

    //previous code

    <tbody>
        @foreach (var item in Model)
        {
            <tr>
                //previous code

                @if (User.IsInRole("Admin"))
                {
                    <td>
                        @Html.ActionLink("Edit", "Edit", new { /* id=item.PrimaryKey */ }) |
                        @Html.ActionLink("Details", "Details", new { /* id=item.PrimaryKey */ }) |
                        @Html.ActionLink("Delete", "Delete", new { /* id=item.PrimaryKey */ })
                    </td>
                }
            </tr>
        }
    </tbody>
</table>
We use the IsInRole method to allow only Admin users to see these links.
Finally, we have to state where our framework can find the user’s role:
.AddOpenIdConnect("oidc", opt =>
{
    //previous code

    opt.Scope.Add("roles");
    opt.ClaimActions.MapUniqueJsonKey("roles", "role");

    opt.TokenValidationParameters = new TokenValidationParameters
    {
        RoleClaimType = "role"
    };
});
The TokenValidationParameters class exists in the Microsoft.IdentityModel.Tokens namespace.
Now, we can start our applications and login with Jane’s account:
We can see an additional scope in the Consent screen. Once we allow this, we can see the Index view but without additional actions. That’s because Jane is in the Visitor role. If we log out and log in with Mick, we are going to see those links for sure.
Excellent.
But can we protect our endpoints with roles as well? Of course, we can. Let’s see how to do it.
Using Roles to Protect Endpoints
Le’s say, for example, only the Admin users can access the Privacy page. Well, with the same action we did in a previous part, we can show the Privacy link in the _Layout view:
<ul class="navbar-nav flex-grow-1">
    <li class="nav-item">
        <a class="nav-link text-dark" asp-area="" asp-controller="Home" asp-action="Index">Home</a>
    </li>
    @if (User.IsInRole("Admin"))
    {
        <li class="nav-item">
            <a class="nav-link text-dark" asp-area="" asp-controller="Home" asp-action="Privacy">Privacy</a>
        </li>
    }
    @if (User.Identity.IsAuthenticated)
    {
        <li class="nav-item">
            <a class="nav-link text-dark" asp-area="" asp-controller="Authentication" asp-action="Logout">Logout</a>
        </li>
    }
</ul>
If we log in as Jane, we won’t be able to see the Privacy link:
Even though we can’t see the Privacy link, we still have access to the Privacy page by entering a valid URI address:
So, what we have to do is to protect our Privacy endpoint with the user’s role:
[Authorize(Roles = "Admin")]
public async Task<IActionResult> Privacy()
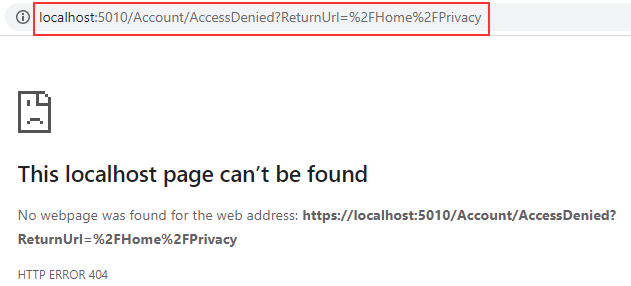
Now, if we log out, log in again as Jane, and try to use the URI address to access the privacy page, we won’t be able to do that:
The application redirects us to the /Account/AccessDenied page, but we get 404 because we don’t have that page.
So, let’s create it.
The first thing we are going to do is to add a new action in the Account controller:
public IActionResult AccessDenied()
{
    return View();
}
And, let’s create a view for this action:
@{
    ViewData["Title"] = "AccessDenied";
}

<h1>AccessDenied</h1>

<h3>You are not authorized to view this page.</h3>

<p>
    You can always <a asp-controller="Account" asp-action="Logout">log in as someone else</a>.
</p>
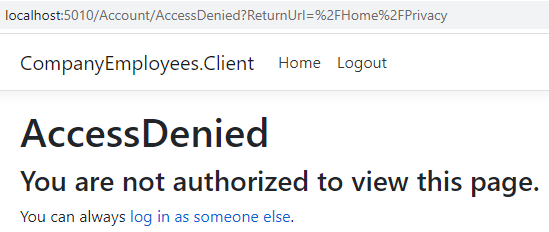
After these changes, we can log out and log in as Jane. Once we navigate to the /Home/Privacy URI, we are going to be redirected to the AccessDenied page:
So, this works as we expect it to do.
We want to mention one more thing. If you create this action in a controller with a different name, you have to add additional mapping in the AddCookie method in the Client application:
.AddCookie("Cookies", (opt) =>
{
    opt.AccessDeniedPath = "/ControllerName/AccessDenied";
})
With this configuration, we are adding a different address for the AccessDenied action.
Conclusion
Let’s sum up everything.
We have learned:
- How to modify claims and add additional ones
- The way to get claims manually from the
/userinfoendpoint - How to setup authorization
- And how to use roles for authorization purposes
In the next article, we are going to learn how to protect our Web API with the Hybrid flow.


