

In the second part of this series, we were talking about securing Web API. But, we used the ResourceOwnerPassword and the ClientCredentials flows and Postman as a client. But now, we have our MVC client application, secured with the Hybrid Flow, which requires access to the Web API. So, securing Web API with the Hybrid flow requires additional configuration and this is going to be our goal for this article. Additionally, we are going to learn how we can use policies instead of roles to secure endpoints in our application.
We highly recommend visiting the IdentityServer4 series page to learn about all the articles in this series because this article is strongly related to the previous ones.
So, let’s get down to business.
Securing Web API – Adding Additional Configuration
As we said, we have already added most of the required configuration for the IdentityServer and our Web API.
We have set up ApiResource and ApiScopes in the InMemoryConfig class:
public static IEnumerable<ApiScope> GetApiScopes() =>
   new List<ApiScope> { new ApiScope("companyApi", "CompanyEmployee API") };

public static IEnumerable<ApiResource> GetApiResources() =>
   new List<ApiResource>
   {
       new ApiResource("companyApi", "CompanyEmployee API")
       {
           Scopes = { "companyApi" }
       }
   };
Configuration for the Web API client:
new Client
{
    ClientId = "company-employee",
    ClientSecrets = new [] { new Secret("codemazesecret".Sha512()) },
    AllowedGrantTypes = GrantTypes.ResourceOwnerPasswordAndClientCredentials,
    AllowedScopes = { IdentityServerConstants.StandardScopes.OpenId, "companyApi" }
},
Lastly, we can find the configuration in the Web API project to communicate with the IdentityServer project:
services.AddAuthentication("Bearer")
    .AddJwtBearer("Bearer", opt =>
    {
        opt.RequireHttpsMetadata = false;
        opt.Authority = "https://localhost:5005";
        opt.Audience = "companyApi";
    });
This enables back-channel communication between the Web API project and our IdentityServer, where API asks for a public key from IdentityServer to validate the access_token.
But now we have our client application that communicates with the Web API project and we need to add additional steps to complete the Hybrid Flow cycle and protect our API.
So, the first thing we have to do is to add a scope to the MvcClient in the IdentityServer configuration:
new Client
{
    ClientName = "MVC Client",
    ClientId = "mvc-client",
    AllowedGrantTypes = GrantTypes.Hybrid,
    RedirectUris = new List<string>{ "https://localhost:5010/signin-oidc" },
    AllowedScopes =
    {
        IdentityServerConstants.StandardScopes.OpenId,
        IdentityServerConstants.StandardScopes.Profile,
        IdentityServerConstants.StandardScopes.Address,
        "roles",
        "companyApi"
    },
    ClientSecrets = { new Secret("MVCSecret".Sha512()) },
    PostLogoutRedirectUris = new List<string> { "https://localhost:5010/signout-callback-oidc" }
    RequireConsent = true
}
The companyApi value comes from the ApiResource configuration and we have to add it to the allowed scopes of our MVC client application.
Next, let’s modify the client’s OIDC configuration by adding a scope:
.AddOpenIdConnect("oidc", opt =>
{
    //previous code
    opt.ClaimActions.MapUniqueJsonKey("roles", "role");

    opt.TokenValidationParameters = new TokenValidationParameters
    {
        RoleClaimType = "roles"
    };

    opt.Scope.Add("companyApi");
});
Finally, we have to uncomment the [Authorize] attribute in the Web API’s Companies controller:
[Authorize]
[HttpGet]
public IActionResult GetCompanies()
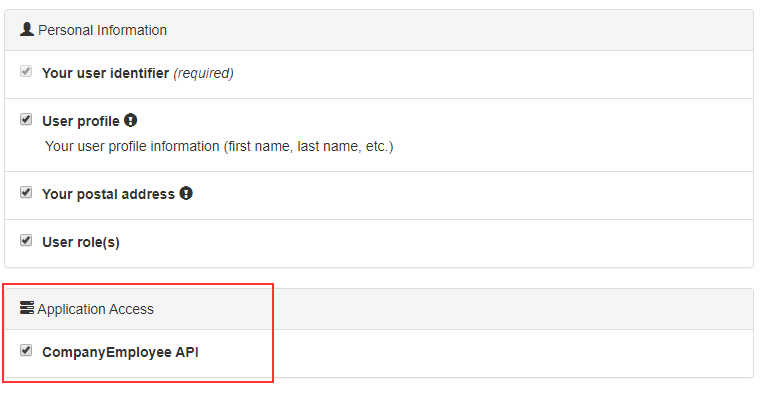
Now, we can start the IdentityServer, Web API, and client application. As soon as we log in, we are going to see a different consent screen:
But, once we click the Allow button, we are going to get an error page:

Even though we have all these configurations in place, we are still missing something.
Providing Access Token for Each Call to the API
Before we dive into the code, let’s explain the reason our client is still unauthorized. Well, as we learned in the third part of this series, the Hybrid flow has several steps. Our client sends a request for the code and id_token to the /authorization endpoint. IdentityServer returns them to the client. Then the client validates the id_token and if it’s valid it sends another request with the code to the /token endpoint. IdentityServer issues the access_token and id_token.
So, the client has the access_token, but it must provide that token as a Bearer token in the Authorization header (as we did in the second part of this series with the Postman). But right now, our client application is not using that access token at all. That’s why we get an Unauthorized response.
To provide access token as a Bearer token, we have to modify the GetClient method in the CompanyHttpClient class in the client application:
public async Task<HttpClient> GetClient()
{
    var accessToken = await _httpContextAccessor
        .HttpContext
        .GetTokenAsync(OpenIdConnectParameterNames.AccessToken);

    if (!string.IsNullOrWhiteSpace(accessToken))
    {
        _httpClient.SetBearerToken(accessToken);
    }

    _httpClient.BaseAddress = new Uri("https://localhost:5001/");
    _httpClient.DefaultRequestHeaders.Accept.Clear();
    _httpClient.DefaultRequestHeaders.Accept.Add(
       new MediaTypeWithQualityHeaderValue("application/json"));

    return _httpClient;
}
So, we extract the access token from the HttpContext by using the _httpContextAccessor object and the GetTokenAsync method. If we find the token, we store it as a Bearer token with the SetBearerToken method. For all of these to work, we have to add additional using directives:
using IdentityModel.Client;
using Microsoft.AspNetCore.Authentication;
using Microsoft.IdentityModel.Protocols.OpenIdConnect;
Now, we can start our client app and login again. This time, we can see the data from the API.
Redirecting the Client to the Unauthorized Page
It is not a good user experience to show the generic error page when an unauthorized user tries to access a protected page. Moreover, we have the AccessDenied page created. So, all we have to do is redirect an unauthorized user to that page.
To do that, let’s modify the Index action in the Home controller:
public async Task<IActionResult> Index()
{
    var httpClient = await _companyHttpClient.GetClient();

    var response = await httpClient.GetAsync("api/companies").ConfigureAwait(false);

    if (response.IsSuccessStatusCode)
    {
        var companiesString = await response.Content.ReadAsStringAsync().ConfigureAwait(false);

        var companyViewModel = JsonConvert.DeserializeObject<List<CompanyViewModel>>(companiesString).ToList();

        return View(companyViewModel);
    }
    else if(response.StatusCode == HttpStatusCode.Unauthorized || response.StatusCode == HttpStatusCode.Forbidden)
    {
        return RedirectToAction("AccessDenied", "Account");
    }

    throw new Exception($"Problem with fetching data from the API: {response.ReasonPhrase}");
}
So, we check the StatusCode property from our response. If it is unauthorized or forbidden, we redirect a user to the AccessDenied page.
Now, let’s try this. But, on the consent page, we are not going to allow the API access:

After we click the Allow button, we are going to see the AccessDenied page for sure.
Securing Application with Policies
In the previous article, we explained how to use Role Base Authorization (RBA) to protect our application. But, there is another approach – Attribute-based Access Control (ABAC), which is more suited for the authorization with complex rules. When we talk about the complex rules, we mean something like the user has to be authenticated and it must have a certain title and from a certain country, for example. So, as you can see, there are several rules for authorization to be completed, and the best way to configure that is by using the ABAC approach. This approach is also known as Policy-based Access Control because it uses policies to grant access for users to protected resources.
So, let’s learn how to use Policies in our client application.
We have to modify the configuration class on the IDP level first. So, let’s add new identity resources:
public static IEnumerable<IdentityResource> GetIdentityResources() =>
    new List<IdentityResource>
    {
        new IdentityResources.OpenId(),
        new IdentityResources.Profile(),
        new IdentityResources.Address(),
        new IdentityResource("roles", "User role(s)", new List<string> { "role" }),
        new IdentityResource("position", "Your position", new List<string> { "position" }),
        new IdentityResource("country", "Your country", new List<string> { "country" })
    };
We want our client to request these scopes, so let’s modify allowed scopes for the MVC client:
AllowedScopes =
{
    IdentityServerConstants.StandardScopes.OpenId,
    IdentityServerConstants.StandardScopes.Profile,
    IdentityServerConstants.StandardScopes.Address,
    "roles",
    "companyApi",
    "position",
    "country"
}
Finally, let’s add these claims to our users:
public static List<TestUser> GetUsers() =>
    new List<TestUser>
    {
        new TestUser
        {
            SubjectId = "a9ea0f25-b964-409f-bcce-c923266249b4",
            Username = "Mick",
            Password = "MickPassword",
            Claims = new List<Claim>
            {
                new Claim("given_name", "Mick"),
                new Claim("family_name", "Mining"),
                new Claim("address", "Sunny Street 4"),
                new Claim("role", "Admin"),
                new Claim("position", "Administrator"),
                new Claim("country", "USA")
            }
        },
        new TestUser
        {
            SubjectId = "c95ddb8c-79ec-488a-a485-fe57a1462340",
            Username = "Jane",
            Password = "JanePassword",
            Claims = new List<Claim>
            {
                new Claim("given_name", "Jane"),
                new Claim("family_name", "Downing"),
                new Claim("address", "Long Avenue 289"),
                new Claim("role", "Visitor"),
                new Claim("position", "Viewer"),
                new Claim("country", "USA")
            }
        }
    };
Excellent. That’s it regarding the IDP level modifications.
Now, on the client level, we have to modify the OIDC configuration with familiar actions:
.AddOpenIdConnect("oidc", opt =>
{
    //previous code

    opt.Scope.Add("companyApi");

    opt.Scope.Add("position");
    opt.Scope.Add("country");
    opt.ClaimActions.MapUniqueJsonKey("position", "position");
    opt.ClaimActions.MapUniqueJsonKey("country", "country");
});
And, we have to create our policies right above the AddControllersWithViews method:
services.AddAuthorization(authOpt =>
{
    authOpt.AddPolicy("CanCreateAndModifyData", policyBuilder =>
    {
        policyBuilder.RequireAuthenticatedUser();
        policyBuilder.RequireClaim("position", "Administrator");
        policyBuilder.RequireClaim("country", "USA");
    });
});

services.AddControllersWithViews();
We use the AddAuthorization method to add Authorization in the service collection. By using the AddPolicy method, we provide the policy name and all the policies required for the authorization process to complete. As you can see, we require a user to be an authenticated administrator from the USA.
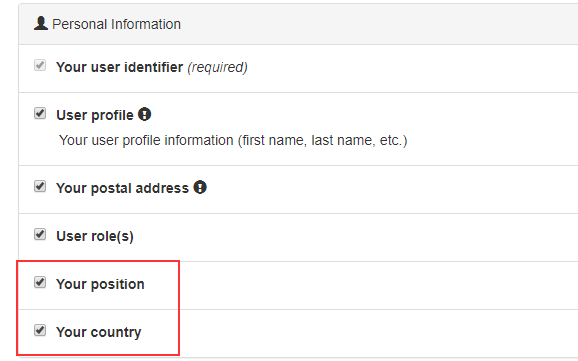
So, once we log in, we are going to see additional scopes in our consent screen:
And, if we navigate to the Privacy page, we are going to see additional claims for sure.
But, we are not using our created policy for authorization. At least not yet. So, let’s change that.
Using Policies
We are going to modify the Index view first:
@if ((await AuthorizationService.AuthorizeAsync(User, "CanCreateAndModifyData")).Succeeded)
{
    <p>
        <a asp-action="Create">Create New</a>
    </p>
}

//additional code

@if ((await AuthorizationService.AuthorizeAsync(User, "CanCreateAndModifyData")).Succeeded)
{
    <td>
        @Html.ActionLink("Edit", "Edit", new { /* id=item.PrimaryKey */ }) |
        @Html.ActionLink("Details", "Details", new { /* id=item.PrimaryKey */ }) |
        @Html.ActionLink("Delete", "Delete", new { /* id=item.PrimaryKey */ })
    </td>
}
And finally, let’s modify the [Authorize] attribute for the Privacy action:
[Authorize(Policy = "CanCreateAndModifyData")]
public async Task<IActionResult> Privacy()
And that’s it. We can test this with both Mick and Jane. For sure with Jane’s account, we won’t be able to see Create, Update, Delete, and Details link and we are going to be redirected to the AccessDenied page if we try to navigate to the Privacy page. You can try it out.
Conclusion
Excellent.
In this article, we have learned how to implement the Hybrid Flow to protect our Web API. Additionally, we’ve learned how to place an access_token to each call from our client to the API and how to use Policies to protect our application.
In the next article, we are going to show you how to transfer all the in-memory configuration to the database.
Until then,
Best regards.

I try to implement IDS4, aspnetcore web api by following your bonus book (Bonus 6 – Mastering ASP.NET Core Security.pdf) that included with main sold-ebook (Ultimate ASP.NET Core Web API Premium.pdf).
Everything is work perfectly, but I need to get user-login info such as userId, userName, user’s email etc..
How can I get that info in my aspnetcore REST Api?
Thank you
Maybe something like this can help you: https://stackoverflow.com/questions/44761058/how-to-add-custom-claims-to-access-token-in-identityserver4