

Updated on
In the previous article, we have learned how to integrate an Angular application with IdentityServer4 and how to allow communication between these two projects. The configuration is prepared on both sides and as soon as we click the Login button, we get directed to the Login screen on the IDP level. But when we enter valid credentials, we get redirected to the Angular application on the Not Found (404) page. That’s because we didn’t finish the implementation of the Angular authentication actions. So, in this one, we are going to finish the Angular authentication implementation with the Login and Logout actions.
That said, we strongly recommend reading the previous article to keep track of all the things we implemented up until now.
Additionally, if you want to read the entire IdentityServer4, OAuth2, and OIDC series, feel free to do that and learn a lot more about the application security in ASP.NET Core.
So, let’s start.
Completing the Login Functionality in the Angular Authentication Process
If you inspect our work so far, you will find the code in the AuthService class and some modifications in the app.component.ts file to check for the authenticated user. This code provides the functionality to navigate to the IDP server and once we enter credentials, to navigate back to the Angular application. But as soon as we navigate back to the Angular application, we need to complete the signin process because we don’t want to navigate the user to the Not Found page. To do that, we have to process the response from the /authorization endpoint and populate the user object with the id and access tokens.
That said, let’s add a new function in the AuthService class:
public finishLogin = (): Promise<User> => {
  return this._userManager.signinRedirectCallback()
  .then(user => {
    this._user = user;
    this._loginChangedSubject.next(this.checkUser(user));
    return user;
  })
}
In this function, we call the signinRedirectCallback function that processes the response from the /authorization endpoint and returns a promise. From that promise, we extract the user object and populate the _user property. Additionally, we call the next function from the observable to inform any subscribed component about the Angular authentication state change, and finally, return that user.
Adding Signin-Redirect-Callback Component
Now, we have to create the signin component, use this function, and react to the redirect action from the IDP server:
ng g c signin-redirect-callback --skipTests
We can remove the HTML and CSS files because we don’t need them, and modify the .ts file:
import { Component, OnInit } from '@angular/core';
import { AuthService } from '../shared/services/auth.service';
import { Router } from '@angular/router';

@Component({
  selector: 'app-signin-redirect-callback',
  template: `<div></div>`
})
export class SigninRedirectCallbackComponent implements OnInit {

  constructor(private _authService: AuthService, private _router: Router) { }

  ngOnInit(): void {
    this._authService.finishLogin()
    .then(_ => {
      this._router.navigate(['/'], { replaceUrl: true });
    })
  }
}
As you can see, we only have an empty div element for the template part and that’s the reason why we removed the HTML file. Additionally, in the ngOnInit function, we call the finishLogin function from the AuthService and just navigate the user to the home page. We set the replaceUrl property to true because we want to remove this component from the navigation stack.
After that, we have to add the route to this component in the app.module.ts file:
RouterModule.forRoot([
  { path: 'home', component: HomeComponent },
  { path: 'company', loadChildren: () => import('./company/company.module').then(m => m.CompanyModule) },
  { path: 'signin-callback', component: SigninRedirectCallbackComponent },
  { path: '404', component : NotFoundComponent},
  { path: '', redirectTo: '/home', pathMatch: 'full' },
  { path: '**', redirectTo: '/404', pathMatch: 'full'}
])
The value of the path property must match the value we assigned to the redirect_uri property of the UserManager settings in the AuthService class.
Now, we can test this.
- Let’s start the IDP server and the Angular application
- Once both started, we can click the Login link in the Angular menu
- After the Login screen appears, we should enter valid credentials and click the Login button
- Soon after, the application navigates us to the Home screen
Excellent.
We can check the logs, to verify what happens behind the scenes:
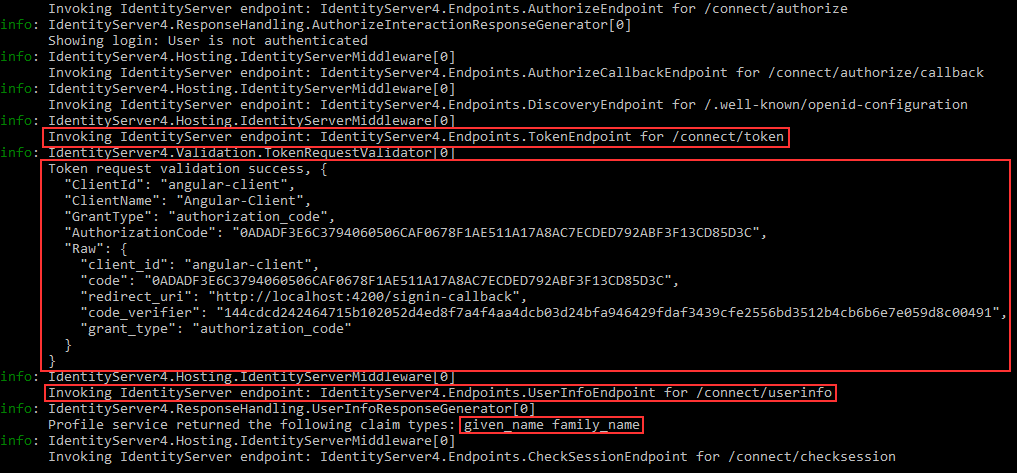
We can see the request to the /token endpoint that takes place after we finish the login action. Also, we can see the successful token validation and the call towards the /userinfo endpoint. The given_name and the family_name claims were returned to the client application.
Adding Logout Functionality to the Angular Authentication Process
After we log in and land on the Home page, we can still see the Login link on the menu. This is not user-friendly at all, and there is no way to log out from the application (unless we manually clear the site’s data).
To fix this, let’s open the AuthService class and add two functions inside:
public logout = () => {
  this._userManager.signoutRedirect();
}

public finishLogout = () => {
  this._user = null;
  return this._userManager.signoutRedirectCallback();
}
In the logout function, we call the signoutRedirect function to redirect the flow to the IDP server to execute the logout action. Additionally, we create the finishLogout function, set the _user object to null, and call the singoutRedirectCallback function to finish the signout process.
Then, let’s navigate to the menu.component.html file, modify the Login link, and add the Logout link:
<section>
  <button *ngIf="!isUserAuthenticated" class="btn btn-link" style="color:gray" (click)="login()">Login</button>
  <button *ngIf="isUserAuthenticated" class="btn btn-link" style="color:gray" (click)="logout()">Logout</button>
</section>
We also have to modify the menu.component.ts file:
export class MenuComponent implements OnInit {
  public isUserAuthenticated: boolean = false;

  constructor(private _authService: AuthService) {}

  ngOnInit(): void {
    this._authService.loginChanged
    .subscribe(res => {
      this.isUserAuthenticated = res;
    })
  }

  public login = () => {
    this._authService.login();
  }

  public logout = () => {
    this._authService.logout();
  }
}
In the ngOnInit function, we subscribe to the loginChanged observable and set the isUserAuthenticated property. This will help our application decide which link to show (Login or Logout). Also, we have the logout function that just calls the logout function from the AuthService class.
Singout-Redirect-Callback Component Creation
Now, as we did with the signin-redirect-callback component, we are going to create the signout-redirect-callback component:
ng g c signout-redirect-callback --skipTests
After the creation, let’s remove the .html and .css files and modify the .ts file:
import { Component, OnInit } from '@angular/core';
import { AuthService } from '../shared/services/auth.service';
import { Router } from '@angular/router';

@Component({
  selector: 'app-signout-redirect-callback',
  template: `<div></div>`
})
export class SignoutRedirectCallbackComponent implements OnInit {

  constructor(private _authService: AuthService, private _router: Router) { }

  ngOnInit(): void {
    this._authService.finishLogout()
    .then(_ => {
      this._router.navigate(['/'], { replaceUrl: true });
    })
  }

}
That’s pretty much it. We just navigate to the home page as soon as this component initializes.
Finally, we have to add the route to this component in the app.module.ts file:
RouterModule.forRoot([
  { path: 'home', component: HomeComponent },
  { path: 'company', loadChildren: () => import('./company/company.module').then(m => m.CompanyModule) },
  { path: 'signin-callback', component: SigninRedirectCallbackComponent },
  { path: 'signout-callback', component: SignoutRedirectCallbackComponent },
  { path: '404', component : NotFoundComponent},
  { path: '', redirectTo: '/home', pathMatch: 'full' },
  { path: '**', redirectTo: '/404', pathMatch: 'full'}
])
Excellent.
Now, let’s start our applications and login with valid credentials.
Soon after that, the application redirects us to the Home page and the Logout button will appear:

Looks good.
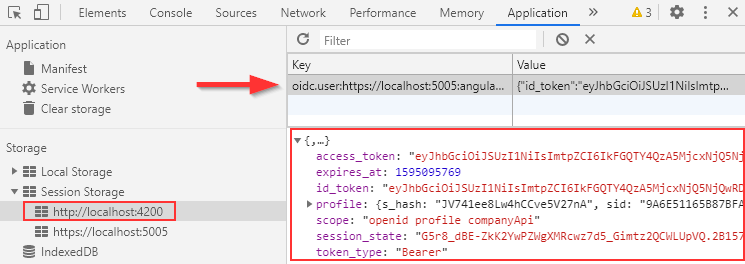
Additionally, if we open the Developer Tools window and navigate to the Application tab, we can find the user object in the Session Storage menu:
Finally, let’s click the Logout button.
As soon as we do that, the application redirects us to the IDP level, and then back to the Home page with the Login link displayed. Of course, you can inspect the Session Storage to confirm that the user object is removed.
Inspecting Tokens
If we decode the access token, we can see what it consists of:
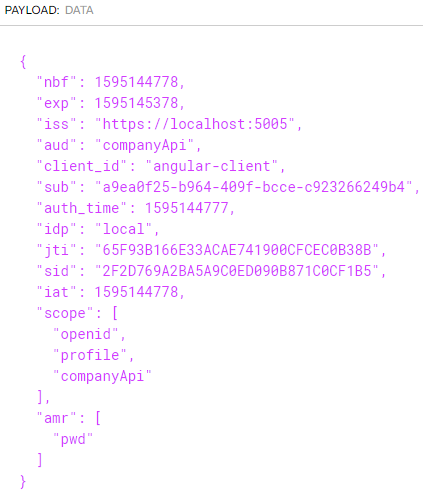
We can see the not before (nbf) and expiry (exp) properties both JSON time stamped. Then, we can see the issuer (iss) that points to the IDP server address. Of course, we won’t go through each of them, but you can pay attention to the issuer (iss) pointing to the IDP server URI, the audience (aud) that has the value of the API scope, client_id, the subject identifier (sub), scope with all the supported scopes and amr (Authentication Methods References) with the password-based authentication (pwd) value.
We can also inspect the id_token:
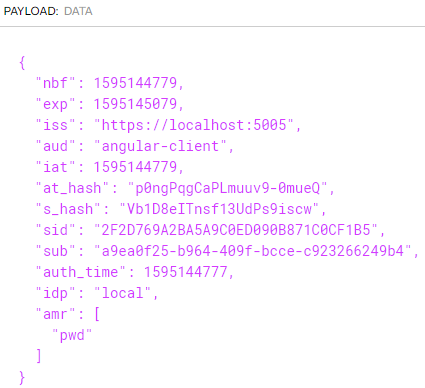
Here, we can see many properties we already saw in the access token. Just to mention one thing, this time the audience (aud) property has a value of the client id and not the API scope.
We can extract all this information in our Angular application by using the getUser function from the UserManager class. If you inspect the isAuthenticated function in the AuthService class, you can see that the getUser function returns a promise with the user object inside. Once we extract that user object, we can access all these properties.
Conclusion
Excellent job.
Now, we know how to create Login action with Angular and IdentityServer4 and what components we require to do so. Similarly, we have learned how to create a Logout action and what components it requires for the redirection purpose. Finally, we have inspected the id token and the access token to verify all the information they consist of.
In the next article, we are going to learn about using the access token to secure communication between the Angular application and Web API.

Hi
I wanted to know if we can clear authentication cookies set by Duende Identity server at login.
In the log-out I want to clear the Cookie with my Angular 11 app on logout
Hi Marinko,
My Angular app call is flooding the API with the same request. The line of code in repository.service.ts is
this.http.get(this.createCompleteRoute(route, this.envUrl.urlAddress));
Research indicates I need something like a .pipe(share()) but I am having trouble identifying all the RxJS imports.
Regards,
Ger
Hello Gerard. Well, I am not sure what that line is sending multiple HTTP requests towards your API, it shouldn’t be doing that once you subscribe to the result of that request. Have you tried our source code, maybe comparing it with our code, you can find what is wrong/different in yours?
Hi Marinko, My newness to all this is probably a big factor. The critical code is based on your “Role-Based Access Control and Claims with Angular and IdentityServer4”, and is a close or identical match, but most of my logic from a forms perspective is following Adam Freeman’s Angular 9 book, and he uses a much different less reusable variation on the http call. That code is very different and deliberatly so. The problem most likely lies in my interface between how he approaches the call and how you implement it . I might go down the route of using his code entirely as an experiment and see if that solves the issue, then work back to your reusable call.
Hi, first of all, thanks for this article. I have a question, how to add windows authentication beside local login? Thanks.
Hello Jovana. To be honest, I didn’t work with Windows Auth at all, but when reading the documentation it doesn’t seem too hard: https://docs.identityserver.io/en/latest/topics/windows.html. Again, I haven’t tried it so I couldn’t tell.
Hi Marinko! I found another little mistake in this wonderful Tutorial you made.
In the Menu Component
The code should be
constructor(private _authService:AuthService){
this._authService.loginChanged
.subscribe(res => {
this.isUserAuthenticated = res;
})
}
ngOnInit(): void {
this._authService.isAuthenticated()
.then(isAuth => {
this.isUserAuthenticated = isAuth;
})
}
This way the isUserAuthenticated works.
This code is correct in the branch https://github.com/CodeMazeBlog/angular-identityserver4/tree/role-based-access-control-angular-is4
Thank you again for the great Tutorial Marinko
Hi Axel. Thanks for the suggestion, but I am not sure that I understand. I just checked again the code and it works as it supposed to. When you login you get the user object (if you debug it, you will get it in the second iteration) and the menu show Logout button. It goes well other way around. Also our code in the branch is the same as in the article.
Can confirm this is fix necessary. The sequence of lifecycle methods is wrong otherwise (or prone to frequent race conditions at least). Subscribing in OnInit is too late, the state transition from the Duende/IdentityServer callback in the auth service occurs before the subscription is made.
Hello dlatikay. Thank you for the comment. Just to confirm, you are saying the code that axelrotter suggested should be implemented inside the menu component. Of course, I have to test this again, but I would never post an article without testing it completely, so it feels a bit strange to me that my code is not working now since it was working while I was writing this article and the complete series.
Hi – Thanks for the article, it helped me understand how the process works. But I run your solution and I’m getting this error after the log in. Any idea what’s causing it or how to solve it?
https://uploads.disquscdn.com/images/0d46f20c00e1fd6bb26bb1c290865a0ea132563a119e5a7a05f88fbc10d27af7.png
Hi. I am really not sure why do you have this error. When you say “I run your solution” do you mean our project from GitHub repo? I ask this because I just tested that solution and it works without a single problem. Previous article is important for this one, if you are coding your own app.
Hi – yes I mean the project from GitHub repo. I’ve seen the previous article as well. Thank you though.
Well, I must admit, I don’t like if this works on my machine and not on yours. This should be working on all machines. If you manage to solve it or have some additional info on the problem, please let me now here.