
In this article, we are going to continue our IdentityServer4 series by learning how to implement Angular OAuth2 OIDC security with IdentityServer4 using the Authorization Code flow.
This article is heavily dependent on the previous articles from the series, so if you are not familiar with the IdentityServer4 concept or OAuth2 and OpenID Connect concepts, we strongly suggest reading all of our previous articles related to the IdentityServer4 series.
So, let’s get going.
About Authorization Code Flow
Up until recently, the recommendation for securing Angular application (or any other js application) was using the Implicit flow. But with the newest standards, that’s not the case anymore. Now, it is a recommendation using the Authorization Code flow with PKCE (Proof Key for Code Exchange).
In one of the previous articles, we have been talking about protecting the MVC client using the Hybrid Flow and there we have explained how that flow works. The Authorization Code flow is similar, but it has some differences. The ResponseType property is one difference. With the Hybrid Flow, we have three combinations for the Response type: code token, code id_token, and code id_token token. But for the Authorization Code flow, we have just one response type, which is code.
We can inspect the URI to see this for ourselves:

As we can see, next to all other parameters the response type code is sent to the IDP server.
Flow explanation without PKCE (Proof Key for Code Exchange)
The flow starts with the user clicking the login button or accessing the protected page. Then, the client app sends the request to the /authorization endpoint with the parameters from the picture above (and additional ones, but the url was shortened for better readability). The IDP replies with the code via the front-end channel. The client then calls the /token endpoint and provides the code. After the IDP verifies the code, it replies with the access token and the id token. The client application then uses that access token to access the protected API resources.
If we compare this to the Hybrid Flow, we are going to find a lot of similarities there. But, there is one addition to the Authorization Code flow, and that’s the usage of the PKCE.
Flow explanation with PKCE
Let’s take a look at the diagram for an easier understanding of the flow with PKCE:
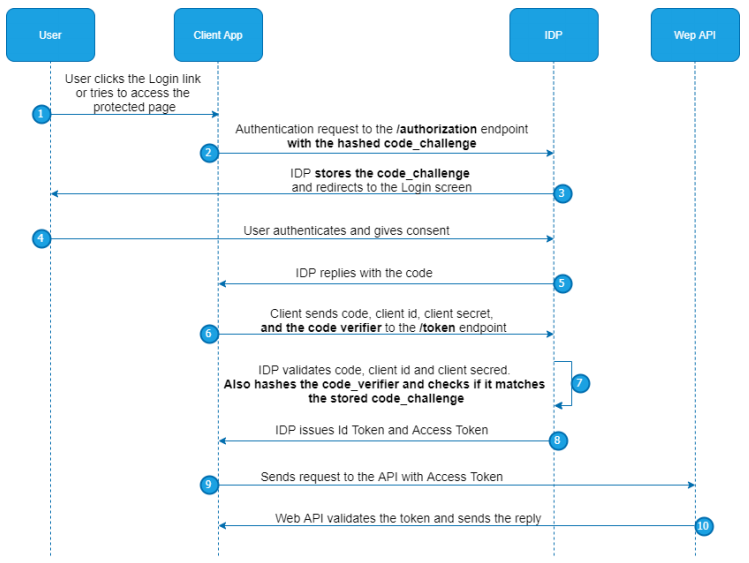
As you can see, when a client sends a request to the /authorization endpoint, it adds the hashed code_challenge in addition to all the parameters in the URI. This code is stored at the IDP level. Later on, the client sends the code_verifier, next to the client’s credentials and code. IDP hashes the code_verifier and compares it to the stored code_challenge. If it matches, IDP replies with the id token and access token.
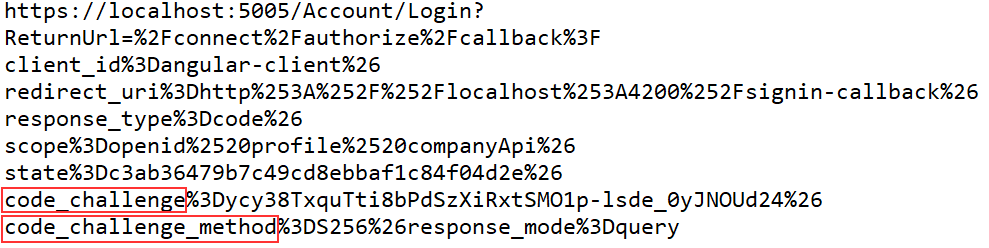
We can see the code_challenge in the complete URI as well:
As you can see, a lot is going on here and we are going to cover all of that with our articles and examples.
IdentityServer4 and Angular OAuth2 OIDC Configuration
It’s time to start with the coding part. The first step towards the Angular OAuth2 OIDC security is to create a client configuration in the IDP project. To do that, we have to add a new client configuration in the InMemoryConfig class:
new Client
{
    ClientName = "Angular-Client",
    ClientId = "angular-client",
    AllowedGrantTypes = GrantTypes.Code,
    RedirectUris = new List<string>{ "http://localhost:4200/signin-callback", "http://localhost:4200/assets/silent-callback.html" },
    RequirePkce = true,
    AllowAccessTokensViaBrowser = true,
    AllowedScopes =
    {
        IdentityServerConstants.StandardScopes.OpenId,
        IdentityServerConstants.StandardScopes.Profile,
        "companyApi"
    },
    AllowedCorsOrigins = { "http://localhost:4200" },
    RequireClientSecret = false,
    PostLogoutRedirectUris = new List<string> { "http://localhost:4200/signout-callback" },
    RequireConsent = false,
    AccessTokenLifetime = 600
}
This configuration is similar to a previous MVC client configuration but here, we use the Code as our grant type that stands for the Authorization Code flow. For the RedirectUris property, we add two values and both will be applied in the client code. We require PKCE and allow access token transmission via the browser. The scopes are the same as for the previous client application. Then, we set the URI for the allowed CORS origin, set the URI for the post logout redirect, disable the consent screen, and set the access token lifetime to 10 minutes (600 seconds).
But for our IDP application, this is not enough.
Transferring New Configuration to the Database
If you remember the previous article, we have transferred the entire configuration to the database and our IDP server doesn’t use this in-memory configuration anymore. So, the easiest thing to do is to remove the entire database and just start the IDP application. Since we have a code to migrate all the configuration to the database (the MigrationManager class), as soon as we start the IDP server, the complete configuration will be transferred to the database for sure:

That’s all it takes. The IDP configuration is in place and we can move on to the Angular OAuth2 OIDC security part.
Using OIDC-Client to Implement Angular OAuth2 OIDC Security
In the Start folder of our source code, next to the Web API and OAuth project, we can find the AngularClient project. Let’s open that project and inspect it a bit:
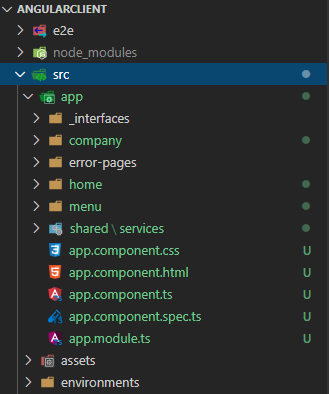
We have a basic project with a Home component, NavigationMenu component, Company module with the Companies component to fetch all the companies from the API, and the Error pages components.
Of course, don’t forget to open the terminal window (CTRL + ~) and run the npm install command.
If you followed along with the entire series, then you already have the database created for the Web API application. If not, all you have to do is to start the Web API application, modify the connection string in the appsettings.json file, and run the Update-Database command in the Package Manager Console window.
You can start the Web API application and the AngularClient application to inspect how the app works.
Installing the Required Library
Let’s navigate back to the client application, and install the oidc-client library:
npm install oidc-client --save
After the installation, we are going to create a file named constants in the shared folder and add a couple of properties inside:
export class Constants {
    public static apiRoot = "https://localhost:5001/api";
    public static clientRoot = "http://localhost:4200";
    public static idpAuthority = "https://localhost:5005"
    public static clientId = "angular-client";
}
Here, we create four properties and group them in a single class. We are going to use this file for additional properties as well. For now, we have the root address of our API project, the client application root, the URI of the IDP project, and finally the clientId property. The value of the clientId property must be the same as the ClientId property in the IDP configuration.
Creating Authentication Service
To create an authentication service file, we are going to execute another command:
ng g service shared/services/auth --skipTests
Let’s add the import statements required for our authentication logic:
import { Injectable } from '@angular/core';
import { UserManager, User, UserManagerSettings } from 'oidc-client';
import { Constants } from '../constants';
The UserManager class contains different low-level abstractions for oidc-client that save us from doing a lot of manual work. The User class contains all the properties related to the authenticated user (tokens, claims, expiration…). Finally, the UserManagerSettings class is a class meant for the OIDC configuration similar to the one we have on the IDP level.
Now, we can add our configuration:
export class AuthService {
  private _userManager: UserManager;
  private _user: User;

  private get idpSettings() : UserManagerSettings {
    return {
      authority: Constants.idpAuthority,
      client_id: Constants.clientId,
      redirect_uri: `${Constants.clientRoot}/signin-callback`,
      scope: "openid profile companyApi",
      response_type: "code",
      post_logout_redirect_uri: `${Constants.clientRoot}/signout-callback`
    }
  }

  constructor() {
    this._userManager = new UserManager(this.idpSettings);
  }
}
The idpSettings property returns the object of the UserManagerSettings type containing all the required oidc configuration. Here, we can see all the properties that we have in the IDP configuration, except the authority, and yes these must match. Also, we have seen a similar configuration in our MVC client application.
Let’s explain these properties:
- authority => the URI of the IDP project
- client_id => the id of the client that consumes the IDP server
- redirect_uri => the URI to redirect to after successful authentication
- scope => the list of supported scopes by IDP
- response_type => determines the flow we want to use (AllowedGrantTypes property on IDP)
- post_logout_redirect_uri: the URI to redirect to after successful logout
Then, in the constructor, we instantiate the _userManager property passing the idpSettings object with all the required configuration.
Using the UserManager Class to Enable IDP and Angular Integration
We have explained all the steps that happen during the Authorization Code flow. But, we don’t have to manually add any of these steps. All we have to do is to ask the UserManager class to do that for us. So, to start, we are going to create a new function in the AuthService file:
public login = () => {
    return this._userManager.signinRedirect();
}
In this function, we call the signinRedirect function from the UserManager class. This function will redirect us to the authorization endpoint on the IDP server. Additionally, the UserManager stores a user result in the session storage after a successful login action and we can always retrieve that object and use all the information it contains.
That said, let’s create a new function in the AuthService file:
public isAuthenticated = (): Promise<boolean> => {
  return this._userManager.getUser()
  .then(user => {
    this._user = user;
    return this.checkUser(user);
  })
}

private checkUser = (user : User): boolean => {
  return !!user && !user.expired;
}
Here, we use the getUser function that returns a promise that produces a user object. After we fetch a user object from the storage, we assign it to the local _user property and return a result of the private checkUser function. In this function, we check if the user object is not null and not expired.
We need to do one additional thing. As soon as the user’s status changes, we want to inform any component that needs that kind of information. To do that, we are going to use an Observable:
import { Subject } from 'rxjs';

@Injectable({
  providedIn: 'root'
})
export class AuthService {
  private _userManager: UserManager;
  private _user: User;
  private _loginChangedSubject = new Subject<boolean>();

  public loginChanged = this._loginChangedSubject.asObservable();
And modify the isAuthenticated function:
public isAuthenticated = (): Promise<boolean> => {
  return this._userManager.getUser()
  .then(user => {
    if(this._user !== user){
      this._loginChangedSubject.next(this.checkUser(user));
    }

    this._user = user;

    return this.checkUser(user);
  })
}
Modifying the App Component to Check for an Authenticated User
We need to realize that after the login action on the IDP side, the redirection happens back to the Angular application causing the Angular app to refresh itself (a fresh load of the application). So, let’s modify the app.component file to check if the user is authenticated:
import { Component, OnInit } from '@angular/core';
import { AuthService } from './shared/services/auth.service';

@Component({
  selector: 'app-root',
  templateUrl: './app.component.html',
  styleUrls: ['./app.component.css']
})
export class AppComponent implements OnInit {
  title = 'CompanyEmployees.Client.Oidc';
  public userAuthenticated = false;

  constructor(private _authService: AuthService){
    this._authService.loginChanged
    .subscribe(userAuthenticated => {
      this.userAuthenticated = userAuthenticated;
    })
  }

  ngOnInit(): void {
    this._authService.isAuthenticated()
    .then(userAuthenticated => {
      this.userAuthenticated = userAuthenticated;
    })
  }
}
In the ngOnInit function, we just call the isAuthenticated function from the AuthService file and populate the userAuthenticated property with true or false values. Also, we modify the constructor to react to the login change event. Now, if we need it, we can use the userAuthenticated property to modify the app.component.html page based on whether the user is authorized or not.
Testing the Connection Between the Angular Application and IDP
Before we start with the test actions, we need to provide a way to trigger the redirection to the IDP server from a client application. We are going to do that by clicking the Login button on the navigation menu.
That said, let’s modify the menu.component.ts file:
import { Component, OnInit } from '@angular/core';
import { AuthService } from '../shared/services/auth.service';

@Component({
  selector: 'app-menu',
  templateUrl: './menu.component.html',
  styleUrls: ['./menu.component.css']
})
export class MenuComponent implements OnInit {

  constructor(private _authService: AuthService) { }

  ngOnInit(): void {
  }

  public login = () => {
    this._authService.login();
  }

}
Nothing special here, we just call the login function from the AuthService class.
After this modification, let’s modify the menu.component.html file:
<div class="collapse navbar-collapse" id="navbarSupportedContent">
    <ul class="navbar-nav mr-auto">
      <li class="nav-item">
        <a class="nav-link" [routerLink]="['/company/companies']" routerLinkActive="active"
          [routerLinkActiveOptions]="{exact: true}"> Companies </a>
      </li>
      <li class="nav-item">
        <a class="nav-link" href="#"> Privacy </a>
      </li>
    </ul>
    <section>
      <button class="btn btn-link" style="color:gray" (click)="login()">Login</button>
    </section>
</div>
Great.
We can start the IDP application and the client application:
ng serve -o

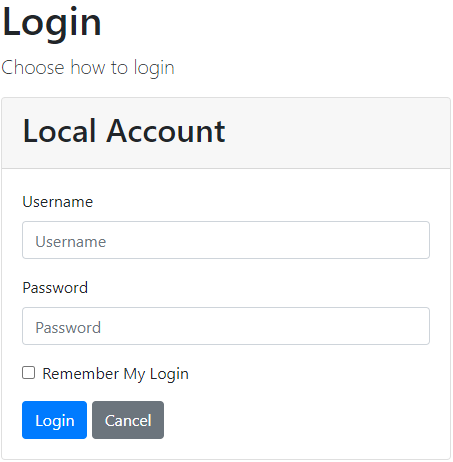
Once we click the Login button, the application redirects us to the IDP server on the Login screen:
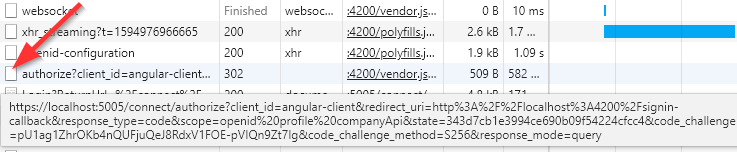
If we open the Developer Tools window (F12) and navigate to the Network tab, we are going to see the URI we have been talking about with all the required parameters from the configuration:
Additionally, if we inspect the console logs:
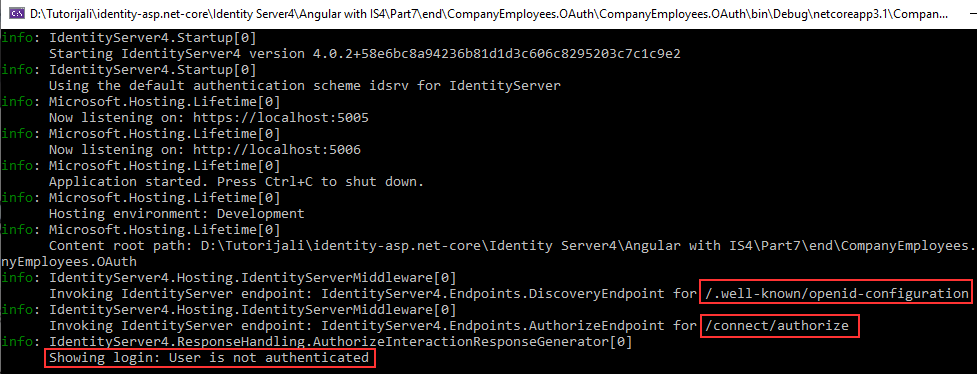
We can see that the signinRedirect function calls the /.well-known/openid-configuration endpoint, then the /authorize endpoint was invoked and we got redirected to the Login page.
Excellent, we can see our integration works, and our Angular application successfully communicates with the IDP server.
We can use Mick’s credentials (Mick and MickPassword) but after clicking the Login button, we are going to see the 404 page. That’s because we didn’t finish the login process and we don’t have the /signin-oidc route in our angular application:

But this also proves that the communication between the Angular app and the IDP server works like a charm.
Conclusion
In this article, we have enabled the communication between the Angular application and the IDP server. The configuration is in place on both sides and we have a way to redirect the user to the Login page that resides on the level of IDP.
Of course, we are not going to display the 404 page after successful login action, and that’s something we are going to handle in the next article. There, we will learn about the authentication actions, how to create required routes and components, and how to execute the logout actions as well.
So, see you there.

