

In this article, we are going to learn about Vertical Slice Architecture in ASP.NET Core and the benefits it provides to make our code more maintainable. We’re also going to learn how it differs from traditional architecture and its advantages over the traditional approach.
We’re going to use the MediatR library to build a RESTful API that follows the vertical slice architecture.
Let’s start with a refresher on the traditional approach.
VIDEO: Vertical Slice Architecture in ASP.NET Core Web API.
The Traditional Approach
Maintainability is one of the core tenets of software development. Our applications should be easily maintainable and adaptable to change.
One of the go-to approaches to attain maintainability is to achieve separation of concerns. The traditional approach to software architecture splits the application into separate layers to achieve this, thus forming the layered architecture:
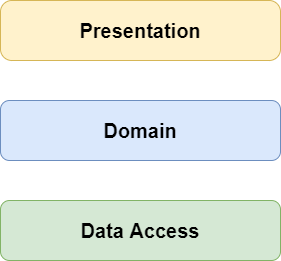
Hence, with this approach, we have each layer addressing simple distinct concerns. The user interface does not concern with how the business logic works, or how we persist the data.
Other variants like the Onion Architecture are also based on the same layered architecture approach.
Problems With the Layered Approach
The problem with following the layered approach through any of the variants like Clean, Onion, or the traditional N-tier architecture is that these do not scale well to the application growing in size and complexity.
The implementation of a single unit of functionality is split across different layers. Thus, we need to go into each of the layers to add a new feature, or to fix an existing bug.
We start by separating every layer to allow them to change independently of each other. However, all our changes are made across all the layers together.
This leads to situations where we are leaving the application more prone to bugs due to a new developer not being aware of certain service dependencies between the layers.
What Is Vertical Slice Architecture
The vertical slice architecture is a technique that helps us build maintainable applications by separating the application around features or “vertical slices”.
In this approach, we think of the application code in terms of features rather than the layer it sits in. We treat each feature as a vertical slice. Because every feature within the application is a separate component, it can change independently.
When building an application based on this approach, we consider every request as a distinct use case. We break the requests into either a “query” or a “command” and hence implement the CQRS (Command and Query Responsibility Segregation) pattern in the application.
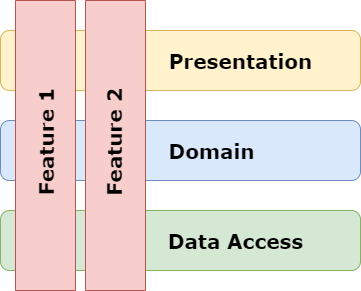
A feature or slice covers all the layers of a traditional architecture design and instead of coupling across a layer, we couple along the “slice”. The aim is to maximize coupling in the slice while minimizing coupling between the slices.
In essence, with vertical slice architecture, to start developing an application, it’s okay to have a degree of duplication in the code, as long as the separation between the features is clear.
Advantages of Vertical Slice Architecture
Let’s see some of the advantages of vertical slice architecture on the traditional architecture:
Reduction in Coupling
With vertical slice architecture, we reduce the coupling between features. We can focus on a single slice while implementing a feature rather than different layers, thus improving maintainability.
External Interaction
Every slice is independent to interact with external resources. We can have different slices using distinct ways to persist data without interfering with each other.
Command and Query Responsibility Segregation
We have our application code split between the reads (queries) and the writes (commands). This segregation helps us to treat each feature as a distinct use case.
Feature Grouping
As we promote heavy coupling within a slice, we have the code for any part of the feature physically near each other. This leads to the easier implementation of a change request. This also allows easier understanding of components for the new developers who might not completely understand the application yet.
With all that said and done, let’s see what an application code looks like following this architecture.
Solution Structure
Let’s look at the project organization:
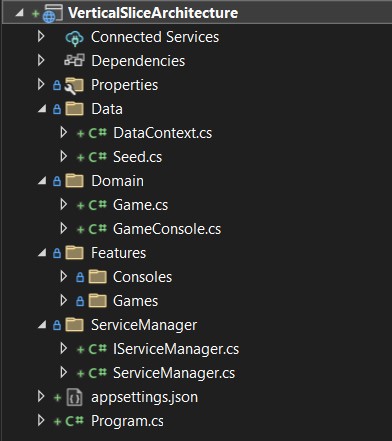
The solution includes the Data folder that contains DbContext and data-seeding classes. The Domain folder contains all the entities and the Features folder contains the vertical slices/features.
Each subfolder inside the Features folder is a self-contained use case. It exposes the MediatR request classes segregated into command and query as well as the result classes of these requests.
The solution uses some dependencies like:
- MediatR library to implement the CQRS pattern
- AutoMapper for the object to object mapping of entities to the models
- EF Core InMemory database
Domain and Data Setup
The Domain classes are the base entities on which our application is built.
Let’s create the entity classes Game and GameConsole, under the Domain folder:
public class Game
{
    public int Id { get; set; }
    public string Name { get; set; }
    public string Publisher { get; set; }
    public int ConsoleId { get; set; }
    public GameConsole Console { get; set; }
}
public class GameConsole
{
    public int Id { get; set; }
    public string Name { get; set; }
    public string Manufacturer { get; set; }
    public ICollection<Game> Games { get; set; }
}
Next, we need to take a look at our data-related classes. Let’s create a DataContext class inside the Data folder that inherits from DbContext :
public class DataContext : DbContext
{
    public DataContext(DbContextOptions<DataContext> options) : base(options) { }
    public DbSet<GameConsole> Consoles { get; set; }
    public DbSet<Game> Games { get; set; }
}
We will use this class to query and save instances of our entities in the database.
Let’s use this DataContext class to set up our database in the Program class:
builder.Services.AddDbContext<DataContext>(options =>
{
    options.UseInMemoryDatabase("GamingDB")
           .ConfigureWarnings(builder => builder.Ignore(InMemoryEventId.TransactionIgnoredWarning));
});
Here, we’ll be using an in-memory database for data persistence.
Now that we have our database set up, we need a way to populate the database with some seed data. Let’s create a Seed class inside the Data folder:
public class Seed
{
    public void SeedData(DataContext context)
    {
        //Seeding Consoles

        context.Consoles.Add(new GameConsole
        {
            Id = 1,
            Name = "Xbox Series X",
            Manufacturer = "Microsoft"
        });

        context.Consoles.Add(new GameConsole
        {
            Id = 2,
            Name = "PlayStation 5",
            Manufacturer = "Sony"
        });

        context.Consoles.Add(new GameConsole
        {
            Id = 3,
            Name = "Nintendo Switch",
            Manufacturer = "Nintendo"
        });

        //Seeding Games

        context.Games.Add(new Game
        {
            Id = 10,
            Name = "Horizon Forbidden West",
            Publisher = "Sony Interactive Entertainment",
            ConsoleId = 2
        });

        context.Games.Add(new Game
        {
            Id = 11,
            Name = "Animal Crossing: New Horizons",
            Publisher = "Nintendo",
            ConsoleId = 3
        });

        context.Games.Add(new Game
        {
            Id = 12,
            Name = "Halo Infinite",
            Publisher = "Xbox Game Studios",
            ConsoleId = 1
        });

        context.SaveChanges();
    }
}
However, just creating this class would not seed the database. Let’s call the SeedData() method at the application start in the Program class to do so:
using (var scope = app.Services.CreateScope())
{
    var dataContext = scope.ServiceProvider.GetRequiredService<DataContext>();
    new Seed().SeedData(dataContext);
}
Hence, our domain and data setup is complete. Now, let’s focus on the services.
Service Manager
We have the code divided into segregated features and each of these features has its independent service class. A service manager class acts like a unit of work and contains the instance of the service class for every feature, registering these instances inside the dependency injection container.
Let’s create our IServiceManager interface:
public interface IServiceManager
{
    IConsoleService Console { get; }
    IGameService Game { get; }
    Task SaveAsync();
}
Then let’s implement the interface in the ServiceManager class:
public class ServiceManager : IServiceManager
{
    private readonly DataContext _context;
    private IConsoleService _consoleService;
    private IGameService _gameService;

    public ServiceManager(DataContext context)
    {
        _context = context;
    }

    public IConsoleService Console
    {
        get
        {
            if (_consoleService == null)
                _consoleService = new ConsoleService(_context);

            return _consoleService;
        }
    }

    public IGameService Game
    {
        get
        {
            if (_gameService == null)
                _gameService = new GameService(_context);

            return _gameService;
        }
    }

    public Task SaveAsync()
    {
        return _context.SaveChangesAsync();
    }
}
As we can see, we are exposing the services (repositories) for each feature in the ServiceManager class. We also have a SaveAsync() method that we can call to save all the modifications done on each service.
Both classes (GameService and ConsoleService) can be found in our source project (linked at the start of the article) inside the Features folder.
Now as a final step, let’s register our ServiceManager class in the Program class for dependency injection to take effect:
builder.Services.AddScoped<IServiceManager, ServiceManager>();
Let’s move on to the separate features.
Features
With all the other setup done, let’s look at the core of what makes up a vertical slice architecture i.e. features.
Each feature closely resembles how a user interacts with the system. So, instead of having the functionality separated by layers, the emphasis is on each separate feature being a separate component.
This minimizes the coupling between features and allows them to change independently.
The MediatR library that we are using enables us to create controllers that are simple and segregate the actions into either a query or a command category.
Controllers
Let’s start by looking at one of our feature controllers in GamesController:
[Route("api/[controller]")]
[ApiController]
public class GamesController : ControllerBase
{
    private readonly IMediator _mediator;

    public GamesController(IMediator mediator)
    {
        _mediator = mediator;
    }
}
Here, we inject a mediator service into the controller that handles all the requests. All the actions are divided into queries or commands.
All the Get requests are classified as queries:
[HttpGet(Name = "GetGamesForConsole")]
public async Task<ActionResult<IEnumerable<GameResult>>> GetGamesForConsole(int consoleId)
{
    var query = new GetGamesQuery
    {
        ConsoleId = consoleId
    };

    var result = await _mediator.Send(query);

    return Ok(result);
}
Whereas, all the Post/Update/Delete requests are classified as commands:
[HttpPost]
public async Task<ActionResult> AddGame(AddGameToConsole.AddGameCommand command)
{
    var result = await _mediator.Send(command);

    return CreatedAtRoute("GetGamesForConsole", new { consoleId = result.ConsoleId }, result);
}

[HttpPut]
public async Task<ActionResult> UpdateGameForConsole(int consoleId, UpdateGameCommand command)
{
    command.ConsoleId = consoleId;

    var result = await _mediator.Send(command);

    return NoContent();
}

[HttpDelete]
public async Task<ActionResult> RemoveGameFromConsole(int consoleId, RemoveGameCommand command)
{
    command.ConsoleId = consoleId;

    await _mediator.Send(command);

    return NoContent();
}
The controller itself doesn’t process the request. It only dispatches the message with either a query or a command as an argument. The actual processing takes place in the handler classes.
One of the major differences between vertical slice architecture and the traditional approach is that we create separate classes for each request instead of keeping them together inside one service class as a method.
Queries
A query class contains several nested classes. We can classify these nested classes into request (input), result (output), and handler.
Let’s look at the GetAllGamesForConsole class to get a better idea of how it works:
public class GetAllGamesForConsole
{
    public class GetGamesQuery : IRequest<IEnumerable<GameResult>>
    {
        public int ConsoleId { get; set; }
    }

    public class GameResult
    {
        public int Id { get; set; }
        public string Name { get; set; }
        public string Publisher { get; set; }
    }

    public class Handler : IRequestHandler<GetGamesQuery, IEnumerable<GameResult>>
    {
        private readonly IServiceManager _serviceManager;
        private readonly IMapper _mapper;

        public Handler(IServiceManager serviceManager, IMapper mapper)
        {
            _serviceManager = serviceManager;
            _mapper = mapper;
        }

        public async Task<IEnumerable<GameResult>> Handle(GetGamesQuery request, CancellationToken cancellationToken)
        {
            var console = await _serviceManager.Console.GetConsoleByIdAsync(request.ConsoleId);

            if (console is null)
                throw new NoConsoleExistsException(request.ConsoleId);

            var games = await _serviceManager.Game.GetAllGamesAsync(console.Id);

            var result = _mapper.Map<IEnumerable<GameResult>>(games);

            return result;
        }
    }
}
We have the GamesQuery class that acts as the request class. This class contains everything needed to execute the functionality i.e. getting all the games for a particular console.
The IRequest<IEnumerable<GameResult>> interface communicates to MediatR that this class is a request and needs to route to its handler. The GameResult class is the return value of the handler.
The handler class implements IRequestHandler<GetGamesQuery, IEnumerable<GameResult>> and returns an IEnumerable<GameResult> instance.
The controller then returns a 200 (OK) or a 409 (Conflict) depending on the resulting object.
Commands
A command class is similar to a query class we saw earlier. It also contains the nested classes for the request, the result, and the handler.
Let’s explore the AddGameToConsole class:
public class AddGameToConsole
{
    //Input
    public class AddGameCommand : IRequest<GameResult>
    {
        public string Name { get; set; }
        public string Publisher { get; set; }
        public int ConsoleId { get; set; }
    }

    //Output
    public class GameResult
    {
        public int Id { get; set; }
        public string Name { get; set; }
        public string Publisher { get; set; }
        public int ConsoleId { get; set; }
    }

    //Handler
    public class Handler : IRequestHandler<AddGameCommand, GameResult>
    {
        private readonly IServiceManager _serviceManager;
        private readonly IMapper _mapper;

        public Handler(IServiceManager serviceManager, IMapper mapper)
        {
            _serviceManager = serviceManager;
            _mapper = mapper;
        }

        public async Task<GameResult> Handle(AddGameCommand request, CancellationToken cancellationToken)
        {
            var console = await _serviceManager.Console.GetConsoleByIdAsync(request.ConsoleId);

            if (console == null)
                throw new NoConsoleExistsException(request.ConsoleId);

            var game = new Game()
            {
                Name = request.Name,
                Publisher = request.Publisher,
                ConsoleId = request.ConsoleId
            };

            _serviceManager.Game.AddGameToConsole(request.ConsoleId, game);

            await _serviceManager.SaveAsync();

            var result = _mapper.Map<GameResult>(game);

            return result;
        }
    }
}
Here, we have the AddGameCommand class that implements the IRequest<GameResult> to denote that this is a request class. It contains all the properties needed to add a game to a particular console.
The Handler implements the IRequestHandler<AddGameCommand, GameResult> interface. It takes in an instance of AddGameCommand as a request and returns an instance of the GameResult class.
The controller returns a 201 (CreatedAtRoute) or a 409 (Conflict) depending on the resulting object.
Mapper Profiles
Within the MapperProfile class, we encapsulate the AutoMapper mappings from our domain classes to the command/query classes. Each feature has its separate mapper profile which is kept at the same hierarchical level as the controller.
Let’s look at the MapperProfile for Games:
public class MapperProfile : Profile
{
    public MapperProfile()
    {
        CreateMap<Game, AddGameToConsole.GameResult>();
        CreateMap<Game, GetAllGamesForConsole.GameResult>();
    }
}
Similar to this, we have a separate MapperProfile class for the Consoles feature:
public class MapperProfile : Profile
{
    public MapperProfile()
    {
        CreateMap<GameConsole, GetAllConsoles.ConsoleResult>();
    }
}
Configurations
So, at this point, we have the data, domain, and features classes set up. All we need to do to complete the application is to register AutoMapper, and MediatR services in the Program class:
builder.Services.AddAutoMapper(typeof(Program).Assembly);
builder.Services.AddMediatR(cfg => cfg.RegisterServicesFromAssembly(typeof(Program).Assembly));
Running the Application
Once everything is done, we can hit F5 and run the application. This will open the browser to Swagger interface:
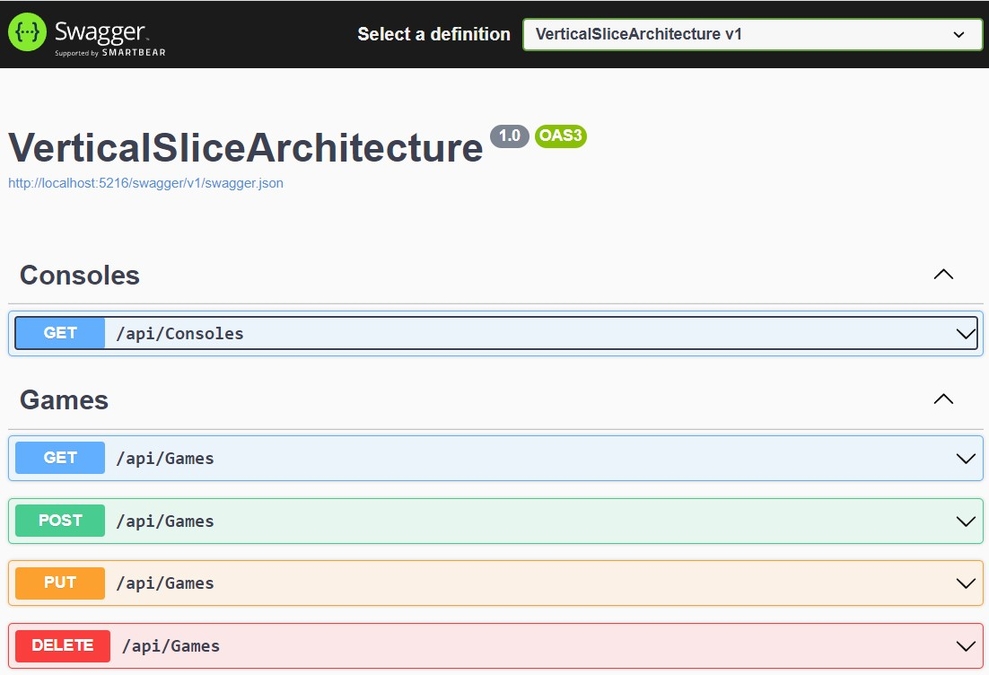
Here we can test our API endpoints.
Conclusion
In this article, we’ve learned about vertical slice architecture. We’ve seen how we separate the code into several vertical “slices” of complete features.
In addition, we saw how the CQRS pattern is implemented using the MediatR library to achieve minimal coupling between the feature classes.
Finally, we’ve learned how it differs from traditional architecture. Where the traditional or clean architecture tries to separate the business rules from the user interface, the vertical slice architecture separates the code by features even allowing a degree of code duplication to avoid the wrong abstraction.

