

In this article, we are going to provide a brief introduction to the CQRS pattern, and how the .NET library MediatR helps us build software with this architecture.
We will see MediatR in action with the requests, notifications, and behaviors.
VIDEO: CQRS and MediatR in ASP.NET Core.
Let’s start.
CQRS and the Mediator Pattern
The MediatR library was built to facilitate two primary software architecture patterns: CQRS and the Mediator pattern. Whilst similar, let’s spend a moment understanding the principles behind each pattern.
CQRS
CQRS stands for “Command Query Responsibility Segregation”. As the acronym suggests, it’s all about splitting the responsibility of commands (saves) and queries (reads) into different models.
If we think about the commonly used CRUD pattern (Create-Read-Update-Delete), usually we have the user interface interacting with a datastore responsible for all four operations. CQRS would instead have us split these operations into two models, one for the queries (aka “R”), and another for the commands (aka “CUD”).
The following image illustrates how this works:
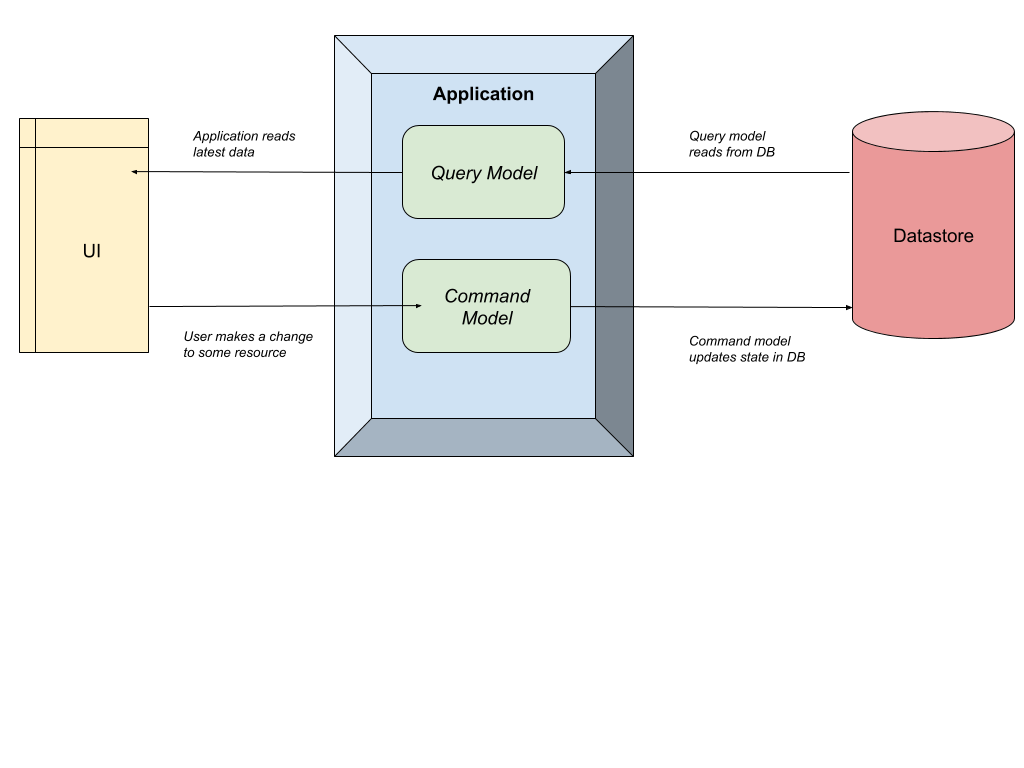
As we can see, the Application simply separates the query and command models. The CQRS pattern makes no formal requirements of how this separation occurs. It could be as simple as a separate class in the same application (as we’ll see shortly with MediatR), all the way up to separate physical applications on different servers. That decision would be based on factors such as scaling requirements and infrastructure, so we won’t go into that decision path today.
The key point being is that to create a CQRS system, we just need to split the reads from the writes.
What problem is this trying to solve?
Well, a common reason is often when we design a system, we start with the data storage. We perform database normalization, add primary and foreign keys to enforce referential integrity, add indexes, and generally ensure the “write system” is optimized. This is a common setup for a relational database such as SQL Server or MySQL. Other times, we think about the read use cases first, then try and add that into a database, worrying less about duplication or other relational DB concerns (often “document databases” are used for these patterns).
Neither approach is wrong. But the issue is that it’s a constant balancing act between reads and writes, and eventually one side will “win out”. All further development means both sides need to be analyzed and often one is compromised.
CQRS allows us to “break free” from these considerations, and give each system the equal design and consideration it deserves, without worrying about the impact of the other system. This has tremendous benefits on both performance and agility, especially if separate teams are working on these systems.
Trade-offs
CQRS sounds great in principle, but as with anything in software, there are always trade-offs.
A few of these might include:
- Managing separate systems (if the application layer is split)
- Data becoming stale (if the database layer is split)
- The complexity of managing multiple components
It’s ultimately up to our specific use cases. Good development practices would encourage us to “keep it simple” (KISS) and therefore only employ these patterns when a need arises Otherwise it’s simply premature optimization.
In the next section, let’s discuss a similar pattern called Mediator.
Mediator Pattern
The Mediator pattern is simply defining an object that encapsulates how objects interact with each other. Instead of having two or more objects take a direct dependency on each other, they instead interact with a “mediator”, who is in charge of sending those interactions to the other party:
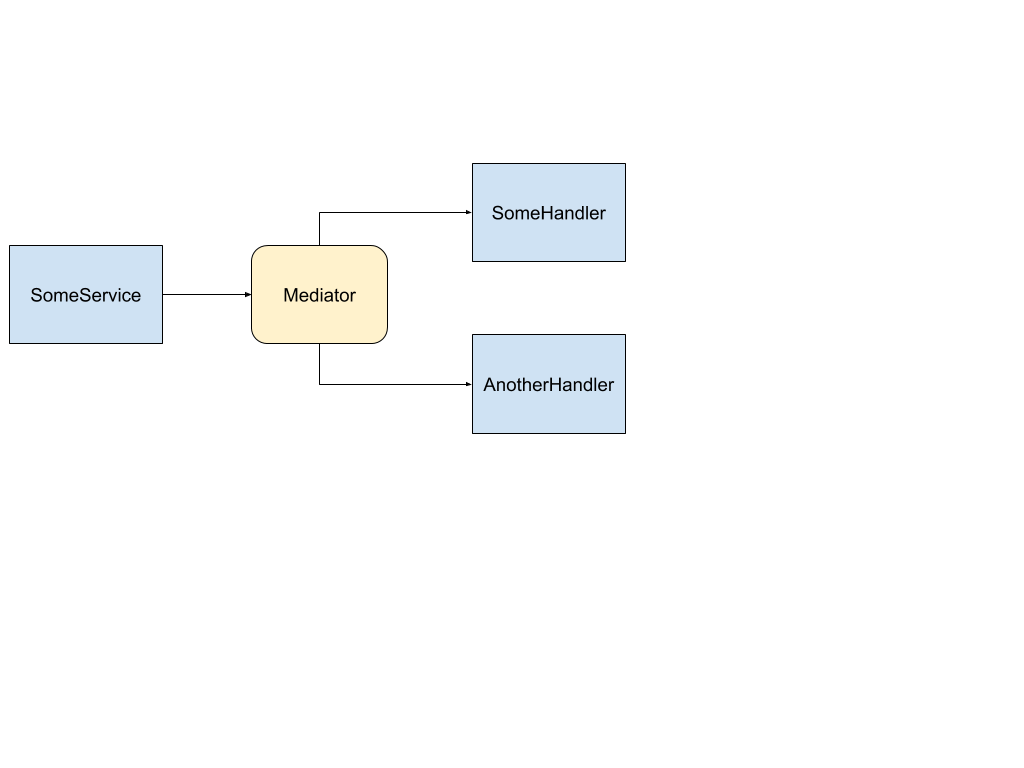
We can see in the image above, SomeService sends a message to the Mediator, and the Mediator then invokes multiple services to handle the message. There is no direct dependency between any of the blue components.
The reason the Mediator pattern is useful is the same reason patterns like Inversion of Control is useful. It enables “loose coupling”, as the dependency graph is minimized and therefore code is simpler and easier to test. In other words, the fewer considerations a component has, the easier it is to develop and evolve.
We saw in the previous image how the services have no direct dependency, and the producer of the messages doesn’t know who or how many things are going to handle it. This is very similar to how a message broker works in the “publish/subscribe” pattern. If we wanted to add another handler we could, and the producer wouldn’t have to be modified.
Now that we’ve been over some theory, let’s talk about how MediatR makes all these things possible.
How MediatR facilitates CQRS and Mediator Patterns
You can think of MediatR as an “in-process” Mediator implementation, that helps us build CQRS systems. All communication between the user interface and the data store happens via MediatR.
The term “in process” is an important limitation here. Since it’s a .NET library that manages interactions within classes on the same process, it’s not an appropriate library to use if we wanted to separate the commands and queries across two systems. In those circumstances, a better approach would be to a message broker such as Kafka or Azure Service Bus.
However for this article, we are going to stick with a simple single-process CQRS system, so MediatR fits the bill perfectly.
Setting up an ASP.NET Core API with MediatR
Project Setup
First off, let’s open Visual Studio and create a new ASP.NET Core Web API Application. We are going to name it CqrsMediatrExample.
Dependencies
Let’s install a couple of packages via the Package Manager Console.
First, the MediatR package:
PM> install-package MediatR
There is nothing more we need to install. In previous versions, we had to install the MediatR.Extensions.Microsoft.DependencyInjection package, but that is not required from MediatR v12.
Program class
Let’s open up Program.cs and register MediatR
builder.Services.AddMediatR(cfg => cfg.RegisterServicesFromAssembly(typeof(Program).Assembly));
We have to provide a default configuration to the constructor.
Now MediatR is configured and ready to go.
Just before we move to the controller creation, we are going to modify the launchSettings.json file:
{
  "profiles": {
    "https": {
      "commandName": "Project",
      "dotnetRunMessages": true,
      "launchBrowser": false,
      "applicationUrl": "https://localhost:5001;http://localhost:5000",
      "environmentVariables": {
        "ASPNETCORE_ENVIRONMENT": "Development"
      }
    }
  }
}
Controller
Now that we have everything installed, let’s set up a new controller that will send messages to MediatR.
In the Controllers folder, let’s add an “API Controller – Empty”, with the name ProductsController.cs.
We then end up with the following class:
[Route("api/products")]
[ApiController]
public class ProductsController : ControllerBase
{
}
Let’s then add a constructor that initializes a IMediatR instance:
[Route("api/products")]
[ApiController]
public class ProductsController : ControllerBase
{
    private readonly IMediator _mediator;

    public ProductsController(IMediator mediator) => _mediator = mediator;
}
The IMediatR interface allows us to send messages to MediatR, which then dispatches to the relevant handlers. Because we already installed the dependency injection package, the instance will be resolved automatically.
One additional note. From the MediatR version 9.0, the IMediator interface is split into two interfaces – ISender and IPublisher. So, even though we can still use the IMediator interface to send requests to a handler, if we want to be more strict about that, we can use the ISender interface instead. You don’t have to change anything else. This interface contains the Send method to send requests to the handlers. Of course, for the notifications, you should use the IPublisher interface that contains the Publish method:
public interface ISender
{
    Task<TResponse> Send<TResponse>(IRequest<TResponse> request, CancellationToken cancellationToken = default);

    Task<object?> Send(object request, CancellationToken cancellationToken = default);
}

public interface IPublisher
{
    Task Publish(object notification, CancellationToken cancellationToken = default);

    Task Publish<TNotification>(TNotification notification, CancellationToken cancellationToken = default)
        where TNotification : INotification;
}

public interface IMediator : ISender, IPublisher
{
}
Data Store
Usually, we’d want to interact with a real database. But for this article, let’s create a fake class that encapsulates this responsibility, and simply interacts with some Product values.
But before we do that, we have to create a simple Product class:
public class Product
{
    public int Id { get; set; }
    public string Name { get; set; }
}
Just as simple as that.
Now, let’s add a new FakeDataStore class, and modify it:
public class FakeDataStore
{
    private static List<Product> _products;

    public FakeDataStore()
    {
        _products = new List<Product>
        {
            new Product { Id = 1, Name = "Test Product 1" },
            new Product { Id = 2, Name = "Test Product 2" },
            new Product { Id = 3, Name = "Test Product 3" }
        };
    }

    public async Task AddProduct(Product product)
    {
        _products.Add(product);
        await Task.CompletedTask;
    }

    public async Task<IEnumerable<Product>> GetAllProducts() => await Task.FromResult(_products);
}
Here we’re simply interacting with a static list of products, which is enough for our purposes.
Let’s update the Program.cs to configure our DataStore as a singleton:
builder.Services.AddSingleton<FakeDataStore>();
Now that our data store is implemented, let’s set up our app for CQRS.
Separating the Commands and Queries
This article is about CQRS after all, so let’s create three new folders for this purpose: “Commands”, “Queries”, and “Handlers”.
We’ll use these folders throughout the exercise to separate our models. As mentioned earlier, we are doing “in-process” CQRS, so this is a simple way to organize that.
In the next section, we are going to talk about the most common usage of MediatR, “Requests”.
Requests With MediatR
MediatR Requests are very simple request-response style messages, where a single request is synchronously handled by a single handler (synchronous from the request point of view, not C# internal async/await). Good use cases here would be returning something from a database or updating a database.
There are two types of requests in MediatR. One that returns a value, and one that doesn’t. Often this corresponds to reads/queries (returning a value) and writes/commands (usually doesn’t return a value).
We’ll use the FakeDataStore we created earlier to implement some MediatR requests.
First, let’s create a request that returns all the products from our FakeDataStore.
GetProductsQuery
Since this is a query, let’s add a class called GetProductsQuery to the “Queries” folder, and implement it:
public record GetProductsQuery() : IRequest<IEnumerable<Product>>;
Here, we create a record called GetProductsQuery, which implements IRequest<IEnumerable<Product>>. This simply means our request will return a list of products.
Then, in the Handlers folder, we are going to create a new handler class to handle our query:
public class GetProductsHandler : IRequestHandler<GetProductsQuery, IEnumerable<Product>>
{
    private readonly FakeDataStore _fakeDataStore;

    public GetProductsHandler(FakeDataStore fakeDataStore) => _fakeDataStore = fakeDataStore;

    public async Task<IEnumerable<Product>> Handle(GetProductsQuery request,
        CancellationToken cancellationToken) => await _fakeDataStore.GetAllProducts();
}
A bit is going on here, so let’s break it down a bit.
We create a class called GetProductsHandler, which inherits from IRequestHandler<GetProductsQuery, IEnumerable<Product>>. This means this class will handle GetProductsQuery, in this case, returning the list of products.
In our GetProductsHandler class, we implement a single method called Handle, which returns the values from our FakeDataStore.
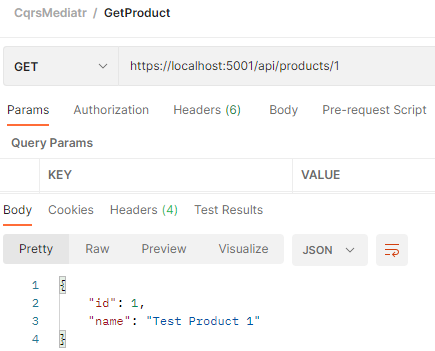
Calling and Testing our Request
To call our request, we just need to add the GetProducts() action in our ProductsController:
[HttpGet]
public async Task<ActionResult> GetProducts()
{
    var products = await _mediator.Send(new GetProductsQuery());

    return Ok(products);
}
That’s how simple it is to send a request to MediatR. Notice we’re not taking a dependency on FakeDataStore, or have any idea on how the query is handled. This is one of the principles of the Mediator pattern, and we can see it implemented firsthand here with MediatR.
Now let’s make sure everything is working as expected.
First, let’s hit CTRL+F5 to build and run our app.
Let’s then fire up Postman and create a new request:
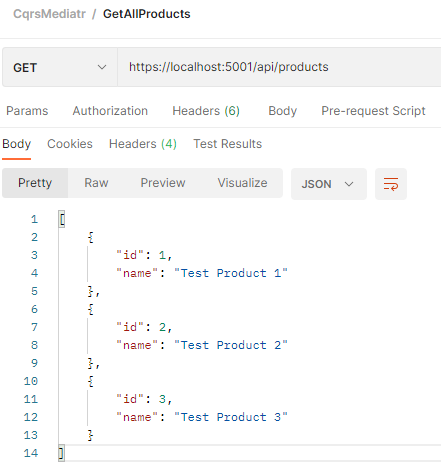
Fantastic! This proves that MediatR is working correctly, as the values we see are the ones initialized by our FakeDataStore. We’ve just implemented our first “Query” in CQRS 🙂
In the next section, let’s talk about the other type of MediatR request, the one that doesn’t return a value, ie a “Command”.
MediatR Commands
To create our first “Command”, let’s add a request that takes a single product and updates our FakeDataStore.
Inside our “Commands” folder, let’s add a record called AddProductCommand:
public record AddProductCommand(Product Product) : IRequest;
So, our record has a single Product property and inherits from the IRequest interface. Notice this time the IRequest signature doesn’t have a type parameter. This is because we aren’t returning a value.
Take a note that due to the simplicity of this example we are using domain entity (Product) as the return type for our query and as a parameter for the command. In real-world apps, we wouldn’t do that, we would use DTOs to hide a domain entity from the public API. If you want to see how to use DTOs with Web API actions, you can read part 5 and part 6 articles of our .NET Core Web API series.
Then, in the Handlers folder, we are going to add our handler:
public class AddProductHandler : IRequestHandler<AddProductCommand>
{
    private readonly FakeDataStore _fakeDataStore;

    public AddProductHandler(FakeDataStore fakeDataStore) => _fakeDataStore = fakeDataStore;

    public async Task Handle(AddProductCommand request, CancellationToken cancellationToken)
    {
        await _fakeDataStore.AddProduct(request.Product);

        return;
    }
}
We create the Handler class, which inherits from the IRequestHandler<AddProductCommand> interface. This is a similar implementation to our previous GetValuesQuery. We’re simply saying this class will handle the AddProductCommand request and return a void.
Then, we implement the Handle(AddProductCommand request, CancellationToken cancellationToken) method, adding value to our FakeDataStore.
Calling and Testing our Request
Let’s now call our AddProductCommand by adding the Post method in ProductsController:
[HttpPost]
public async Task<ActionResult> AddProduct([FromBody]Product product)
{		{
    await _mediator.Send(new AddProductCommand(product));

    return StatusCode(201);
}
Again very similar to our Get method. But this time, we are setting a value on our AddProductCommand, and we don’t return a value.
To test our command, let’s run our app again and add a new request to Postman:
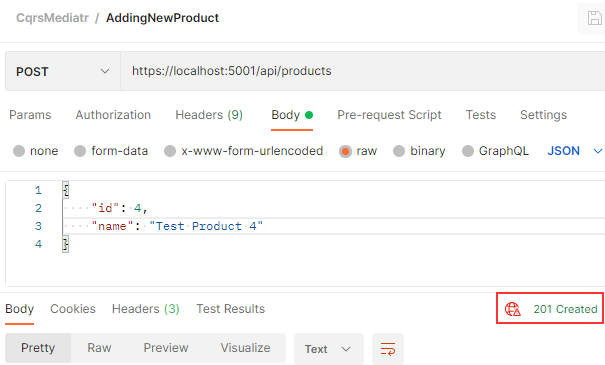
To test actually worked, let’s run our GetAllProducts request again:

This proves that our AddProductCommand is working correctly, by sending a message to MediatR with our new value and updating the state. We can then see our Query model (e.g GetAllProducts) has been updated with our new value.
While this may seem simple in theory, let’s try to think beyond the fact we’re simply updating an in-memory list of strings. We are communicating to a datastore via simple message constructs, without having any idea of how it’s being implemented. The commands and queries could be pointing to different data stores. They don’t know how their request will be handled, and they don’t care.
At this point, let’s pat ourselves on the back, as we now have a fully-functioning ASP.NET Core API implementing the CQRS + Mediator patterns with MediatR. 🙂
Working with Commands that Return a Value
As you can see, our POST action just returns a 201 status code. But that is not enough. There is a much better way of informing our client that this action succeeded.
But to do that, we have to create GetProductById action.
Of course, before we do that, we have to create a new query record:
public record GetProductByIdQuery(int Id) : IRequest<Product>;
Modify the FakeDataStore class by adding a new method:
public async Task<Product> GetProductById(int id) =>
    await Task.FromResult(_products.Single(p => p.Id == id));
And create a new handler:
public class GetProductByIdHandler : IRequestHandler<GetProductByIdQuery, Product>
{
    private readonly FakeDataStore _fakeDataStore;

    public GetProductByIdHandler(FakeDataStore fakeDataStore) => _fakeDataStore = fakeDataStore;

    public async Task<Product> Handle(GetProductByIdQuery request, CancellationToken cancellationToken) =>
        await _fakeDataStore.GetProductById(request.Id);

}
Excellent.
Now we can add a new action in the controller:
[HttpGet("{id:int}", Name = "GetProductById")]
public async Task<ActionResult> GetProductById(int id)
{
    var product = await _mediator.Send(new GetProductByIdQuery(id));

    return Ok(product);
}
You can test this with a new Postman query if you want:
Modifying Command
With this in place, we can modify our AddProductCommand record:
public record AddProductCommand(Product Product) : IRequest<Product>;
Then a handler:
public class AddProductHandler : IRequestHandler<AddProductCommand, Product>
{
    private readonly FakeDataStore _fakeDataStore;

    public AddProductHandler(FakeDataStore fakeDataStore) => _fakeDataStore = fakeDataStore;

    public async Task<Product> Handle(AddProductCommand request, CancellationToken cancellationToken)
    {
        await _fakeDataStore.AddProduct(request.Product);

        return request.Product;
    }
}
Of course, this is a very simplified implementation, but you get the point.
And finally, we can modify our action:
[HttpPost]
public async Task<ActionResult> AddProduct([FromBody]Product product)
{
    var productToReturn = await _mediator.Send(new AddProductCommand(product));

    return CreatedAtRoute("GetProductById", new { id = productToReturn.Id }, productToReturn);
}
After all of these changes, we can send the post request, but this time, we will find a newly created product in the response body, and also, in the header tab, a Location to fetch that new product:

With all this in mind, you can easily implement the Update and Delete actions.
Now let’s go even further, and in the next section explore another MediatR topic called “Notifications”.
MediatR Notifications
So we’ve only seen a single request being handled by a single handler. However, what if we want to handle a single request by multiple handlers?
That’s where notifications come in. In these situations, we usually have multiple independent operations that need to occur after some event.
Examples might be:
- Sending an email
- Invalidating a cache
To demonstrate this, we will update the AddProductCommand flow we created previously to publish a notification and have it handled by two handlers.
Sending an email and invalidating a cache is out of the scope of this article, but to demonstrate the behavior of notifications, let’s instead simply update our fake values list to signify that something was handled.
Updating our FakeDataStore
Let’s open up our FakeDataStore and add a new method:
public async Task EventOccured(Product product, string evt)
{
    _products.Single(p => p.Id == product.Id).Name = $"{product.Name} evt: {evt}";
    await Task.CompletedTask;
}
Very simply, we are looking for a particular product and updating it to signify an event that occurred on it.
Now that we’ve modified our store, let’s create the notification and handlers in the next section.
Creating the Notification and Handlers
Let’s define a notification message that encapsulates the event we would like to define.
First, let’s add a new folder called Notifications.
Inside that folder, let’s add a record called ProductAddedNotification:
public record ProductAddedNotification(Product Product) : INotification;
Here, we create a class called ProductAddedNotification which implements INotification, with a single propertyProduct. This is the equivalent of IRequest we saw earlier, but for Notifications.
Now, we can create our two handlers:
public class EmailHandler : INotificationHandler<ProductAddedNotification>
{
    private readonly FakeDataStore _fakeDataStore;

    public EmailHandler(FakeDataStore fakeDataStore) => _fakeDataStore = fakeDataStore;

    public async Task Handle(ProductAddedNotification notification, CancellationToken cancellationToken)
    {
        await _fakeDataStore.EventOccured(notification.Product, "Email sent");
        await Task.CompletedTask;
    }
}
public class CacheInvalidationHandler : INotificationHandler<ProductAddedNotification>
{
    private readonly FakeDataStore _fakeDataStore;

    public CacheInvalidationHandler(FakeDataStore fakeDataStore) => _fakeDataStore = fakeDataStore;

    public async Task Handle(ProductAddedNotification notification, CancellationToken cancellationToken)
    {
        await _fakeDataStore.EventOccured(notification.Product, "Cache Invalidated");
        await Task.CompletedTask;
    }
}
With these two classes, we create two handlers called EmailHandler and CacheInvalidationHandler that essentially do the same thing:
- Implement INotificationHandler<ProductAddedNotification>, signifying it can handle that event
- Call the EventOccured method on FakeDataStore, specifying the event that occurred
In real-world use cases, these would be implemented differently, likely taking external dependencies and doing something meaningful, but here we are just trying to demonstrate the behavior of Notifications.
Triggering the Notification
Next, we need to actually trigger our notification.
Let’s open up ProductsController and modify the Post method:
[HttpPost]
public async Task<ActionResult> AddProduct([FromBody]Product product)
{
    var productToReturn = await _mediator.Send(new AddProductCommand(product));

    await _mediator.Publish(new ProductAddedNotification(productToReturn));

    return CreatedAtRoute("GetProductById", new { id = productToReturn.Id }, productToReturn);
}
In addition to sending MediatR the AddProductCommand request, we are now sending MediatR our ProductAddedNotification, this time using the Publish method.
If we wanted to, we could have done this directly in the handler for AddProductCommand, but let’s place it here for simplicity.
Testing our Notifications
To test out things are working, let’s run our application and again run the request to GetProducts:
As we expect, we have the three values we initialize in the FakeDataStore constructor.
Next, let’s run the other Postman request to add a new product.
Now, let’s run the GetProducts request again:
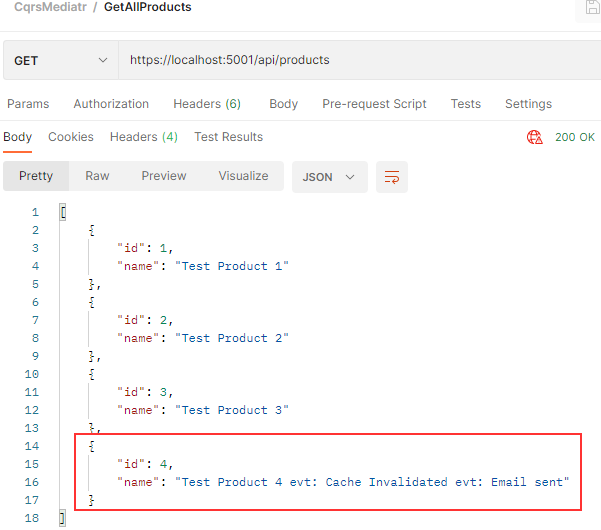
As expected, when we added a new product both events fired off and edited the name. While being a contrived example, the key takeaway here is that we can fire an event and have it handled many times, without the producer knowing any different.
If we wanted to extend our workflow to do an additional task, we could simply add a new handler. We wouldn’t need to modify the notification itself or the publishing of said notification, which again touches on the earlier points of extensibility and separation of concerns.
In the final section, we’ll talk about something new in MediatR 3.0, called Behaviors.
Building MediatR Behaviors
Often when we build applications, we have many cross-cutting concerns. These include authorization, validating, and logging.
Instead of repeating this logic throughout our handlers, we can make use of Behaviors. Behaviors are very similar to ASP.NET Core middleware, in that they accept a request, perform some action, then (optionally) pass along the request.
Let’s look at implementing a MediatR behavior that does logging for us.
Creating our Behavior
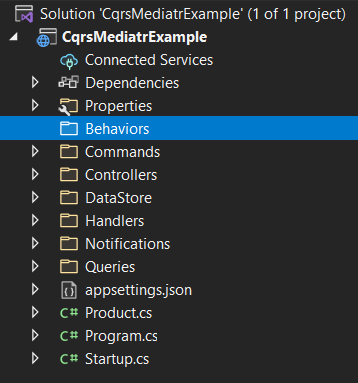
First, let’s add another solution folder called “Behaviors”:
Next, let’s add a class inside the folder called LoggingBehavior:
public class LoggingBehavior<TRequest, TResponse> : IPipelineBehavior<TRequest, TResponse>
    where TRequest : IRequest<TResponse>
{
    private readonly ILogger<LoggingBehavior<TRequest, TResponse>> _logger;

    public LoggingBehavior(ILogger<LoggingBehavior<TRequest, TResponse>> logger)
        => _logger = logger;

    public async Task<TResponse> Handle(TRequest request, RequestHandlerDelegate<TResponse> next,
        CancellationToken cancellationToken)
    {
        _logger.LogInformation($"Handling {typeof(TRequest).Name}");

        var response = await next();

        _logger.LogInformation($"Handled {typeof(TResponse).Name}");

        return response;
    }
}
Let’s explain our code:
- We first define a
LoggingBehaviorclass, taking two types of parametersTRequestandTResponse, and implementing theIPipelineBehavior<TRequest, TResponse>interface. Simply put, this behavior can operate on any request. - We then implement the
Handlemethod, logging before and after we call thenext()delegate.
This logging handler can then be applied to any request, and will log output before and after it is handled.
Registering our Behavior
To register our behavior, let’s add a line to Program.cs:
builder.Services.AddSingleton(typeof(IPipelineBehavior<,>), typeof(LoggingBehavior<,>));
Notice that we are using the <,> notation to specify the behavior that can be used for any generic type parameters
Testing our Behavior
Let’s run our application, this time by using the F5 shortcut to run in Debug mode.
Then let’s open up Postman and run the GetAllProducts request.
If we then open the “Output” window in Visual Studio and select “Show output from: Web Application – ASP.NET Core Web Server“, we see some interesting messages:
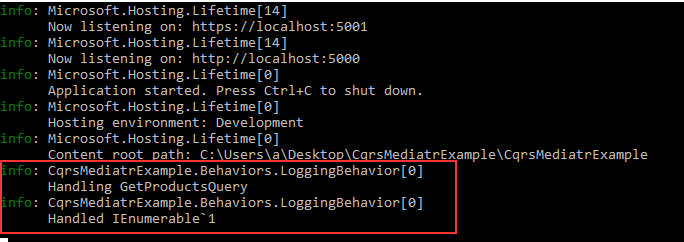
Great! This is the logging output before and after our GetProducts query handler was invoked.
The important thing here is we didn’t need to modify our existing requests or handlers. We simply added a new behavior and wired it up.
Just as easily we could add authorization and validation to our entire application, in the same manner, making behaviors a great way to handle cross-cutting concerns simply and concisely.
Conclusion
In this article, we’ve gone over how MediatR can be used to implement both the CQRS and Mediator patterns in ASP.NET Core. We’ve been through requests and notifications, and how to handle cross-cutting concerns with behaviors.
MediatR provides a great starting point for an application that needs to evolve from a simple monolith into a more mature application, by allowing us to separate read and write concerns, and minimizing the dependencies between code.
This puts us in a great position to take several additional possible steps:
- Use a different database for the reads (perhaps by extending our
ProductAddedNotificationto add a second handler to write to a new DB, then modifyingGetProductsQueryto read from this DB) - Split out our reads/writes into separate apps (by modifying the
ProductAddedNotificationto publish to Kafka/Service Bus, then having a second app read from the message bus)
We now have our app in a great position to make the above steps if the need arises, without overcomplicating things in the short term.
We hope you enjoyed this article and have a good foundation on CQRS and MediatR.
Happy coding!

