

When working with distributed applications that need to asynchronously communicate with each other, the “Publish-Subscribe” pattern is very common. To avoid being tightly coupled to a message broker, such as RabbitMQ, we use an abstraction layer, known as a service bus. Rebus is one such service bus implementation for .NET that allows us to easily communicate asynchronously between services.
This article makes use of Docker to run our message broker (RabbitMQ) server locally.
For this tutorial, we recommend that you have some knowledge of RabbitMQ. For an introduction, we have a great article on the topic – How to Use RabbitMQ in ASP.NET Core.
Let’s dive in and see what Rebus has to offer.
What is Rebus?
Rebus is a lightweight service bus implementation for .NET developers. A service bus is a layer of abstraction that handles concepts such as messaging between our services and the routing of these messages to the correct endpoints. Rebus specifically aims to simplify these concepts and the configuration required. It allows us to choose from a range of message brokers without being tied to their specific implementations.
There are some fundamental concepts that we should familiarize ourselves with in Rebus.
Transports
Transports are the underlying message broker or queueing system that Rebus will use to send and route messages between our services. RabbitMQ, Azure Service Bus, in-memory, and Amazon SQS are some of the supported transports.
Bus
The bus is how we interact with the underlying message broker/queueing systems. It provides us with the ability to publish and subscribe to messages. In Rebus, there are two ways to configure the bus. The normal method is a two-way bus, which is one that can publish and subscribe to messages.
Alternatively, if our application only needs to send messages, we can make use of the one-way client configuration.
Routing
Routing is how we configure where our messages should be sent to. Rebus allows us to define a destination at the point of sending a message:
await bus.Advanced.Routing.Send("destination-queue", message);
However, this doesn’t scale particularly well. Instead, the recommended approach is to route messages based on their type, which is the default configuration. This allows publishing to be much simpler:
await bus.Publish(message);
In turn, we can subscribe by using the type of message we want to receive:
await bus.Subscribe<MessageType>();
Logging
Logging is key when trying to understand what is happening in our services and diagnose any issues. Rebus allows us to configure its internal logs to our logging framework of choice, such as Serilog or NLog. Using the Rebus fluent Configuration API makes it simple to configure logging:
Configure.With(activator)
    .Logging(l => l.Serilog(loggerConfiguration))
    .(...);
Or we can configure it inside the AddRebus() method:
services.AddRebus(
    configure => configure
        .Logging(l => l.Serilog(loggerConfiguration))
        .(...)
);
Either way is fine, so feel free to use whichever way you prefer.
Fleet Manager
One of the more advanced Rebus features is the Fleet Manager tool. It is a fully-featured user interface that allows us to manage failed messages, set up auditing for processed messages, and configure alerts to notify us of failed messages, etc.
Not only does Fleet Manager allow us to manage our failed messages easier, but it collects metrics from each instance of Rebus that we connect to it. This is useful for real-time visualization of the number of messages each of our applications is processing, which we can group by queue name or even the host machine the instance is running on.
If our applications make use of Sagas, which are stateful services that handle closely related events that happen over time, Fleet Manager becomes very useful as it allows easy debugging of the saga state. It stores snapshots of the state, allowing us to view what triggered a state change, understand how the process got into it’s current state, and be able to predict the potential next events in the process.
When we deal with distributed systems and send messages between services, there can be transient errors or exceptions that occur, causing our message to not be delivered. Usually, we send these messages to a dead-letter queue so that they can be manually investigated.
This is a non-trivial task if we use something like the RabbitMQ user interface to directly inspect these messages, as it isn’t built for that task. Fortunately, Fleet Manager is fully supportive of this and allows us to return these failed messages to their original queue to be re-processed once we fix the issue.
It is worth mentioning that this is a paid tool as part of the Rebus Pro offering, and there is a trial version available.
Why use Rebus?
When we work directly with a message broker, such as RabbitMQ, we have to configure all the specific components to publish messages and subscribe to them, such as exchanges, queues, and topics. Furthermore, we need to manage the connection to the RabbitMQ server, ensuring we don’t exhaust connections, and also configure retry policies in case we cannot publish a message on the first attempt.
This is why choosing a service bus such as Rebus is a good choice. It means we no longer have to worry about configuring all the individual components specific to a given message broker. Beyond that, if we want to run something like RabbitMQ locally, and then switch to Azure Service Bus in production, we don’t have to maintain two sets of code for each system. Instead, we can abstract the underlying components with Rebus, and easily swap message brokers in different environments.
Another popular service bus for .NET is MassTransit. Like Rebus, it provides support for RabbitMQ, Azure Service Bus, and Amazon SQS.
So why choose Rebus over MassTransit?
Rebus aims to be more lightweight and easier to configure than MassTransit. It also supports some queuing systems that MassTransit does not, such as Azure Storage Queues and MSMQ, and even relational databases such as SQL Server, PostgreSQL, and MySQL.
Implementing Rebus in .NET
Now that we understand the core components of the Rebus library, let’s look at implementing some of them in a .NET application.
To start, we’ll run a docker container for RabbitMQ locally.
Installing RabbitMQ
With docker installed, we run the docker run command to spin up a docker container:
docker run -d --hostname rabbitmq --name rabbitmq -p 5672:5672 -p 15672:15672 rabbitmq:3-management
We are using the rabbitmq:3-management image from DockerHub which will provide us with a UI, available on port 15672. We also add a port mapping for 5672, which is the default port RabbitMQ uses for communication. In order for us to access the management UI, we open a browser window and navigate to localhost:15672, using the default login of guest/guest. We will come back to this management UI later to see what Rebus creates for us in RabbitMQ.
Create Shared Library
One of the benefits of Rebus is that it allows us to publish strongly typed objects, and also use those types for binding when configuring our routing. So, let’s start by creating a Shared class library, with a single class:
public class UserCreatedEvent
{
    public UserCreatedEvent(string userName)
    {
        UserName = userName;
    }

    public string UserName { get; }
}
Here we define a UserCreatedEvent. This is what we’ll publish from our publisher application whenever it creates a new user.
The benefit of using a shared library is that we can create our publisher and subscriber applications independently, as long as they both reference the shared library. This makes for a much cleaner separation of concerns, as we may choose to deploy each application independently of the other. Note that it is best practice to model messages as immutable types, so for this reason we define UserName as a getter-only property.
Next up, let’s create our publisher application.
Create Publisher API
We will implement our publisher as an ASP.NET Core Web API. We do this using the Visual Studio template or the dotnet new webapi command.
The first thing we’ll do is add a project reference to the Shared class library. Next up, we need a couple of Rebus NuGet packages:
RebusRebus.ServiceProviderRebus.RabbitMq
The first and second packages are what we use to configure Rebus. It also gives us access to the IBus interface, which is what we use to publish messages. The final package allows us to configure the RabbitMQ transport.
Now that we have the required packages, let’s configure Rebus in the Program class:
builder.Services.AddRebus(configure =>
{
    var configurer = configure
        .Logging(l => l.ColoredConsole())
        .Transport(t => t.UseRabbitMqAsOneWayClient("amqp://guest:guest@localhost:5672"));

    return configurer;
});
We use the AddRebus() method to configure everything. Here, we add console logging with the ColoredConsole() method and then configure RabbitMQ as our transport with the UseRabbitMqAsOneWayClient() method. This lets Rebus know that this application is only going to publish events.
This is enough to get us started with Rebus, but we still need an API controller to create new users, so let’s do that next.
First, as we are going to be publishing a UserCreatedEvent, let’s create a User class that we’ll use in our API controller:
public class User
{
    public string Email { get; set; }
    public string Password { get; set; }
}
With that class created, we can create our UsersController:
public class UsersController : ControllerBase
{
    private static List<User> _users = new();
    private readonly IBus _bus;

    public UsersController(IBus bus)
    {
        _bus = bus;
    }

    [HttpPost]
    public async Task<IActionResult> CreateUser(User user)
    {
        if (_users.Any(u => string.Equals(u.Email, user.Email, StringComparison.OrdinalIgnoreCase)))
        {
            return BadRequest("User already exists");
        }

        _users.Add(user);

        await _bus.Publish(new UserCreatedEvent(user.Email));

        return Ok("User created");
    }
}
Here, we create a constructor that takes an IBus parameter. This is the interface we use to publish messages to our chosen transport through Rebus.
We have a single HTTP POST endpoint CreateUser, that will first verify if the user exists in our _users list. If it doesn’t, we will add it to the list, instantiate a new UserCreatedEvent and use the Publish() method to send this event to RabbitMQ via Rebus.
That’s all we need to publish our first message with Rebus. But we still need something to consume the message, so let’s look at that next.
Implement Subscriber Application
For our subscriber, we can stick to a simple console application, by running the dotnet new console command.
Once again, we reference the Shared class library, and add the Rebus NuGet packages. This time, we only need Rebus and Rebus.RabbitMq.
Rebus provides us with an interface, IHandleMessages<T> that we can implement to handle our UserCreatedEvent:
public class UserCreatedEventHandler : IHandleMessages<UserCreatedEvent>
{
    public async Task Handle(UserCreatedEvent message)
    {
        Console.WriteLine($"{nameof(UserCreatedEvent)} received. Username: {message.UserName}");
    }
}
There is a single method, Handle() that we must implement. This will be called whenever we receive a UserCreatedEvent. For now, we simply log the username to the console.
In the Program class, we must register this handler:
using var activator = new BuiltinHandlerActivator();
activator.Register(() => new UserCreatedEventHandler());
We use the BuiltInHandlerActivator class and call the Register() method to make Rebus aware of our handler.
Next, we need to configure Rebus to use RabbitMQ:
var subscriber = Configure.With(activator)
    .Transport(t => t.UseRabbitMq("amqp://guest:guest@localhost:5672", "user-created"))
    .Start();

await subscriber.Subscribe<UserCreatedEvent>();

Console.ReadLine();
We first call the With() method, passing in our activator class previously instantiated. Like our publisher, we call the Transport() extension method. However, unlike our publisher, we need to define a queue to receive messages. This time, we use the UseRabbitMq() method, which takes 2 parameters. The first is the connection string, which we set as our local instance, and the name of the queue we want to receive messages on, in this case user-created.
Then, we call the Subscribe() generic method with our UserCreatedEvent class. Finally, we add a Console.ReadLine() call so our subscriber doesn’t immediately run and exit.
Great! We’ve configured both our publisher and subscriber with Rebus and RabbitMQ. Now it’s time to test it out.
Testing our Rebus Application
Ensuring we have our publisher and subscriber applications set to run on startup, we can run them both with F5, which will open our Publisher in a web browser and our Subscriber console window.
Now we can test our application by sending a POST request to https://localhost:7205/api/users including our user in the request body:
{
  "email": "[email protected]",
  "password": "AVerySecurePassword"
}
In our subscriber console window, we will see we’ve successfully received the message:
UserCreatedEvent received. Username: [email protected]
Let’s navigate to the RabbitMQ management interface, and we see that Rebus has created 2 exchanges for us:
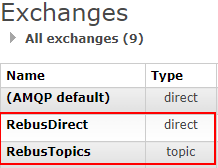
Along with 2 queues:

We didn’t define a queue called error anywhere in our code, so where did it come from?
Rebus creates this for us, to handle errors. This acts as a dead-letter queue, where any message that can’t be successfully handled gets routed to. Let’s look at this functionality next.
Handling Errors in Rebus
Each message sent through Rebus includes an ID. Rebus keeps track of this ID to determine if it’s been seen before, and how many times. If the subscriber fails to process the message, Rebus will attempt to redeliver the message. If this redelivery fails a certain number of times, then the message will be forwarded to the error queue Rebus created for us.
Let’s see that in action.
We’ll add an exception to our UserCreatedEventHandler:
public async Task Handle(UserCreatedEvent message)
{
    throw new Exception("Unable to handle message");
    Console.WriteLine($"{nameof(UserCreatedEvent)} received. Username: {message.UserName}");
}
Now, when we create a user, we’ll see the error being forwarded to the error queue in the console logs:
[WRN] Rebus.Retry.ErrorTracking.InMemErrorTracker (.NET ThreadPool Worker):
    Unhandled exception 5 while handling message with ID "6b03c086-1eae-4403-ac6c-e0755a92705c"
    System.Exception: Unable to handle message
    at Subscriber.UserCreatedEventHandler.Handle(UserCreatedEvent message)
[ERR] Rebus.Retry.PoisonQueues.PoisonQueueErrorHandler (.NET ThreadPool Worker):
    Moving message with ID "6b03c086-1eae-4403-ac6c-e0755a92705c" to error queue "error"
Here, we see that Rebus attempts to forward the message to our handler 5 times, after which it determined the message could not be processed. At this point, it moved the message to the error queue.
If we look in RabbitMQ, we’ll see the message in the queue:

Then, we can view the message directly, by navigating into the error queue, and selecting Get Message:

This will show us the raw message including the stack trace of the exception and the source queue that this message came from. From this, we can determine what needs to change in our code to fix the issue.
Customizing Rebus Retry Attempts
Rebus provides us with some sensible defaults for retrying failed messages. But it also provides us with the ability to completely customize this, from the number of times it attempts to redeliver the message, or allowing us to define our own error handling.
Let’s define a lower amount of max redelivery attempts for our subscriber in the Program class:
var subscriber = Configure.With(activator)
    .Transport(t => t.UseRabbitMq("amqp://guest:guest@localhost:5672", "user-created"))
    .Options(o => o.SimpleRetryStrategy(maxDeliveryAttempts: 3)
    .Start();
Here, we add the SimpleRetryStrategy() method, providing a value for maxDeliveryAttempts. Now when we publish our UserCreatedEvent it will only attempt to be processed 3 times before being moved to the error queue:
[WRN] Rebus.Retry.ErrorTracking.InMemErrorTracker (.NET ThreadPool Worker):
    Unhandled exception 3 while handling message with ID "41e0454f-d011-46cb-9b31-8664abc94f27"
    System.Exception: Unable to handle message
    at Subscriber.UserCreatedEventHandler.Handle(UserCreatedEvent message)
[ERR] Rebus.Retry.PoisonQueues.PoisonQueueErrorHandler (.NET ThreadPool Worker):
    Moving message with ID "41e0454f-d011-46cb-9b31-8664abc94f27" to error queue "error"
Second Level Retry
We can take this a step further, and define our own error-handling logic using a second-level retry:
activator.Register(() => new UserCreatedEventHandler(activator.Bus));

var subscriber = Configure.With(activator)
    .Transport(t => t.UseRabbitMq("amqp://guest:guest@localhost:5672", "user-created"))
    .Options(o => o.SimpleRetryStrategy(maxDeliveryAttempts: 3, secondLevelRetriesEnabled: true))
    .Timeouts(t => t.StoreInMemory())
    .Start();
The SimpleRetryStrategy() method includes another parameter, secondLevelRetriesEnabled which we can enable to define our own error-handling logic. Also, we pass the Bus property to our UserCreatedEventHandler, which we’ll use next.
Finally, we need to define somewhere to store our messages when they are being deferred by using the Timeouts() extension method and calling the StoreInMemory() method.
For demo purposes, using the StoreInMemory() method is fine. However, this is not suitable for production applications, as messages will be lost if the application restarts.
Instead, we should use one of the database-backed timeout storages that Rebus supports, such as SQL Server, PostgreSQL, or MongoDB. Some transports come with native message delay functionality, such as Azure Service Bus or Amazon SQS, which would also be suitable here.
This is not complete yet. Next, we must adjust our UserCreatedEventHandler to include our custom logic:
public class UserCreatedEventHandler :
    IHandleMessages<UserCreatedEvent>,
    IHandleMessages<IFailed<UserCreatedEvent>>
{
    private const int MaxRetries = 3;
    private readonly IBus _bus;

    public UserCreatedEventHandler(IBus bus)
    {
        _bus = bus;
    }

    public async Task Handle(UserCreatedEvent message)
    {
        // code omitted for brevity
    }

    public async Task Handle(IFailed<UserCreatedEvent> message)
    {
        var deferCount = int.Parse(message.Headers.GetValueOrDefault(Headers.DeferCount) ?? "0");
        if (deferCount >= MaxRetries)
        {
            await _bus.Advanced.TransportMessage.Deadletter(
                $"Unable to handle {nameof(UserCreatedEvent)}, with error: {message.ErrorDescription}");
        }
        else
        {
            await _bus.Advanced.TransportMessage.Defer(TimeSpan.FromSeconds(10));
        }
    }
}
First, we inherit the IHandleMessages<IFailed<T>> interface, which requires us to implement a new Handle() method, this time with an IFailed<UserCreatedEvent> parameter.
Next, we inject the IBus interface, which will allow us to retry the message. Also, we define a constant for our max retry attempts.
In the new Handle() method, we retrieve the DeferCount header from the message. Rebus adds this and keeps track of the total number of retries the message has had.
If this value is greater or equal to our MaxRetries constant, then we use the DeadLetter() method to tell Rebus to forward this message to the error queue.
Otherwise, if we can still redeliver the message, we call the Defer() method, which will wait the specified time, in our case 10 seconds, before attempting to deliver the message again.
The logs will show our second-level retry handler in action:
[DBG] Rebus.Pipeline.Receive.HandleDeferredMessagesStep (.NET ThreadPool Worker):
    Deferring message "UserCreatedEvent/9d79d37e-53e2-43f2-8534-a43af1a32c7a"
    until 2022-12-18T12:19:06.6474362+00:00
[ERR] Rebus.Retry.PoisonQueues.PoisonQueueErrorHandler (.NET ThreadPool Worker):
    Moving message with ID "9d79d37e-53e2-43f2-8534-a43af1a32c7a" to error queue "error"
    Rebus.Exceptions.RebusApplicationException: Unable to handle UserCreatedEvent, with error:
    3 unhandled exceptions: 18/12/2022 12:19:25 +00:00: System.Exception: Unable to handle message
But what if we want to reprocess this message without defining custom error handling logic?
This is where the Fleet Manager tool from Rebus comes into play.
Let’s have a look at that next.
Rebus Fleet Manager
To get started with Fleet Manager, we need to add a package to both our publisher and subscriber applications, Rebus.FleetManager.
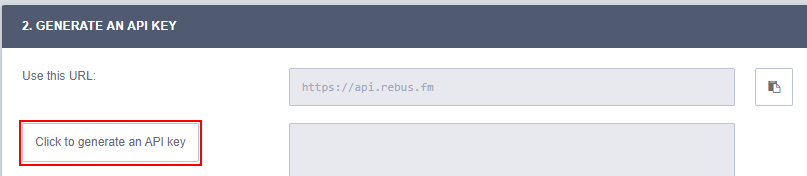
Before we configure our applications, we need an API key from Fleet Manager. From the Fleet Manager UI, navigate to Settings > Key Generator, and generate an API key:
Configure Applications
With our API key retrieved, let’s configure our publisher first:
builder.Services.AddRebus(configure =>
{
    var configurer = configure
    .Logging(l => l.ColoredConsole())
    .Transport(t => t.UseRabbitMqAsOneWayClient("amqp://guest:guest@localhost:5672"))
    .Options(o => o.EnableFleetManager("https://api.rebus.fm", <API_KEY>));

    return configurer;
});
The configuration for our subscriber is identical:
var subscriber = Configure.With(activator)
    .Transport(t => t.UseRabbitMq("amqp://guest:guest@localhost:5672", "user-created"))
    .Options(o => o.EnableFleetManager("https://api.rebus.fm", <API_KEY>))
    .Start();
As we are using the cloud-hosted version, the URL is https://api.rebus.fm.
Now we’re ready to test it out. Running our application and creating a user, we’ll once again see Rebus attempting to redeliver the message. However, this time, whenever it exceeds the retries, instead of sending it to the error queue, the message will be sent to Fleet Manager:
[INF] Rebus.FleetManager.Internals.Emitters.FailedMessageEmitter (.NET ThreadPool Worker):
      Moving message with ID "0720f91d-747e-4250-94f6-03d3de85f4aa" to Fleet Manager:
      "5 unhandled exceptions (Unable to handle message) (Unable to handle message)
     (Unable to handle message) (Unable to handle message) (Unable to handle message)"
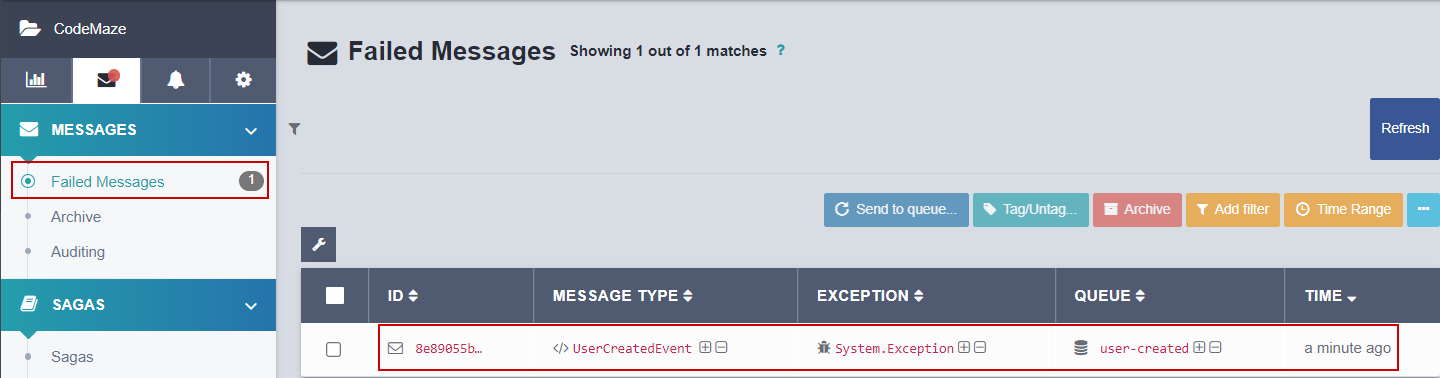
Now when we navigate to Fleet Manager, we’ll see a message waiting for us in failed messages:
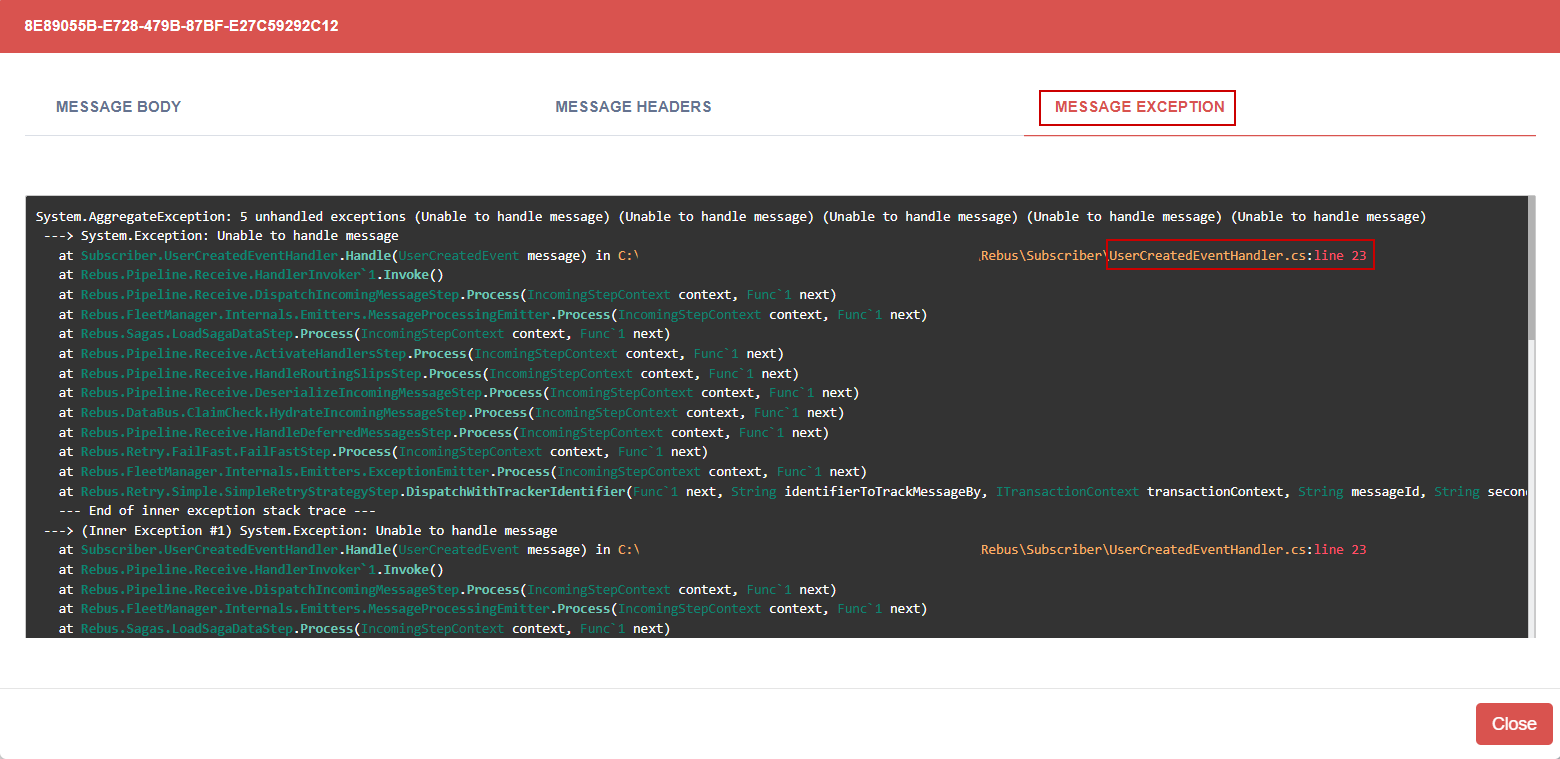
We can inspect this message to see the message body, the headers Rebus adds, and most importantly, the exception that caused the message to fail:
From here, we can also send it back to the source queue where it originated. Before we do this, let’s fix up our handler to remove the exception:
public async Task Handle(UserCreatedEvent message)
{
    Console.WriteLine($"{nameof(UserCreatedEvent)} received. Username: {message.UserName}");
}
Now we’re ready to reprocess this message. Back in Fleet Manager, select the failed message and click Send to queue, which will open a prompt to allow us to choose which queue to send to:
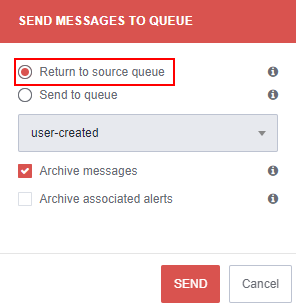
As we want to send it back to the user-created queue, we can simply leave this as the default, and click Send, checking our subscriber for confirmation:
UserCreatedEvent received. Username: [email protected]
This is a much cleaner and simpler process than interacting directly with RabbitMQ. Fleet Manager also archives our message, so we retain a record of it should we need to investigate it again or un-archive and redeliver it another time.
Conclusion
In this article, we looked at the lightweight service bus library, Rebus, covering some of its core components, and finding out why we’d choose it over other service bus libraries such as MassTransit.
Then, we covered a simple Publish-Subscribe application with Rebus and RabbitMQ.
Finally, we covered some of the more advanced features, including some custom error handling and the Fleet Manager plugin, which allows us to easily handle failed messages and redeliver them when we fix the issues in our code.

Hi, this is so great introduction to Rebus library with simple demo. I realy like this kind of articles when library, framework, concept or any other thing is simple explained and applied no matter the article’s length.
Thanks!
Hey Branislav,
I’m glad you enjoyed the article! Rebus is a great library indeed, and I certainly could have doubled the length of this article with all the features it provides!