

Updated on
In this article, we are going to take a look at using a message broker, RabbitMQ, with an ASP.NET Core Web API application.
Message brokers are applications that allow other applications to send and receive messages asynchronously. As a result of this, we can build highly scalable, decoupled applications that don’t rely on synchronous actions, such as HTTP, to communicate. We can use any binary encoded data as a message to send between one application to another.
This article makes use of Docker to run our RabbitMQ server locally.
With that in mind, let’s start.
VIDEO: How to Use RabbitMQ in .NET to Build Highly Scalable Applications.
What is RabbitMQ and How It Works?
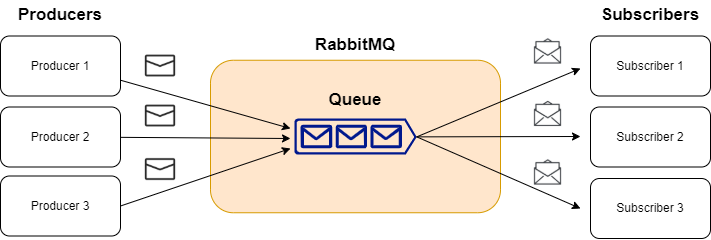
RabbitMQ is just one of many message brokers, which handles accepting, storing, and sending messages.
What Are the Advantages of Message Queues?
Message queues allow us to build decoupled applications while improving the performance, reliability, and scalability of our applications. We don’t want to create tight coupling between our applications, because doing so would mean we couldn’t independently change one application without causing breaking changes in another application.
When we introduce message queues into our application architecture, our Producers and Subscribers don’t have to be aware of each other. As long as we keep the message contract the same we can change Producers and Subscribers independently of each other.
What is RabbitMQ Used For?
Having a message broker, like RabbitMQ, manage our inter-application communication, allows our system as a whole to scale much easier. For example, we can use messages to inform Subscribers of a long-running task that needs processing.
Using a message queue, we can have multiple Subscribers which would each take one or more messages off the queue and process them, without affecting the performance of our Producer or overall application.
Why Should We Use RabbitMQ?
So why would we choose RabbitMQ, over something such as Azure Service Bus or Amazon Simple Queue Service? We can apply the same argument of loosely coupled applications to that of our choice of a message broker.
We avoid being tightly coupled to a message broker offering from one of the Cloud Providers as RabbitMQ is an open-source, platform-agnostic solution.
How Does RabbitMQ Work?
Before we look at the code, there are a couple of concepts we must cover first:
- Producers/Publishers – these are applications that send data to RabbitMQ
- Queues – this is where we send messages to in RabbitMQ. Think of it as a large message buffer
- Consumers/Subscribers – these are applications that receive messages stored in queues
With some of the basic concepts of RabbitMQ covered and with an understanding of the benefit of message queues, let’s see how we can make use of it in an ASP.NET Core Web API application.
How to Implement RabbitMQ in ASP.NET Core Web API?
We are going to use two applications, a Producer application, which is a Web API project, and a Subscriber application, which is a console application.
First, we need to ensure the RabbitMQ package is added to our applications, which can be found on the NuGet Package Manager as RabbitMQ.Client. With this package added, we are ready to send and receive messages.
Creating a Producer
Let’s look at the code required to create a Producer class first. We first define an interface for our message publishing logic:
namespace Producer.RabbitMQ
{
    public interface IMessageProducer
    {
        void SendMessage<T> (T message);
    }
}
Now we are going to implement this interface, using the RabbitMQProducer class:
public class RabbitMQProducer : IMessageProducer
{
    public void SendMessage<T>(T message)
    {
    }
}
Then, we want to create a connection to the RabbitMQ server in the SendMessage method:
var factory = new ConnectionFactory { HostName = "localhost" };
var connection = factory.CreateConnection();
using var channel = connection.CreateModel();
Ensuring we use the RabbitMQ.Client namespace, we first create a new ConnectionFactory, using the localhost hostname. This is where our RabbitMQ server will be running.
Next, we create a connection to the server, which abstracts the socket connection.
Finally, we create a channel, which is what will allow us to interact with the RabbitMQ APIs.
With a connection created, we can now declare a queue:
channel.QueueDeclare("orders");
This will create a queue on the server with the name of orders, if it doesn’t already exist.
The final step is to send a message to this newly created queue:
var json = JsonConvert.SerializeObject(message);
var body = Encoding.UTF8.GetBytes(json);

channel.BasicPublish(exchange: "", routingKey: "orders", body: body);
Since RabbitMQ doesn’t allow plain strings or complex types to be sent in the message body, we must convert our Order class to JSON format, and then encode it as a byte[]. With this done, we will publish our message to the orders queue, which we specify using the routingKey parameter.
Sending Data to RabbitMQ
Once we have fully implemented the SendMessage method, we can now inject our IMessageProducer interface into our OrdersController:
[ApiController]
[Route("[controller]")]
public class OrdersController : ControllerBase
{
    private readonly IOrderDbContext _context;
    private readonly IMessageProducer _messagePublisher;

    public OrdersController(IOrderDbContext context, IMessageProducer messagePublisher)
    {
        _context = context;
        _messagePublisher = messagePublisher;
    }
}
We also inject an IOrderDbContext. This is our Entity Framework DbContext that contains our Order model, which in this case, is using an In-Memory database.
Before creating an endpoint to create a new Order, we must first create an OrderDto class, which will be used as a parameter for our endpoint method:
public class OrderDto
{
    public string ProductName { get; set; }
    public decimal Price { get; set; }
    public int Quantity { get; set; }
}
Now that we have the OrderDto class defined, let’s create an API method that will create a new order, and then publish a message to RabbitMQ:
[HttpPost]
public async Task<IActionResult> CreateOrder(OrderDto orderDto)
{
    Order order = new()
    {
         ProductName = orderDto.ProductName,
         Price = orderDto.Price,
         Quantity = orderDto.Quantity
    };

    _context.Order.Add(order);
    await _context.SaveChangesAsync();

    _messagePublisher.SendMessage(order);

    return Ok(new { id = order.Id });
}
First and foremost, we need to create a new method called CreateOrder and decorate it with the HttpPost attribute. This method will take our OrderDto.
When we receive a request, we want to create a new Order using the OrderDto properties. From here, we will add it to our IOrderDbContext and call SaveChangesAsync so our new order is created. Next, we publish the message to RabbitMQ, by calling the SendMessage method we previously implemented and passing in our newly created order. Finally, we return the Id of our newly created order.
Receiving Data From RabbitMQ
Next, let’s take a look at subscribing to a queue to receive messages, by using the Subscriber application.
The implementation for receiving messages is slightly more complex, as we need to constantly listen for messages that enter the queue. However, to start off, we need to create a connection to our RabbitMQ server and declare a queue called orders in the Program class of our console application:
var factory = new ConnectionFactory { HostName = "localhost" };
var connection = factory.CreateConnection();
using var channel = connection.CreateModel();

channel.QueueDeclare("orders");
We need to ensure to declare the queue, in case the Subscriber starts before the Producer. Without it, there would be no queue to subscribe to.
Now we can implement the logic required to receive messages from the queue:
var consumer = new EventingBasicConsumer(channel);
consumer.Received += (model, eventArgs) =>
{
    var body = eventArgs.Body.ToArray();
    var message = Encoding.UTF8.GetString(body);

    Console.WriteLine(message);
};
First, we create a consumer. Messages will be pushed to us asynchronously, therefore we define a callback method for the Received event, which will give us access to the message body through the eventArgs parameter.
Since we encoded our messages in the Producer code, we need to decode them to get our actual JSON message of the Order class. To finish things off, we simply write this message to the console.
The final thing we must do is to start the consumer:
channel.BasicConsume(queue: "orders", autoAck: true, consumer: consumer);
Console.ReadKey();
We specify the queue we want to start consuming messages from. Next, we set autoAck to true, which will automatically handle acknowledgment of messages. Finally, we pass in our consumer object, which has our custom Received event handler logic which will be executed when we receive a message.
Running the Application
With our Producer and Subscriber code now in place, let’s take a look at how we actually run the application.
Running RabbitMQ in Docker
First and foremost, we need to spin up a RabbitMQ server, which we can do simply using Docker. Given that Docker is installed, we’ll open a command-line terminal and use the docker run command to spin up our server:
docker run -d --hostname my-rabbitmq-server --name rabbitmq -p 5672:5672 -p 15672:15672 rabbitmq:3-management
We are using the rabbitmq:3-management image from DockerHub which will provide us with a UI, available on port 15672, to view our queues/message throughput, for instance.
We must also add a port mapping for 5672, which is the default port RabbitMQ uses for communication. In order for us to access the management UI, we open a browser window and navigate to localhost:15672, using the default login of guest/guest.
Running Application
Ensuring we have both applications set to run on startup, we can simply run the applications with F5, which as a result will open a console window (Subscriber) and a browser window with the Swagger UI (Producer). Alternatively, open a browser window and navigate to https://localhost:44304/swagger/index.html, where we will find the Swagger UI. From here, we can send a POST request to https://localhost:44304/orders, providing an order in the request body:
{
    "productName": "keyboard",
    "price": 99.99,
    "quantity": 1
}
Now when we look at our console window, a message is present to show our Producer application has sent a message to RabbitMQ and which shows our Subscriber has successfully received it:
Message received: {"Id": 1, "ProductName": "keyboard", "Price": 99.99, "Quantity": 1}
That’s it, we have properly set up our simple RabbitMQ application.
Conclusion
In this article, we’ve learned why message brokers are beneficial to build decoupled, asynchronous applications. Next, we’ve looked at RabbitMQ, a specific message broker.
Finally, we learned how to publish and subscribe to messages with ASP.NET Core and RabbitMQ in C#.

If you get the below error, change the code line by adding exclusive: false to:
channel.QueueDeclare("orders", exclusive: false);RabbitMQ.Client.Exceptions.OperationInterruptedException: The AMQP operation was interrupted: AMQP close-reason, initiated by Peer, code=405, text=’RESOURCE_LOCKED – cannot obtain exclusive access to locked queue in ‘orders’ vhost ‘/’. It could be originally declared on another connection or the exclusive property value does not match that of the original declaration.’…
Ref: https://github.com/pardahlman/RawRabbit/issues/192
Hi Karr, I tried this approach but still getting the same error.
Never mind! this issue got resolved after placing the following statement in consumer.
channel.QueueDeclare("orders", exclusive: false);Excellent Tutorial.
Thanks a lot.
Thank you very much for this content. Really helps me on upskilling my dev skills
You are most welcome.
If you’re using asp.net core web.api in one solution and blazor server side in another and you want to have rabbitmq in between. How would you go along?
how to run this app without docker(in “vscode”)?
ps I install and run rabbitmq server on my pc.
how run this app without docker?
where is a link to GitHub?
On top of the article, you just can’t miss it. Or maybe… 🙂
Why isn’t there a Exhange in front of it?
Thanks for the article, definitely helpful.
Should the connection and channel declaration not happen in the startup and then re-used by SendMessage? Apparently the connection and channel comes with overhead and should be long lived.
Hi Quinton,
Thanks for your feedback. You are definitely correct that the connection and channel should be long-lived and opening them each time we want to send a message is inefficient.
For the purposes of the article, we kept all the required code in the MessagePublisher class for simplicity, but in a production environment, you would want to create the connection during app startup. Channels can have a shorter lifespan than connections, but it is still recommended that these are long-lived.
Thanks for the prompt response and confirmation. I am sure the readers will find it useful.
Should we close a connection to Rabbit in Dispose method or does it done automatically by the end of the service life?
This is stated in the official documentation: “When a connection is no longer necessary, applications must close them to conserve resources. Apps that fail to do it run the risk of eventually exhausting its target node of resources.”
What is the best option to send email? Is that console app or Web API ownself?
Usually, you want to reuse that logic for sending emails between different applications so having a class library is for me the best option. At least, this is the way I am doing it.
DeclareQueue -> Typo
Thank you, it is fixed now.
Great article. More about message brokers
Thank you Magomed Mirzaev, we do our best. We’ll consider other message brokers.
Thanks
Glad to be able to help HeywhyDevz.
How do we replace the stock picture on these articles? As a woman, I love that fact, but the dreadlocks, no, it’s the definition of appropriation to a T and shouldn’t be broadcast/advertised.
This is a programming blog, and we care about teaching stuff here. As you’ve said that’s a stock image and doesn’t represent us, women, our opinions on anything. We care equally for all people out there and especially those that come to learn C#/.NET programming. It’s a placeholder needed to share the post on social media, and nothing more than that. I’m sure you (not you, but anyone) can find a reason that bothers them on each of the images so let’s keep it to the programming stuff 🙂
How did you like the article?
I am from Africa, and I can assure you the ladies in the villages will be delighted to braid your hair. Similarly, if of the Rastafarian faith, no one has the right to tell you off for wearing dreadlocks. I believe being offended on other peoples behalf shows your own privilege, something that perhaps need to be checked at the door. This blog is however about programming and as such this comment should have no place on sites such as this. Hope you have a great day.