

Updated on
In this article, we are going to take a look at how we can use the open-source, distributed application library MassTransit in conjunction with RabbitMQ in an ASP.NET Core application. First, we are going to cover some of the more advanced RabbitMQ features, as well as some of the concepts we will come across in the MassTransit library. Finally, we will learn how to use these libraries in an ASP.NET Core Web API application.
This article makes use of Docker to run our RabbitMQ server locally.
For this tutorial, we recommend that you have some knowledge of RabbitMQ. We will cover some of the more advanced features of RabbitMQ in this article, but for an introduction, we have a great article on the topic: How to Use RabbitMQ in ASP.NET Core.
After finishing this article, we expect you to have a good understanding of what MassTransit is, what benefits it provides, and how we can use it in conjunction with RabbitMQ.
VIDEO: Using MassTransit with RabbitMQ in .NET Core Applications.
What is RabbitMQ?
To very briefly recap, RabbitMQ is a message broker, which handles the accepting, storing, and sending of messages between our applications. Using a message broker allows us to build decoupling, performant applications, relying on asynchronous communication between our applications.
What Are RabbitMQ Exchanges?
When working with RabbitMQ, producers can send messages to a couple of different endpoints:
- Queues
- Exchanges
As we have covered queues in the previous article, we are going to focus just on exchanges. When a producer sends directly to a queue, this message will be received by all consumers of that queue. But what if we want to selectively send messages to different queues based on metadata found in the message? This is where exchanges come into play.
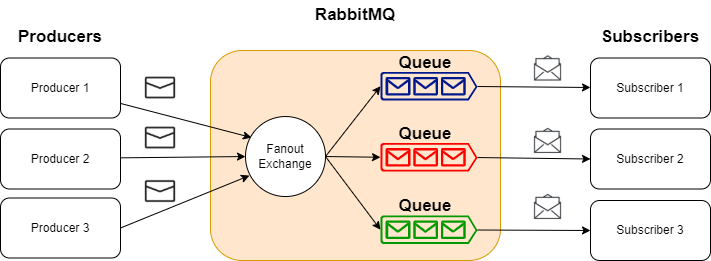
An exchange receives messages from producers, and depending on its configuration, will send the message to one or many queues. We must create a binding, which will ensure our messages get sent from our exchange to one or many queues.
We can define exchanges from one of the following types:
- Direct
- Topic
- Headers
- Fanout
For this article, we will focus on the Fanout type, as that is what MassTransit uses by default. The fanout exchange type is very simple. It will just broadcast all the messages it receives to all the queues that have created a binding with it.
What is MassTransit?
MassTransit is a free, open-source, distributed application framework for .NET applications. It abstracts away the underlying logic required to work with message brokers, such as RabbitMQ, making it easier to create message-based, loosely coupled applications.
There are a few fundamental concepts we should cover first:
Service Bus, usually shortened to Bus, is the term given to the type of application that handles the movement of messages.
Transports are the different types of message brokers MassTransit works with, including RabbitMQ, InMemory, Azure Service Bus, and more.
Message is a contract, defined code first by creating a .NET class or interface.
Command is a type of message, specifically used to tell a service to do something. These message types are sent to an endpoint (queue) and will be expressed using a verb-noun sequence.
Events are another message type, signifying that something has happened. Events are published to one or multiple consumers and will be expressed using noun-verb (past tense) sequence.
Why Use MassTransit?
There are a few benefits to choosing to use a library such as MassTransit, instead of working with the native message broker library. Firstly, by abstracting the underlying message broker logic, we can work with multiple message brokers, without having to completely rewrite our code. This allows us to work with something such as the InMemory transport when working locally, then when deploying our code, use another transport such as Azure Service Bus or Amazon Simple Queue Service.
Additionally, when we work with a message-based architecture, there are a lot of specific patterns we need to be aware of and implement, such as retry, circuit breaker, outbox to name a few. MassTransit handles all of this for us, along with many other features such as exception handling, distributed transactions, and monitoring.
Now that we have an understanding of what MassTransit is and why we would use it, let’s see how we can use it along with RabbitMQ in ASP.NET Core.
Implementing MassTransit With RabbitMQ in ASP.NET Core
Let’s start by installing RabbitMQ.
Installing RabbitMQ
Before we start creating our application, we will first need to spin up a RabbitMQ server, by making use of Docker. Given that Docker is installed, we’ll open a command-line terminal and use the docker run command to spin up our server:
docker run -d --hostname my-rabbitmq-server --name rabbitmq -p 5672:5672 -p 15672:15672 rabbitmq:3-management
We are using the rabbitmq:3-management image from DockerHub which will provide us with a UI, available on port 15672. We must also add a port mapping for 5672, which is the default port RabbitMQ uses for communication. In order for us to access the management UI, we open a browser window and navigate to localhost:15672, using the default login of guest/guest. We will come back to this management UI later to see what MassTransit creates for us in RabbitMQ.
Creating a Shared Class Library
If you remember back to the concepts of MassTransit, when we use Messages, we must define a .NET class or interface. MassTransit includes the namespace for message contracts, so we can use a shared class/interface to set up our bindings correctly.
With this in mind, the first thing we are going to do is create a class library that will contain the shared interface that we will use for our Producer and Consumer applications.
We will first create a class library, which we will call SharedModels, within which we will define an interface:
public interface OrderCreated
{
    int Id { get; set; }
    string ProductName { get; set; }
    decimal Price { get; set; }
    int Quantity { get; set; }
}
We are using the past tense for the interface name, which indicates that this is an event message type. This is everything we need for our SharedModels class library. Next up, we will implement our Producer.
Creating a Producer Using MassTransit
Let’s create our Producer, which we will implement as an ASP.NET Core Web API. The first thing we want to do is add a project reference to our SharedModels class library.
Next up, we need to add a couple of Nuget packages for MassTransit:
MassTransitMassTransit.AspNetCoreMassTransit.RabbitMQ
Now let’s configure MassTransit to use RabbitMQ in Program.cs:
var builder = WebApplication.CreateBuilder(args);

builder.Services.AddMassTransit(x =>
{
    x.UsingRabbitMq();
});

builder.Services.AddMassTransitHostedService();
NOTE: For the newest versions of the MassTransit package, you can ignore the builder.Services.AddMassTransitHostedService() line.
First, we create our WebApplicationBuilder.
Next up we configure MassTransit to use RabbitMQ. As this is our Producer, and RabbitMQ is going to be running on localhost, we don’t need to define any more configuration here. The final step is to call AddMassTransitHostedService, which automatically handles the starting/stopping of the bus (you don’t have to do this for the newest library version).
Before we create an API controller, we must first create an OrderDto class, which will be used as a parameter for our endpoint method:
public class OrderDto
{
    public string ProductName { get; set; }
    public decimal Price { get; set; }
    public int Quantity { get; set; }
}
With MassTransit configured to use RabbitMQ and our DTO defined, let’s now create an API controller that will publish a message, or more specifically an event, using our OrderCreated interface:
[ApiController]
[Route("api/[controller]")]
public class OrdersController : ControllerBase
{
    private readonly IPublishEndpoint _publishEndpoint;

    public OrdersController(IPublishEndpoint publishEndpoint)
    {
        _publishEndpoint = publishEndpoint;
    }
}
The first thing we must do is inject an IPublishEndpoint into our controller, which is what we’ll use to publish our event.
Now we can create an endpoint for creating an order:
[HttpPost]
public async Task<IActionResult> CreateOrder(OrderDto orderDto)
{
    await _publishEndpoint.Publish<OrderCreated>(new
    {
        Id = 1,
        orderDto.ProductName,
        orderDto.Quantity,
        orderDto.Price
    });

    return Ok();
}
The first thing we must do is create a new method called CreateOrder, and decorate it with the HttpPost attribute. This method will take our OrderDto as a parameter. Within the method, we call the generic Publish method on the IPublishEndpoint interface, using our OrderCreated interface to define what type of event we are going to be publishing.
We can then create an anonymous type, ensuring we use the same property names that are defined in our OrderCreated interface. This is all we require to publish an event to our configured transport, RabbitMQ.
Finally, we will return an OkResult.
Creating a Consumer Using MassTransit
Now that we have our Producer in place, we’ll take a look at creating a very simple Consumer, using a .NET console application.
Within the same solution, let’s create a console application called Consumer. Like our Producer application, we must add a project reference to our SharedModels class library. We must also add a couple of Nuget packages for MassTransit:
MassTransitMassTransit.RabbitMQ
This time, we don’t need the MassTransit.AspNetCore package, as we won’t be making use of dependency injection in this project.
With the references correctly added, we first need to create a Consumer implementation, that will contain the logic for what we want to do with any message received:
class OrderCreatedConsumer : IConsumer<OrderCreated>
{
    public async Task Consume(ConsumeContext<OrderCreated> context)
    {
        var jsonMessage = JsonConvert.SerializeObject(context.Message);
        Console.WriteLine($"OrderCreated message: {jsonMessage}");
    }
}
First, we create a class called OrderCreatedConsumer, ensuring we implement the IConsumer generic interface provided by MassTransit, using our OrderCreated interface defined in our ShareModels library. In the Consume method, we can simply serialize the message object and log the message to the console for the purposes of this article.
Now that our Consumer class is defined, let’s configure our Consumer to use MassTransit in Program.cs:
var busControl = Bus.Factory.CreateUsingRabbitMq(cfg =>
{
    cfg.ReceiveEndpoint("order-created-event", e =>
    {
        e.Consumer<OrderCreatedConsumer>();
    });

});
We create an IBusControl, using the static Bus class provided by MassTransit, which we’re going to configure to use RabbitMQ. We must then configure the ReceiveEndpoint, which will receive messages from the order-created-event queue. Finally, we use our previously created OrderCreatedConsumer to consume messages from this queue.
With our Consumer configured to receive messages, the final thing we need to do is start our bus:
await busControl.StartAsync(new CancellationToken());

try
{
    Console.WriteLine("Press enter to exit");

    await Task.Run(() => Console.ReadLine());
}
finally
{
    await busControl.StopAsync();
}
First, we call StartAsync on our busControl, passing in a new CancellationToken. Now we set up the console app to run without exiting until a Console.ReadLine is registered. The final step is to ensure we stop our busControl by calling StopAsync.
Testing Our Application
Now it’s time to test our code. Ensuring we have both the Producer and Consumer applications set up run on startup, hitting F5 will open a web browser (Producer) and a console window (Consumer). Next, we can send a POST request to https://localhost:7188/api/orders, providing an order in the request body:
{
    "productName": "keyboard",
    "quantity": 1,
    "price": 99.99
}
Let’s look at our console window, and we will see that our Producer correctly sent a message to RabbitMQ which our Consumer has successfully received:
OrderCreated message: {"Id": 1, "ProductName": "keyboard", "Price": 99.99, "Quantity": 1}
Furthermore, we can navigate to our RabbitMQ management UI, to see what exchanges MassTransit has created for us:
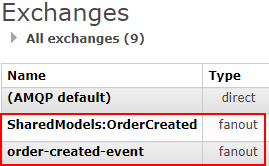
We should be able to see 2 exchanges created, both with the fanout type. One for the SharedModels:OrderCreated event type, which uses the namespace and model name from our shared library. We also have one for the receive endpoint we defined in our Consumer, order-created-event, which has a binding to the SharedModels:OrderCreated exchange.
And we can also check what queues were created:
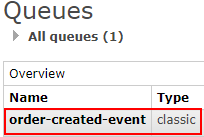
We can see our queue, order-created-event created, which has a binding to the exchange of the same name.
Conclusion
In this article, we’ve learned about a more advanced feature of RabbitMQ, exchanges. We also had a look at the MassTransit library, and why we would choose to use it over one of the native message broker libraries. Finally, we brought this altogether by learning how to create a Producer and Consumer using MassTransit and RabbitMQ.

I successfully completed all the steps in this tutorial. And I downloaded and checked your solution as well. And found out that no Exchanges, Queue, or Messages are being created in RabbitMQ. I don’t know how to solve these issues. RabbitMQ is running in a Docker Container.
Hi Tassisto,
Do you have the correct connection string for RabbitMQ running in Docker? Have you opened the correct RabbitMQ ports and can you access the management interface? We have an article that runs you through the RabbitMQ setup: https://code-maze.com/aspnetcore-rabbitmq/
Hi Phil,
I could only access the management interface etc.
I retried all the steps on a different machine and I succeeded. Is it possible that firewall was blocking the creation of queue, exchanges etc. when using the older machine? Thank you for this great article
Hey Tassisto,
That’s good to hear you got it working on another machine. It’s very possible that a firewall could block communication between MassTransit and RabbitMQ.
Glad you enjoyed the article 🙂
The latest version of MassTransit no longer requires the AddMassTransitHostedService configuration method.
You should remove it while it causes a compile error.
Thanks Majid. We’ve left a note in the article about that. The code is still there in the code snippet if someone is using an older library version.
public class CompanyDetailConsumer : IConsumer<CompanyDetail>
{
public Task Consume(ConsumeContext<CompanyDetail> context)
{
throw new NotImplementedException();
}
}
IConsumer not working in class library for example i have a service class library
and i want use inside but IConsumer work only in main project how to fix this issue
why order-created-event exchange created?
what is reason that order-created-eventhas a binding to theSharedModels:OrderCreatedexchange?Hi gerik. This is all down to the RabbitMQ topology MassTransit creates, and the different ways messages can be delivered. When we publish a message or event, it is not sent to a specific endpoint, but instead broadcasted to all consumers that have subscribed to the message type. In our example, this would use the SharedModels:OrderCreated exchange.
If we want to send a message or command, this would go to a specific endpoint or consumer. In our example, we can either send this message to the order-created-event exchange, which will then route to our queue. Or, we can send the message directly to the order-created-event queue if we wish.
A short note for anyone else that faced the same issue. If you are using MassTransit v8 then the MassTransit.AspNetCore nuget is not required and thereby rendering the following line of code obsolete. It can be ignored.
builder.Services.AddMassTransitHostedService();
Very right you are Noel – thanks for highlighting! I thought I would keep it in there in case anyone is using an older version. There aren’t currently any issues with including this line, but that’s not to say there won’t be in the future.
Why do we receive messages through “order-created-event”? Where did we set this name?
Search for the text “Now that our Consumer class is defined, let’s configure our Consumer to use MassTransit in
Program.cs“ to find your answer. “order-created-event” is configured in that code sample and further explained.