

In this article, we’re going to cover how to set up an ASP.NET Core Web API with MongoDB as our database. MongoDB is an increasingly popular database and an excellent option for small and large-scale applications. MongoDB is also a convenient database option for startups and development teams with database design limitations.
Let’s jump right in.
What Is MongoDB?
MongoDB is a NoSQL database. This is because it does not store data in a tabular format and does not use SQL to manipulate data.
It can also be classified as a document-oriented database because the data we store in it is stored as semi-structured JSON documents:
{
  _id: "5d8f90c0ab00ff",
  firstName: "john",
  lastName: "doe"
  course: {
    name: "history"
    grade: 94
  }
}
When compared to SQL databases, it has collections instead of tables, documents instead of rows, and fields instead of columns.
Let’s look at these concepts briefly.
What Is a MongoDB Document?
A document in MongoDB is a record that is made up of key-value pairs. If we had a ball store, then a document is a single item in our store:
{
    "name": "football",
    "shape": "round",
    "color": "white"
}
What Is a MongoDB Collection?
Still based on our sports store sample, a list of balls from our store would make up a collection:
[
    {
        "name": "football",
        "shape": "round",
        "color": "white"
    },
    {
        "name": "basketball",
        "shape": "round",
        "color": "red"
    }
]
It is accurate to say that a collection is a group of documents.
What Is a MongoDB Field?
A field is a single key-value pair in a document. In our sports store ball example, we have a field with a key name and the value of football.
Aside from simple values like strings and numbers, we can store other complex data types in a field:
{
    "name": "football",
    "shape": "round",
    "color": "white",
    "origin": {
        "city": "Solar",
        "town": "Light town"
    }
}
In the preceding code snippet, the value of the origin field is a document.
Depending on our use case, we can also have situations where the value of a field is a collection of documents :
{
    "name": "footbal",
    "shape": "round",
    "color": "white",
    "customers": [
        {
            "name": "Johnny Doe",
            "age": 59
        },
        {
            "name": "Jane Doe",
            "age": 32
        }
    ]
}
Why Should We Use MongoDB?
There are several reasons why we may want to consider using MongoDB. Let’s consider a couple of them.
A solid use case arises when developing an application with unpredictable data structure growth. MongoDB offers us the flexibility to modify our database structure without fear of breaking relationship rules defined by a rigid schema.
A second use case arises when developing a data-intensive project on a limited budget. In this situation, MongoDB offers a more accessible and cost-effective solution for scaling to handle substantial data volumes.
How to Setup MongoDB
Let’s look at three ways we can set up MongoDB.
Setting up a Local MongoDB Server
Firstly, we download and install MongoDB Community Edition and the MongoDB command shell. We can refer to the official Installation instructions to get up and running.
Our application is a simple school management system. After we have installed MongoDB and the MongoDB command shell, we create a folder called SchoolDb.
This folder will serve as the storage location for all our data within MongoDB. We need to obtain the path to the SchoolDb folder to connect it with MongoDB.
We will use it to tell MongoDB where to store the data using the command line:
mongod --dbpath <SchoolDb_data_directory_path>
Now, let’s move to creating and interacting with our database.
Firstly, we execute the mongosh.exe file found in the bin folder of our extracted MongoDB Shell directory.
After executing mongosh.exe, our terminal opens up with a prompt to enter a MongoDB connection string.
Next, we click the enter key to use the default local host connection string:
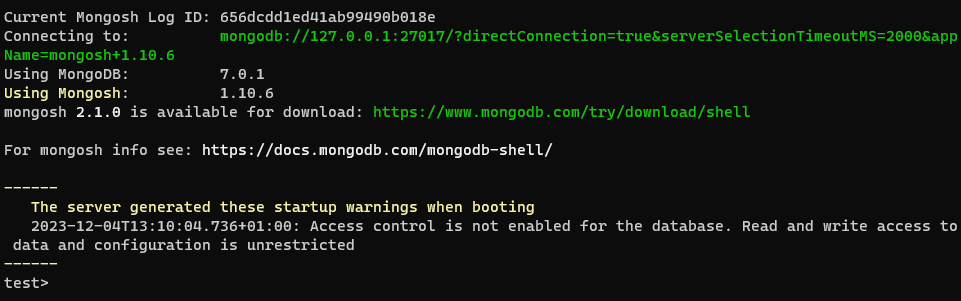
The green URL in the image that begins with “mongo” is our connection string. This connection string allows us to establish a connection to the MongoDB server running on our local machine.
We are using the default local host connection string because we want to keep this example simple. In a real-life project, we would use a proper connection string and, for security, we would store it as part of our environment variables or in a secure key vault.
Setting up a MongoDB Atlas Server
For faster development, we can avoid the installation process by taking advantage of the free tier of the MongoDB Atlas cloud service.
MongoDB Atlas eliminates the need for local installation as it is hosted in the cloud.
For us to make use of this option, we first sign up to the MongoDB cloud. Once we have successfully signed up and completed the verification process, the next step is to log in to our account.
After a successful login, the next page in MongoDB Atlas is where we can create a cluster:
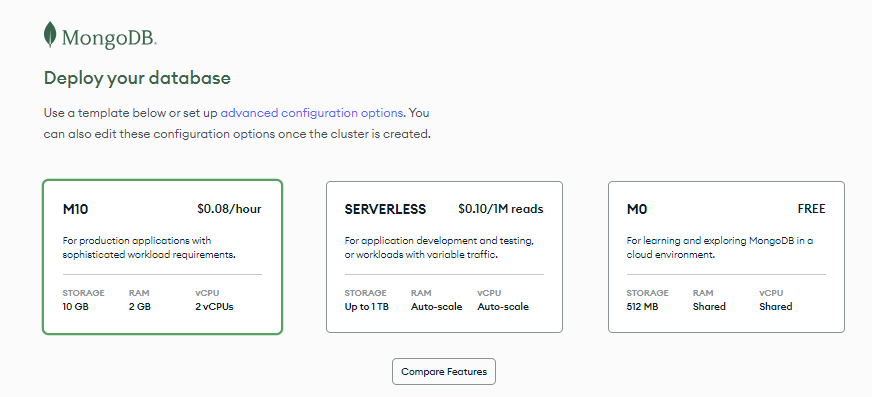
We choose the MO (Free) option while keeping all other settings at their default values. Then, we click on the “Create” button.
The next section is for authentication. Here, MongoDB Atlas automatically generates a username and password for us. However, we can choose to update them if we want.
After we take note of the username and password, we click “Create User” to proceed.
The final step is the “Where would you like to connect from” section. Here, we click on the “Add my Current IP Address” button to include our IP Address in the access list:
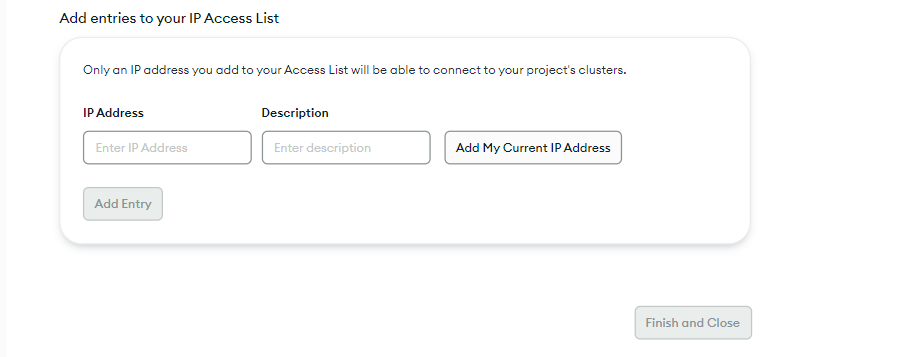
Then we click on “Finish and Close” to complete the process.
Now, let’s retrieve our connection string.
On the overview screen, we locate the database deployments card and click on the “connect” button.
From there, we select the “Drivers” option and update the driver to the most recent C#/.NET version. Finally, we copy our connection string.
Setting up a MongoDB Server Using Docker
Another way to speed up the development process is to run MongoDB as a Docker container.
To get started, we run the pull command to download the MongoDB Docker image into our local system:
docker pull mongodb/mongodb-community-server
Next, we run the image as a container:
docker run --name aspnetmongosample -d mongodb/mongodb-community-server:latest
This command starts a docker container that allows us to execute and access MongoDB. The --name option allows us to customize the name of the container running our image.
We need to confirm that our container is running:
docker container ls
This command brings up information about our running container:

Inside our running Docker container, we run an interactive session with the MongoDB Shell by executing the mongosh command:
docker exec -it <CONTAINER ID> mongosh
In our case, we run the execution command with the highlighted container ID:
docker exec -it c1aefeb51808 mongosh
Finally, we have our connection string displayed on the terminal.
Configuring ASP.NET Core with MongoDB
Now that we have MongoDB set up, let’s proceed to configure our application.
Firstly, we create an ASP.NET Core Web API application named SchoolAPI.
For us to be able to connect our application to the MongoDB server we need the MongoDB.Driver which is a NuGet package that provides us with a .NET driver for MongoDB. It also provides an Object Document Mapper (ODM) to map our .NET objects to MongoDB documents and vice-versa.
We can install the MongoDB.Driver from the Package Manager or the .NET CLI:
dotnet add package MongoDB.Driver
Next, we set our config values in our appsettings.json file:
{
    "SchoolDatabaseSettings": {
        "StudentsCollectionName": "Students",
        "CoursesCollectionName": "Courses",
        "ConnectionString": "mongodb://localhost:27017",
        "DatabaseName": "SchoolDb"
    }
}
For the sake of simplicity, here we store our connection string in appsettings.json. As previously stated, in a production or real-life scenario, sensitive information like our connection string should be stored as part of our environment variables or in a secure key vault.
For this application, we are using the connection string from our local server. The local server is a perfect fit for our sample because we can perform all the same actions that can be done on the Atlas dashboard.
If we decide to go with our MongoDB Atlas option, all we need to do is swap the value of the ConnectionString property in appsettings.json with the connection string from MongoDB Atlas.
Next, we create a Models folder in the project root and create the SchoolDatabaseSettings model:
public class SchoolDatabaseSettings
{
    public string StudentsCollectionName { get; set; } = null!;

    public string CoursesCollectionName { get; set; } = null!;

    public string ConnectionString { get; set; } = null!;

    public string DatabaseName { get; set; } = null!;
}
By intentionally naming the class properties the same as the fields in the appsettings.json file, we can conveniently store the database configuration in this model. This approach allows us to easily access these settings through dependency injection (DI).
Let’s configure this in our Program.cs:
builder
  .Services
  .Configure<SchoolDatabaseSettings>(
    builder.Configuration.GetSection("SchoolDatabaseSettings")
  );
In the code, we use Configure<SchoolDatabaseSettings> to bind the values from the SchoolDatabaseSettings section in our appsettings.json to the SchoolDatabaseSettings the model we created.
Creating a MongoClient instance
IMongoClient provides us with the functionalities to connect and access our database:
builder.Services.AddSingleton<IMongoClient>(_ => {
    var connectionString =
        builder
            .Configuration
            .GetSection("SchoolDatabaseSettings:ConnectionString")?
            .Value;

    return new MongoClient(connectionString);
});
Here, we register a singleton instance of IMongoClient. When we request for IMongoClient in our service classes, we get a MongoClient instance that has been configured with our connection string.
Another way we can configure IMongoClient is by making use of MongoClientSettings:
builder.Services.AddSingleton<IMongoClient>(_ => {
    var settings = new MongoClientSettings()
    {
        Scheme = ConnectionStringScheme.MongoDB,
        Server = new MongoServerAddress("localhost", 27017)
    };

    return new MongoClient(settings);
});
MongoClientSettings provides a higher level of flexibility when configuring the database connection by exposing connection settings at a granular level. This allows for more precise control and customization as we set up our database connection.
Creating Entity Models for MongoDB
Now, we can create entity models that will reflect the data we want to store in MongoDB.
Firstly, we create Student in the Models folder:
public class Student
{
    [BsonId]
    [BsonRepresentation(BsonType.ObjectId)]
    public string? Id { get; set; }

    [Required(ErrorMessage = "First name is required")]
    public string FirstName { get; set; } = null!;

    [Required(ErrorMessage = "Last name is required")]
    public string LastName { get; set; } = null!;

    public string Major { get; set; } = null!;
}
In the code, the Id is a nullable string because we do not need to supply it during the creation of a Student. Instead, we will generate it automatically in the code. The Id property serves a dual purpose – it helps us to facilitate mapping to MongoDB documents and enables retrieval of documents when needed.
We use BsonId to mark a property as the primary key, specifically the Id property. In MongoDB, the Id primary key is represented by a special type of object called the ObjectId.
The ObjectId is a struct located within the MongoDB.Bson namespace, and it serves as the unique identifier for each document in a MongoDB database
By applying the [BsonRepresentation(BsonType.ObjectId)] to the Id property, we can pass the Id as a string instead of an ObjectId. This attribute ensures that the string representation of our Id property is properly converted to an ObjectId when we interact with our MongoDB database.
For the sake of simplicity, we chose to use a string as the data type for the Id property. However, it is also very possible to make use of the ObjectId type directly.
The BsonId and [BsonRepresentation(BsonType.ObjectId)] attributes can be found in the MongoDB.Bson and MongoDB.Bson.Serialization.Attribute namespaces.
Furthermore, we applied the Required attribute to the FirstName and LastName fields to ensure that a Student entity must have a value for those fields.
Next, let’s take a look at the Course model:
public class Course
{
    [BsonId]
    [BsonRepresentation(BsonType.ObjectId)]
    public string? Id { get; set; }

    [Required(ErrorMessage = "Course name is required")]
    public string Name { get; set; } = null!;

    [Required(ErrorMessage = "Course code is required")]
    public string Code { get; set; } = null!;
}
Similarly, we create our Course model with an Id and two required fields, the Name and the Code of the course.
Implementing CRUD Operations
Now that our models are ready, let’s create a simple service to help us run CRUD operations on our database.
We’ll start by creating the Interfaces and the Services folders.
Within the Interfaces folder, we have the ICourseService and IStudentService:
public interface ICourseService
{
    Task<Course?> Create(Course course);

    Task<Course?> GetById(string id);
}

public interface IStudentService
{
    Task<Student?> Create(Student student);

    Task<DeleteResult> Delete(string id);

    Task<List<Student>> GetAll();

    Task<Student?> GetById(string id);

    Task<ReplaceOneResult> Update(string id, Student student);
}
The interfaces define the different methods we need to create, read, update, and delete the courses and students’ data.
In the Services folder, we create the StudentService class where we implement the IStudentService interface:
public class StudentService : IStudentService
{
    private readonly IMongoCollection<Student> _studentCollection;

    public StudentService(IOptions<SchoolDatabaseSettings> schoolDatabaseSettings, IMongoClient client)
    {
        var database = client.GetDatabase(schoolDatabaseSettings.Value.DatabaseName);

        _studentCollection = database.GetCollection<Student>(schoolDatabaseSettings.Value.StudentsCollectionName);
    }
}
First, we inject IOptions<SchoolDatabaseSettings> and IMongoClient via constructor dependency injection. IOptions<SchoolDatabaseSettings> is an interface that gives us access to configuration settings.
After that, we call the IMongoClient.GetDatabase() method to get a reference to our database.
Finally, we call the IMongoClient.GetCollection() method to get a reference to our MongoDB collection. We store this collection reference in the _studentCollection variable of type IMongoCollection<Student>.
To clarify, the IMongoCollection<T> type is a powerful generic interface that provides a set of methods for performing CRUD operations on a specific document type in our database.
To leverage the methods defined in IMongoCollection<Student>, our StudentService methods encapsulate them:
public async Task<List<Student>> GetAll()
{
    return await _studentCollection.Find(s => true).ToListAsync();
}
The GetAll() method uses the Find() method to get all items from the database.
In GetById(), we employ Find() to get an item with a corresponding Id:
public async Task<Student?> GetById(string id)
{
    return await _studentCollection.Find(s => s.Id == id).FirstOrDefaultAsync();
}
Post, Put, And Delete
The IMongoCollection<T> interface offers us several other useful methods, such as InsertOneAsync() for inserting a new record, ReplaceOneAsync() for replacing an existing record, and DeleteOneAsync() for deleting a record based on its Id:
public class StudentService : IStudentService
{
    //private field, constructor and previously mentioned methods

    public async Task<Student?> Create(Student student)
    {
        student.Id = ObjectId.GenerateNewId().ToString();

        await _studentCollection.InsertOneAsync(student);

        return student;
    }

    public async Task<ReplaceOneResult> Update(string id, Student student)
    {
        return await _studentCollection.ReplaceOneAsync(s => s.Id == id, student);
    }

    public async Task<DeleteResult> Delete(string id)
    {
        return await _studentCollection.DeleteOneAsync(s => s.Id == id);
    }
}
In the Create() method, we generated an ObjectId using ObjectId.GenerateNewId(), then we assigned it to the Id property of the student being created.
IMongoCollection<T>.ReplaceOneAsync() in Update() returns a ReplaceOneResult instance which gives us valuable insight into the outcome of the replacement operation.
For instance, ReplaceOneResult.IsAcknowlegded tells us if the operation’s result has been acknowledged by the MongoDB server as being successfully completed, while ReplaceOneResult.ModifiedCount() gives us the count of modified items.
Similarly, when using IMongoCollection<T>.DeleteOneAsync(), we get a DeleteResult instance that bears similarities to ReplaceOneResult. In this case, DeleteResult.DeletedCount gives us the count of deleted items, and DeleteResult.IsAcknowledged tells us if the operation has been acknowledged by the MongoDB server as successfully completed.
Following the same logic, we implement our CourseService class, this time we will use a corresponding IMongoCollection<Course> to create our wrapper methods:
public class CourseService : ICourseService
{
    private readonly IMongoCollection<Course> _courseCollection;

    public CourseService(IOptions<SchoolDatabaseSettings> schoolDatabaseSettings, IMongoClient client)
    {
        var database = client.GetDatabase(schoolDatabaseSettings.Value.DatabaseName);

        _courseCollection = database.GetCollection<Course>(schoolDatabaseSettings.Value.CoursesCollectionName);
    }

    public async Task<Course?> GetById(string id)
    {
        return await _courseCollection.Find(c => c.Id == id).FirstOrDefaultAsync();
    }

    public async Task<Course?> Create(Course course)
    {
        course.Id = ObjectId.GenerateNewId().ToString();

        await _courseCollection.InsertOneAsync(course);

        return course;
    }
}
After we create our services, the next step is to register them in our DI in the Program.cs:
builder.Services.AddSingleton<IStudentService, StudentService>();
builder.Services.AddSingleton<ICourseService, CourseService>();
Now we are ready to hook our services to our controllers.
Implementing the Controllers of the Web API
Firstly, we create StudentsController which is a simple API controller that consumes our StudentService:
[Route("api/[controller]")]
[ApiController]
public class StudentsController : ControllerBase
{
    private readonly IStudentService _studentService;

    public StudentsController(IStudentService studentService)
    {
        _studentService = studentService;
    }

    [HttpGet]
    public async Task<ActionResult<IEnumerable<Student>>> GetAll()
    => Ok(await _studentService.GetAll());

    [HttpGet("{id:length(24)}")]
    public async Task<ActionResult<Student>> GetById(string id)
    {
        var student = await _studentService.GetById(id);

        return student is null ? NotFound() : Ok(student);
    }

    [HttpPost]
    public async Task<IActionResult> Create(Student student)
    {
        var createdStudent = await _studentService.Create(student);

        return createdStudent is null
            ? throw new Exception("Student creation failed")
            : CreatedAtAction(nameof(GetById),
            new { id = createdStudent.Id }, createdStudent);
    }

    [HttpPut("{id:length(24)}")]
    public async Task<IActionResult> Update(string id, Student updatedStudent)
    {
        var queriedStudent = await _studentService.GetById(id);

        if (queriedStudent is null)
        {
            return NotFound();
        }

        await _studentService.Update(id, updatedStudent);

        return NoContent();
    }

    [HttpDelete("{id:length(24)}")]
    public async Task<IActionResult> Delete(string id)
    {
        var student = await _studentService.GetById(id);

        if (student is null)
        {
            return NotFound();
        }

        await _studentService.Delete(id);

        return NoContent();
    }
}
Here, we inject our IStudentService into the StudentsController class via constructor dependency injection. Then we create controller methods for each of our service methods.
In the case of GetById(), if no student is found associated with the provided Id, a status code of 404 is returned.
Conversely, in the context of Create(), if the creation process does not yield a newly created student, it indicates there was a failure in the creation process and we throw an exception.
Next, let’s implement our CourseController:
[Route("api/[controller]")]
[ApiController]
public class CourseController : ControllerBase
{
    private readonly ICourseService _CourseService;

    public CourseController(ICourseService service)
    {
        _CourseService = service;
    }

    [HttpGet("{id:length(24)}")]
    public async Task<ActionResult<Course>> GetById(string id)
    {
        var course = await _CourseService.GetById(id);

        return course is null ? NotFound() : Ok(course);
    }

    [HttpPost]
    public async Task<IActionResult> Create(Course course)
    {
        var createdCourse = await _CourseService.Create(course);

        return CreatedAtAction(nameof(GetById),
            new { id = createdCourse!.Id },
            createdCourse);

        return createdCourse is null
            ? throw new Exception("Course creation failed")
            : CreatedAtAction(nameof(GetById),
            new { id = createdCourse.Id }, createdCourse);
    }
}
That’s it! We have created API controllers that consume our services.
What’s the point of the service models? Why don’t we use the MongoDB driver directly in the API controller?
The additional service layer decouples the API controller from the database. This is useful if we plan to change our database and is often considered a good practice.
Course and the Student entity models from our persistence layer within our controller. However, it is advisable to decouple the entity layer from the controller layer by using Data Transfer Objects (DTOs) and mapping them manually or through a mapper like AutoMapper. Now that we have everything set up, we are ready to start testing our API.
Testing an ASP.NET Core Web API With Postman
We can use Postman to verify that our API endpoints are working. Firstly, let’s create a student:
Method: POST
URL: https://localhost:44370/api/Students
Body: {
    "firstName" : "John",
    "lastName": "Dow",
    "major": "Gravity"
}
We see the response contains the created student:
{
    "id": "6124f8a6e4b0a4e8e8a3e8b3",
    "firstName" : "John",
    "lastName": "Dow",
    "major": "Gravity"
}
Now that we created a student, let’s check if everything went well by retrieving all the students:
Method : GET
URL : https://localhost:44370/api/Students
As a result, we get back the created student:
{
    "id": "6124f8a6e4b0a4e8e8a3e8b3",
    "firstName" : "John",
    "lastName": "Dow",
    "major": "Gravity"
}
Nice! Now let’s update the details of the student we created:
Method: PUT
URL: https://localhost:44370/api/Students/6124f8a6e4b0a4e8e8a3e8b3
Body: {
    "firstName" : "Jennie",
    "lastName": "Dow",
    "major": "Gravity"
}
Then, we can confirm that our update functionality works by retrieving the updated details:
Method : GET
URL : https://localhost:44370/api/Students/6124f8a6e4b0a4e8e8a3e8b3
As a result, we get back the updated student:
{
    "id": "6124f8a6e4b0a4e8e8a3e8b3",
    "firstName" : "Jennie",
    "lastName": "Dow",
    "major": "Gravity"
}
Next, let’s delete a student:
Method: DELETE
URL: https://localhost:44370/api/Students/6124f8a6e4b0a4e8e8a3e8b3
Next, to confirm that our delete functionality works, we attempt to retrieve the deleted student:
Method : GET
URL : https://localhost:44370/api/Students/6124f8a6e4b0a4e8e8a3e8b3
We get a 404 response, which means the resource wasn’t found. Great! our endpoints are working perfectly
Next, let’s look at how we can create relationships between MongoDB documents.
How to Create Relationships Between MongoDB Documents
We can define a relationship within a document by referencing the Id of another document. A student with two courses could have a document like this:
{
  _id: "5d8f90c0ab00ff",
  firstName: "john",
  lastName: "doe",
  courses: ["4c7e8fb09affee", "3b6d7eaf80eedd"]
}
Firstly, let’s go ahead and modify Student to give it a relationship to courses:
public class Student
{
    [BsonId]
    [BsonRepresentation(BsonType.ObjectId)]
    public string Id { get; set; }

    [Required(ErrorMessage = "First name is required")]
    public string FirstName { get; set; } = null!;

    [Required(ErrorMessage = "Last name is required")]
    public string LastName { get; set; } = null!;

    public string Major { get; set; } = null!;

    [BsonRepresentation(BsonType.ObjectId)]
    public List<string> Courses { get; set; } = null!;

    [BsonIgnore]
    public List<Course> CourseList { get; set; } = null!;
}
Here, We introduce two new properties to our Student model. Firstly, Courses is a list of strings used to store the ObjectIds of the courses in which a student is enrolled.
To facilitate this, we utilize the [BsonRepresentation(BsonType.ObjectId)] attribute on the Courses property, allowing us to store ObjectIds as strings.
Additionally, we include a CourseList, which is of type List<Course>. When we retrieve a student’s data, we will store the student’s actual course details in CourseList.
As the CourseList serves the sole purpose of providing course information during retrieval, we’ve marked it with the [BsonIgnore] attribute. This instructs the MongoDB server not to persist the CourseList property to the database.
Because MongoDB does not require a schema, we don’t have to migrate our changes. This is a huge advantage in using NoSQL databases.
API Controller Modifications
Next, we are going to modify our API controller to handle these changes:
public class StudentsController : ControllerBase
{
    private readonly IStudentService _studentService;

    private readonly ICourseService _courseService;

    public StudentsController(IStudentService studentService, ICourseService courseService)
    {
        _studentService = studentService;

        _courseService = courseService;
    }

    [HttpGet("{id:length(24)}")]
    public async Task<ActionResult<Student>> GetById(string id)
    {
        var student = await _studentService.GetById(id);

        if (student is null)
        {
            return NotFound();
        }

        if (student.Courses is null || !student.Courses.Any())
        {
            return Ok(student);
        }

        student.CourseList ??= new();

        foreach (var courseId in student.Courses)
        {
            var course = await _courseService.GetById(courseId) ?? throw new Exception("Invalid Course Id");

            student.CourseList.Add(course);
        }

        return Ok(student);
    }

    //Other methods
}
In the StudentsController, we use Dependency Injection to inject the CourseService alongside the StudentService.
Now, in the GetById() method, for each course in the courses IDs list we retrieve the course details using the GetById() method from the CourseService instance and add them to the student’s CourseList property. Then we return the student instance.
To test this out, we need a student with courses.
Let’s create a course:
Method: POST
URL: https://localhost:44370/api/Course
Body: {
    "name": "Gravity Diffusion",
    "code": "GRD 101"
}
We get back the created course:
{
    "id": "6144f8a7e4b0a4e8e8a3e8b1",
    "name": "Gravity Diffusion",
    "code": "GRD 101"
}
Now, that we have a course Id, let’s create a Student:
Method: POST
URL: https://localhost:44370/api/Students
Body: {
    "firstName" : "John",
    "lastName": "Dow",
    "major": "Gravity",
    "courses: [
        "6144f8a7e4b0a4e8e8a3e8b1"
    ]
}
We assign the student to the corresponding course by placing the course Id within the student’s courses array.
Our response contains the created student:
{
    "id": "6224f8a6e4b0a4e8e8a3e811",
    "firstName" : "John",
    "lastName": "Dow",
    "major": "Gravity",
    "courses: [
        "6144f8a7e4b0a4e8e8a3e8b1"
    ]
}
In order to see the full details of the courses associated with the student, let’s send a request to the GetById endpoint:
Method : GET
URL : https://localhost:44370/api/Students/6224f8a6e4b0a4e8e8a3e811
We get the student’s data with the course details:
{
    "id": "6124f8a6e4b0a4e8e8a3e8b3",
    "firstName" : "Jennie",
    "lastName": "Dow",
    "major": "Gravity",
    "courses": [
        "6144f8a7e4b0a4e8e8a3e8b1"
    ],
    "courseList": [
        {
            "id": "6144f8a7e4b0a4e8e8a3e8b1",
            "name": "Gravity Diffusion",
            "code": "GRD 101"
        }
    ]
}
The response we get includes the details of the student we created, including their array of course Id and an array containing the details of each course they are enrolled in.
Conclusion
In this article, we have looked at how we can configure our ASP.NET Core web API Application with MongoDB. Then, we built a web API that uses MongoDB, and following we saw how to add relationships between MongoDB documents in C#.

