

In this article, we will discuss how to use a MariaDB database with an ASP.NET Core Web API.
First, we will discuss what MariaDB is and how we include it in our application. Then, we will use the Entity Framework Core library to create a mapping between our Web API models and our MariaDB database. After that, we’ll implement methods for creating, reading, updating, and deleting data from our MariaDB database. Finally, we will test our Web API and its MariaDB integration using Postman.
Let’s dive in!
What is MariaDB?
MariaDB is an open-source fork of the MySQL relational database management system (RDBMS). It is currently actively maintained by the open-source community, led by many of the original developers of the MySQL database. In comparison to MySQL, MariaDB offers additional features, such as Galera, Sequences, and the UUID data type. Furthermore, MariaDB provides extra storage engines like ColumnStore, MyRocks, and Aria.
Now that we know what MariaDB is, let’s see how to download, install, and use it.
Preparation of MariaDB and ASP.NET Core App
First, let’s download MariaDB from the MariaDB download page. Next, we install it with the preselected default options on the installation menu. We need to make a note of the root user password we set during the installation.
It’s important to mention that the installation package includes the HeidiSQL app, a free GUI client for interacting with the MariaDB server. We can use this app to explore the databases we create.
Next up, let’s create an ASP.NET Core Web API project named UsingMariaDBWithASPNETCoreWebAPI:
dotnet new webapi --name UsingMariaDBWithASPNETCoreWebAPI
To learn how to do this from Visual Studio, please visit our guide on creating and configuring a new ASP.NET Core Web API project.
Setting Up the Entity Framework Core Library to Connect MariaDB with ASP.NET Core APP
Entity Framework (EF) Core is a library that we can utilize to access our database from our web API. When we use the EF Core library, we can choose to build our application using either the Database-First approach or the Code-First approach.
In the Database-First approach, we design our database first and then use EF Core to generate the tables and the context. In the Code-First approach, we create our models and context first, then we use EF Core to create the database schema and possibly add seed data to it. Here, we will use the Code-First approach.
That said, let’s now install the EF Core package from the operating system command line:
dotnet add package Microsoft.EntityFrameworkCore
As the next step, let’s install the Pomelo.EntityFrameworkCore.MySql database provider:
dotnet add package Pomelo.EntityFrameworkCore.MySql -v 8.0.0-beta.2
This NuGet package is the EF Core database provider for MariaDB and other MySQL-compatible databases.
We utilize the version -v 8.0.0-beta.2 modifier to specify the version of the provider. Using lower versions of this provider with version 8.0.0 of the Microsoft.EntityFrameworkCore.Tools package will cause an exception when we want to add our migrations.
Creating the Model
Now, let’s create a Models folder in our project’s base directory. In this folder, let’s define our model:
public class Student
{
    public int Id { get; set; }
    public string? FirstName { get; set; }
    public string? LastName { get; set; }
    public string? Address { get; set; }
}
Creating Our Context Class
The context class is an important part of our application that we use to communicate with our database. This class inherits the base EF Core DbContext class that contains details for configuring and accessing the database.
Let’s define a Context class named ApplicationContext in our Models folder:
public class ApplicationContext(DbContextOptions<ApplicationContext> options) : DbContext(options)
{
    public DbSet<Student> Students { get; set; }

    protected override void OnModelCreating(ModelBuilder modelBuilder)
    {
        modelBuilder.Entity<Student>().HasData(
            new Student
            {
                Id = 1,
                FirstName = "John",
                LastName = "Doe",
                Address = "123 Main St",
            },
            new Student
            {
                Id = 2,
                FirstName = "Jane",
                LastName = "Doe",
                Address = "456 Oak St",
            }
        );
    }
}
In this ApplicationContext class, we first establish a DbSet<Student> object named Students to represent our entity. The DbSet<T> class provides methods for executing CRUD operations on the corresponding database tables in our database. Then, we override the OnModelCreating() method, utilizing the HasData() method to add seed data to our Students table.
With that, let’s add our database connection string to the appsettings.json file:
{
  "Logging": {
    "LogLevel": {
      "Default": "Information",
      "Microsoft.AspNetCore": "Warning"
    }
  },
  "ConnectionStrings": {
    "StudentsConnection": "server=127.0.0.1;database=CodeMazeStudents;user=root;password=yourpassword;"
  },
  "AllowedHosts": "*"
}
In our connection string, we specify 127.0.0.1 (localhost) as the server. Then, we set the database name as CodeMazeStudents. If a database with that name exists on our server, we use it. Otherwise, MariaDB will create a new database for us. The password yourpassword corresponds to the one we noted during the MariaDB installation.
Now, we will move to the Program.cs file and register our ApplicationContext class as a service:
builder.Services.AddDbContext<ApplicationContext>(options =>
{
    var connectionString = builder.Configuration.GetConnectionString("StudentsConnection");
    options.UseMySql(connectionString, ServerVersion.AutoDetect(connectionString));
});
Here, we define the connection details for our ApplicationContext. First, we call the GetConnectionString() method, with the "StudentsConnection" argument, to retrieve the connection string from our appsettings.json file.
Subsequently, we configure our context to connect to a MySQL-compatible database by invoking the UseMySql() method. Here, we pass in the returned connection string, and the server version is automatically detected using the ServerVersion.AutoDetect() method.
Adding Migration and Updating the Database
We use the EF Core migrations feature to create and incrementally update our database schema based on our application’s models. To work with the migrations API, let’s install the Microsoft.EntityFrameworkCore.Tools NuGet package:
dotnet add package Microsoft.EntityFrameworkCore.Tools
Let’s now add our first migration:
dotnet ef migrations add FirstMigration
After that, let’s create our database and schema:
dotnet ef database update
With everything set, we can now view our database with HeidiSQL:

Now that we have seen what our database looks like, let’s move on to the data access of our application.
Integrating Our MariaDB Database With Our ASP.NET Core App
Now, let’s define our repository pattern logic for performing CRUD operations (Creating, Reading, Updating, and Deleting) on our CodeMazeStudents database. After that, we’ll proceed to define the logic for our Web API controller.
Creating the Repository Logic
To implement a simple repository pattern, first, let’s create a Contracts folder in our Models folder. Then, in this folder, let’s add an interface:
public interface IDataRepository
{
    Task<IEnumerable<Student>> GetAllAsync();
    Task<Student?> GetAsync(int id);
    Task AddAsync(Student entity);
    Task UpdateAsync(Student entityToUpdate, Student entity);
    Task DeleteAsync(Student entity);
}
This interface defines various asynchronous CRUD methods for data operations in our application. We will create a concrete class that implements this interface and uses our ApplicationContext to perform CRUD operations on our database.
For this, let’s create a DataRepository folder in the Models directory. In this folder, let’s define a StudentRepository class:
public class StudentRepository(ApplicationContext context) : IDataRepository
{
    readonly ApplicationContext _studentContext = context;

    public async Task AddAsync(Student entity)
    {
        _studentContext.Students.Add(entity);
        await _studentContext.SaveChangesAsync();
    }

    public async Task<Student?> GetAsync(int id) => await _studentContext.Students.FindAsync(id);

    public async Task UpdateAsync(Student entityToUpdate, Student entity)
    {
        entityToUpdate.FirstName = entity.FirstName;
        entityToUpdate.LastName = entity.LastName;
        entityToUpdate.Address = entity.Address;

        await _studentContext.SaveChangesAsync();
    }

    public async Task DeleteAsync(Student entity)
    {
        _studentContext.Remove(entity);
        await _studentContext.SaveChangesAsync();
    }

    public async Task<IEnumerable<Student>> GetAllAsync()
    {
        return await _studentContext.Students.ToListAsync<Student>();
    }
}
Here, we add logic for creating, reading, updating, and deleting student data. Additionally, we implement a method to retrieve all students in our database.
With that, let’s open the Program.cs file and register this class and the IDataRepository interface as a service:
builder.Services.AddScoped<IDataRepository, StudentRepository>();
Nice! Next up, let’s create our Web API controller and add action methods to it.
Adding Our Controller
Controllers enable us to process HTTP requests, validate our models, and send back responses to our users.
So, let’s add a StudentsController class to the Controllers folder in our project:
[Route("api/students")]
[ApiController]
public class StudentsController(IDataRepository dataRepository) : ControllerBase
{
    private readonly IDataRepository _dataRepository = dataRepository;
}
Next, let’s define a GetAllStudents() method in this controller:
[HttpGet]
public async Task<IActionResult> GetAllStudents()
{
    var students = await _dataRepository.GetAllAsync();

    return Ok(students);
}
Here, we call our data repository’s GetAllAsync() method to retrieve all the students in our database.
Now, let’s create a GetStudent() action method:
[HttpGet("{id}", Name = "GetStudent")]
public async Task<IActionResult> GetStudent(int id)
{
    var student = await _dataRepository.GetAsync(id);
    if (student is null)
    {
        return NotFound("Student not found.");
    }

    return Ok(student);
}
For this action method, we specify that it is an HttpGet method with an "{id}" template. We set the route name of this method to "GetStudent".
Then, we try to retrieve the student from the database by calling the GetAsync() method with the provided id. If the student is null, we return a 404 Not Found error. Otherwise, we call the Ok() method that returns an OkObjectResult object and a 200 OK status code.
Next, let’s define a PostStudent() method:
[HttpPost]
public async Task<IActionResult> PostStudent([FromBody] Student student)
{
    if (student is null)
    {
        return BadRequest("Student is null.");
    }
    await _dataRepository.AddAsync(student);

    return CreatedAtRoute("GetStudent", new { student.Id }, null);
}
If the student that we want to add to our MariaDB database is null, we return a 400 Bad Request error. If the student is not null, we add the student to our database and return a 201 Created status code.
Let’s now create a PutStudent() method in our controller:
[HttpPut("{id}")]
public async Task<IActionResult> PutStudent(int id, [FromBody] Student student)
{
    if (student is null)
    {
        return BadRequest("Student is null.");
    }

    var studentToUpdate = await _dataRepository.GetAsync(id);
    if (studentToUpdate is null)
    {
        return NotFound("The Student record couldn't be found.");
    }
    await _dataRepository.UpdateAsync(studentToUpdate, student);

    return NoContent();
}
Once again, if the incoming student is null, we return a 400 Bad Request error. Otherwise, we retrieve the existing student from the database. If we do not find the specified student, we return a 404 Not Found response.
Then, if the existing student is not null, we invoke our data repository’s UpdateAsync() method, passing in the existing student and the new student data. At the end, we return a 204 No Content response.
Finally, let’s define a DeleteStudent() action method:
[HttpDelete("{id}")]
public async Task<IActionResult> DeleteStudent(int id)
{
    var student = await _dataRepository.GetAsync(id);
    if (student is null)
    {
        return NotFound("The Student record couldn't be found.");
    }
    await _dataRepository.DeleteAsync(student);

    return NoContent();
}
In this method, we first retrieve the student from our database. If the student is null, we return a 404 Not Found response. Otherwise, we delete the student from our database and return a 204 No Content response.
Great! Our controller is now ready, and we can proceed to test our Web API and its interaction with our MariaDB database.
Testing the Web API With Postman
Now, let’s test our StudentsController endpoints with Postman.
First, let’s visit our GET https://localhost:7091/api/students endpoint and check the result:
[
    {
        "id": 1,
        "firstName": "John",
        "lastName": "Doe",
        "address": "123 Main St"
    },
    {
        "id": 2,
        "firstName": "Jane",
        "lastName": "Doe",
        "address": "456 Oak St"
    }
]
Next, let’s see what our GET https://localhost:7091/api/students/1 endpoint returns:
{
    "id": 1,
    "firstName": "John",
    "lastName": "Doe",
    "address": "123 Main St"
}
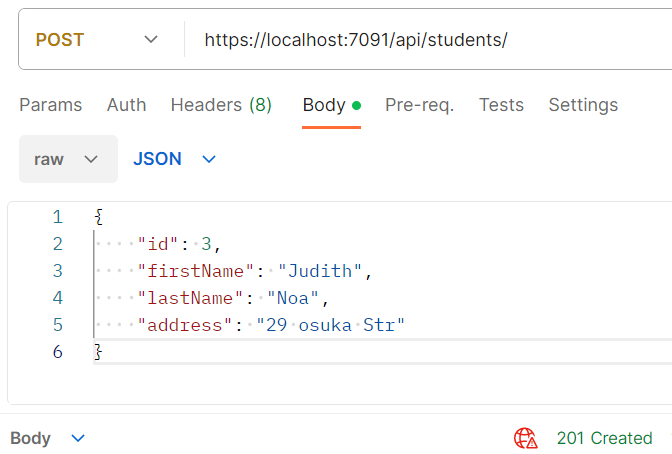
With that, let’s look at the result of visiting our POST endpoint:
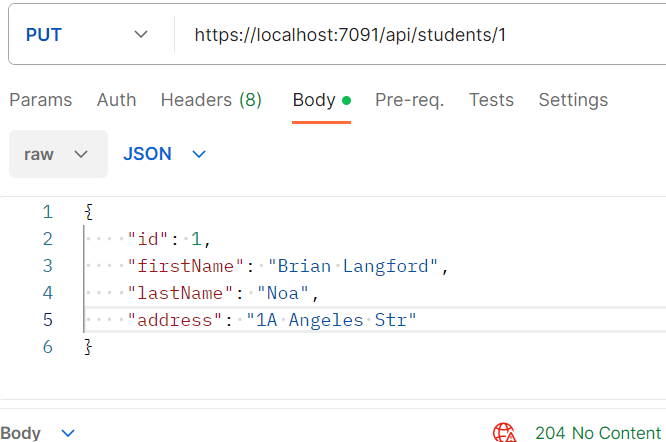
Now, let’s update our first student’s record:
Finally, let’s delete a student from our database:

That’s it. As we can see, all our endpoints are working perfectly.
Conclusion
In this article, we learned how to work with a MariaDB database in an ASP.NET Core Web API.
Using EF Core’s code-first approach, we began our database design by defining our database model and ApplicationContext. Then, we created and applied our migrations. We also implemented all the CRUD operations.
At the end, we used Postman to examine how our Web API interacts with our MariaDB database.
