

Having roles is always a good practice to increase security for our applications and protect some resources from even logged-in users. That said, in this article, we are going to implement the Angular Role-Based authorization and learn how to work with roles on both Angular and ASP.NET Core side.
Additionally, we are going to make use of Guards to create more secure route protections. We will learn how to use Guards and how to modify them to support roles.
Lastly, we are going to show you how to preserve the authentication state of our Angular application even if the user refreshes the page.
For complete navigation through the entire series, you can visit the Angular with ASP.NET Core Identity page.
Let’s get down to business.
Using Angular Guards to Secure Routes
Right now, if the user is not authorized but tries to access the Companies link, they will be redirected to the Login page. But for this to happen, the HTTP request has to reach the API, and our interceptor has to process the 401 response and navigate the user to the Login page. Well, we can make this more efficient by using Angular guards.
The first thing we have to do is to install the angular2-jwt library:
npm i @auth0/angular-jwt
Now, we can modify the app.module.ts file:
...
import { HttpClientModule, HTTP_INTERCEPTORS } from '@angular/common/http';
import { JwtModule } from "@auth0/angular-jwt";

...
import { NotFoundComponent } from './error-pages/not-found/not-found.component';

export function tokenGetter() {
  return localStorage.getItem("token");
}

@NgModule({
  declarations: [
    ...
  ],
  imports: [
    BrowserModule,
    HttpClientModule,
    RouterModule.forRoot([
      ...
    ]),
    JwtModule.forRoot({
      config: {
        tokenGetter: tokenGetter,
        allowedDomains: ["localhost:5001"],
        disallowedRoutesRoutes: []
      }
    })
  ],
  providers: [
    {
      provide: HTTP_INTERCEPTORS,
      useClass: ErrorHandlerService,
      multi: true
    }
  ],
  bootstrap: [AppComponent]
})
export class AppModule { }
With this in place, we can create our Guard service:
ng g guard shared/guards/auth --skip-tests
And choose to implement only the CanActivate interface.
Now, we can modify the authentication service:
...
import { JwtHelperService } from '@auth0/angular-jwt';

@Injectable({
  providedIn: 'root'
})
export class AuthenticationService {
  private _authChangeSub = new Subject<boolean>()
  public authChanged = this._authChangeSub.asObservable();

  constructor(private http: HttpClient, private envUrl: EnvironmentUrlService, private jwtHelper: JwtHelperService) { }

  ...

  public isUserAuthenticated = (): boolean => {
    const token = localStorage.getItem("token");

    return token && !this.jwtHelper.isTokenExpired(token);
  }

  private createCompleteRoute = (route: string, envAddress: string) => {
    return `${envAddress}/${route}`;
  }
}
And then, we can modify the guard:
import { Injectable } from '@angular/core';
import { CanActivate, ActivatedRouteSnapshot, RouterStateSnapshot, Router } from '@angular/router';
import { AuthenticationService } from '../services/authentication.service';

@Injectable({
  providedIn: 'root'
})
export class AuthGuard implements CanActivate {

  constructor(private authService: AuthenticationService, private router: Router){}

  canActivate(next: ActivatedRouteSnapshot, state: RouterStateSnapshot) {
    if (this.authService.isUserAuthenticated()) {
      return true;
    }

    this.router.navigate(['/authentication/login'], { queryParams: { returnUrl: state.url }});

    return false;
  }
}
As you can see, in this guard we use the state.url property to set it as a query parameter for our returnUrl property in the Login component. All the other parts of this service are already explained in the mentioned article.
After this, we can protect our route in the app.module.ts file:
RouterModule.forRoot([
  { path: 'home', component: HomeComponent },
  { path: 'company', loadChildren: () => import('./company/company.module').then(m => m.CompanyModule), canActivate: [AuthGuard] },
  { path: 'authentication', loadChildren: () => import('./authentication/authentication.module').then(m => m.AuthenticationModule) },
  { path: '404', component : NotFoundComponent},
  { path: '', redirectTo: '/home', pathMatch: 'full' },
  { path: '**', redirectTo: '/404', pathMatch: 'full'}
]),
Testing the Guard
If we start the Angular app and try to navigate to the Companies page, we are going to see the Login page:
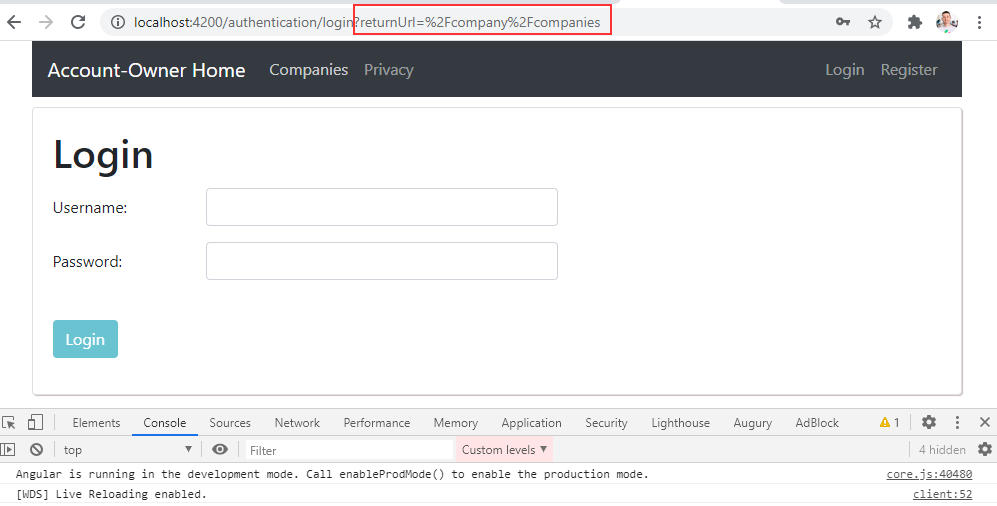
But this time, we didn’t send the request to the API, and also, we have the returnUrl parameter in the URI.
As soon as we enter valid credentials, the application navigates us to the Companies page and not to the Home Page. Moreover, we can see all the companies. This means the token is included in the HTTP request.
Adding Roles to the Web API
We already support roles in the Identity configuration:
services.AddIdentity<User, IdentityRole>(opt =>
{
    opt.Password.RequiredLength = 7;
    opt.Password.RequireDigit = false;

    opt.User.RequireUniqueEmail = true;
})
So, all we have to do is to add default roles in the database and include the role claim in the JWT.
First, let’s add a role configuration class in the Entities/Configuration folder:
public class RoleConfiguration : IEntityTypeConfiguration<IdentityRole>
{
    public void Configure(EntityTypeBuilder<IdentityRole> builder)
    {
        builder.HasData(
            new IdentityRole
            {
                Name = "Viewer",
                NormalizedName = "VIEWER"
            },
            new IdentityRole
            {
                Name = "Administrator",
                NormalizedName = "ADMINISTRATOR"
            }
        );
    }
}
Then, we have to modify the OnModelCreating method and run commands to create and execute migration:
protected override void OnModelCreating(ModelBuilder modelBuilder)
{
    base.OnModelCreating(modelBuilder);

    modelBuilder.ApplyConfiguration(new CompanyConfiguration());
    modelBuilder.ApplyConfiguration(new EmployeeConfiguration());
    modelBuilder.ApplyConfiguration(new RoleConfiguration());
}
PM> Add-Migration InitialRoleSeed

PM> Update-Database
Also, because we have one user in the database, let’s connect that user to the Administrator role:
INSERT INTO AspNetUserRoles
VALUES ('48d668ff-3d3e-4999-9592-ed116b69413b','91b8dbdd-50ed-4a9e-9bba-99ec95616787')
Of course, you will have different Id values for the User and the Role.
Modifying Register Action and Claims
After these changes, we are going to modify the RegisterUser action to include Visitor role for new users:
[HttpPost("Registration")]
public async Task<IActionResult> RegisterUser([FromBody] UserForRegistrationDto userForRegistration)
{
    if (userForRegistration == null || !ModelState.IsValid)
        return BadRequest();

    var user = _mapper.Map<User>(userForRegistration);

    var result = await _userManager.CreateAsync(user, userForRegistration.Password);
    if (!result.Succeeded)
    {
        var errors = result.Errors.Select(e => e.Description);

        return BadRequest(new RegistrationResponseDto { Errors = errors });
    }

    await _userManager.AddToRoleAsync(user, "Viewer");

    return StatusCode(201);
}
And let’s populate claims by modifying the JwtHandler class:
private readonly IConfiguration _configuration;
private readonly IConfigurationSection _jwtSettings;
private readonly UserManager<User> _userManager;
public JwtHandler(IConfiguration configuration, UserManager<User> userManager)
{
    _userManager = userManager;
    _configuration = configuration;
    _jwtSettings = _configuration.GetSection("JwtSettings");
}
...
public async Task<List<Claim>> GetClaims(User user)
{
    var claims = new List<Claim>
    {
        new Claim(ClaimTypes.Name, user.Email)
    };

    var roles = await _userManager.GetRolesAsync(user);
    foreach (var role in roles)
    {
        claims.Add(new Claim(ClaimTypes.Role, role));
    }

    return claims;
}
Here, we inject the UserManager class and use it to find all the user’s roles and add them to a list of claims.
Finally, in the Login action, we have to modify the call to the GetClaims method because it is now an async one:
var claims = await _jwtHandler.GetClaims(user);
That’s all it takes. We can move on to implement the Angular Role-Based authorization.
Implementing Angular Role-Based Authorization Part
To implement the Angular Role-Based authorization, we have to create a component that we are going to protect with roles. So, let’s create a privacy component:
ng g c privacy --skip-tests
After the component creation, we are going to create a simple logic to fetch the claims from the Web API’s action:
export class PrivacyComponent implements OnInit {

  public claims: [] = [];

  constructor(private _repository: RepositoryService) { }

  ngOnInit(): void {
    this.getClaims();
  }

  public getClaims = () =>{
    this._repository.getClaims('api/companies/privacy')
    .subscribe(res => {
      this.claims = res as [];
    })
  }
}
Of course, we have to add a new method in the repository file:
public getClaims = (route: string) => {
  return this.http.get(this.createCompleteRoute(route, this.envUrl.urlAddress));
}
Also, we need to slightly modify the privacy HTML file:
<section style="margin-left: 15px;">
    <h2>List of Claims</h2>

    <ul>
        <li *ngFor="let claim of claims">
            {{claim.type}} : {{claim.value}}
        </li>
    </ul>
</section>
Now, we have to add the route in the app.module.ts file:
RouterModule.forRoot([
  { path: 'home', component: HomeComponent },
  { path: 'company', loadChildren: () => import('./company/company.module').then(m => m.CompanyModule), canActivate: [AuthGuard] },
  { path: 'authentication', loadChildren: () => import('./authentication/authentication.module').then(m => m.AuthenticationModule) },
  { path: 'privacy', component: PrivacyComponent },
  { path: '404', component : NotFoundComponent},
  { path: '', redirectTo: '/home', pathMatch: 'full' },
  { path: '**', redirectTo: '/404', pathMatch: 'full'}
]),
And let’s modify menu.component.html file:
<li class="nav-item">
  <a class="nav-link" [routerLink]="['/privacy']" routerLinkActive="active"
    [routerLinkActiveOptions]="{exact: true}"> Privacy </a>
</li>
Finally, for this to work, we have to create action on the server-side. We are going to create it in the Companies controller:
[HttpGet("Privacy")]
[Authorize]
public IActionResult Privacy()
{
    var claims = User.Claims
        .Select(c => new { c.Type, c.Value })
        .ToList();

    return Ok(claims);
}
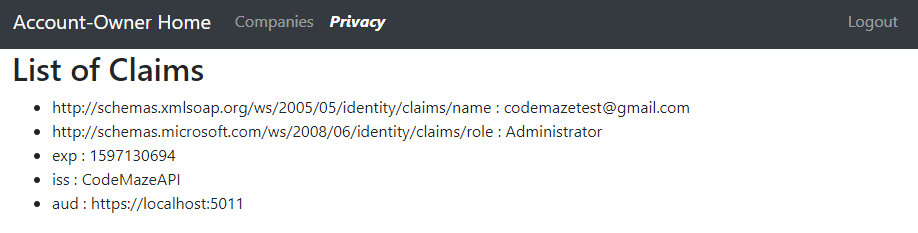
Here, we just return all the claims to the client application in a key-value format.
Now, if we start both applications and log in successfully, we can visit the Privacy page and see our claims:
Of course, if you are not logged in and try to click the Privacy link, you will be directed to the Login page. You won’t be able to see the returnUrl parameter because we are not handling it in our Interceptor service. But if you want to implement that, all you have to do is to add a small change in the handleUnauthorized function:
private handleUnauthorized = (error: HttpErrorResponse) => {
  if(this.router.url === '/authentication/login') {
    return 'Authentication failed. Wrong Username or Password';
  }
  else {
    this.router.navigate(['/authentication/login'], { queryParams: { returnUrl: this.router.url }});
    return error.message;
  }
}
Now, let’s modify the [Authorize] attribute for the Privacy action to support roles:
[HttpGet("Privacy")]
[Authorize(Roles = "Administrator")]
public IActionResult Privacy()
With this modification, we state that only Administrators can access this action.
If we register a new “test user” for our application, log in with that user and try to access the Privacy page, we are going to get an error message:
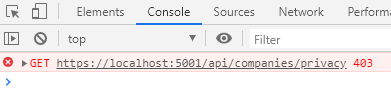
This means access is forbidden for the user. Since our new user has the Viewer role, it is clear why we get this type of error.
This works as expected but, we don’t want this type of behavior. The better approach to handling this is to have a Forbidden page.
Handling Angular Role-Based Authorization Error with a Forbidden Page
Let’s start with the component creation:
ng g c forbidden --skip-tests
Then, we can add the route to this component in the app.module.ts file:
{ path: 'forbidden', component: ForbiddenComponent },
Now, we can modify the forbidden.component.ts file:
import { Component, OnInit } from '@angular/core';
import { Router, ActivatedRoute } from '@angular/router';

@Component({
  selector: 'app-forbidden',
  templateUrl: './forbidden.component.html',
  styleUrls: ['./forbidden.component.css']
})
export class ForbiddenComponent implements OnInit {
  private returnUrl: string;

  constructor( private router: Router, private route: ActivatedRoute) { }

  ngOnInit(): void {
    this.returnUrl = this.route.snapshot.queryParams['returnUrl'] || '/';
  }

  public navigateToLogin = () => {
    this.router.navigate(['/authentication/login'], { queryParams: { returnUrl: this.returnUrl }});
  }
}
This is a pretty simple logic where we fetch the returnUrl from the ActivatedRoute class and in the navigateToLogin function, we just navigate to the Login page with the query parameter.
After this, we have to modify the forbidden.component.html page:
<h2>Forbidden</h2>
<p>
    This page is forbidden for you. Please <button class="btn btn-link" (click)="navigateToLogin()">log in with a different user</button>
    to access the requested page.
</p>
Of course, we have to handle this in the error handler service and with the guard as well.
Let’s first start with the error-handler.service.ts file modification:
private handleError = (error: HttpErrorResponse) : string => {
    if(error.status === 404) {
      return this.handleNotFound(error);
    }
    else if(error.status === 400) {
      return this.handleBadRequest(error);
    }
    else if(error.status === 401) {
      return this.handleUnauthorized(error);
    }
    else if(error.status === 403) {
      return this.handleForbidden(error);
    }
  }

  private handleForbidden = (error: HttpErrorResponse) => {
    this.router.navigate(["/forbidden"], { queryParams: { returnUrl: this.router.url }});
    return "Forbidden";
  }
Now, if we log in with a test user and try to access the privacy page, we are going to see the Forbidden page with the returnUrl parameter:
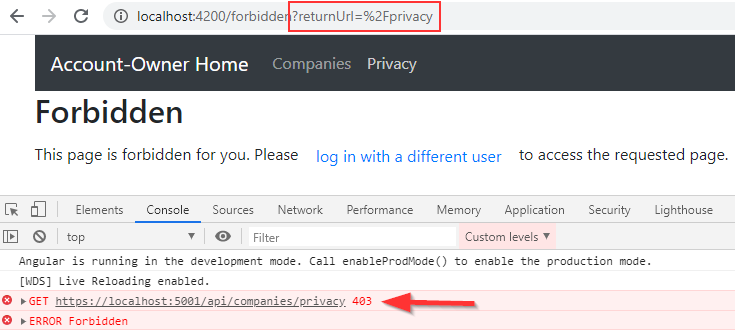
Of course, as soon as we log in with the administrator’s credentials, we are going to see the Privacy page.
Using Guards to Implement the Angular Role-Based Authorization
We can improve our Angular Role-Based authorization by using Guards and thus preventing the request to reach the server at all.
To implement this, we can modify the existing guard file or we can create a new one.
In this article, we are going to create a new one.
So, let’s start with a creation:
ng g guard shared/guards/admin --skip-tests
And choose the CanActivate implementation.
Then, let’s add a new function to the authentication.service.ts file:
public isUserAdmin = (): boolean => {
  const token = localStorage.getItem("token");
  const decodedToken = this.jwtHelper.decodeToken(token);
  const role = decodedToken['http://schemas.microsoft.com/ws/2008/06/identity/claims/role']

  return role === 'Administrator';
}
Here we decode our token, extract the role, and return the comparison result.
Now, we can implement the guard file:
import { Injectable } from '@angular/core';
import { CanActivate, ActivatedRouteSnapshot, RouterStateSnapshot, Router } from '@angular/router';
import { AuthenticationService } from '../services/authentication.service';

@Injectable({
  providedIn: 'root'
})
export class AdminGuard implements CanActivate {

  constructor(private authService: AuthenticationService, private router: Router) {}

  canActivate(next: ActivatedRouteSnapshot, state: RouterStateSnapshot) {
    if(this.authService.isUserAdmin())
      return true;

    this.router.navigate(['/forbidden'], { queryParams: { returnUrl: state.url }});
    return false;
  }
}
And, let’s protect the Privacy route:
{ path: 'privacy', component: PrivacyComponent, canActivate: [AuthGuard, AdminGuard] },
Great.
Let’s try it now:
As we can see, if we try to navigate to the Privacy page without logging in, we are going to be redirected to the Login page. If we enter the test user’s credentials, we are going to be navigated to the Forbidden page. But if we log in with a user with sufficient rights, we can see the Privacy page.
Excellent.
This works like a charm.
Preserving Authentication State in the Angular Application
Right now if we log in and right away refresh our application, we are going to see the Login and Register links, even though we have the valid token (not expired) in the Local Storage.
Of course, we can leave it as-is and make the user repeat the Login action. But, if we want to preserve the authentication state of the application, we have to make a few changes.
First, let’s modify the menu.component.ts file:
constructor(private authService: AuthenticationService, private router: Router) {
  this.authService.authChanged
  .subscribe(res => {
    this.isUserAuthenticated = res;
  })
}
After this change, we have to modify the app.component.ts file:
import { Component, OnInit } from '@angular/core';
import { AuthenticationService } from './shared/services/authentication.service';

@Component({
  selector: 'app-root',
  templateUrl: './app.component.html',
  styleUrls: ['./app.component.css']
})
export class AppComponent implements OnInit {
  title = 'AngularClient';

  constructor(private authService: AuthenticationService){}

  ngOnInit(): void {
    if(this.authService.isUserAuthenticated())
      this.authService.sendAuthStateChangeNotification(true);
  }
}
Here, as soon as our component initializes, we check if the user is authenticated. If the check passes, we sand the observable notification to the menu component.
And that’s it.
Now, we can log in and refresh the page. We are still going to see just the Logout link. Of course, if we do the same action after 5 minutes, we are going to see the Login and Register links because our token is not valid anymore.
Conclusion
There we go.
We have covered a lot of ground here and learned how to implement roles in our Angular application. Also, we have learned how to use interceptors and guards to increase the protection of our application.
In the next article, we are going to learn how to implement the Password Reset functionality with Angular and ASP.NET Core Identity.
So, see you there.

