

It is always a good practice to provide the possibility for the users to reset their password if they want to change it or they forgot it. That said, in this article, we are going to learn how to implement Angular password reset functionality with ASP.NET Core Identity.
Because we have an entire series related to ASP.NET Core Identity, we won’t dive deep into explanations regarding the ASP.NET Core Identity part. Of course, we will show all the required code in this article, but for further explanations, you can visit the mentioned article.
For complete navigation through the entire series, you can visit the Angular with ASP.NET Core Identity page.
Let’s move on.
Enabling an Email Service Inside the Application
In the password reset flow, we are going to send an email message with the required parameters to the user. To send that message, we must have an Email service. Because creating such a service is not a topic of this article, we are going to include the service we already created in our Send an Email Message from ASP.NET Core article. So, to learn more about the email service logic, you can read the linked article.
We strongly suggest reading the linked article to see how to enable the Application password feature for Gmail to be able to send emails with less secure apps. You can’t use your own passwords anymore as Google has blocked the usage of less secure apps in Gmail.
To start, let’s add an existing project to the Web API solution and reference the Email service in the main project.
Now, let’s modify the appsettings.json file by providing the necessary data for the email service:
"EmailConfiguration": {
    "From": "[email protected]",
    "SmtpServer": "smtp.gmail.com",
    "Port": 465,
    "Username": "[email protected]",
    "Password": "app password"
  },
After that, we have to register our email service in the Program class:
builder.Services.AddScoped<JwtHandler>();

var emailConfig = builder.Configuration
    .GetSection("EmailConfiguration")
    .Get<EmailConfiguration>();
builder.Services.AddSingleton(emailConfig);
builder.Services.AddScoped<IEmailSender, EmailSender>();

builder.Services.AddControllers();
And that’s all it takes.
We can inject this service in the Accounts controller:
private readonly UserManager<User> _userManager;
private readonly IMapper _mapper;
private readonly JwtHandler _jwtHandler;
private readonly IEmailSender _emailSender;

public AccountsController(UserManager<User> userManager, IMapper mapper, JwtHandler jwtHandler, IEmailSender emailSender)
{
    _userManager = userManager;
    _mapper = mapper;
    _jwtHandler = jwtHandler;
    _emailSender = emailSender;
}
This service is ready to use and we can move on.
Adding the Forgot Password Functionality
To transfer the data between the client and the server, we need to have a specific DTO. So, let’s create the ForgotPasswordDto class in the Entities/DataTransferObjects folder:
public class ForgotPasswordDto
{
    [Required]
    [EmailAddress]
    public string? Email { get; set; }

    [Required]
    public string? ClientURI { get; set; }
}
Here we have both the Email and ClientURI properties because we are going to require them both when sending an email message to the user.
Now, we have to add the ForgotPassword action inside the AccountsController:
[HttpPost("ForgotPassword")]
public async Task<IActionResult> ForgotPassword([FromBody] ForgotPasswordDto forgotPasswordDto)
{
    if (!ModelState.IsValid)
        return BadRequest();

    var user = await _userManager.FindByEmailAsync(forgotPasswordDto.Email);
    if (user == null)
        return BadRequest("Invalid Request");

    var token = await _userManager.GeneratePasswordResetTokenAsync(user);
    var param = new Dictionary<string, string?>
    {
        {"token", token },
        {"email", forgotPasswordDto.Email }
    };

    var callback = QueryHelpers.AddQueryString(forgotPasswordDto.ClientURI, param);
    var message = new Message(new string[] { user.Email }, "Reset password token", callback, null);

    await _emailSender.SendEmailAsync(message);

    return Ok();
}
In this action, we fetch the user from the database, create a token, and use the QueryHelpers class to create the URI with two query parameters. After that, we just call the SendEmailAsync method to send an email and return the 200 status code.
You can see that if we don’t find a user in the database, we don’t send the NotFound response, but just the BadRequest. This is for security reasons if someone is trying to hack the account and just guessing the email address.
Now, to enable the token creation, we have to register a default token provider:
builder.Services.AddIdentity<User, IdentityRole>(opt =>
{
    ...
}).AddEntityFrameworkStores<RepositoryContext>()
    .AddDefaultTokenProviders();

builder.Services.Configure<DataProtectionTokenProviderOptions>(opt =>
    opt.TokenLifespan = TimeSpan.FromHours(2));
Additionally, we set the lifespan of this token to two hours.
Great.
We can send the Post request:

We can see the request is successful.
Let’s also check our email:
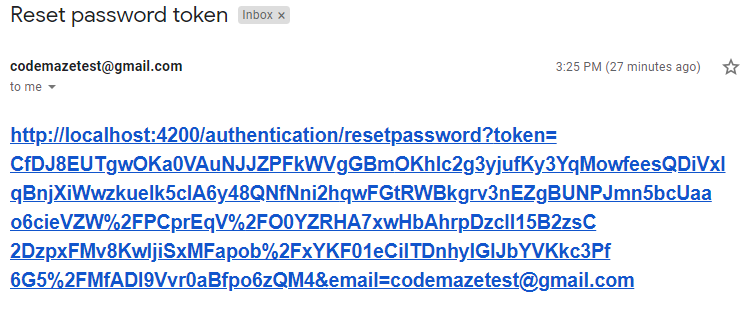
The link is here with two query parameters.
Just one note here. If you are using Gmail and you get an error about less secure apps, all you have to do is to sign in to your Gmail account, follow this link and turn on the allow option.
Forgot Password on the Angular Side
We can’t complete the Angular reset password functionality without the forgot password part.
To start, we have to create a new interface:
export interface ForgotPassword {
    email: string;
    clientURI: string;
}
Then, let’s create a new component under the authentication module:
ng g c authentication/forgot-password --skip-tests
After that, we are going to create a route in the authentication.module.ts file:
RouterModule.forChild([
  { path: 'register', component: RegisterUserComponent },
  { path: 'login', component: LoginComponent },
  { path: 'forgotpassword', component: ForgotPasswordComponent }
])
We also need a way to send an HTTP request to our action. So, let’s modify the authentication service file:
public forgotPassword = (route: string, body: ForgotPasswordDto) => {
  return this.http.post(this.createCompleteRoute(route, this.envUrl.urlAddress), body);
}
Now, we can modify the forgot-password.component.html file:
<div class="card">
    <div class="card-body">
        <h1 class="card-title">Forgot Password</h1>

        <div *ngIf="showError" class="alert alert-danger" role="alert">
            {{errorMessage}}
        </div>

        <div *ngIf="showSuccess" class="alert alert-success" role="alert">
            {{successMessage}}
        </div>

        <form [formGroup]="forgotPasswordForm" autocomplete="off" novalidate (ngSubmit)="forgotPassword(forgotPasswordForm.value)">
            <div class="mb-3 row">
                <label for="email" class="col-form-label col-sm-2">Email:</label>
                <div class="col-md-5">
                    <input type="text" id="email" formControlName="email" class="form-control" />
                </div>
                <div class="col-md-5">
                    <em *ngIf="validateControl('email') && hasError('email', 'required')">Email is required</em>
                </div>
            </div>
            <br>
            <div class="mb-3 row">
                <div class="col-md-1">
                    <button type="submit" class="btn btn-info" [disabled]="!forgotPasswordForm.valid">Submit</button>
                </div>
            </div>
        </form>
    </div>
</div>
Here, we only have one input field with the Submit button. Also, we have placeholders for the success and error messages.
After the HTML file, we have to modify the forgot-password.component.ts file:
import { HttpErrorResponse } from '@angular/common/http';
import { ForgotPasswordDto } from './../../_interfaces/resetPassword/forgotPasswordDto.model';
import { AuthenticationService } from './../../shared/services/authentication.service';
import { Component, OnInit } from '@angular/core';
import { FormGroup, FormControl, Validators } from '@angular/forms';

@Component({
  selector: 'app-forgot-password',
  templateUrl: './forgot-password.component.html',
  styleUrls: ['./forgot-password.component.css']
})
export class ForgotPasswordComponent implements OnInit {
  forgotPasswordForm: FormGroup
  successMessage: string;
  errorMessage: string;
  showSuccess: boolean;
  showError: boolean;

  constructor(private _authService: AuthenticationService) { }

  ngOnInit(): void {
    this.forgotPasswordForm = new FormGroup({
      email: new FormControl("", [Validators.required])
    })
  }

  public validateControl = (controlName: string) => {
    return this.forgotPasswordForm.get(controlName).invalid && this.forgotPasswordForm.get(controlName).touched
  }

  public hasError = (controlName: string, errorName: string) => {
    return this.forgotPasswordForm.get(controlName).hasError(errorName)
  }

  public forgotPassword = (forgotPasswordFormValue) => {
    this.showError = this.showSuccess = false;
    const forgotPass = { ...forgotPasswordFormValue };

    const forgotPassDto: ForgotPasswordDto = {
      email: forgotPass.email,
      clientURI: 'http://localhost:4200/authentication/resetpassword'
    }

    this._authService.forgotPassword('api/accounts/forgotpassword', forgotPassDto)
    .subscribe({
      next: (_) => {
      this.showSuccess = true;
      this.successMessage = 'The link has been sent, please check your email to reset your password.'
    },
    error: (err: HttpErrorResponse) => {
      this.showError = true;
      this.errorMessage = err.message;
    }})
  }
}
This code is pretty similar to the previous ones we had in the Login and Register forms. We have our validation functions and the forgotPassword function that triggers when the user clicks the Submit button. Pay attention that we hardcode the clientURI property, but you can always create the client root URI in the environment file and use it here. That’s something we would always suggest. For the sake of simplicity, we are going to keep it as-is.
Finally, we have to modify the login.component.html file, to add the link to the forgot password page:
<div>
  <a [routerLink]="['/authentication/forgotpassword']"> Forgot Password </a>
</div>
<br>
<div class="mb-3 row">
  <div class="col-md-1">
    <button type="submit" class="btn btn-info" [disabled]="!loginForm.valid">Login</button>
  </div>
</div>
We just add a new link above the Login button.
Testing Forgot Password Functionality
Let’s start both applications and navigate to the Login page:
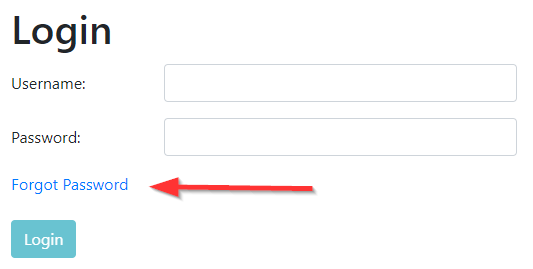
After we click that link, the app navigates us to the required page. There, we can enter an invalid email and press the Submit button:
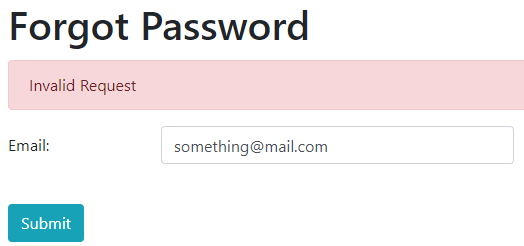
We can see the error message.
Now, let’s enter the valid email:
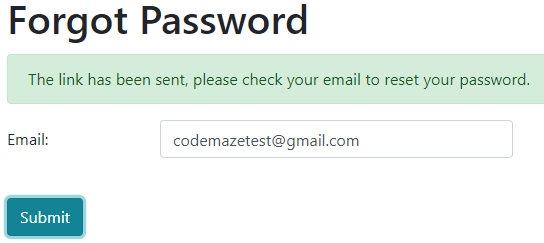
And we can see the success message. Of course, we can check our email and we will find the link inside the email message.
Reset Password Functionality with ASP.NET Core Web API
The first thing, we have to do is to create a new DTO class:
public class ResetPasswordDto
{
    [Required(ErrorMessage = "Password is required")]
    public string? Password { get; set; }

    [Compare("Password", ErrorMessage = "The password and confirmation password do not match.")]
    public string? ConfirmPassword { get; set; }

    public string? Email { get; set; }
    public string? Token { get; set; }
}
After this, we can implement the ResetPassword action in the AccountsController:
[HttpPost("ResetPassword")]
public async Task<IActionResult> ResetPassword([FromBody]ResetPasswordDto resetPasswordDto)
{
    if (!ModelState.IsValid)
        return BadRequest();

    var user = await _userManager.FindByEmailAsync(resetPasswordDto.Email);
    if (user == null)
        return BadRequest("Invalid Request");

    var resetPassResult = await _userManager.ResetPasswordAsync(user, resetPasswordDto.Token, resetPasswordDto.Password);
    if (!resetPassResult.Succeeded)
    {
        var errors = resetPassResult.Errors.Select(e => e.Description);

        return BadRequest(new { Errors = errors });
    }

    return Ok();
}
In this action, if the model is invalid or we can’t find the user by their email, we return BadRequest. If these checks pass, we try resetting the password. If this action is not successful, we collect all the errors and return them to a client. Otherwise, we return 200 status code.
Angular Password Reset Functionality Implementation
The Angular forgot password part is prepared, so we can continue towards the Angular password reset functionality.
Let’s start with the interface creation:
export interface ResetPasswordDto {
    password: string;
    confirmPassword: string;
    email: string;
    token: string;
}
Then, let’s create the reset-password component files:
ng g c authentication/reset-password --skip-tests
Right after the component creation, we are going to add the route to it:
RouterModule.forChild([
    { path: 'register', component: RegisterUserComponent },
    { path: 'login', component: LoginComponent },
    { path: 'forgotpassword', component: ForgotPasswordComponent },
    { path: 'resetpassword', component: ResetPasswordComponent }
  ])
]
Of course, we need a way to send the request to the API. So, let’s modify the Authentication service:
public resetPassword = (route: string, body: ResetPasswordDto) => {
  return this.http.post(this.createCompleteRoute(route, this.envUrl.urlAddress), body);
}
After that, we can modify the reset-password.component.html file:
<div class="card">
    <div class="card-body">
        <h1 class="card-title">Reset Password</h1>

        <div *ngIf="showError" class="alert alert-danger" role="alert">
            <span [innerHTML]="errorMessage"></span>
        </div>

        <div *ngIf="showSuccess" class="alert alert-success" role="alert">
            Your password has been reset. Please <a [routerLink]="['/authentication/login']"> click here to log in. </a>
        </div>

        <form [formGroup]="resetPasswordForm" autocomplete="off" novalidate (ngSubmit)="resetPassword(resetPasswordForm.value)">
            <div class="mb-3 row">
                <label for="password" class="col-form-label col-sm-2">Password:</label>
                <div class="col-md-5">
                    <input type="password" id="password" formControlName="password" class="form-control" />
                </div>
                <div class="col-md-5">
                    <em *ngIf="validateControl('password') && hasError('password', 'required')">Password is required</em>
                </div>
            </div>
            <div class="mb-3 row">
                <label for="confirm" class="col-form-label col-sm-2">Confirm Password:</label>
                <div class="col-md-5">
                    <input type="password" id="confirm" formControlName="confirm" class="form-control" />
                </div>
                <div class="col-md-5">
                    <em *ngIf="validateControl('confirm') && hasError('confirm', 'required')">Confirmation is required</em>
                    <em *ngIf="hasError('confirm', 'mustMatch')">Passwords must match</em>
                </div>
            </div>
            <br>
            <div class="mb-3 row">
                <div class="col-md-1">
                    <button type="submit" class="btn btn-info" [disabled]="!resetPasswordForm.valid">Submit</button>
                </div>
            </div>
        </form>
    </div>
</div>
In this form, we conditionally generate success and error messages that we are going to show depending on the response from the server. Also, we have the password and confirm password fields as we had in the register form.
To continue, we are going to modify the reset-password.component.ts file:
import { ResetPasswordDto } from './../../_interfaces/resetPassword/resetPasswordDto.model';
import { ActivatedRoute } from '@angular/router';
import { PasswordConfirmationValidatorService } from './../../shared/custom-validators/password-confirmation-validator.service';
import { AuthenticationService } from './../../shared/services/authentication.service';
import { FormGroup, FormControl, Validators } from '@angular/forms';
import { Component, OnInit } from '@angular/core';

@Component({
  selector: 'app-reset-password',
  templateUrl: './reset-password.component.html',
  styleUrls: ['./reset-password.component.css']
})
export class ResetPasswordComponent implements OnInit {
  resetPasswordForm: FormGroup;
  showSuccess: boolean;
  showError: boolean;
  errorMessage: string;

  private token: string;
  private email: string;

  constructor(private authService: AuthenticationService, private passConfValidator: PasswordConfirmationValidatorService,
    private route: ActivatedRoute) { }

    ngOnInit(): void {
      this.resetPasswordForm = new FormGroup({
        password: new FormControl('', [Validators.required]),
        confirm: new FormControl('')
    });

    this.resetPasswordForm.get('confirm').setValidators([Validators.required,
      this.passConfValidator.validateConfirmPassword(this.resetPasswordForm.get('password'))]);

      this.token = this.route.snapshot.queryParams['token'];
      this.email = this.route.snapshot.queryParams['email'];
  }
}
Here, we create a required form group with all the controls inside. Also, we register the custom validation for the “confirm password”. Of course, because we access this page with the email link that contains two parameters (token and email), we extract these parameters to the local properties.
Now, we need a way to validate our controls and a function to reset the password:
public validateControl = (controlName: string) => {
  return this.resetPasswordForm.get(controlName).invalid && this.resetPasswordForm.get(controlName).touched
}

public hasError = (controlName: string, errorName: string) => {
  return this.resetPasswordForm.get(controlName).hasError(errorName)
}

public resetPassword = (resetPasswordFormValue) => {
  this.showError = this.showSuccess = false;
  const resetPass = { ... resetPasswordFormValue };

  const resetPassDto: ResetPasswordDto = {
    password: resetPass.password,
    confirmPassword: resetPass.confirm,
    token: this.token,
    email: this.email
  }

  this.authService.resetPassword('api/accounts/resetpassword', resetPassDto)
  .subscribe({
    next:(_) => this.showSuccess = true,
  error: (err: HttpErrorResponse) => {
    this.showError = true;
    this.errorMessage = err.message;
  }})
}
At this point, all of these are pretty familiar to us.
One last thing.
Let’s just modify the error-handler service, to enable the 400 error handler for this route as well:
private handleBadRequest = (error: HttpErrorResponse): string => {
  if(this.router.url === '/authentication/register' ||
     this.router.url.startsWith('/authentication/resetpassword')) {
    let message = '';
    const values = Object.values(error.error.errors);
    values.map((m: string) => {
       message += m + '<br>';
    })

    return message.slice(0, -4);
  }
  else{
    return error.error ? error.error : error.message;
  }
}
Great job.
It’s time to test this.
Testing Angular Reset Password Functionality
Following the steps from the previous example, let’s acquire an email for the reset password.
Once we click the link, a new tab will open with the reset password form. Pay attention to the URI bar – you will see both parameters inside the link.
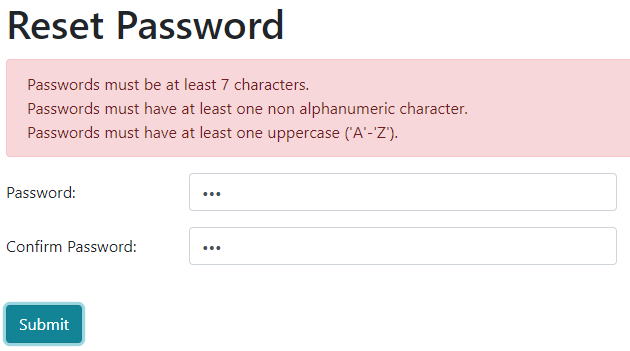
If we try entering an invalid password, we are going to see an error message:
But if we enter a valid password, we are going to see the success message:
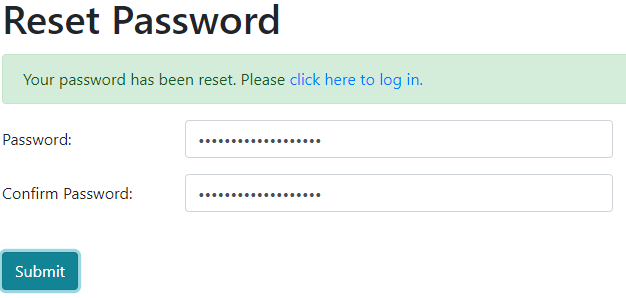
Once we click the provided link, we can enter new credentials and we will be logged in. Of course, try the previous password, to see that you can’t log in anymore.
Conclusion
Awesome.
We did a great job implementing Angular Reset Password functionality with the help of the ASP.NET Core Identity library.
Through this step-by-step guide, you have learned how to implement different actions to complete the reset password functionality on both Angular and Web API sides.
In the next article, we are going to learn about the Angular Email Confirmation functionality.
So, see you there.

