

Right now, we have a way to register new users in our application. But these users don’t have the option to log in or log out from our application. So, creating Angular Authentication functionality (Login and Logout) will be the main goal for this article. As in the previous articles, we are going to use the ASP.NET Core Identity library to help us in the process.
For complete navigation through the entire series, you can visit the Angular with ASP.NET Core Identity page.
Let’s get going.
Integrating JWT in the Web API Project
We are going to use tokens to transfer information to the client-side application and back to the server-side. So for that, we have to integrate JWT into our Web API application.
We won’t dive deep into the JWT explanations because we have detailed articles related to that topic (Jwt Authentication Part1, Part2, Part3). So, if you want to read more about JWT, feel free to read them.
That said, let’s start by installing the Microsoft.AspNetCore.Authentication.JwtBearer library in the main project:
![]()
After the installation, we are going to add the configuration parameters in the appsettings.json file:
{
  "Logging": {
    "LogLevel": {
      "Default": "Information",
      "Microsoft": "Warning"
    }
  },
  "ConnectionStrings": {
    "sqlConnection": "server=.; database=CompanyEmployees; Integrated Security=true"
  },
  "JWTSettings": {
    "securityKey": "CodeMazeSecretKey",
    "validIssuer": "CodeMazeAPI",
    "validAudience": "https://localhost:5011",
    "expiryInMinutes": 5
  },
  "AllowedHosts": "*"
}
Then, let’s modify the Program class and register the JWT authentication right below the AddEntityFrameworkStores<RepositoryContext>() method:
var jwtSettings = builder.Configuration.GetSection("JwtSettings");
builder.Services.AddAuthentication(opt =>
{
    opt.DefaultAuthenticateScheme = JwtBearerDefaults.AuthenticationScheme;
    opt.DefaultChallengeScheme = JwtBearerDefaults.AuthenticationScheme;
}).AddJwtBearer(options =>
{
    options.TokenValidationParameters = new TokenValidationParameters
    {
        ValidateIssuer = true,
        ValidateAudience = true,
        ValidateLifetime = true,
        ValidateIssuerSigningKey = true,
        ValidIssuer = jwtSettings["validIssuer"],
        ValidAudience = jwtSettings["validAudience"],
        IssuerSigningKey = new SymmetricSecurityKey(Encoding.UTF8
            .GetBytes(jwtSettings.GetSection("securityKey").Value))
    };
});
Also, we have to add Authentication and Authorization to the request pipeline:
app.UseAuthentication();
app.UseAuthorization();
Lastly, let’s protect the CompaniesController from unauthorized access:
[Route("api/companies")]
[Authorize]
[ApiController]
public class CompaniesController : ControllerBase
That’s all we need.
We can move on to the Login implementation.
Web API’s Login Implementation
Before we start working on the Angular authentication functionality, we need to have a server-side logic to handle the authentication request.
That said, let’s start with two DTO classes inside the Entities/DataTransferObjects folder:
public class UserForAuthenticationDto
{
    [Required(ErrorMessage = "Email is required.")]
    public string? Email { get; set; }
    [Required(ErrorMessage = "Password is required.")]
    public string? Password { get; set; }
}

public class AuthResponseDto
{
    public bool IsAuthSuccessful { get; set; }
    public string? ErrorMessage { get; set; }
    public string? Token { get; set; }
}
Now, we are going to create a new JwtFeatures folder and inside a new JwtHandler class:
public class JwtHandler
{
    private readonly IConfiguration _configuration;
    private readonly IConfigurationSection _jwtSettings;

    public JwtHandler(IConfiguration configuration)
    {
        _configuration = configuration;
        _jwtSettings = _configuration.GetSection("JwtSettings");
    }

    public SigningCredentials GetSigningCredentials()
    {
        var key = Encoding.UTF8.GetBytes(_jwtSettings.GetSection("securityKey").Value);
        var secret = new SymmetricSecurityKey(key);

        return new SigningCredentials(secret, SecurityAlgorithms.HmacSha256);
    }

    public List<Claim> GetClaims(IdentityUser user)
    {
        var claims = new List<Claim>
        {
            new Claim(ClaimTypes.Name, user.Email)
        };

        return claims;
    }

    public JwtSecurityToken GenerateTokenOptions(SigningCredentials signingCredentials, List<Claim> claims)
    {
        var tokenOptions = new JwtSecurityToken(
            issuer: _jwtSettings["validIssuer"],
            audience: _jwtSettings["validAudience"],
            claims: claims,
            expires: DateTime.Now.AddMinutes(Convert.ToDouble(_jwtSettings["expiryInMinutes"])),
            signingCredentials: signingCredentials);

        return tokenOptions;
    }
}
In this class, we create several methods to help us with the authentication process. We fetch the SigningCredentials, the list of claims, and create a JwtSecurityToken. Again all of these are explained in our Jwt with ASP.NET Core article.
To continue, we can register JwtHandler as a service:
builder.Services.AddScoped<JwtHandler>();
After that, we can inject this service inside the AccountsController:
private readonly UserManager<User> _userManager;
private readonly IMapper _mapper;
private readonly JwtHandler _jwtHandler;

public AccountsController(UserManager<User> userManager, IMapper mapper, JwtHandler jwtHandler)
{
    _userManager = userManager;
    _mapper = mapper;
    _jwtHandler = jwtHandler;
}
And we can add the Login action to the same controller:
[HttpPost("Login")]
public async Task<IActionResult> Login([FromBody] UserForAuthenticationDto userForAuthentication)
{
    var user = await _userManager.FindByNameAsync(userForAuthentication.Email);

    if (user == null || !await _userManager.CheckPasswordAsync(user, userForAuthentication.Password))
        return Unauthorized(new AuthResponseDto { ErrorMessage = "Invalid Authentication" });

    var signingCredentials = _jwtHandler.GetSigningCredentials();
    var claims = _jwtHandler.GetClaims(user);
    var tokenOptions = _jwtHandler.GenerateTokenOptions(signingCredentials, claims);
    var token = new JwtSecurityTokenHandler().WriteToken(tokenOptions);

    return Ok(new AuthResponseDto { IsAuthSuccessful = true, Token = token });
}
With the help of UserManager, we fetch the user by calling the FindByNameAsync method. If the user doesn’t exist, we return an unauthorized response. Otherwise, we use our JwtHandler class to get all the information we require, create a token and return it as a part of our response.
Now, we can test this functionality:
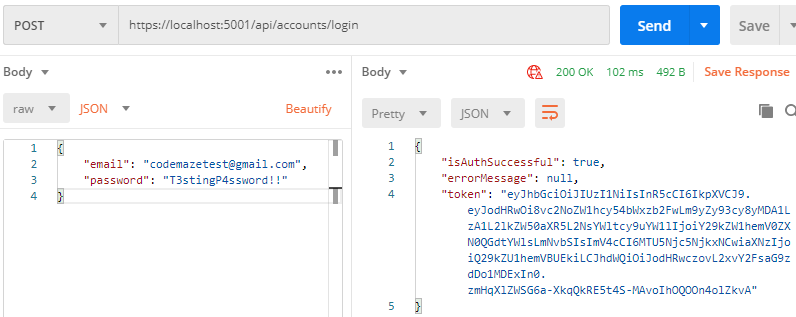
With this out of the way, we can move on to the Angular authentication functionality.
Angular Authentication Functionality – Creating the Login Action
Let’s start with the interface creation.
In the _interfaces/user folder, we are going to create the userForAuthenticationDto interface:
export interface UserForAuthenticationDto {
    email: string;
    password: string;
}
We need one more interface under the _interfaces/response folder:
export interface AuthResponseDto {
    isAuthSuccessful: boolean;
    errorMessage: string;
    token: string;
}
After this, we have to modify the authentication.service.ts file by adding a new loginUser function:
public loginUser = (route: string, body: UserForAuthenticationDto) => {
  return this.http.post<AuthResponseDto>(this.createCompleteRoute(route, this.envUrl.urlAddress), body);
}
Now, we are going to create the Login component files:
ng g c authentication/login --skip-tests
Before we move on with the Login component implementation, let’s add the route to this component inside the authentication.module.ts file:
RouterModule.forChild([
  { path: 'register', component: RegisterUserComponent },
  { path: 'login', component: LoginComponent }
])
Excellent.
We are ready to modify the login.component.ts file:
import { HttpErrorResponse } from '@angular/common/http';
import { AuthResponseDto } from './../../_interfaces/response/authResponseDto.model';
import { UserForAuthenticationDto } from './../../_interfaces/user/userForAuthenticationDto.model';
import { Router, ActivatedRoute } from '@angular/router';
import { AuthenticationService } from './../../shared/services/authentication.service';
import { Component, OnInit } from '@angular/core';
import { FormGroup, FormControl, Validators } from '@angular/forms';

@Component({
  selector: 'app-login',
  templateUrl: './login.component.html',
  styleUrls: ['./login.component.css']
})
export class LoginComponent implements OnInit {
  private returnUrl: string;

  loginForm: FormGroup;
  errorMessage: string = '';
  showError: boolean;

  constructor(private authService: AuthenticationService, private router: Router, private route: ActivatedRoute) { }

  ngOnInit(): void {
    this.loginForm = new FormGroup({
      username: new FormControl("", [Validators.required]),
      password: new FormControl("", [Validators.required])
    })
    this.returnUrl = this.route.snapshot.queryParams['returnUrl'] || '/';
  }

  validateControl = (controlName: string) => {
    return this.loginForm.get(controlName).invalid && this.loginForm.get(controlName).touched
  }

  hasError = (controlName: string, errorName: string) => {
    return this.loginForm.get(controlName).hasError(errorName)
  }

  loginUser = (loginFormValue) => {
    this.showError = false;
    const login = {... loginFormValue };

    const userForAuth: UserForAuthenticationDto = {
      email: login.username,
      password: login.password
    }

    this.authService.loginUser('api/accounts/login', userForAuth)
    .subscribe({
      next: (res:AuthResponseDto) => {
       localStorage.setItem("token", res.token);
       this.router.navigate([this.returnUrl]);
    },
    error: (err: HttpErrorResponse) => {
      this.errorMessage = err.message;
      this.showError = true;
    }})
  }
}
Here, we create the FormGroup object populated with both controls. Also, we create the returnUrl parameter to navigate the user to the requested location once they log in successfully. The validateControl and hasError functions are familiar ones. Since these two functions repeat in both the register and login components, you can extract them to a separate class. For the sake of simplicity, we are going to leave this implementation as-is.
In the loginUser function, we extract the value from the Login form and send the request to the API. If it is successful, we store the token in the local storage and redirect the user. Otherwise, we just show the error message.
Of course, we have to modify the login.component.html file:
<div class="card">
  <div class="card-body">
      <h1 class="card-title">Login</h1>

      <div *ngIf="showError" class="alert alert-danger" role="alert">
          {{errorMessage}}
      </div>

      <form [formGroup]="loginForm" autocomplete="off" novalidate (ngSubmit)="loginUser(loginForm.value)">
          <div class="mb-3 row">
              <label for="username" class="col-form-label col-sm-2">Username:</label>
              <div class="col-md-5">
                  <input type="text" id="username" formControlName="username" class="form-control" />
              </div>
              <div class="col-md-5">
                  <em *ngIf="validateControl('username') && hasError('username', 'required')">Username is required</em>
              </div>
          </div>
          <div class="mb-3 row">
              <label for="password" class="col-form-label col-sm-2">Password:</label>
              <div class="col-md-5">
                  <input type="password" id="password" formControlName="password" class="form-control" />
              </div>
              <div class="col-md-5">
                  <em *ngIf="validateControl('password') && hasError('password', 'required')">Password is required</em>
              </div>
          </div>
          <br>
          <div class="mb-3 row">
              <div class="col-md-1">
                  <button type="submit" class="btn btn-info" [disabled]="!loginForm.valid">Login</button>
              </div>
          </div>
      </form>
  </div>
</div>
This is a familiar code, with two controls and the Login button.
Testing the Login Functionality
Let’s start the API and the Angular application. Then, we have to navigate to the http://localhost:4200/authentication/login because we don’t have the login link yet:

If we try to leave these controls empty, we are going to see validation messages:
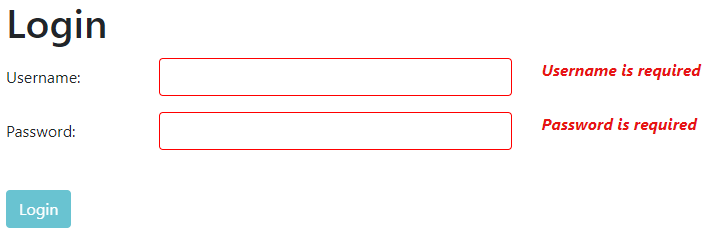
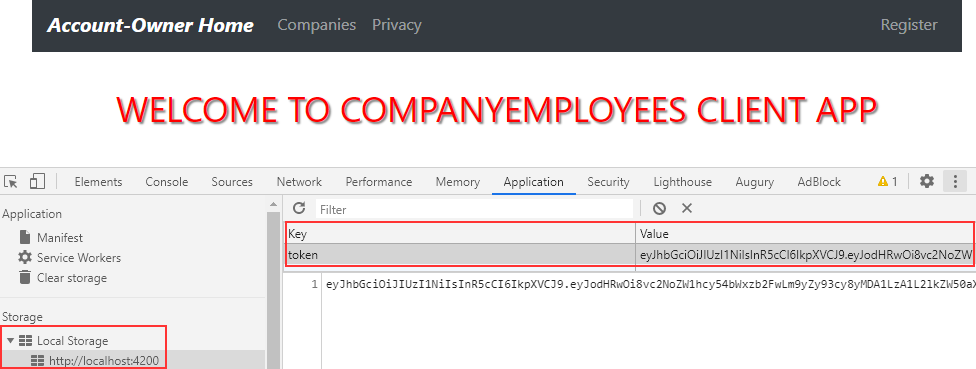
But, if we enter valid credentials, the application navigates us to the Home page with the token stored in the Local Storage:
The login action works, but we still have tasks to complete.
Modifying Menu After the Angular Authentication State Changes
Right now, we only have the Register link displayed on the navigation menu. But what we want is to display the Login and Register buttons if the user is not authenticated and otherwise to display the Logout button.
To do that, we are going to start with authentication.service.ts file modification.
First, let’s create an observable to notify all the subscribed components about the Angular authentication state change:
...
import { Subject } from 'rxjs';
@Injectable({
  providedIn: 'root'
})
export class AuthenticationService {
  private authChangeSub = new Subject<boolean>()
  public authChanged = this.authChangeSub.asObservable();

  constructor(private http: HttpClient, private envUrl: EnvironmentUrlService) { }
  ...
  public sendAuthStateChangeNotification = (isAuthenticated: boolean) => {
    this.authChangeSub.next(isAuthenticated);
  }
  private createCompleteRoute = (route: string, envAddress: string) => {
    return `${envAddress}/${route}`;
  }
}
With this in place, we can modify the loginUser function:
.subscribe({
      next: (res:AuthResponseDto) => {
       localStorage.setItem("token", res.token);
       this.authService.sendAuthStateChangeNotification(res.isAuthSuccessful);
       this.router.navigate([this.returnUrl]);
    },
Here, we send the notification to the subscribed components.
Now, let’s continue with the menu.component.ts modification:
import { AuthenticationService } from './../shared/services/authentication.service';
import { Component, OnInit } from '@angular/core';

@Component({
  selector: 'app-menu',
  templateUrl: './menu.component.html',
  styleUrls: ['./menu.component.css']
})
export class MenuComponent implements OnInit {
  public isUserAuthenticated: boolean;

  constructor(private authService: AuthenticationService) { }

  ngOnInit(): void {
    this.authService.authChanged
    .subscribe(res => {
      this.isUserAuthenticated = res;
    })
  }

}
We inject the Authentication service and subscribe to the observable notification sent from that service.
Now, we can modify the menu.component.html file:
<form class="form-inline my-2 my-lg-0">
  <ul *ngIf='!isUserAuthenticated' class="navbar-nav mr-auto mt-2 mt-lg-0">
    <li class="nav-item">
      <a class="nav-link"[routerLink]="['/authentication/login']" routerLinkActive="active"
        [routerLinkActiveOptions]="{exact: true}">Login</a>
    </li>
    <li class="nav-item">
      <a class="nav-link"[routerLink]="['/authentication/register']" routerLinkActive="active"
        [routerLinkActiveOptions]="{exact: true}">Register</a>
    </li>
  </ul>
  <ul *ngIf='isUserAuthenticated' class="navbar-nav mr-auto mt-2 mt-lg-0">
    <li class="nav-item">
      <button class="btn btn-link" style="color: #ffffff80;">Logout</button>
    </li>
  </ul>
</form>
And that’s it.
If we log in successfully, we are going to see the Logout button for sure:

Great job.
Modifying Registration Logic
Since we have the Login component in place, we don’t have to log the success message after successful registration, we can navigate to the Login page.
All we have to do is to inject the Router class in the register-user.component.ts file:
constructor(private authService: AuthenticationService, private passConfValidator: PasswordConfirmationValidatorService,
    private router: Router) { }
And to modify the subscribe part of the registerUser function:
next: (_) => this.router.navigate(["/authentication/login"]),
As you can see, it doesn’t get easier than that.
We can move on to the Logout implementation.
Angular Authentication Functionality – Implementing the Logout Action
To implement the Logout action in our Angular application, we have to add a new function in the Authentication service:
public logout = () => {
  localStorage.removeItem("token");
  this.sendAuthStateChangeNotification(false);
}
Here, we just remove the token from the storage and send an authentication change notification to the subscribed components (in this case only the menu component).
That said, we are going to modify the menu.component.ts file:
constructor(private authService: AuthenticationService, private router: Router) { }

ngOnInit(): void {
  this.authService.authChanged
  .subscribe(res => {
    this.isUserAuthenticated = res;
  })
}

public logout = () => {
  this.authService.logout();
  this.router.navigate(["/"]);
}
And finally, we have to modify the HTML file:
<ul *ngIf='isUserAuthenticated' class="navbar-nav mr-auto mt-2 mt-lg-0">
  <li class="nav-item">
    <button class="btn btn-link" style="color: #ffffff80;" (click)="logout()">Logout</button>
  </li>
</ul>
That’s it.
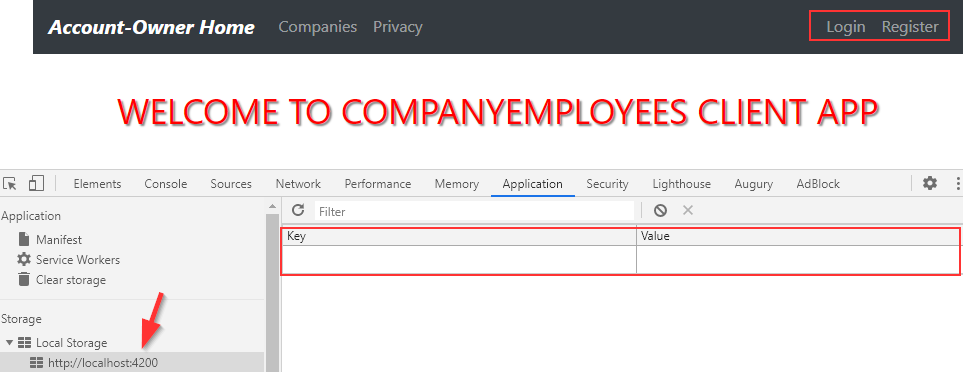
Now, as soon as we click the Logout link, the token will be removed from the storage, the Logout link will disappear and our application will redirect the user to the Home page:
Let’s move on.
Handling Angular Authentication Errors
We have working Login and Logout actions prepared for the Angular Authentication process, but there are still missing pieces. One of those is error handling and showing an error message on the Login page.
We are going to handle the rest of the missing pieces in the next article (Roles, Guards, Refresh app state…).
If we try to log in with invalid credentials, we are going to see a red empty square on the page:
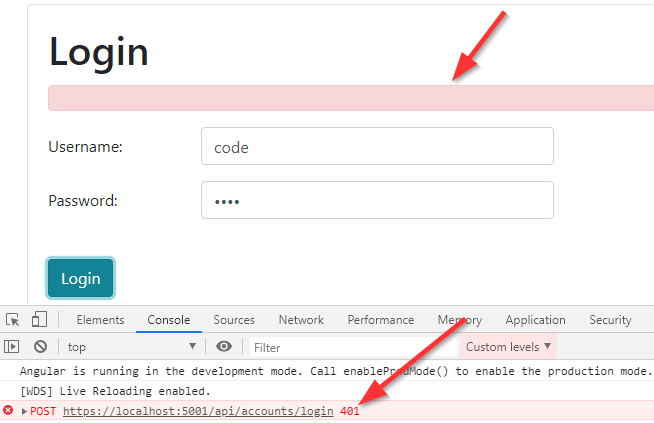
Right away, we can see why the error message is not displayed on the page. It’s because we only handle the 404 and 400 errors, and this error is 401 – Unauthorized.
To fix this, we have to modify the error-handler.service.ts file:
private handleError = (error: HttpErrorResponse) : string => {
  if(error.status === 404) {
    return this.handleNotFound(error);
  }
  else if(error.status === 400) {
    return this.handleBadRequest(error);
  }
  else if(error.status === 401) {
    return this.handleUnauthorized(error);
  }
}

private handleUnauthorized = (error: HttpErrorResponse) => {
  if(this.router.url === '/authentication/login') {
    return 'Authentication failed. Wrong Username or Password';
  }
  else {
    this._router.navigate(['/authentication/login']);
    return error.message;
  }
}
If our service intercepts the response with the 401 error message, it will check whether we are already on the Login page or not. If we are on the Login page, we just return the error message. Otherwise, we redirect the user to the Login page.
Now if we test this:
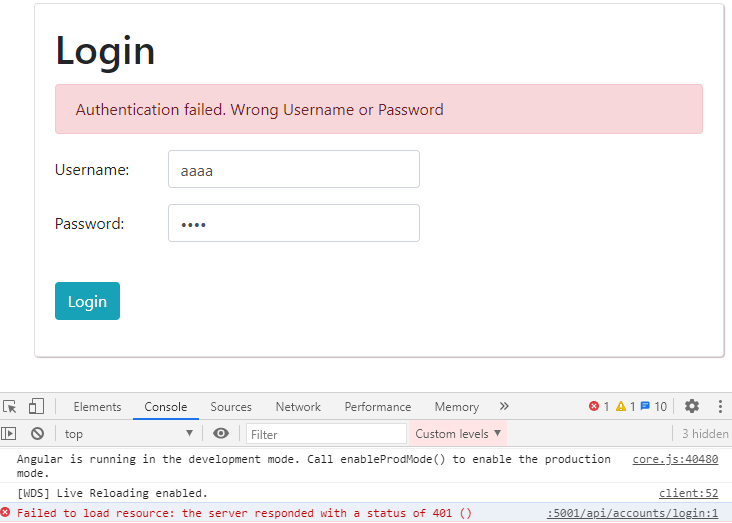
We can see the error message in place.
Nicely done.
Conclusion
We could say that we have everything in place regarding the Login and Logout actions and partially we would be right. We have implemented a lot of actions in this article but there are still things that need to be covered.
So, in the next article, we are going to learn how to work with Roles, how to protect our routes with Guards, and also how to preserve Angular Authentication state upon the application refresh.
As you can see a lot more to work with.
That said, see you in the next article.

good
Hello, Thank you for this tutorial, it is awesome. The only problem that I am having so far is that after I login successfully, I see the token but I am not able to access pages decorated with [Authorize] in the API.
Hello Eric. I can hardly know why is that, but you can always download our source code and compare it with yours. This usually helps
Sorry, I know my question was bogus but I couldn’t pinpoint the issue but I finally figured it out. You are not passing the token in the headers from the front end to the API so you will always get a 401 response when calling the companies controller, you have a token in local storage but doing nothing with it. You are missing this or something like it:
public getData = (route: string) => {
const headers = new HttpHeaders({
‘Content-Type’: ‘application/json’,
‘Authorization’: ‘Bearer ‘ + localStorage.getItem(‘token’)
})
return this.http.get<Company[]>(this.createCompleteRoute(route, this.envUrl.urlAddress), { headers: headers });
}
Hello Eric. I get it. But I have to tell you that you are going ahead of yourself here a bit 🙂 In this article, I’ve shown how to create an authentication part on both sides, and that works great. I didn’t show how to access protected routes. And you are right, here, I am not using a token in my HTTP requests, because I have no HTTP requests (other than login) yet. But if you check the next article in the series, you will see that I use this library: @auth0/angular-jwt. With it and its setup in the app module, the token will be automatically stored inside the request, so you don’t have to do it manually.
got ya, thanks, loving this series so far. Wish I would’ve known the next article addressed that.
Great tutorial. Thanks!
Quick question: How can we handle when someone copy the token (by F12 > Local Storage) and pass to another computer then impersonate the user without login?
If someone does that then your app has nothing to do with it. If your user is ready to risk his private data inside the token by sharing it with another user, that should be out of the scope of your app.
Thanks for your reply. The funny thing is… it is our company IT security team concerns. Anyway you would like to propose to resolve this?
My company is enforcing Okta SSO. Without keeping the token at client SPA, we can only keep the token in server side… but that will incur a lot of traffic between client and server. Any better proposal?
Well, not that I have any proposal for that or a solution. I didn’t work with Okta, but I’ve been working with IS4 and Duende and they are storing some tokens in the browser but just the session storage, not the local storage.
Hi Wthank you for this tutorial. I have a problem. Ahen I try to go to address authentication / login I have a blank page. Zero error and does not fall into any breakpoints in the ts file. Could the backend (.net) also have any impact on this? Everything partly angular seems to me 1: 1 with your code
No. On that page you have no connection to the backend untill you press the login button.
Isn’t it possible to implement below code in the authentication-service instead of the menu-component.ts?
Any component then only needs to query the authenticationService.isAuthenticated boolean. Subscribing already takes place in the service
authentication-service.ts
…….
private authenticationChangedSubject = new Subject()
public authenticationChanged$ = this.authenticationChangedSubject.asObservable();
public isAuthenticated= false;
……..
this.authenticationChanged$
.subscribe(res => {
this.isAuthenticated = res;
});
menu.component.ts
….
if (this.authenticationService.isAuthenticated) {
}
…..
Well, my implementation is there to show our readers how something can be done. Than it is up to you guys to use it that way or to make your own implementation. I am pretty sure you can do all the stuff you want with the code as long as you think it is well organized and it works 🙂 So, just try the implementation and see how it works.
I have got the following error, can you suggest solution.
Error: src/app/authentication/login/login.component.ts:47:42 – error TS2339: Property ‘token’ does not exist on type ‘Object’.
localStorage.setItem(“token”, res.token);
Please download our source code and compare the solution. It is the easiest way to find the thing you are missing.
I had the same issue with res.token and res.isAuthSuccessful. I resolved the issue by replacing these with res[‘token’] and res[‘isAuthSuccessful’]. I do not know if this could cause problems down the road, but it works for me for now!
To fix this issue you can add the type of the response object to the post method:
return this._http.post<LoginResponseDto>(url, body);
Seems like i get logged out whenever i refresh the page…
In the next article of this series you will find a solution for that. Somwhere at the end. Just keep up with all the articles.
Aha, thank you! However, how “good” of an idea is it to use localstorage instead of cookies?
Well, that is a question where there is no a short answer. This really depends on a number of circumstances. If you wanna be more secure you can always go with session-storage, but maybe the best way is to do some google search about that topic and see for your self. Basically, to answer your question, I would have to write a new article here 🙂
Thanks for the article. I tried it, only error I found is in the loginUser function. The property for auth success in “res” is “isAuthSuccessful” so the correct line is: this._authService.sendAuthStateChangeNotification(res.isAuthSuccessful);
Hi Zoltan. Yeah, it was my typo. Thanks for that.