

In this article, we are going to learn about User Registration with Angular and ASP.NET Core Web API. As you might guess from the title of this article, we are going to utilize the ASP.NET Core Identity library to help us in the process.
For complete navigation through the entire series, you can visit the Angular with ASP.NET Core Identity page.
That said, let’s get started.
Integration of ASP.NET Core Identity and the Web API Project
In this section, we are going to install and prepare everything required for the ASP.NET Core Identity library to work inside the Web API project.
Now, let’s start with the library installation:

After the installation, we are going to create a new User class in the Entities/Models folder:
public class User : IdentityUser
{
    public string? FirstName { get; set; }
    public string? LastName { get; set; }
}
We can see this class inherits from the IdentityUser class. You can read more about the IdentityUser class by reading the linked article.
After this modification, we are going to modify the RepositoryContext class:
public class RepositoryContext : IdentityDbContext<User>
{
    public RepositoryContext(DbContextOptions options)
    : base(options)
    {
    }

    protected override void OnModelCreating(ModelBuilder modelBuilder)
    {
        base.OnModelCreating(modelBuilder);

        modelBuilder.ApplyConfiguration(new CompanyConfiguration());
        modelBuilder.ApplyConfiguration(new EmployeeConfiguration());
    }

    public DbSet<Company> Companies { get; set; }
    public DbSet<Employee> Employees { get; set; }
}
With this out of the way, we have to register ASP.NET Core Identity in the Program class:
builder.Services.AddIdentity<User, IdentityRole>()
    .AddEntityFrameworkStores<RepositoryContext>();
This will require several imported namespaces:
using CompanyEmployees.Entities.Models;
using CompanyEmployees.Repository;
using Microsoft.AspNetCore.Identity;
With all these in place, we can create the required tables in our database.
Since our starting project already has migration files for the initial data, all we have to do is to run the Update-Database command. This will create a new CompanyEmployee database with some initial data inside.
After that, we can create migration files for our ASP.NET Core Identity tables:
PM> Add-Migration IdentityTablesCreation

PM> Update-Database
If we inspect our database now, we are going to find all the AspNet tables next to the Company and Employee tables.
User Registration With ASP.NET Core Web API
Inside the DataTransferObjects folder, we are going to create the UserForRegistrationDto class:
using System.ComponentModel.DataAnnotations;
...

public class UserForRegistrationDto
{
    public string? FirstName { get; set; }

    public string? LastName { get; set; }

    [Required(ErrorMessage = "Email is required.")]
    public string? Email { get; set; }

    [Required(ErrorMessage = "Password is required")]
    public string? Password { get; set; }

    [Compare("Password", ErrorMessage = "The password and confirmation password do not match.")]
    public string? ConfirmPassword { get; set; }
}
Right after this class, we are going to create another one to transfer the result of the registration action to the Angular application:
public class RegistrationResponseDto
{
    public bool IsSuccessfulRegistration { get; set; }
    public IEnumerable<string>? Errors { get; set; }
}
Next, we are going to create a new Accounts API empty controller and add the RegisterUser action:
[Route("api/accounts")]
[ApiController]
public class AccountsController : ControllerBase
{
    private readonly UserManager<User> _userManager;
    private readonly IMapper _mapper;

    public AccountsController(UserManager<User> userManager, IMapper mapper)
    {
        _userManager = userManager;
        _mapper = mapper;
    }

    [HttpPost("Registration")]
    public async Task<IActionResult> RegisterUser([FromBody] UserForRegistrationDto userForRegistration)
    {
        if (userForRegistration == null || !ModelState.IsValid)
            return BadRequest();

        var user = _mapper.Map<User>(userForRegistration);

        var result = await _userManager.CreateAsync(user, userForRegistration.Password);
        if (!result.Succeeded)
        {
            var errors = result.Errors.Select(e => e.Description);

            return BadRequest(new RegistrationResponseDto { Errors = errors });
        }

        return StatusCode(201);
    }
}
In this controller, we inject the UserManager class from the ASP.NET Core Identity and the IMapper interface from the Automapper library.
Inside the action, we check our DTO class. If it is not valid, we return a bad request. After that, we map our DTO object to the User object and call the CreateAsync method to create a new user in our database. If unsuccessful, we extract errors and return them to the RegistrationResponseDto object. Otherwise, we return the 201 status code.
Of course, don’t forget the namespaces:
using AutoMapper;
using CompanyEmployees.Entities.DataTransferObjects;
using CompanyEmployees.Entities.Models;
using Microsoft.AspNetCore.Identity;
Moreover, for the mapping action to work, we have to add a new rule to the MappingProfile class:
public MappingProfile()
{
    CreateMap<Company, CompanyDto>()
        .ForMember(c => c.FullAddress,
            opt => opt.MapFrom(x => string.Join(' ', x.Address, x.Country)));

    CreateMap<UserForRegistrationDto, User>()
        .ForMember(u => u.UserName, opt => opt.MapFrom(x => x.Email));
}
That’s it.
For now, we are not going to modify the password policy configuration, we are going to leave it as is. But if you want to play around with it, we highly recommend reading the Registration with ASP.NET Core Identity article. There, you will learn how to modify the password policy and how to require a unique email address for a new user. Also, you will learn more about the UserManager class.
Testing the API
Now, we can test this functionality by sending two requests.
First, we are going to send the request with the wrong password:
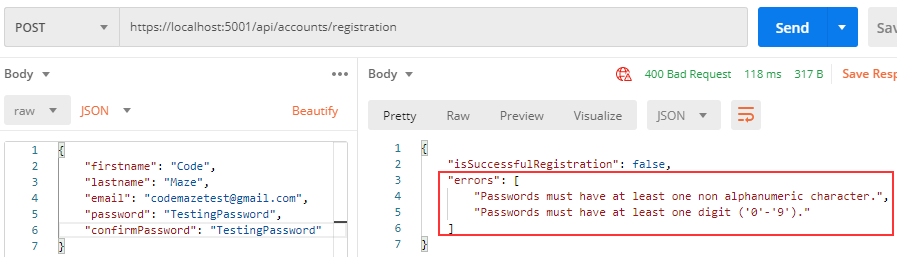
As a result, we can see the error messages in the response.
The next request is going to be a valid one:
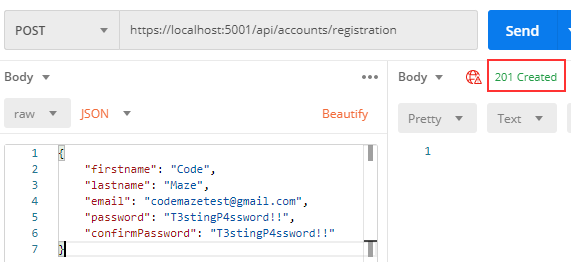
There we go.
Our user is successfully created. You can check the AspNetUsers table in the database.
User Registration With Angular – Interfaces, AuthService, and Authentication Module
We have already prepared a starter Angular application and you can find it under the start folder in our repository. There, we have some basic structure and functionalities to fetch all the companies from the database. If you start the Web API application and the Angular application and navigate to the Companies link, you will see the companies listed on the page.
Now, we are going to start adding new stuff to this application.
First, let’s create two new folders (user and response) under the _interfaces folder.
Inside the user folder, we are going to create the userForRegistrationDto interface:
export interface UserForRegistrationDto {
    firstName: string;
    lastName: string;
    email: string;
    password: string;
    confirmPassword: string;
}
Then, inside the response folder, we are going to create the registrationResponseDto interface:
export interface RegistrationResponseDto {
    isSuccessfulRegistration: boolean;
    errros: string[];
}
We are going to use these interfaces to transfer data between our two applications.
Now, we have to create the Authentication service:
ng g service shared/services/authentication --skip-tests
After the creation, we can modify it:
import { UserForRegistrationDto } from './../../_interfaces/user/userForRegistrationDto.model';
import { RegistrationResponseDto } from './../../_interfaces/response/registrationResponseDto.model';
import { HttpClient } from '@angular/common/http';
import { Injectable } from '@angular/core';
import { EnvironmentUrlService } from './environment-url.service';

@Injectable({
  providedIn: 'root'
})
export class AuthenticationService {

  constructor(private http: HttpClient, private envUrl: EnvironmentUrlService) { }

  public registerUser = (route: string, body: UserForRegistrationDto) => {
    return this.http.post<RegistrationResponseDto> (this.createCompleteRoute(route, this.envUrl.urlAddress), body);
  }

  private createCompleteRoute = (route: string, envAddress: string) => {
    return `${envAddress}/${route}`;
  }
}
Here, we import all the required services and interfaces and inject the HttpClient and the EnvironemntUrlService inside the constructor. This service is already a part of the starter application. Inside the registerUser function, we just use the post function to send the POST request to the Web API. We can also find a private createCompleteRoute function that is just a helper function to create a complete route from the API’s root address and the endpoint part.
Next, we are going to create a new Authentication module:
ng g module authentication
We are doing this because we won’t require an authenticated user to access the Home page. That said, we want to load all the authentication components only when they are required and we are going to achieve that with the lazy loading feature.
Now, let’s create a new RegisterUser component:
ng g c authentication/register-user --skip-tests
After the component creation, we have to modify the authentication.module.ts file to add the route:
import { NgModule } from '@angular/core';
import { CommonModule } from '@angular/common';
import { RegisterUserComponent } from './register-user/register-user.component';
import { RouterModule } from '@angular/router';

@NgModule({
  declarations: [RegisterUserComponent],
  imports: [
    CommonModule,
    RouterModule.forChild([
      { path: 'register', component: RegisterUserComponent },
    ])
  ]
})
export class AuthenticationModule { }
For the sake of simplicity, we are keeping our routes inside the module file. Of course, if you want, you can always create a new routing module file.
Now, we have to modify the imports array in the app.module.ts file:
imports: [
  BrowserModule,
  HttpClientModule,
  RouterModule.forRoot([
    { path: 'home', component: HomeComponent },
    { path: 'company', loadChildren: () => import('./company/company.module').then(m => m.CompanyModule) },
    { path: 'authentication', loadChildren: () => import('./authentication/authentication.module').then(m => m.AuthenticationModule) },
    { path: '404', component : NotFoundComponent},
    { path: '', redirectTo: '/home', pathMatch: 'full' },
    { path: '**', redirectTo: '/404', pathMatch: 'full'}
])
Here, we use the loadChildren function to specify the lazy load route from the authentication module file. Also, we can see already registered routes for the Home page and the NotFound page.
RegisterUser Component Implementation
The user registration with Angular is going to have a main implementation inside the RegisterUser component. So, to start with the implementation, we have to modify the register-user.component.ts file:
import { HttpErrorResponse } from '@angular/common/http';
import { Component, OnInit } from '@angular/core';
import { UserForRegistrationDto } from './../../_interfaces/user/userForRegistrationDto.model';
import { AuthenticationService } from './../../shared/services/authentication.service';
import { FormControl, FormGroup, Validators } from '@angular/forms';

@Component({
  selector: 'app-register-user',
  templateUrl: './register-user.component.html',
  styleUrls: ['./register-user.component.css']
})
export class RegisterUserComponent implements OnInit {
  registerForm: FormGroup;

  constructor(private authService: AuthenticationService) { }

  ngOnInit(): void {
    this.registerForm = new FormGroup({
      firstName: new FormControl(''),
      lastName: new FormControl(''),
      email: new FormControl('', [Validators.required, Validators.email]),
      password: new FormControl('', [Validators.required]),
      confirm: new FormControl('')
    });
  }

  public validateControl = (controlName: string) => {
    return this.registerForm.get(controlName).invalid && this.registerForm.get(controlName).touched
  }

  public hasError = (controlName: string, errorName: string) => {
    return this.registerForm.get(controlName).hasError(errorName)
  }

  public registerUser = (registerFormValue) => {
    const formValues = { ...registerFormValue };

    const user: UserForRegistrationDto = {
      firstName: formValues.firstName,
      lastName: formValues.lastName,
      email: formValues.email,
      password: formValues.password,
      confirmPassword: formValues.confirm
    };

    this.authService.registerUser("api/accounts/registration", user)
    .subscribe({
      next: (_) => console.log("Successful registration"),
      error: (err: HttpErrorResponse) => console.log(err.error.errors)
    })
  }
}
In the constructor, we inject the Authentication service. Then in the ngOnInit lifecycle function, we create a new FormGroup object populated with all the FormControls. After that, we have two functions that are going to help us with the form control validations.
Finally, in the registerUser function, we extract the user’s data, create the user object, and call the registerUser function from the Authentication service. As you can see, whether the response is successful or not, we just log the message to the console. Once we implement the Login component, we will navigate to that component if the response is successful. Also, in the next article, we are going to introduce the error handler service and update the error logic.
RegisterUser HTML Part
Now, we are going to modify the HTML part of our component:
<div class="card">
  <div class="card-body">
      <h1 class="card-title">Register</h1>
      <form [formGroup]="registerForm" autocomplete="off" novalidate (ngSubmit)="registerUser(registerForm.value)">
          <div class="mb-3 row">
              <label for="firstName" class="col-form-label col-sm-2">First Name:</label>
              <div class="col-md-5">
                  <input type="text" id="firstName" formControlName="firstName" class="form-control" />
              </div>
          </div>
          <div class="mb-3 row">
              <label for="lastName" class="col-form-label col-sm-2">Last Name:</label>
              <div class="col-md-5">
                  <input type="text" id="lastName" formControlName="lastName" class="form-control" />
              </div>
          </div>
          <div class="mb-3 row">
              <label for="email" class="col-form-label col-sm-2">Email:</label>
              <div class="col-md-5">
                  <input type="email" id="email" formControlName="email" class="form-control" />
              </div>
              <div class="col-md-5">
                  <em *ngIf="validateControl('email') && hasError('email', 'email')">Please provide a valid email</em>
                  <em *ngIf="validateControl('email') && hasError('email', 'required')">Email is required</em>
              </div>
          </div>
          <div class="mb-3 row">
              <label for="password" class="col-form-label col-sm-2">Password:</label>
              <div class="col-md-5">
                  <input type="password" id="password" formControlName="password" class="form-control" />
              </div>
              <div class="col-md-5">
                  <em *ngIf="validateControl('password') && hasError('password', 'required')">Password is required</em>
              </div>
          </div>
          <div class="mb-3 row">
              <label for="confirm" class="col-form-label col-sm-2">Confirm Password:</label>
              <div class="col-md-5">
                  <input type="password" id="confirm" formControlName="confirm" class="form-control" />
              </div>
          </div>
          <br>
          <div class="mb-3 row">
              <div class="col-md-1">
                  <button type="submit" class="btn btn-info" [disabled]="!registerForm.valid">Register</button>
              </div>
          </div>
      </form>
  </div>
</div>
In this file, we create the required FormGroup with all the FormControls and a single submit button. You can see that under the email and password controls we have the places for the client validation errors as well. Again, we strongly recommend reading the Angular Form Validation article, to learn more about Reactive Validation in Angular applications.
Now, let’s modify the styles.css file, to add some stiles to the client error messages:
em{
    color: #e71515;
    font-weight: bold;
}

.ng-invalid.ng-touched{
    border-color: red;
}

.card{
    margin-top: 10px;
    background-color: #fff;
    box-shadow: 1px 1px 1px #cabcbc;
}
Finally, we have to add the ReactiveFormsModule inside the authentication.module.ts file:
import { ReactiveFormsModule } from '@angular/forms';

@NgModule({
  declarations: [RegisterUserComponent],
  imports: [
    CommonModule,
    ReactiveFormsModule,
    RouterModule.forChild([
      { path: 'register', component: RegisterUserComponent },
    ])
  ]
})
Excellent.
We are ready to test this.
Testing User Registration with Angular and Web API
We can start both our applications.
Right now, we don’t have the link towards the Registration page, so we have to type the URI manually:
http://localhost:4200/authentication/register
There, we can test the client validation logic:
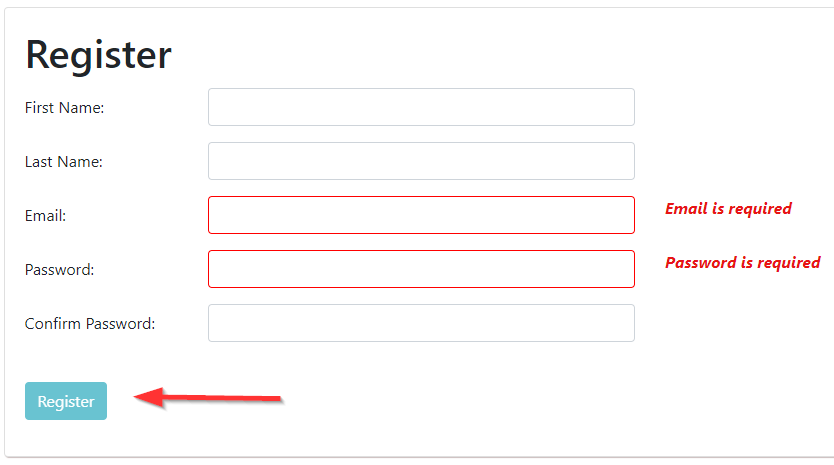
The validation works and our Register button is disabled.
We didn’t implement the Confirm Password logic, because for that we need custom validators. We are going to do that in the next article alongside the error handler service.
Now, let’s populate all the fields, but with the wrong password:
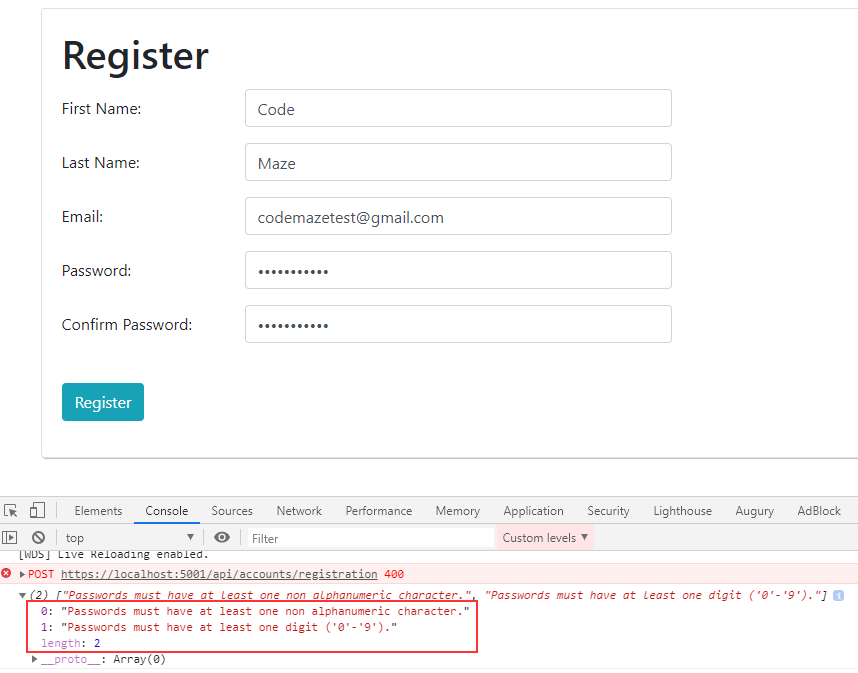
And we can see that we have the error messages logged in the console window. As we stated above, we are going to handle this in the next article. Of course, we are going to show these messages on the Registration form.
Finally, let’s remove the user from the database and send one more request from the Angular application, but this time with a valid password:
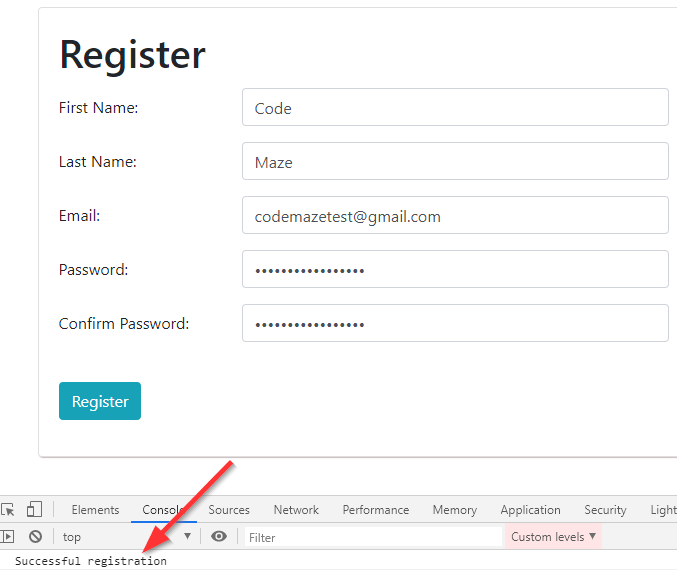
You can check the database as well. You are going to find a new user for sure.
Conclusion
We have seen how we can integrate the ASP.NET Core Identity library into the ASP.NET Core Web API application. Also, we’ve implemented the registration logic on the Web API’s side and used that logic in our Angular application.
Of course, we are missing some pieces here.
So in the next article, we are going to modify the navigation menu to show the registration link and add the error handler with the HTTP Interceptor and display the errors in the registration form. Also, since we are missing the Confirm Password logic, we are going to handle that as well.
So, stay with us, because interesting content awaits.

