

With ASP.NET Core Identity fully registered we can learn how to perform user registration actions in our project.
User registration is the process of registering users in our application by saving their credentials in the database. So, in this article, we are going to learn how to implement user registration actions in our project. Additionally, we are going to learn about different identity options that could help us in the process.
To navigate through the entire series, visit the ASP.NET Core Identity series page.
So, let’s get started.
VIDEO: User Registration with ASP.NET Core Web API and Identity.
Preparation for User Registration
Let’s begin with the UserRegistrationModel.cs class:
public class UserRegistrationModel
{
    public string FirstName { get; set; }
    public string LastName { get; set; }
    [Required(ErrorMessage = "Email is required")]
    [EmailAddress]
    public string Email { get; set; }

    [Required(ErrorMessage = "Password is required")]
    [DataType(DataType.Password)]
    public string Password { get; set; }

    [DataType(DataType.Password)]
    [Compare("Password", ErrorMessage = "The password and confirmation password do not match.")]
    public string ConfirmPassword { get; set; }
}
In this class, we have a couple of properties the user populates in the registration form. As you can see the Email and Password properties are required and the ConfirmPassword property must match the Password property.
With this in place, let’s create a new MVC controller with two actions inside:
public class AccountController : Controller
{
    [HttpGet]
    public IActionResult Register()
    {
        return View();
    }

    [HttpPost]
    [ValidateAntiForgeryToken]
    public IActionResult Register(UserRegistrationModel userModel)
    {
        return View();
    }
}
So, we have the Account controller with two Register actions (GET and POST). We are going to use the first one to show the view and the second one for the user registration logic.
With that in place, let’s create a view for the GET Register action:
@model IdentityByExamples.Models.UserRegistrationModel

<h1>Register</h1>

<h4>UserRegistrationModel</h4>
<hr />
<div class="row">
    <div class="col-md-4">
        <form asp-action="Register">
            <div asp-validation-summary="All" class="text-danger"></div>
            <div class="form-group">
                <label asp-for="FirstName" class="control-label"></label>
                <input asp-for="FirstName" class="form-control" />
                <span asp-validation-for="FirstName" class="text-danger"></span>
            </div>
            <div class="form-group">
                <label asp-for="LastName" class="control-label"></label>
                <input asp-for="LastName" class="form-control" />
                <span asp-validation-for="LastName" class="text-danger"></span>
            </div>
            <div class="form-group">
                <label asp-for="Email" class="control-label"></label>
                <input asp-for="Email" class="form-control" />
                <span asp-validation-for="Email" class="text-danger"></span>
            </div>
            <div class="form-group">
                <label asp-for="Password" class="control-label"></label>
                <input asp-for="Password" class="form-control" />
                <span asp-validation-for="Password" class="text-danger"></span>
            </div>
            <div class="form-group">
                <label asp-for="ConfirmPassword" class="control-label"></label>
                <input asp-for="ConfirmPassword" class="form-control" />
                <span asp-validation-for="ConfirmPassword" class="text-danger"></span>
            </div>
            <div class="form-group">
                <input type="submit" value="Create" class="btn btn-primary" />
            </div>
        </form>
    </div>
</div>

@section Scripts {
    @{await Html.RenderPartialAsync("_ValidationScriptsPartial");}
}
So basically, we have all the input fields from our model in this view. Of course, clicking the Create button will direct us to the POST Register method with the UserRegistrationModel populated.
Now, let’s install the AutoMapper library, so we could map the UserRegistrationModel to the User class:
PM> Install-Package AutoMapper.Extensions.Microsoft.DependencyInjection
After we execute this command, AutoMapper will be installed. We are going to use it in a moment.
Finally, let’s slightly modify the _Layout view:
<div class="navbar-collapse collapse d-sm-inline-flex flex-sm-row-reverse">
    <partial name="_LoginPartial" />
    <ul class="navbar-nav flex-grow-1">
        <li class="nav-item">
            <a class="nav-link text-dark" asp-area="" asp-controller="Home" asp-action="Index">Home</a>
        </li>
...
We’ve added a partial view, but we have to create it as well. To do that, let’s create a new _LoginPartial view file in the Shared folder:
<ul class="navbar-nav">
    <li class="nav-item">
        <a class="nav-link text-dark" asp-controller="Account"
               asp-action="Register">Register</a>
    </li>
</ul>
Excellent.
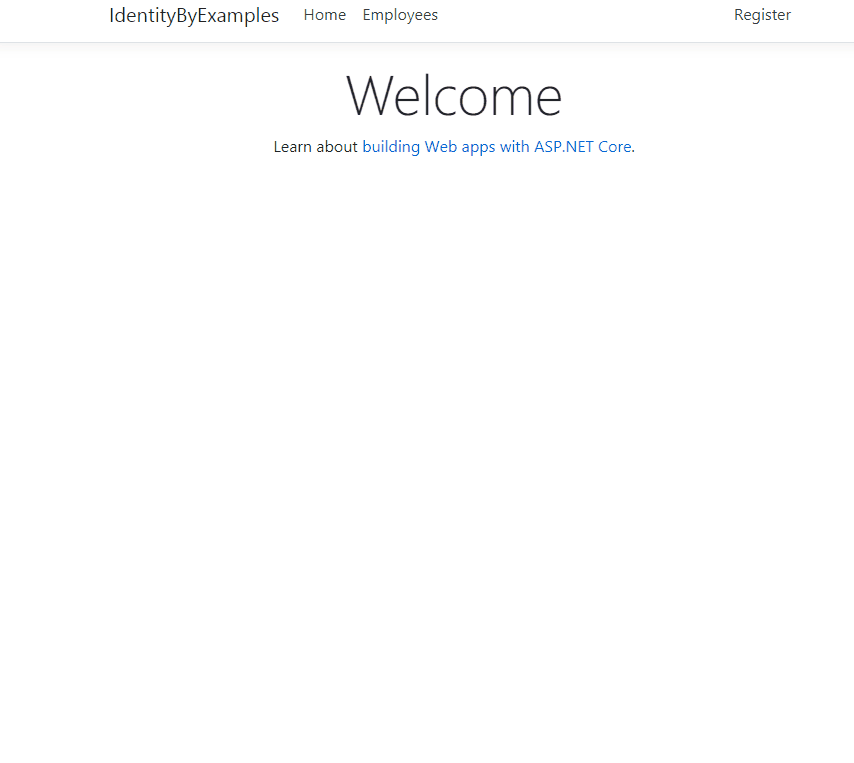
If we start our application, we are going to see the Register link in the upper-right corner. After we click on it, the Register view will appear.
User Registration in Action
To start with the user registration logic, we have to inject our AutoMapper and UserManager class in the Account controller:
private readonly IMapper _mapper;
private readonly UserManager<User> _userManager;

public AccountController(IMapper mapper, UserManager<User> userManager)
{
    _mapper = mapper;
    _userManager = userManager;
}
The UserManager class comes from the Microsoft.AspNetCore.Identity namespace and it provides a set of helper methods to help us manage a user in our application.
Before we continue, let’s register AutoMapper in the ConfigureServices method in the Startup class:
services.AddAutoMapper(typeof(Startup));
If you are using .NET 6 or later, the code is a bit different because we have to modify the Program class:
builder.Services.AddAutoMapper(typeof(Program));
Now, we can modify the Register action:
[HttpPost]
[ValidateAntiForgeryToken]
public async Task<IActionResult> Register(UserRegistrationModel userModel)
{
    if(!ModelState.IsValid)
    {
        return View(userModel);
    }

    var user = _mapper.Map<User>(userModel);

    var result = await _userManager.CreateAsync(user, userModel.Password);
    if(!result.Succeeded)
    {
        foreach (var error in result.Errors)
        {
            ModelState.TryAddModelError(error.Code, error.Description);
        }

        return View(userModel);
    }

    await _userManager.AddToRoleAsync(user, "Visitor");

    return RedirectToAction(nameof(HomeController.Index), "Home");
}
As you can see, the action is async now because the UserManager’s helper methods are async as well. Inside the action, we check for the model validity and if it is invalid, we just return the same view with the invalid model.
If that check passes, we map the registration model to the user.
Additionally, we use the CreateAsync method to register the user. But this method does more for us. It hashes a password, executes an additional user checks and returns a result.
If the result is successful, we just attach the default role to the user, again with the UserManager’s help, and redirect the user to the Index page.
But if the registration fails, we loop through all the errors and add them to the ModelState.
Finally, we have to create the MappingProfile class:
public class MappingProfile : Profile
{
    public MappingProfile()
    {
        CreateMap<UserRegistrationModel, User>()
            .ForMember(u => u.UserName, opt => opt.MapFrom(x => x.Email));
    }
}
You can see that we map email to the username because we are not using the username in the registration form.
Testing
Let’s test several invalid cases:

You can see the model validation is working just fine. The CreateAsync method validates the password-related errors too.
If a user enters valid values in our form, the user registration process will complete successfully and they will be redirected to the Index page:
Excellent.
Now, let’s dive a bit into the ASP.NET Core Identity configuration.
Identity Options
As you could see in the testing example, our user registration process requires a password to fulfill certain rules. These rules can be found and adjusted in the IdentityOptions settings.
Right now, the password requires at least 6 characters, upper and lower case letters, etc.
Let’s play around a bit with these values.
We are going to modify the AddIdentity method in the ConfigureServices method for .NET 5 and previous versions:
services.AddIdentity<User, IdentityRole>(opt =>
{
    opt.Password.RequiredLength = 7;
    opt.Password.RequireDigit = false;
    opt.Password.RequireUppercase = false;
})
 .AddEntityFrameworkStores<ApplicationContext>();
In .NET 6 and later, we have to modify the Program class:
builder.Services.AddIdentity<User, IdentityRole>(opt =>
{
    opt.Password.RequiredLength = 7;
    opt.Password.RequireDigit = false;
    opt.Password.RequireUppercase = false;
})
.AddEntityFrameworkStores<ApplicationContext>();
So, we override the default password configuration by setting the required password length to 7 instead of 6 characters, which is the default value. Additionally, we state that digits and upper case letters are not required.
If we test this with the „test“ password:

We can see that there are no more alerts for digits and uppercase letters, and the required length is now 7 characters.
In our example, we are using an email as a user name. By default, email is not required to be unique, but we can change that:
opt.Password.RequiredLength = 7;
opt.Password.RequireDigit = false;
opt.Password.RequireUppercase = false;

opt.User.RequireUniqueEmail = true;
If we try to register with an already registered email address:
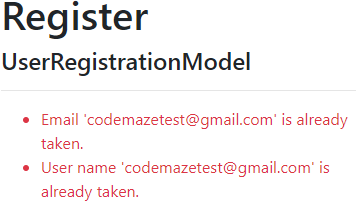
Of course, pay attention that showing a message like this to a user could be a potential security risk.
That’s because, if this is a user who tries to hack our account, we have just reviled this email that already exists in our system and allowed them to focus only on the passwords.
A better solution would be to send an email message to the owner of this account, with the information that the account already exists.
By doing this, we don’t narrow down hacking possibilities for the malicious user and our regular user could proactively change the password or contact the system administrator to report a possible account breach.
Conclusion
There are a lot more settings we can play with, but for now, this is enough.
In articles to come, we are going to modify IdentityOptions settings even more. But feel free to explore it by yourself. As you can see, the names are pretty self-explanatory.
In the next article, we are going to learn about Login and Logout functionalities with ASP.NET Core Identity.
Until then…

