

Authentication is the process of confirming a user’s identity. It is a set of actions, we use to verify the user’s credentials against the ones in the database. For the user to be able to provide credentials, our application requires a Login page with a set of fields for our user to interact with.
In this article, we are going to learn how to implement user authentication with ASP.NET Core Identity. So our main goal is going to be creating a login page and preparing a set of actions to validate input credentials.
To navigate through the entire series, visit the ASP.NET Core Identity series page.
Let’s start.
VIDEO: Web API Authentication With Identity And JWT.
Preparing the Authentication Environment in our Project
The first thing, we are going to do is disable unauthorized users to access the Employees action. To do that, we have to add the [Authorize] attribute on top of that action:
[Authorize]
public async Task<IActionResult> Employees()
{
    var employees = await _context.Employees.ToListAsync();
    return View(employees);
}
Additionally, we have to add authentication middleware to the ASP.NET Core’s pipeline right above the app.UseAuthorization() expression:
app.UseAuthentication();
If we run our application now and click on the Employees link, we are going to get a 404 not found response:

We get this because, by default, ASP.NET Core Identity tries to redirect an unauthorized user to the /Account/Login action, which doesn’t exist at the moment. Additionally, you can see a ReturnUrl query string that provides a path to the required action before the user was redirected to the Login page. We are going to deal with it later in this post.
Now, we are going to do a couple of things to fix this 404 error.
First, let’s create a UserLoginModel class in the Models folder:
public class UserLoginModel
{
    [Required]
    [EmailAddress]
    public string Email { get; set; }

    [Required]
    [DataType(DataType.Password)]
    public string Password { get; set; }

    [Display(Name = "Remember me?")]
    public bool RememberMe { get; set; }
}
Next, let’s add two new actions to the Account controller:
[HttpGet]
public IActionResult Login()
{
    return View();
}

[HttpPost]
[ValidateAntiForgeryToken]
public async Task<IActionResult> Login(UserLoginModel userModel)
{
    return View();
}
We don’t want to navigate to the Login page only by accessing the protected action, we want to have a separate link for that as well. So, let’s modify the _LoginPartial view:
<ul class="navbar-nav">

    <li class="nav-item">
        <a class="nav-link text-dark" asp-controller="Account"
           asp-action="Login">Login</a>
    </li>
    <li class="nav-item">
        <a class="nav-link text-dark" asp-controller="Account"
           asp-action="Register">Register</a>
    </li>

</ul>
Finally, let’s create a Login view:
@model IdentityByExamples.Models.UserLoginModel

<h1>Login</h1>

<div class="row">
    <div class="col-md-4">
        <form asp-action="Login">
            <div asp-validation-summary="ModelOnly" class="text-danger"></div>
            <div class="form-group">
                <label asp-for="Email" class="control-label"></label>
                <input asp-for="Email" class="form-control" />
                <span asp-validation-for="Email" class="text-danger"></span>
            </div>
            <div class="form-group">
                <label asp-for="Password" class="control-label"></label>
                <input asp-for="Password" class="form-control" />
                <span asp-validation-for="Password" class="text-danger"></span>
            </div>
            <div class="form-group form-check">
                <label class="form-check-label">
                    <input class="form-check-input" asp-for="RememberMe" /> @Html.DisplayNameFor(model => model.RememberMe)
                </label>
            </div>
            <div class="form-group">
                <input type="submit" value="Log In" class="btn btn-primary" />
            </div>
        </form>
    </div>
</div>

@section Scripts {
    @{await Html.RenderPartialAsync("_ValidationScriptsPartial");}
}
Ok, let’s test this:
Excellent, everything is prepared and we can continue.
Implementing Authentication with ASP.NET Core Identity
After we click the submit button, the UserLoginModel will be sent to the POST Login action. So, we have to modify that action:
[HttpPost]
[ValidateAntiForgeryToken]
public async Task<IActionResult> Login(UserLoginModel userModel)
{
if(!ModelState.IsValid)
{
return View(userModel);
}
var user = await _userManager.FindByEmailAsync(userModel.Email);
if(user != null &&
await _userManager.CheckPasswordAsync(user, userModel.Password))
{
var identity = new ClaimsIdentity(IdentityConstants.ApplicationScheme);
identity.AddClaim(new Claim(ClaimTypes.NameIdentifier, user.Id));
identity.AddClaim(new Claim(ClaimTypes.Name, user.UserName));
await HttpContext.SignInAsync(IdentityConstants.ApplicationScheme,
new ClaimsPrincipal(identity));
return RedirectToAction(nameof(HomeController.Index), "Home");
}
else
{
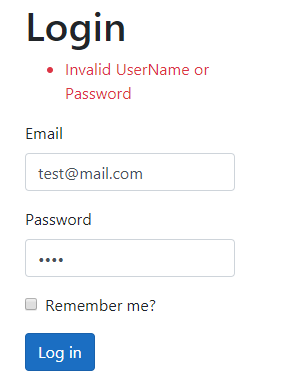
ModelState.AddModelError("", "Invalid UserName or Password");
return View();
}
}
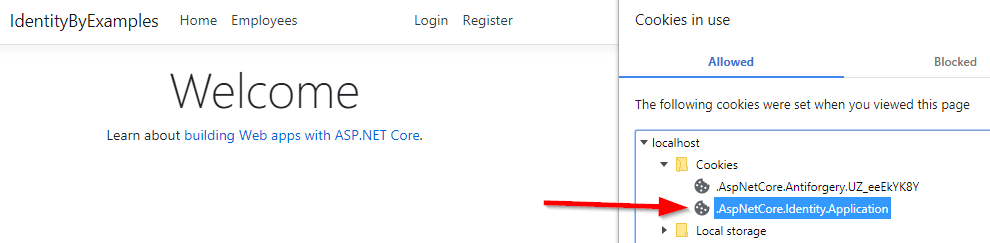
First, we check if the model is invalid and if it is, we just return a view with the model. After that, we use the FindByEmailAsync method from UserManager to return a user by email. If the user exists and the password matches the hashed password from the database, we create the ClaimsIdentity object with two claims inside (Id and UserName). Then, we sign in the user with the SignInAsync method by providing the scheme parameter and the claims principal. This will create the Identity.Application cookie in our browser. Finally, we redirect the user to the Index action.
If the user doesn’t exist in the database or the password doesn’t match, we return a view with the appropriate message.
Before we test this, let’s add a small modification in the Employees view below the table. This way we can see our claims:
<h2>Claim details</h2>
<ul>
    @foreach (var claim in User.Claims)
    {
        <li><strong>@claim.Type</strong>: @claim.Value</li>
    }
</ul>
Now, let’s try to login with the invalid credentials:
If we use valid credentials, we are going to be redirected to the Index page with the Identity.Application cookie created:
Now, we can visit the Employees page:
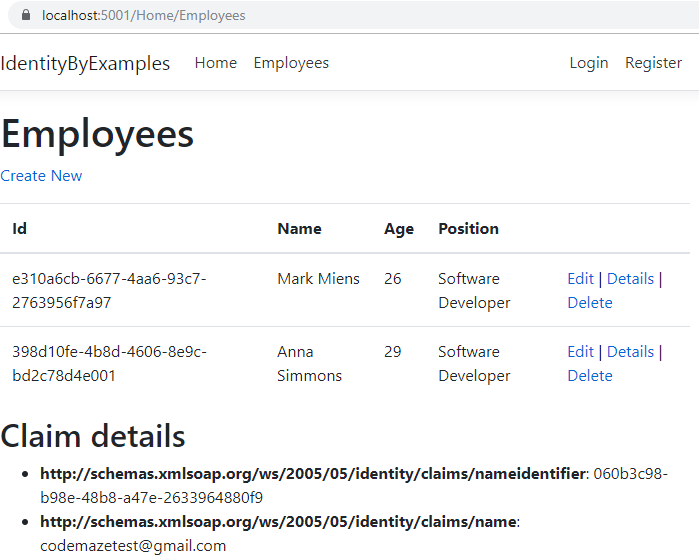
We can access it and we can see our claims.
Implementing ReturnUrl in Authentication Process
As you could see in the first part of this article, if the user is not authorized and tries to access the protected action, they are going to be redirected to the Login page. The URL contains the ReturnUrl query parameter as well, which shows the source page the user came from. But in our case, we just navigate the user to the Home page. So, let’s fix that.
The first thing, we are going to do is to modify the GET Login action:
[HttpGet]
public IActionResult Login(string returnUrl = null)
{
    ViewData["ReturnUrl"] = returnUrl;
    return View();
}
Then, we have to modify the Login.cshtml file as well:
<form asp-action="Login" asp-route-returnUrl="@ViewData["ReturnUrl"]">
We have to modify the POST action too:
public async Task<IActionResult> Login(UserLoginModel userModel, string returnUrl = null)
Also, in the same method, instead of the ReturnToAction method, we are going to call a custom one:
return RedirectToLocal(returnUrl);
And of course, let’s create that method in the Account controller:
private IActionResult RedirectToLocal(string returnUrl)
{
    if (Url.IsLocalUrl(returnUrl))
        return Redirect(returnUrl);
    else
        return RedirectToAction(nameof(HomeController.Index), "Home");

}
So we just check if the returnUrl is a local URL and if it is we redirect the user to that address, otherwise, we redirect the user to the Home page.
Let’s see how it works:
And we can see it works as expected.
One additional thing. Our Login action is on the /Account/Login route, and that’s the default route ASP.NET Core Identity is going to look for. But for a different path, for example: /Authentication/Login, we have to configure application cookie in the ConfigureServices method:
services.ConfigureApplicationCookie(o => o.LoginPath = "/Authentication/Login");
Now, we can proceed.
Automating Authentication Process
If you want to take complete control over the authentication logic, the approach we have used is a great choice. But, we can speed up the process by using the SignInManger<TUser> class. This class provides the API for user sign in with a lot of helper methods.
So, let’s inject it first in the Account controller:
private readonly IMapper _mapper;
private readonly UserManager<User> _userManager;
private readonly SignInManager<User> _signInManager;

public AccountController(IMapper mapper, UserManager<User> userManager, SignInManager<User> signInManager)
{
    _mapper = mapper;
    _userManager = userManager;
    _signInManager = signInManager;
}
And, let’s use it in the Login action:
[HttpPost]
[ValidateAntiForgeryToken]
public async Task<IActionResult> Login(UserLoginModel userModel, string returnUrl = null)
{
    if (!ModelState.IsValid)
    {
        return View(userModel);
    }

    var result = await _signInManager.PasswordSignInAsync(userModel.Email, userModel.Password, userModel.RememberMe, false);
    if (result.Succeeded)
    {
        return RedirectToLocal(returnUrl);
    }
    else
    {
        ModelState.AddModelError("", "Invalid UserName or Password");
        return View();
    }
}
We use the PasswordSignInAsync method that accepts four parameters: Username, Password, Persist Cookie, and LockOut on Failure. For now, we don’t require a lockout feature, so we set it to false. This method does all the magic we had to do by ourselves in the previous implementation. Additionally, it returns a result with four properties:
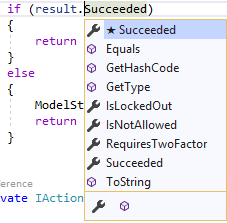
As you can see, we use the Succeeded property to verify that our action completed successfully.
Now if we login successfully to our application, we can see the cookie created with our claims:
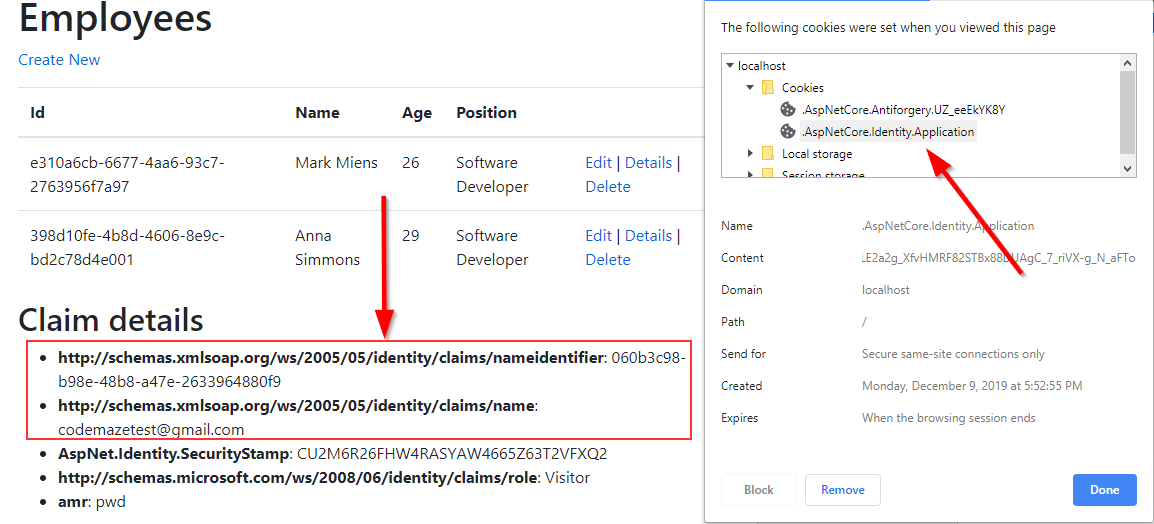
We can see additional claims as well, like security stamp, role, and amr(Authentication Method Reference).
Adding Custom Claims in the Authentication Process
In the previous list of claims, we can’t see our custom properties from the User class. Of course, if we want to add those, there is a way to do that.
Let’s create a new Factory folder and a new class inside:
public class CustomClaimsFactory : UserClaimsPrincipalFactory<User>
{
    public CustomClaimsFactory(UserManager<User> userManager, IOptions<IdentityOptions> optionsAccessor)
        : base(userManager, optionsAccessor)
    {
    }
}
Our custom class has to implement the UserClaimsPrincipalFactory<TUser> class and to send a userManager and optionsAccessor objects to it. Now, we have to override the GenerateClaimsAsync method in this class to add our additional claims:
protected override async Task<ClaimsIdentity> GenerateClaimsAsync(User user)
{
    var identity = await base.GenerateClaimsAsync(user);
    identity.AddClaim(new Claim("firstname", user.FirstName));
    identity.AddClaim(new Claim("lastname", user.LastName));

    return identity;
}
The final thing we have to do is to register this class in the service collection:
services.AddScoped<IUserClaimsPrincipalFactory<User>, CustomClaimsFactory>();
After we test this:

We can see our additional claims.
Awesome.
Update
After the CustomClaimsFactory class implementation, we can’t see the role claim anymore on the page. If we want to add it, we have to modify the GenerateClaimsAsync method:
protected override async Task<ClaimsIdentity> GenerateClaimsAsync(User user)
{
    var identity = await base.GenerateClaimsAsync(user);
    identity.AddClaim(new Claim("firstname", user.FirstName));
    identity.AddClaim(new Claim("lastname", user.LastName));

    var roles = await UserManager.GetRolesAsync(user);
    foreach (var role in roles)
    {
        identity.AddClaim(new Claim(ClaimTypes.Role, role));
    }

    return identity;
}
With this in place, we can see the role claim once again as part of our token.
Logout Implementation
The Logout implementation is pretty simple though. But before we do that, let’s modify the _LoginPartial view:
@using Microsoft.AspNetCore.Identity
@inject SignInManager<User> SignInManager
@inject UserManager<User> UserManager

<ul class="navbar-nav">
    @if (SignInManager.IsSignedIn(User))
    {
        <li class="nav-item">
            <a class="nav-link text-dark" asp-controller="Home" asp-action="Index"
                title="Welcome">Welcome @User.Identity.Name!</a>
        </li>
        <li class="nav-item">
            <form class="form-inline" asp-controller="Account" asp-action="Logout">
                <button type="submit" class="nav-link btn btn-link text-info">Logout</button>
            </form>
        </li>
    }
    else
    {
        <li class="nav-item">
            <a class="nav-link text-dark" asp-controller="Account"
                   asp-action="Login">Login</a>
        </li>
        <li class="nav-item">
            <a class="nav-link text-dark" asp-controller="Account"
               asp-action="Register">Register</a>
        </li>
    }
</ul>
Here, we inject the SignInManager and UserManager classes by using the View Dependency Injection Technique and then just check if our user is signed in. If it is, we show a welcome message and the Logout button.
Now, let’s implement the Logout action:
[HttpPost]
[ValidateAntiForgeryToken]
public async Task<IActionResult> Logout()
{
    await _signInManager.SignOutAsync();

    return RedirectToAction(nameof(HomeController.Index), "Home");
}
Once we start the application, log in successfully and click the Logout link, we are going to be logged out and the cookie will be removed.
Conclusion
So, to sum it up, we have learned:
- How to execute the authentication process
- How to use different UserManager helper methods that help in a process
- The way to implement ReturnUrl logic
- And how to add additional claims to the user
In the next article, we are going to talk about Reset Password (Forgot Password) functionality with ASP.NET Core Identity.

Hello,
I have a question about: if (!ModelState.IsValid) { return View(userModel); } in Login method.
I try to create the project from beginning. Its on 6.0
If I enter wrong password in my project that “if” is fulfil and I don’t get the “Invalid UserName or Password”, which I am for. And I change it to: if (ModelState.IsValid)
But in your project it’s fine. Any idea why that happens?
Hi. I am relly not sure. Have you tried debugging your action? That way you can see what is going on inside.
Hi,
I always debug, but I can’t tell why this happens.
What should I look for when debbuging?
Well, just try to find if a request reaches the required code block that returns an error message to the view about the wrong credentials. If it does, maybe there is an issue with the error validation js library in your MVC project or anything similar. You can also test if you send an invalid model – does that show the error messages for required inputs? Honestly, I am not sure what is going on there.
I saw that .IsValid and .ValidationState in my project are false/invalid, but in yours they are fine. Any idea why?
I fix it by changing the “string returnUrl” in both GET and POST Login to “string? returnUrl”
Thank you for your time.
Thank you for sharing the solution.
I’ve noticed you used an email to sign in, is there a way to configure it so either username or email can be used to sign in?
That’s more of a business logic you will implement in your actions. Identity gives you methods to find the user by email or username so you can use one and if you can’t find it, you can use another one and then base your logic on the results you get.
public class AccountOptions { public static bool AllowLocalLogin = true; public static bool AllowRememberLogin = true; public static TimeSpan RememberMeLoginDuration = TimeSpan.FromDays(30); public static bool ShowLogoutPrompt = true; public static bool AutomaticRedirectAfterSignOut = true; public static string InvalidCredentialsErrorMessage = “Invalid username or password” }
Is this code good?
If the code is good, please help me by guiding me to use it in the right place
Greetings to you teacher
As much as I know the AccountOptions class is from IdentiyServer4 and not ASP.NET Core Identity. If you are using IS4 then this is the correct code.
thank you so much
I use :ASP.NET Core
Hello
My honorable teacher
Thank you very much
Please help me I am a beginner
I need to stop user logout or control user session time
All thanks, appreciation and respect to you
Maybe to use something like this:
services.ConfigureApplicationCookie(options =>
{
    options.Cookie...
});
There you can find a property named Expire or Expiration to extend the lifetime of the cookie. But don’t make it too long.
It is true what you say
Thank you very much for helping me
hello how we can use the Authentication in login with different code
In the Welcome it is showing my Email id, at the place of email id, I want to show First name which is inherited from user.cs, what I need to do.
All you have to do is to extract it from the list of claims. You have added the first name and the last name as additional claims to a list, so all you have to do is to get it out of the list in what ever way you like. For example:
Welcome @User.Claims.First(x => x.Type.Equals(“firstname”)).Value!
When I run the program, there is a command window pop up, is that normal?
Thanks
When I run the program, there is a command window pop up, is that normal?Thanks
You should see the starting page of the app. Please download our source code and run it, you will see the behavior.
Yes, I run your source code. I see the starting page, everything works as expected, but a command window pop up. Please see the snap shot: https://uploads.disquscdn.com/images/98db7e7427b299c2eb4dbdae97bcaf5c5298f20119ad57c80e6123e4146ba5ba.png
That is perfectly normal. You will have all kind of logs logged in that console window.
Is it possible to close this window?Thanks
Run the project with just F5.
Yes, I run the project with F5, but console window is still open. I run the project that I create by my self, which have not this problem.
Under the section “Implementing ReturnUrl in Authentication Process” there seems to be a reference missing for changing the POST declaration for the Task to include the string returnUrl. Nothing major and easily caught, just thought it worth a mention.
public async Task Login(UserLoginModel userModel, string returnUrl = null)
Yeah I see what you mean, I missed that one line for the POST action as well. Thanks a lot for suggesting that. I will fix it.
after implements custom claims, role claims not work. please fixed it.
You have a point. To include the role claim again, all you have to do is to add the role as a custom claim in the GenerateClaimsAsync method like this:
protected override async Task GenerateClaimsAsync(User user)
{
var identity = await base.GenerateClaimsAsync(user);
identity.AddClaim(new Claim(“firstname”, user.FirstName));
identity.AddClaim(new Claim(“lastname”, user.LastName));
var roles = await UserManager.GetRolesAsync(user);
foreach (var role in roles)
{
identity.AddClaim(new Claim(ClaimTypes.Role, role));
}
return identity;
}
After that, you will see the role claim on the page again.
Thanx Marinko
Thank you, Arvind, for pointing this.
Nice article.
Is Cookie based authentication good or Token based authentication(JWT)?
What kind of authentication is used in above explained example JWT or Cookies?
Hello Archana. Both types of authentication have their pros and cons, you can Google a bit about that, and you will see what are pros and cons for both tokens. This example uses the Default ASP.NET Core Identity flow, so it uses cookies.
Thank you
Excellent article! Many thanks for this.
Thank you very much Franks. I hope you will enjoy the entire series as well. The feedback is always very useful and appreciated.