

In this article, we are going to cover how to send an SMS with ASP.NET Core. To accomplish this, we are going to use Twilio as our SMS service to send an SMS message and automate a response when an SMS message is received.
Let’s dive in.
Setting up a Twilio SMS Account
The first thing we need to do is create a Twilio account. When we create an account, we are going to be given a free trial account with 15.50 USD. We can use the trial balance toward purchasing a phone number and sending and receiving messages.
See the Dashboard:
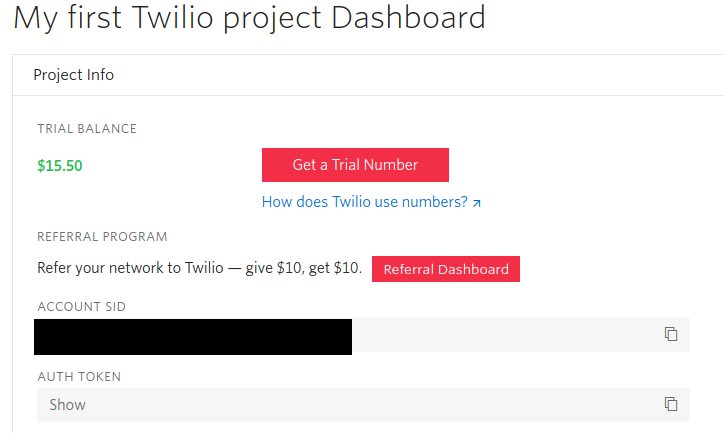
Now that we have an account let’s make a note of our account SID and auth token. Let’s move on and get a Twilio number for our project. Let’s click on “Get a Trial Number” :
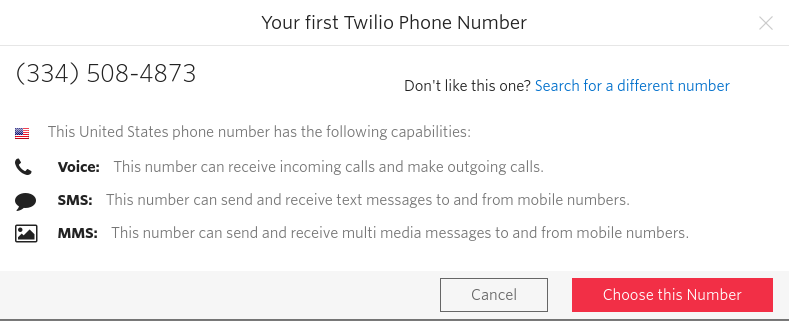
Twilio is going to assign us a number or we can search for a different one. We are going to stick with the one provided by Twilio.
Configuring an ASP.NET Core Project with Twilio
Now that we have a Twilio account set up, let’s create a new ASP.NET Core Web API project:
dotnet new webapi --no-https -o SmsProject
The first thing we are going to do is install the Twilio NuGet Edit SmsProject.csproj to install the NuGet Package:
dotnet add package Twilio
After installing the Twilio package, we are going to modify appsettings.json with the account SID and the auth token found on the Twilio dashboard:
{
  "Logging": {
    "LogLevel": {
      "Default": "Information",
      "Microsoft": "Warning",
      "Microsoft.Hosting.Lifetime": "Information"
    }
  },
  "AllowedHosts": "*",
  "Twilio": {
    "AccountSid": "placeholder",
    "AuthToken": "placeholder"
  }
}
Customizing the Twilio Client
Let’s move on to the Twilio client. This is the piece of code that will implement the Twilio API and make it reusable across the project. Let’s create a folder called Services and create the TwilioClient class:
using TwilioClient SystemHttpClient = System.Net.Http.HttpClient;
public class TwilioClient : ITwilioRestClient
{
    private readonly ITwilioRestClient _innerClient;

    public TwilioClient(IConfiguration config, SystemHttpClient httpClient)
    {
        // customize the underlying HttpClient
        httpClient.DefaultRequestHeaders.Add("X-Custom-Header", "CustomTwilioRestClient-Demo");

        _innerClient = new TwilioRestClient(
            config["Twilio:AccountSid"],
            config["Twilio:AuthToken"],
            httpClient: new SystemNetHttpClient(httpClient));
    }

    public Response Request(Request request) => _innerClient.Request(request);
    public Task<Response> RequestAsync(Request request) => _innerClient.RequestAsync(request);
    public string AccountSid => _innerClient.AccountSid;
    public string Region => _innerClient.Region;
    public Twilio.Http.HttpClient HttpClient => _innerClient.HttpClient;
}
By implementing the ITwilioRestClient from the Twilio package, we are able to customize the headers and make other changes before we use it to make requests. In the constructor, we are going to add a custom header and initialize the client object with the account SID and the auth token that we stored in appsettings.json. Check out our article on the Options Pattern for a better way of accessing data in appsettings.json.
The remainder of the class is simply methods and properties that return the corresponding properties from the private variable _client.
Now that we finished our client, let’s register it in Startup.cs so we can use it via dependency injection. Let’s modify the ConfigureServices methods within the Startup class:
public void ConfigureServices(IServiceCollection services)
{
    services.AddControllers();
    services.AddHttpClient<ITwilioRestClient, TwilioClient>();
}
Our project has been successfully configured with Twilio!
Sending an SMS
The next part of this project is to create an API that will allow us to send a text message to a phone number. First, we are going to need to define the SmsMessage model within a Models folder:
public class SmsMessage
{
    public string To { get; set; }
    public string From { get; set; }
    public string Message { get; set; }
}
The next part of our application is the API controller that will receive our requests. Let’s create the SmsController class within a Controllers folder:
[ApiController]
[Route("[controller]")]
public class SmsController : ControllerBase
{
    private readonly ITwilioRestClient _client;
    public SmsController(ITwilioRestClient client)
    {
        _client = client;
    }

    [HttpGet]
    public IActionResult SendSms(SmsMessage model)
    {
        var message = MessageResource.Create(
            to: new PhoneNumber(model.To),
            from: new PhoneNumber(model.From),
            body: model.Message,
            client: _client); // pass in the custom client

        return Ok("Success");
    }
}
Our controller begins by implementing ControllerBase. Then we initialize the custom client we defined by using dependency injection. Within the SmsController, we define the SendSms action method. When a POST request is sent to http://localhost:5000/sms, the controller is going to call this method. Our method is going to bind the body in the request to the model variable of type SmsMessage. Using the model variable we are going to populate the arguments for the Create method within the MessageResource class. The Create method is how we create SMS messages and pass them on to the Twilio service that is responsible for sending SMS messages.
Finally, we are going to test our API with Postman:
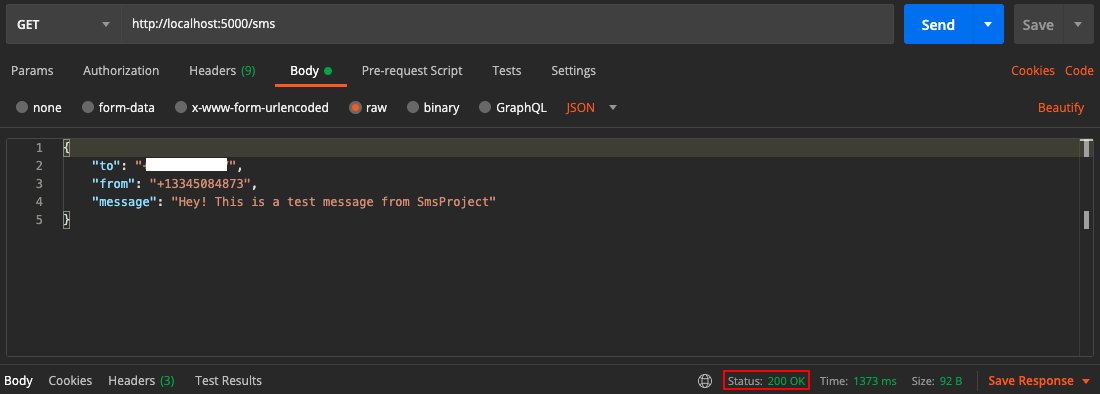
Here is the fruit of our labor:
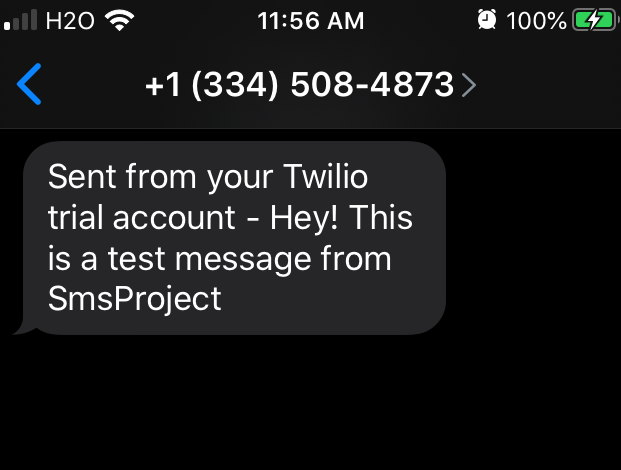
We are going to notice that Twilio has prefixed its own message before the message that we defined. This is going to happen as long as our account remains a trial account.
Receiving an SMS
Now, we can move to the part of our API that is going to be responsible for receiving SMS messages.
First, we are going to install another Twilio NuGet package:
dotnet add package Twilio.AspNet.Core
Let’s continue by modifying SmsController.cs:
[ApiController]
[Route("[controller]")]
public class SmsController : TwilioController
{
    private readonly ITwilioRestClient _client;
    public SmsController(ITwilioRestClient client)
    {
        _client = client;
    }

    [HttpGet]
    public IActionResult SendSms(SmsMessage model)
    {
        var message = MessageResource.Create(
            to: new PhoneNumber(model.To),
            from: new PhoneNumber(model.From),
            body: model.Message,
            client: _client); // pass in the custom client

        return Ok("Success");
    }

    [HttpPost]
    public TwiMLResult ReceiveSms([FromForm]SmsRequest incomingMessage)
    {
        var messagingResponse = new MessagingResponse();
        messagingResponse.Message("Thank you. Your message was received.");

        return TwiML(messagingResponse);
    }
}
To enable receiving capabilities in our API, we need to change BaseController to TwilioController. The TwilioController class lets us use the SmsRequest, TwiMLResult, and TwiML classes. We use these classes to define the ReceiveSms action. This action is called when the Twilio service makes a POST request to http://localhost:5000/sms. In other words, when an SMS message is sent to our number, the Twilio service reacts by making a POST request to this action. In Twilio’s documentation, this is known as a webhook.
The method expects an SmsRequest object which is the format that Twilio will generate the data in the request body. The incoming message data lets us parse the message or find out the details of the sender. For this article, we are just going to acknowledge that a message was received and reply with a simple thank you message. To do this, we must create a MessagingResponse object with the desired message and return a TwiML object containing that MessagingResponse object.
Now our application is ready to be tested!
Testing with Ngrok
To get our application to behave correctly, all we need to do is configure Twilio with our webhook. However, because we are testing it with a development environment, we are going to need a tool that exposes our local server to the internet. We are going to use Ngrok for this.
After signing up for a free account and installing Ngrok, we are going to run the executable with the port number of our application:
path/to/ngrok 5000
Ngrok can also be launched with Visual Studio or VS Code with an extension from the marketplace:
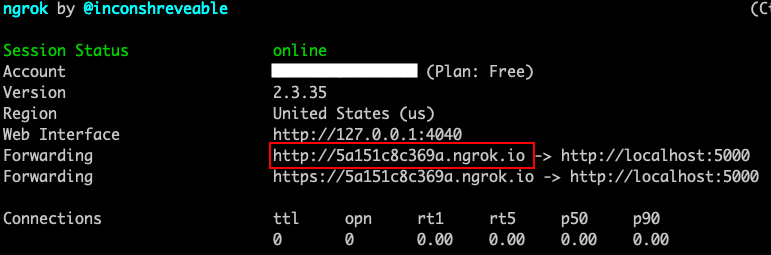
Now we can use the public address provided by Ngrok to configure our Twilio service.
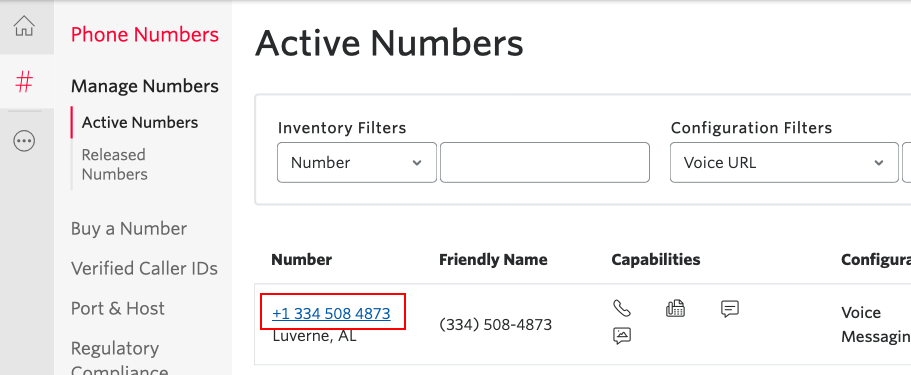
Let’s go back to the Twilio website and navigate to the Phone Numbers Console:
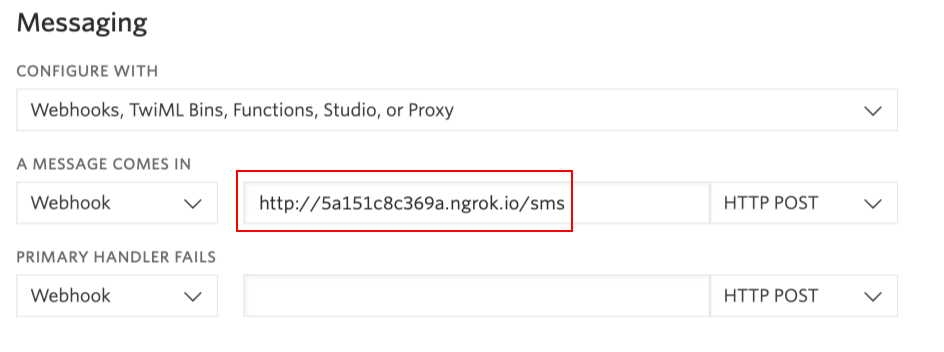
Then we can scroll down to the “Messaging” section of the page and configure our webhook with the Ngrok provided address:
Now we are ready to test our application!
Let’s send a reply to our Twilio number:
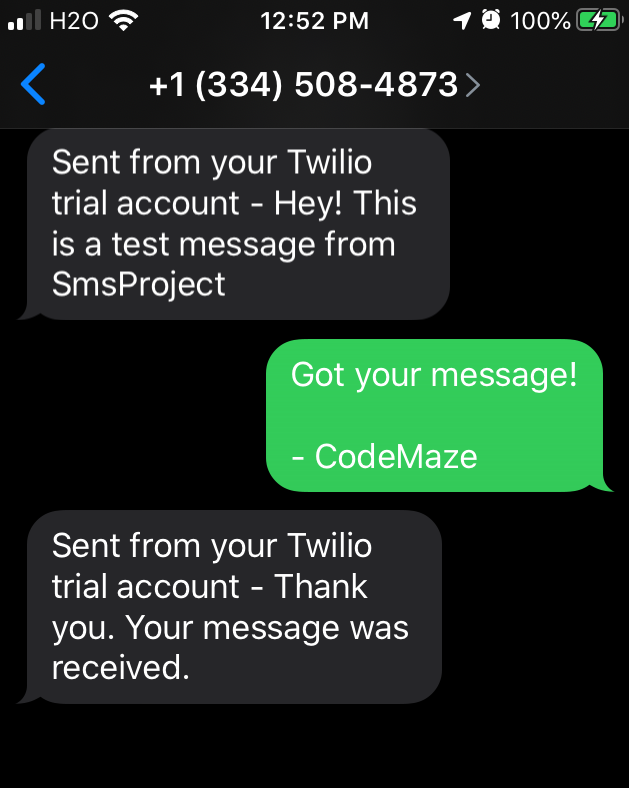
And that’s it! Our application is now ready to send and receive SMS messages!
Conclusion
We have successfully configured our .NET Core project to send and receive SMS messages. To accomplish this, we used Twilio as our messaging service. In this article, we also learned how to integrate Twilio’s C# SDK into our Web API and implement a customizable client. Furthermore, this application can be extended to handle SMS subscriptions and organize mass texting campaigns.

