

In this article, we are going to learn how to implement localization in Blazor WebAssembly applications. We are going to start with a simple introduction to Globalization and Localization. Then, we are going to show you how to implement localization in Blazor WebAssembly applications and also how to enable users to choose the culture they want.
So, let’s start.
About Globalization and Localization
So, what is Globalization?
Globalization is the process of creating an application that supports multiple cultures across the globe. So this means that our app can display numbers or dates differently, collect translations from the resource files rather than using hard-coded ones and also, allow the application’s UI to work with different languages.
What about Localization?
Localization is the process of adapting our globalized application which is already prepared to support localizability. This means that we want to customize our application to support a specific language and region.
You can also find the term Internationalization when reading about these two previously mentioned terms. In simple words, Internationalization just describes both Globalization and Localization.
To work with Localization in Blazor WebAssembly applications, we are going to use the CultureInfo class that helps us in the process. Of course, this class is used for .NET development overall. Two properties CultureInfo.DefaultThreadCurrentCulture and CultureInfo.DefaultThreadCurrentUICulture are going to help us to configure the default culture and the default UI culture. In this article, we are going to see how.
Implementing Localization in Blazor WebAssembly
After we are familiar with the required terms, we can start by building our localized application.
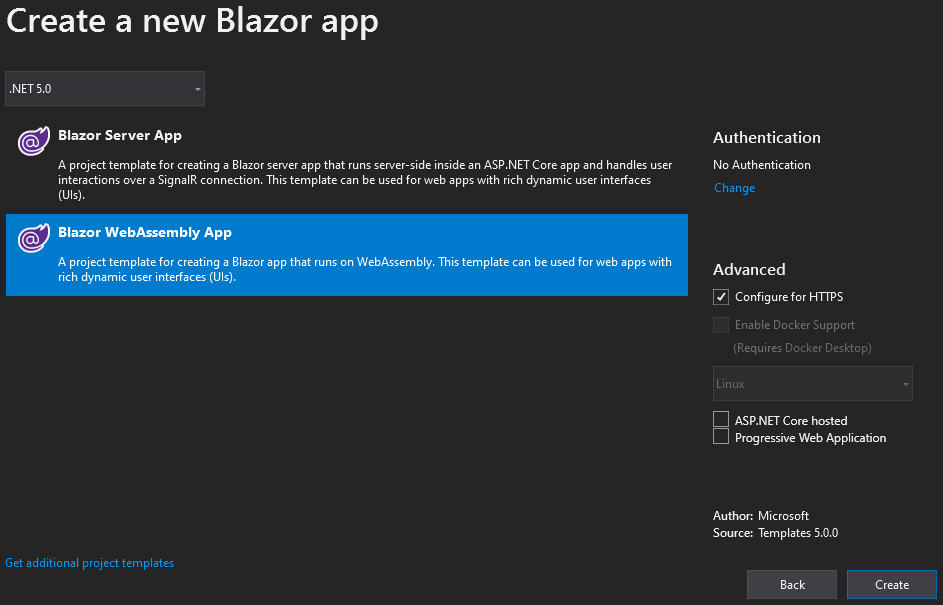
The first thing we are going to do is to create a new Blazor WebAssembly application:
As soon as we start the app, we are going to see the Home page with a couple of messages:
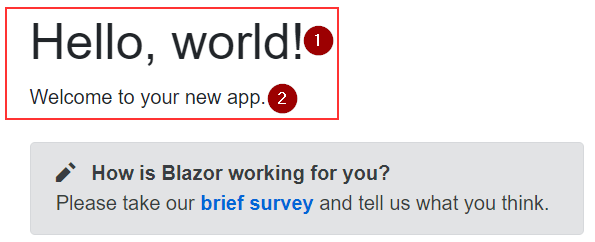
We are going to localize the two selected sentences. This will be enough to show how you can do it for the entire application.
So, let’s get to work.
The first thing we have to do is to install the Microsoft.Extensions.Localization package:
Install-Package Microsoft.Extensions.Localization -Version 5.0.0
After the installation, we are going to register services for application localization. To do that, we are going to modify the Program class:
public static async Task Main(string[] args)
{
    var builder = WebAssemblyHostBuilder.CreateDefault(args);
    builder.RootComponents.Add<App>("#app");

    builder.Services.AddScoped(sp => new HttpClient { BaseAddress = new Uri(builder.HostEnvironment.BaseAddress) });
    builder.Services.AddLocalization();

    await builder.Build().RunAsync();
}
At this point, we need a place to store our localization resources. You can do that in different ways, but in this article, we are going to use resource (.resx) files.
Working with Resource Files
So, let’s create a new ResourceFiles folder under the Shared folder, and let’s create two resource files inside it:
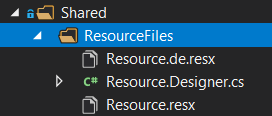
The Resource.resx file will store the English translations and the Resource.de.resx will hold the German translations. The resource files store the translations as key-value pairs, so let’s modify them in such a manner.
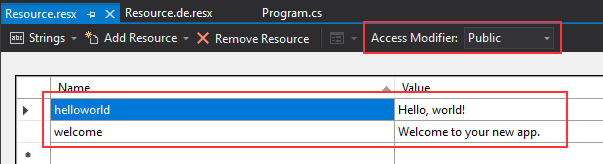
First, let’s modify the Resource.resx file:
And then the other one:
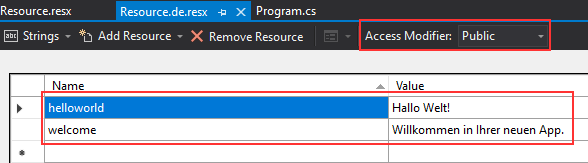
So, we have key-value pairs in both files, and both files have a public access modifier.
After these modifications, we can add the required using directives in the _Imports.razor file:
@using BlazorWasmLocalization.Shared.ResourceFiles
@using Microsoft.Extensions.Localization
And then, we can modify the Index.razor file:
@page "/"
@inject IStringLocalizer<Resource> localizer

<h1>@localizer["helloworld"]</h1>

@localizer["welcome"]

<SurveyPrompt Title="How is Blazor working for you?" />
Here we inject the IStringLocalizer service to provide localized strings. As you can see, we provide the Resource class for the type because this is the class that contains localized strings. Then, instead of the hard-coded strings, we use the localizer variable and provide a key, which is a key from the resource file. Of course, this will return a value from the same resource file.
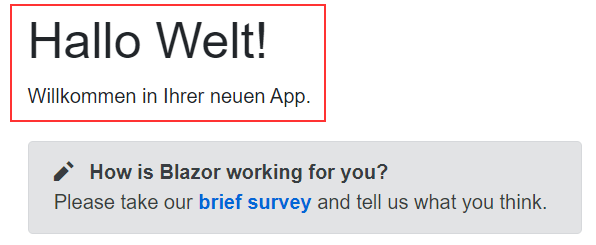
Now if we start the application, we are going to see the same result, but this time our strings are localized. Of course, if we open the browser settings and set the second language as the first one:

And reload the page, we are going to see a different result:
Excellent.
But if we want to enable our users to choose the culture from the application, we have to implement a different logic.
Creating UI for Choosing the Culture
Let’s start by creating a new CultureSelector component (both razor and razor.cs files) under the Shared folder.
We are going to modify the razor file first:
<strong>Culture:</strong>

<select class="form-control" @bind="Culture" style="width:300px; margin-left:10px;">
    @foreach (var culture in cultures)
    {
        <option value="@culture">@culture.DisplayName</option>
    }
</select>
We create a select element and bind it to the Culture property and also for each supported culture, we create a select option. Of course, we are missing the Culture property and the cultures collection, so let’s add it to the razor.cs file:
public partial class CultureSelector
{
    [Inject]
    public NavigationManager NavManager { get; set; }

    [Inject]
    public IJSRuntime JSRuntime { get; set; }

    CultureInfo[] cultures = new[]
    {
        new CultureInfo("en-US"),
        new CultureInfo("de-DE")
    };

    CultureInfo Culture
    {
        get => CultureInfo.CurrentCulture;
        set
        {
            if (CultureInfo.CurrentCulture != value)
            {
                var js = (IJSInProcessRuntime)JSRuntime;
                js.InvokeVoid("blazorCulture.set", value.Name);

                NavManager.NavigateTo(NavManager.Uri, forceLoad: true);
            }
        }
    }
}
Before we start explaining this code, we need to add thee using statements:
using Microsoft.AspNetCore.Components;
using Microsoft.JSInterop;
using System.Globalization;
Now we can explain the code.
First, we inject two services, the NavigationManager and IJSRuntime.
Then, we create a cultures array with two supported cultures – en-US and de-DE. Also, we create a missing Culture property of the CultureInfo type. This property returns the current culture used in the application. Also, when we select a new culture in our drop-down list, this property does some logic in the set part. We first check if the current culture is different than a selected one. If it is, we use JSInterop to invoke the Javascript’s blazorCulture object with a set accessor that sets the culture name in the local storage. Finally, we use the NavigationManager to navigate the user to the requested URI and use the forceLoad parameter to reload the page. We do that because once we reload the app, the logic from the Program.cs class will trigger and will set a new culture as a default one.
Of course, we don’t have that logic yet, so let’s add it.
Setting the Default Culture for the Application
First, let’s create a new Extensions folder and inside it a new WebAssemblyHostExtension class:
public static class WebAssemblyHostExtension
{
    public async static Task SetDefaultCulture(this WebAssemblyHost host)
    {
        var jsInterop = host.Services.GetRequiredService<IJSRuntime>();
        var result = await jsInterop.InvokeAsync<string>("blazorCulture.get");

        CultureInfo culture;

        if (result != null)
            culture = new CultureInfo(result);
        else
            culture = new CultureInfo("en-US");

        CultureInfo.DefaultThreadCurrentCulture = culture;
        CultureInfo.DefaultThreadCurrentUICulture = culture;
    }
}
We create this extension class and method to remove the extra logic from the Program.cs class. In this extension method, we extend the WebAssemblyHost type and use JSInterop to call the get accessor from the blazorCulture Javascript object. This get accessor will return the culture name from the locale storage. If the name is returned, we create a new CultureInfo object with that name, otherwise, we create a new CultureInfo object with the en-US as a parameter. Finally, we set the DefaultThreadCurrentCulture and the DefaultThreadCurrentUICulture properties to the created culture.
Of course, we need a few using directives for this to work:
using Microsoft.AspNetCore.Components.WebAssembly.Hosting;
using Microsoft.Extensions.DependencyInjection;
using Microsoft.JSInterop;
using System.Globalization;
using System.Threading.Tasks;
Now, we can modify the Program.cs class:
public static async Task Main(string[] args)
{
    var builder = WebAssemblyHostBuilder.CreateDefault(args);
    builder.RootComponents.Add<App>("#app");

    builder.Services.AddScoped(sp => new HttpClient { BaseAddress = new Uri(builder.HostEnvironment.BaseAddress) });
    builder.Services.AddLocalization();

    var host = builder.Build();

    await host.SetDefaultCulture();

    await host.RunAsync();
}
Good.
The only thing left is to modify the index.html file, to add the Javascript object that we call to get and set the culture name in the local storage:
<body>
    <div id="app">Loading...</div>

    <div id="blazor-error-ui">
        An unhandled error has occurred.
        <a href="" class="reload">Reload</a>
        <a class="dismiss">🗙</a>
    </div>
    <script src="_framework/blazor.webassembly.js"></script>
    <script>
        window.blazorCulture = {
            get: () => localStorage['BlazorCulture'],
            set: (value) => localStorage['BlazorCulture'] = value
        };
    </script>
</body>
Just to mention, if you want, you can create a new Javascript file and move this logic in that file. For example sake, it could stay here.
Lastly, we have to include our new component instead of the About link in the MainLayout.razor file:
<div class="main">
    <div class="top-row px-4">
        <CultureSelector />
    </div>

    <div class="content px-4">
        @Body
    </div>
</div>
Adding Missing PropertyGroup in the Project file
If we start our application now, we are going to get an error:
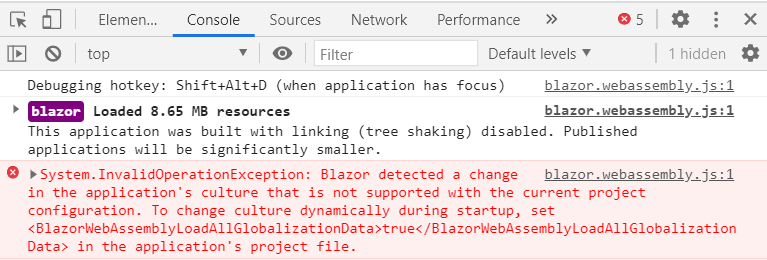
The error is pretty self-explanatory, so let’s do exactly that:
<Project Sdk="Microsoft.NET.Sdk.BlazorWebAssembly">

    <PropertyGroup>
        <TargetFramework>net5.0</TargetFramework>
        <BlazorWebAssemblyLoadAllGlobalizationData>true</BlazorWebAssemblyLoadAllGlobalizationData>
    </PropertyGroup>

    ...

</Project>
Now if we start our app, we are going to see our new component with en (US) culture selected:
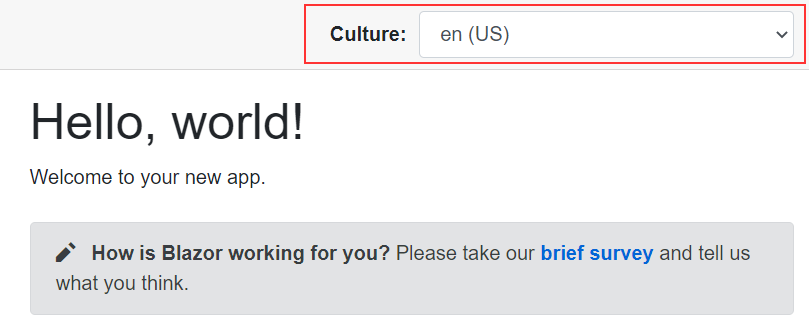
And once we change the culture:

We can see our localization works like a charm.
Conclusion
In this article, we have learned:
- More about the Globalization and Localization
- How to implement Localization in Blazor WebAssembly applications
- How to enable users to change the culture from the app
Until the next article.
Best regards.

Excellent article. I’m trying to figure out if it’s possible to edit the .resx files after the app is published (and without another compilation). The answer appears to be no, but I’d like to be sure. Thanks.
Hi Paul. Even though I never tried to do that, I think you are correct. If there is any option to do that, then I am not aware of it.
Is there some way to pass the localization setting into the server part of the WASM application. For example, I have HomeController with constructor
public HomeController(IHomeService systemService, IStringLocalizer<Resource> localizer)
{
      this.systemService = systemService;
      this.localizer = localizer;
}
And in some point when I access some API Action, I am not able to access the resource file with the target key, for example:
The value which I received is alway the English one.
Regards,
Simeon
Can you point me to an example about localizing MudGrid
I am sorry. I really never did anything similar with it.
Many thanks !
Only issue for me was not able to find blazorCulture but was easy fix form JS like this, adding the “autostart=”true”
<script autostart=”true”>
window.blazorCulture = {
get: () => localStorage[‘BlazorCulture’],
set: (value) => localStorage[‘BlazorCulture’] = value
};
</script>
Thank you too for sharing your solution.
Thanks for Share, works like a charm
Thanks for the comment. All the best.
can you please do and share this for a pre-rendering enabled application!
problem 1 i am facing running this code
in Program.cs
await host.SetDefaultCulture();
WebAssembly host does not contain a definition for SetDefaultCulture
Maybe try looking at this issue on our GitHub repo for this article. Using sync version may help. https://github.com/CodeMazeBlog/blazor-wasm-localization/issues/1
Changing this line to the following, works:
var result = await jsInterop.InvokeAsync
if (result != null)
{
var culture = new CultureInfo(result);
CultureInfo.DefaultThreadCurrentCulture = culture;
CultureInfo.DefaultThreadCurrentUICulture = culture;
}
Thanks for sharing your solution.
does that do anything to the url like adding “domain.com/{en-us}/page” or just load the strings and apply it?
Hello Ahmed. No, it doesn’t add anything to the URI. It just load a new localization and display it on the page. You can always download our source code and run it.