

In this article, we are going to talk about Blazor WebAssembly component virtualization and explain how to use the Virtualize component to achieve that. Also, we are going to show you how to achieve the Blazor WebAssembly component virtualization while fetching the data from the web API project.
To learn more about the Blazor WebAssembly project development, you can read our Blazor WebAssembly series or you can watch our Blazor WebAssembly Video Course.
So, let’s get started.
Projects Introduction
If you open the start folder from our source code, you are going to find two projects inside. One for the server-side and another for the client-side application. Once you open the server-side application, you can modify the appsettings.json file to change the connection string if you want, and start the app. It will create a database with the required data. Later on in this article, we are going to modify this project a bit.
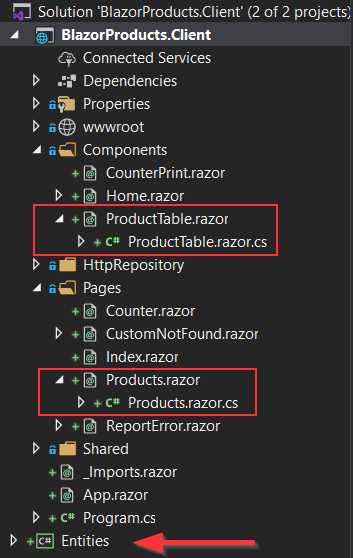
Now, if you open the client-side application, you are going to find two important folders for this article: Pages and Components. In the Pages folder, you will find the Products.razorand Products.razor.cs component files and in the Components folder, you can find the ProductTable.razor and ProductTable.razor.cs component files:
The Products component fetches all the products from the API and passes the list to the child ProductTable component. We are going to work a lot with these files in this article.
Also, you can see the Entities project which is shared between the client and the server applications.
Now, le’s start both applications and navigate to the Products menu item:
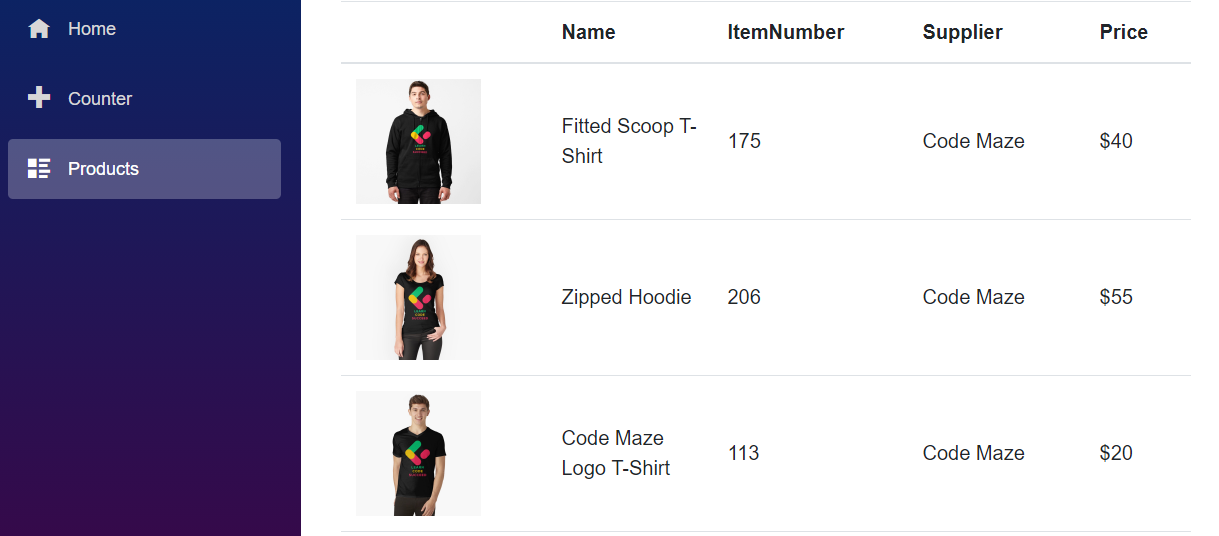
We can see all 250 products listed on the page. Even though our page renders this amount of items pretty quick, what if we had 250 000 items or even millions of them? For sure, we don’t want them all rendered on the page, it would greatly affect the rendering speed of our application. A new Virtualize component can help us with this problem.
Introducing the Virtualize Component in the Blazor WebAssembly Project
The Virtualize component allows us to achieve the Blazor WebAssembly component virtualization by lazy loading items on the DOM. Basically, virtualization helps us render only the items that are currently visible on the page. That way, our page doesn’t have to render all the 250 items (in this case) but just the portion visible on the screen.
Right now, if we inspect the ProductTable.razor file, we are going to see the foreach loop where we render all the items fetched from the API:
<tbody>
    @foreach (var product in Products)
    {
        <tr>
            <td>
                <img src="@product.ImageUrl" alt="product image" style="width:100px;" />
            </td>
            <td class="align-middle" style="max-width:100px">
                @product.Name
            </td>
            <td class="align-middle" style="max-width:200px">
                @product.ItemNumber
            </td>
            <td class="align-middle">
                @product.Supplier
            </td>
            <td class="align-middle">
                [email protected]
            </td>
        </tr>
    }
</tbody>
This is something we want to change.
That said, let’s remove the foreach loop and introduce the Virtualize component:
<tbody>
    <Virtualize Items="Products" Context="product">
        <tr>
            <td>
                <img src="@product.ImageUrl" alt="product image" style="width:100px;" />
            </td>
            <td class="align-middle" style="max-width:100px">
                @product.Name
            </td>
            <td class="align-middle" style="max-width:200px">
                @product.ItemNumber
            </td>
            <td class="align-middle">
                @product.Supplier
            </td>
            <td class="align-middle">
                [email protected]
            </td>
        </tr>
    </Virtualize>
</tbody>
As you can see, we are using the Virtualize component now. For the Items property, we provide our list of items named Products where we store all the items from the API. Also, we have to provide the context for each item in the list, and we do that with the Context property.
And that’s pretty much it.
Testing
We can start the application and navigate to the product list.
Once we do that, we are going to see the same result as before, but we assure you it is not the same. Let’s open the Developer Tools window and inspect elements:
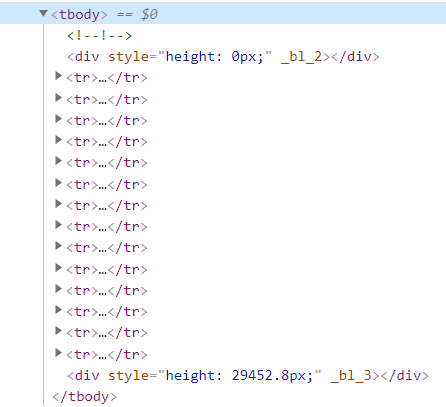
As you can see, our application now renders only a limited number of rows, and as we scroll down, these rows will be recreated for each new chunk of items. Moreover, the height attributes (top and bottom ones) will have different values:
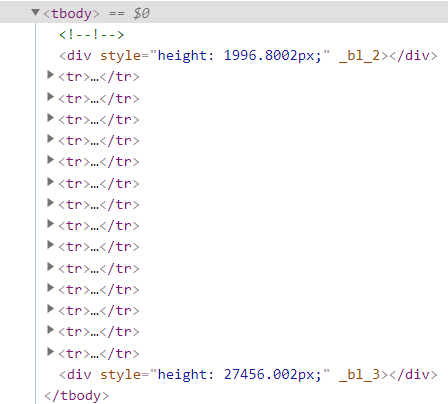
Excellent, this looks great.
The Virtualize component calculates the number of rows to render based on the screen height and the items size, which is 50px by default. The item size can be set with the ItemSize attribute from the Virtualize component.
Even though we now render only the number of items that we can see on the screen, we still have all the items in the memory.
Let’s see how to prevent that.
Blazor WebAssembly Component Virtualization with API Implementation
What we want to do is for each scroll on our page, to send the request to the API and only fetch the required number of items. The Virtualize component helps us there with the ItemsProvider property. But let’s start with the API logic first.
This logic is pretty similar to the Pagination we’ve implemented in our Pagination with Blazor WebAssembly article. So if you want to learn more about it, feel free to read the article.
That said, let’s start with the API project modifications.
Let’s start by creating a new class in the Entities project:
public class ProductParameters
{
    private int _pageSize = 15;

    public int StartIndex { get; set; }
        public int PageSize
        {
            get
            {
                return _pageSize;
            }
            set
            {
                _pageSize = value;
            }
        }
}
We are going to receive values for these two properties from the Blazor WebAssembly application. The Virtualize component provides that for us.
After this file, let’s create another one for the response to the client application:
public class VirtualizeResponse<T>
{
    public List<T> Items { get; set; }
    public int TotalSize { get; set; }
}
Now, we have to modify the IProductRepository interface under the Repository file:
public interface IProductRepository
{
    Task<VirtualizeResponse<Product>> GetProducts(ProductParameters productParams);
}
And also, we have to modify the GetProducts method in the ProductRepository class:
public async Task<VirtualizeResponse<Product>> GetProducts(ProductParameters productParams)
{
    var totalSize = await _context.Products.CountAsync();
    var items = await _context.Products
        .OrderBy(p => p.ItemNumber)
        .Skip(productParams.StartIndex)
        .Take(productParams.PageSize)
        .ToListAsync();

    return new VirtualizeResponse<Product> { Items = items, TotalSize = totalSize };
}
Here, we calculate the total number of items inside the Products table. Then, we fetch the products from the database by skipping the StartIndex number of items and taking the PageSize number of items. Finally, we return the VirtualizeResponse of type Product.
After this modification, we have to modify the ProductsController:
[HttpGet]
public async Task<IActionResult> Get([FromQuery] ProductParameters productParams)
{
    var products = await _repo.GetProducts(productParams);
    return Ok(products);
}
That’s all regarding the API’s side. Let’s move on to the client side.
Client-Side Implementation
The first thing we have to do is to modify the Virtualize component. We don’t need the Items property anymore, instead, we need the ItemsProvider:
<Virtualize ItemsProvider="LoadProducts" Context="product">
Also, we have to remove the conditional table rendering. We don’t need the If-Else statement in the file, so we can remove that as well.
Now, we have to provide this method inside the ProductTable.razor.cs file:
public partial class ProductTable
{
    [Parameter]
    public List<Product> Products { get; set; }

    [Parameter]
    public int TotalSize { get; set; }

    [Parameter]
    public EventCallback<ProductParameters> OnScroll { get; set; }

    private async ValueTask<ItemsProviderResult<Product>> LoadProducts(ItemsProviderRequest request)
    {
        var productNum = Math.Min(request.Count, TotalSize - request.StartIndex);
        await OnScroll.InvokeAsync(new ProductParameters
        {
            StartIndex = request.StartIndex,
            PageSize = productNum == 0 ? request.Count : productNum
        });

        return new ItemsProviderResult<Product>(Products, TotalSize);
    }
}
First, we create two parameters. The TotalSize which represents the total number of items in the table and the OnScroll event callback, which is going to call the function from the parent component as soon as we start scrolling on the page.
Then, we have the LoadProducts method, which will be triggered every time we demand a new chunk of items to render on the page. This method accepts the ItemsProviderRequest parameter provided by the ItemsProvider delegate and returns the ItemsProviderResult type to the Virtualize component. Inside this method, we calculate the number of items we need to display and store that value in the productNum variable. Also, we invoke our event emitter and send the ProductParameters type as an argument with both properties populated.
Now, we have to modify the Product.razor file:
<div class="row">
    <div class="col">
        <ProductTable Products="ProductList" TotalSize="TotalSize" OnScroll="GetProducts" />
    </div>
</div>
Here, we call the ProductTable component and populate all the required properties.
Also, we have to modify the class file:
public partial class Products
{
    public List<Product> ProductList { get; set; } = new List<Product>();
    public int TotalSize { get; set; }

    [Inject]
    public IProductHttpRepository ProductRepo { get; set; }

    private async Task GetProducts(ProductParameters productParams)
    {
        var virtualizeResult = await ProductRepo.GetProducts(productParams);
        ProductList = virtualizeResult.Items;
        TotalSize = virtualizeResult.TotalSize;
    }
}
This time, we don’t have the OnItitializeAsync lifecycle method because we will fetch the data as soon as our child component renders, and also after we scroll the page. This means that the Virtualize component will trigger the LoadProducts method, which will execute the OnScroll event callback resulting in the call to the GetProducts method in the parent component.
Repository Files Modification
Finally, we have to modify the IProductHttpRepository interface:
public interface IProductHttpRepository
{
    Task<VirtualizeResponse<Product>> GetProducts(ProductParameters productParams);
}
And also the ProductHttpRepository file:
public class ProductHttpRepository : IProductHttpRepository
{
    private readonly HttpClient _client;
    private readonly JsonSerializerOptions _options =
        new JsonSerializerOptions { PropertyNameCaseInsensitive = true };

    public ProductHttpRepository(HttpClient client)
    {
        _client = client;
    }

    public async Task<VirtualizeResponse<Product>> GetProducts(ProductParameters productParams)
    {
        var queryStringParam = new Dictionary<string, string>
        {
            ["pageSize"] = productParams.PageSize.ToString(),
            ["startIndex"] = productParams.StartIndex.ToString()
        };

        var response =
            await _client.GetAsync(QueryHelpers.AddQueryString("products", queryStringParam));
        var content = await response.Content.ReadAsStringAsync();

        response.EnsureSuccessStatusCode();

        var virtualizeResponse = JsonSerializer
            .Deserialize<VirtualizeResponse<Product>>(content, _options);

        return virtualizeResponse;
    }
}
Here, we prepare the dictionary with the two query parameters and use the AddQueryString method to send these query strings with the HTTP request. For this, we need the Microsoft.AspNetCore.WebUtilities package. After we receive a response, we just deserialize it and return it back to the Products component.
Good, now let’s test it.
Testing Virtualization with API Communication
Let’s start both applications, open the Developer Tools, open the Network tab, and navigate to the Products menu item:

As you can see the first time we fetch 24 items and skip none (startIndex is 0), but as soon as we start scrolling, we are going to see additional requests once the additional items are required:
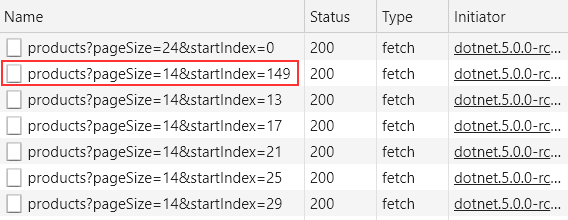
As you can see, startIndex is increasing with the pageSize fixed. But that is not the case for the second request. The Virtualize component sends two consequent requests as soon as we require a new chunk of items. It does this only the first time we require a new chunk of items. For all the other requests this problem doesn’t appear.
For now, to solve this, you can modify the Virtualize component by adding the ItemSize property to 300:
<Virtualize ItemsProvider="LoadProducts" Context="product" ItemSize="300">
Or by adding your custom logic in the LoadProducts method to skip the second request to the API.
Showing the Message if there is a Delay while Fetching Items
While fetching our items from the API, we can have some delays due to network issues or any other reason. In those situations, if you want to show some sort of message to the user, you can do that by using the Placeholder component:
<Virtualize ItemsProvider="LoadProducts" Context="product" ItemSize="300">
    <ItemContent>
        <tr>
            <td>
                <img src="@product.ImageUrl" alt="product image" style="width:100px;" />
            </td>
            <td class="align-middle" style="max-width:100px">
                @product.Name
            </td>
            <td class="align-middle" style="max-width:200px">
                @product.ItemNumber
            </td>
            <td class="align-middle">
                @product.Supplier
            </td>
            <td class="align-middle">
                [email protected]
            </td>
        </tr>
    </ItemContent>
    <Placeholder>
        <tr>
            <td>
                Loading item...
            </td>
        </tr>
    </Placeholder>
</Virtualize>
The content should be placed inside the ItemContent component and the placeholder message inside the Placeholder component.
Additional note: We face very strange behavior with the Placeholder component. It can cause sending multiple continuous requests if you start scrolling down a bit faster, so just test it and see if this happens to you as well. Once the Placeholder is removed, everything works normally.
Conclusion
In this article, we have learned how to use the Virtualize component to show the required number of items on the page. Also, we have learned how to use this component to fetch the required number of items from the API – something similar that Pagination does. With this component, we greatly optimize the page rendering speed and also we are not returning all the data from the API.
Until the next article…
All the best.

Regarding the additional note. That’s due to the difference in height between the items and placeholders. Must match.
Thank you for the comment. It will be a great addition to the article.
Hello can i ask something, i have 25 row in my API, and when i scroll down it load perfectly, butwhen i scroll up again, the upper side where it not visible, load again, and after im on top of row, i tried scroll to bottom again and it load again.
how we can not request the web api if the row already same as totalsize?
Hi, the problem with the placeholder can be corrected by setting the size of the inner element.
In this example I set the height to 300px due to the ItemSize property.
You can set the height with a parameter, variable, …
Thank you Richard. That could help a lot.
Hi, great article and it works APART from the tricky 2nd API request that you mention above. When I run it the PageSize is set to request ALL of the remaining records in the 2nd request, which is far from ideal. Your suggestions:
1. For now, to solve this, you can modify the Virtualize component by adding the ItemSize property to 300
2. Or by adding your custom logic in the LoadProducts method to skip the second request to the API.
The frist suggestion does not work for me – it has no effect. Trying to revise the LoadProducts method, to set a new PageSize value within the await OnScroll.InvokeAsync(new PagingParameters … block results in no records coming through at all! Any advice on how to actually implement a fix for this would be much appreciated.
Hi Ian. Myabe try playing with the ItemSize property, it worked for me on 300, maybe it will work for you on any other value. I just shared my expirience. Regarding the second solution, as much as I remember, I just created a simple counter and counted requests, and just skipped the execution for that second one. I really can’t remember it right now, it was completely a custom logic just to temporary patch that issue.
Hi Marinko- many thanks for that. It seems that setting my new int requestCount and avoiding the await OnScroll.InvokeAsync(…) when the requestCount == 2 just stops all further records being actually retrieved – the LoadProducts event does not get fired for a 3rd time, possibly because the request.Count contains all the remaining records and Blazor thinks there does not need to be any more OnScroll loading to be done. Also trying to control the whole thing by setting my own values for StartIndex and PageSize within the await OnScroll.InvokeAsync(…) block again just prevents all further record retrieval and display completely. I suspect that whatever governs the ItemsProviderRequest request is ‘aware’ of the records that have been requested compared to the TotalSize value and simply stops all further requests being made.
Hi Marinko- many thanks for that. It seems that setting my new int requestCount and avoiding the await OnScroll.InvokeAsync(…) when the requestCount == 2 just stops all further records being actually retrieved – the LoadProducts event does not get fired for a 3rd time, possibly because the request.Count contains all the remaining records and Blazor thinks there does not need to be any more OnScroll loading to be done. Also trying to control the whole thing by setting my own values for StartIndex and PageSize within the await OnScroll.InvokeAsync(…) block again just prevents all further record retrieval and display completely. I suspect that whatever governs the ItemsProviderRequest request is ‘aware’ of the records that have been requested compared to the TotalSize value and simply stops all further requests being made.
Hi, great article and it works APART from the tricky 2nd API request that you mention above. This 2nd request basically requests ALL the other records in the list regardless!
For now, to solve this, you can modify the Virtualize component by adding the ItemSize property to 300:
Or by adding your custom logic in the LoadProducts method to skip the second request to the API.
So the first suggestion makes no difference to me. Trying to modify the PageSize in the LoadProducts() method effectively prevents the 2nd request from actually pulling through any data! So, any update on how to actually implement this would be really useful as right now I just have 2 pulls of the data coming through – the first 40 and then all the rest!