

In this part, we are going to apply some modifications to our ASP.NET Core application in order to prepare it for the dockerization process.
To follow along with this part you need:
- .NET Core 3.1 SDK
- Windows 10
- Git
- IDE of your choice (we use Visual Studio 2019)
- Docker Desktop (at least 2.1.0.5)
These are not necessary but to achieve the best results we recommend this setup.
For the purposes of this article, we are going to re-use the application from our .NET Core Series, more concretely part 6 of the series. The main reason for this decision is that if you are not familiar with the ASP.NET Core, you can go through the series and learn how to make ASP.NET Core WebApi application from scratch.
Since we are going to make some changes to the code, if you want to follow along with the steps of this course, you can find the starting point on the master branch docker-series
If you want to skip the preparation phase and jump right into Docker goodness, you can switch to the docker-series-app-prepared branch of the docker-series repo and go quickly through this section. It might be beneficial for you to follow along if you are not familiar with some of the changes we are going to implement.
These are the changes we’re going to make to the original project:
- Switching to an In-Memory Database
- Introducing AccountController
- Introducing Swagger
- Modifying the launchSettings.json File
- Adding the Test Project and a Unit Test
There is a lot to cover, so let’s get down to business.
Switching to an In-Memory Database
First things first.
To be able to dockerize our application and make it work without relying on external resources (database) we are going to make some changes to the configuration. We are going to re-introduce MySQL later in the series, but for now, we are going to rely on an in-memory database to store our data.
So, let’s modify our ServiceExtensions.cs class:
public static void ConfigureMySqlContext(this IServiceCollection services, IConfiguration config)
{
	services.AddDbContext<RepositoryContext>(o => o.UseInMemoryDatabase("accountowner"));
}
The
UseInMemoryDatabase method is part of the Microsoft.EntityFrameworkCore.InMemory NuGet package, so make sure to import it to the AccountOwnerServer project!
That’s it!
We successfully removed the reference to the MySQL database and added an in-memory database in a single line of code.
Don’t worry about the hanging connection string in the appsettings.json file, we don’t need to remove it since we are going to use it in the next part.
Introducing AccountController
To make our API functional on its own, we are going to modify and rename existing WeatherForecastController. So, first, we are going to rename it to AccountController, and then add some new code to it.
We are going to add GetAllAccounts method and the CreateAccount method that will give us more options to play around with our API.
[ApiController]
	[Route("api/[controller]")]
	public class AccountController : Controller
	{
		private ILoggerManager _logger;
		private IRepositoryWrapper _repository;
		private IMapper _mapper;

		public AccountController(ILoggerManager logger, IRepositoryWrapper repository, IMapper mapper)
		{
			_logger = logger;
			_repository = repository;
			_mapper = mapper;
		}

		[HttpGet]
		public IActionResult GetAllAccounts()
		{
			try
			{
				var accounts = _repository.Account.GetAllAccounts();

				_logger.LogInfo($"Returned all accounts from database.");

				var accountDtos = _mapper.Map<IEnumerable<AccountDto>>(accounts);
				return Ok(accountDtos);
			}
			catch (Exception ex)
			{
				_logger.LogError($"Something went wrong inside GetAllAccounts action: {ex}");
				return StatusCode(500, "Internal server error");
			}
		}

		[HttpPost]
		public IActionResult CreateAccount([FromBody]AccountForCreationDto account)
		{
			try
			{
				if (account == null)
				{
					_logger.LogError("Object sent from client is null.");
					return BadRequest("Object is null");
				}

				if (!ModelState.IsValid)
				{
					_logger.LogError("Invalid object sent from client.");
					return BadRequest("Invalid model object");
				}

				var accountEntity = _mapper.Map<Account>(account);

				_repository.Account.CreateAccount(accountEntity);
				_repository.Save();

				var createdAccount = _mapper.Map<AccountDto>(accountEntity);

				return CreatedAtRoute("AccountById", new { id = createdAccount.Id }, createdAccount);
			}
			catch (Exception ex)
			{
				_logger.LogError($"Something went wrong inside CreateAccount action: {ex}");
				return StatusCode(500, "Internal server error");
			}
		}
	}
Of course, the compiler won’t let us build this since we need to implement GetAllAccounts and CreateAccount methods in our AccountRepository.
So let’s do exactly that.
Add the method declarations to the IAccountRepository:
public interface IAccountRepository
{
	IEnumerable<Account> GetAllAccounts();
	void CreateAccount(Account account);
}
And the implementation of the AccountRepository:
public IEnumerable<Account> GetAllAccounts()
{
	return FindAll()
		.OrderBy(ac => ac.DateCreated);
}

public void CreateAccount(Account account)
{
	account.Id = Guid.NewGuid();
	Create(account);
	Save();
}
Now run the dotnet build on the entire solution, and the project should compile.
Great, now we have a working AccountController.
Introducing Swagger
Swagger is one of the most popular and versatile frameworks for tooling your APIs.
Here is how we are going to add it to our project.
Navigate to the /AccountOwnerServer folder. After that execute the command:
dotnet add package Swashbuckle.AspNetCore --version 5.0.0-rc5
This will add the reference to the Swashbuckle NuGet package for ASP.NET Core to our project (5.0.0-rc5 is the current version, for now, you can use the latest one). In short, Swashbuckle will help us integrate Swagger into our application.
After that, we have to enable Swagger by changing our Startup.cs file a bit.
To the ConfigureServices method, just before the service.AddControllers() line, we are going to add:
services.AddSwaggerGen(c =>
{
	c.SwaggerDoc("v1", new OpenApiInfo
	{
		Title = "AccountOwner API",
		Version = "v1"
	});
});

services.AddControllers();
And to the Configure method just after the app.UseEndpoints() line:
app.UseSwagger();

app.UseSwaggerUI(c =>
{
	c.SwaggerEndpoint("/swagger/v1/swagger.json", "AccountOwner API V1");
});
Great.
But, what have we gained by doing all this?
If you run the application now and go navigate to http://localhost:5000/swagger/v1/swagger.json to see the information about your API presented in JSON format.
This information is the power behind the more interesting part of Swagger, the interactive documentation which you can get by navigating to http://localhost:5000/swagger. If you did everything right you should see the documentation page like this one:
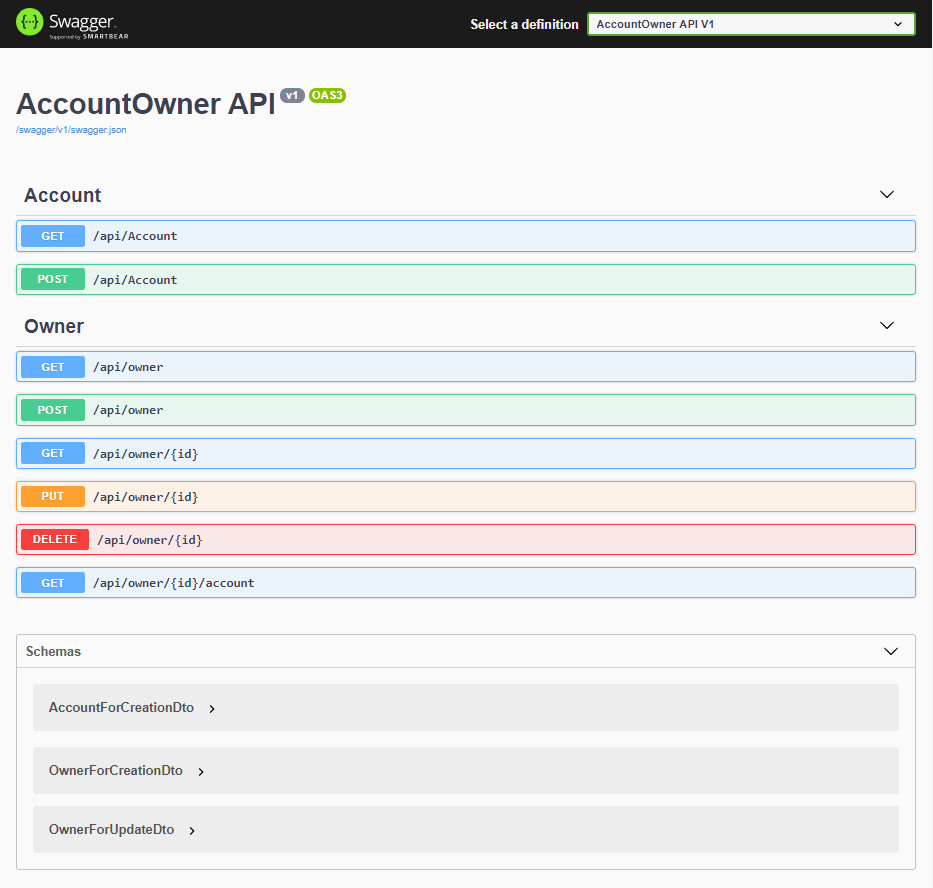
This is a great way to document and explore an API. Since our application has no frontend attached, you can test the API directly using this documentation page, without the need to use external tools like Postman or Fiddler.
To learn more about configuring Swagger in-depth, we suggest reading this article: Configuring and Using Swagger UI in ASP.NET Core Web API.
Let’s move on.
Modifying the launchSettings.json File
We are going to change the applicationUrl property from http://localhost:5000/ to http://0.0.0.0:5000/ because otherwise, we are going to have problems with exposing our application to the local environment.
{
  "iisSettings": {
    "windowsAuthentication": false,
    "anonymousAuthentication": true,
    "iisExpress": {
      "applicationUrl": "http://0.0.0.0:5000/",
      "sslPort": 0
    }
  },
  "profiles": {
    "IIS Express": {
      "commandName": "IISExpress",
      "launchBrowser": false,
      "environmentVariables": {
        "ASPNETCORE_ENVIRONMENT": "Development"
      }
    },
    "AccountOwnerServer": {
      "commandName": "Project",
      "launchBrowser": false,
      "environmentVariables": {
        "ASPNETCORE_ENVIRONMENT": "Development"
      },
      "applicationUrl": "http://0.0.0.0:5000/"
    }
  }
}
Adding the Test Project and a Unit Test
For testing purposes, we’re going to use the xUnit tool and Moq for mocking our data.
The easiest way to add a testing project in ASP.NET Core is with the dotnet CLI. Navigate to the root of the solution and type:
dotnet new xunit -o Tests
This will create the project using the xUnit template and restore the needed packages.
After that we can add the project to the solution:
dotnet sln AccountOwnerServer.sln add .\Tests\Tests.csproj
And because we need to use the Moq library, we are going to navigate to Tests project and add it too:
cd Tests
dotnet add package Moq
dotnet restore
And finally, reference the projects we need in order to write unit tests:
dotnet add reference ..\Contracts\Contracts.csproj
That’s it for the setup part.
Now we can easily add our first unit test to the project.
First, rename the default UnitTests1.cs file to something more appropriate like OwnerRepositoryTests.cs in which we can test our owner repository logic.
Now, let’s add our unit test:
[Fact]
public void GetAllOwners_ReturnsListOfOwners_WithSingleOwner()
{
	// Arrange
	var mockRepo = new Mock<IOwnerRepository>();
	mockRepo.Setup(repo => (repo.GetAllOwners())).Returns(GetOwners());

	// Act
	var result = mockRepo.Object.GetAllOwners().ToList();

	// Assert
	Assert.IsType<List<Owner>>(result);
	Assert.Single(result);
}

public List<Owner> GetOwners()
{
	return new List<Owner>
	{
		new Owner
		{
			Id = Guid.NewGuid(),
			Name = "John Keen",
			DateOfBirth = new DateTime(1980, 12, 05),
			Address = "61 Wellfield Road"
		}
	};
}
This is a simple demo test to check if the GetAllOwners method returns a list of Owner objects and if it returns exactly one owner as we defined in the GetOwners helper method.
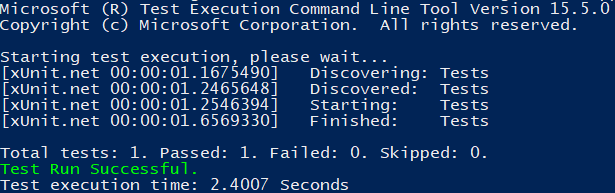
Now if you run dotnet test you should get something like this:
Excellent!
We have completed the preparation part of the project. We have a working ASP.NET Core application, together with interactive documentation and some unit tests.
Everything is set for the next step, which is why we did all this preparation. Now it’s time to dockerize our ASP.NET Core application.
To check if everything works alright, run dotnet build and dotnet test. This is how we do it usually during the development phase. This time around we’ll use docker images and containers to do the same thing and bring our software development skills to another level.
Conclusion
That wraps it up for this part of the series. Although we haven’t even touched upon Docker yet, the changes we made here are important for the parts to come. These changes will help us soften the learning curve by introducing the concepts one by one.
In the next part of the series, we are going to learn more about Docker, the reasons for using it, and we’re going to execute some basic Docker CLI commands.
You can find all the changes up to this point by checking out the docker-series-app-prepared branch of the docker-series repository.

