
Updated on
In the previous part, we’ve gone through some scenarios to show off the Docker’s potential. We have also seen how to utilize Docker CLI and even made the simplest Dockerfiles to learn how to build the images using Docker.
In this article, we are going to focus on dockerizing our ASP.NET Core application with Dockerfiles, and understanding how Dockerfile syntax works. We are also going to spend some effort in optimizing our images to achieve the best results.
This is the third part of our Docker Series. You can find all the parts on our Docker Series page.
To follow along with the steps of this tutorial you need to get the docker-series-app-prepared branch of our docker-series repo.
There are a few steps we need to do in order to dockerize ASP.NET Core application:
- Create a Dockerfile and configure it
- Create a .dockerignore file
- Building the image
- Running the image
- Optimizing the Dockerfile
- Optimizing Even Further
- Just run and test boys, run, and test
- Creating Multistage Builds in Dockerfiles
- Some useful commands
So let’s begin.
Creating a Dockerfile
The first step we need to do is to navigate to the root folder of our solution and make a new Dockerfile. Dockerfiles are the declarative inputs that we can use to tell Docker what to do with our application.
Let’s add some actions to our Dockerfile:
FROM mcr.microsoft.com/dotnet/core/sdk:3.1

WORKDIR /home/app

COPY . .

RUN dotnet restore

RUN dotnet publish ./AccountOwnerServer/AccountOwnerServer.csproj -o /publish/

WORKDIR /publish

ENV ASPNETCORE_URLS="http://0.0.0.0:5000"

ENTRYPOINT ["dotnet", "AccountOwnerServer.dll"]
A Bit of Explanation
So what have we done exactly?
FROM mcr.microsoft.com/dotnet/core/sdk:3.1: Every Dockerfile starts with the FROM command, which initializes a new build stage and sets the base image that we are going to build upon. In this case, that image is mcr.microsoft.com/dotnet/core/sdk:3.1 image because we want to build our ASP.NET Core application with SDK version 3.1. Microsoft has a plethora of other useful images on their Docker Hub profile, so go check them out.WORKDIR /home/app: The WORKDIR command simply sets the current working directory inside our image. In this case, that is the/home/appfolder.COPY . .: The COPY command is pretty straightforward too. In this case, it copies all the files from the local system to the current working directory of the image. Since we don’t need to copy all the files to build the project, we’re going to use a .dockerignore file to which the COPY command will look up when it starts copying the files.RUN dotnet restore: The RUN command runs any command in a new layer and commits it to the base image. Concretely, in this step, we are restoring the packages for our solution, as we would if we run it locally, but this time it’s happening inside the image.RUN dotnet publish ./AccountOwnerServer/AccountOwnerServer.csproj -o /publish/: After we restore the packages, the next step is to publish our application. Since AccountOwnerServer is our main app, we are going to publish it to the/publishfolder inside our image.WORKDIR /publish: We are switching our current directory to/publishENV ASPNETCORE_URLS="http://0.0.0.0:5000": Since launchSettings.json is a file that’s just used by our local IDE, it won’t make it to the publish folder. This means we need to set the application URL manually. Once again, we can’t use localhost or we won’t be able to bind the port from the docker container to the local environment.ENTRYPOINT ["dotnet", "AccountOwnerServer.dll"]: The ENTRYPOINT command allows us to configure the container to run as an executable. In this case, after the project has been published and we run the image, a container will spin up by firingdotnet AccountOwnerServer.dllcommand which will start our application.
Creating a .dockerignore File
Since we are copying our files to the docker image on every build, we should create a .dockerignore file and select which files and folders we don’t want to copy every time. The advantages of using a .dockerignore include faster image build, improving cache performance, and avoiding potential conflicts when building an application.
For example, we don’t want to copy our Dockerfile.
Why is that?
Because besides not being important to the build process, that would mean our COPY step will trigger everytime we change the Dockerfile, and that’s not something we want. So you want to put all the files that you don’t want to trigger a build into a .dockerignore file.
For starters, we are going put these files and folders in our .dockerignore file.:
**/bin/
**/obj/
**/global.json
**/Dockerfile*
**/.dockerignore*
**/*.user
Building the image
Once we configured our Dockerfile and .dockerignore, we can start the build and tag our image:
docker build -t codemazeblog/accountowner:build .
The first time you run the docker build, it will take a while, since Docker is fetching the base image. Give it some time. After the first build, every following build will use that image from the local machine.
First build is fun and you get to see every step of our Dockerfile resolving in real-time.
After the first build, if you don’t change the project files, all the steps will be cached and you’ll get something like this:
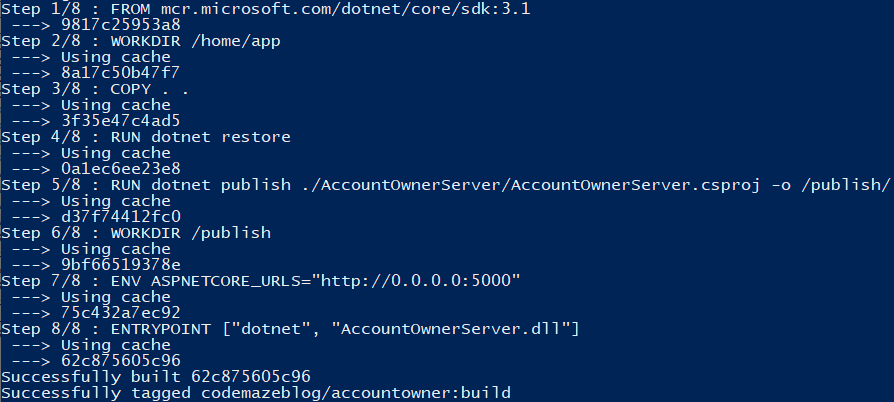
As you can see every step is cached, and there is no need to rebuild the image. If you want you can force the rebuild with the –no-cache flag.
docker build --no-cache -t codemazeblog/accountowner:build .
If you run the docker images command, now you can find our image on the list:

Okay, now we’re ready to run our application.
Running the Image
Finally, to run the application you can spin up the container by typing:
docker run --rm -it -p 8080:5000 codemazeblog/accountowner:build
This should run our application as we expect it to so far.
But, take a quick look at the image size. It’s the biggest so far. That’s because we copied, restored and published our code in the same image.
Let’s try to optimize the process.
Optimizing the Dockerfile
As we have learned by now, Docker images consist of different layers, and we’ve seen the Docker build process. It goes step by step and executes the steps we defined. Once the step is executed, it gets cached, and if there are no changes related to that step it gets pulled from the image cache next time we run the build.
So, knowing all this can you guess what we could have done better in our Dockerfile?
Well, let’s have a look at that third step once again: COPY . ., and then we do RUN dotnet restore.
What this means is that whenever we make a change to the source code, we need to run dotnet restore since that will break the cache.
So instead of copying all the files, we can just copy the project and solution files, do the dotnet restore, and then copy the rest of the files:
FROM mcr.microsoft.com/dotnet/core/sdk:3.1

WORKDIR /home/app

COPY ./AccountOwnerServer/AccountOwnerServer.csproj ./AccountOwnerServer/
COPY ./Contracts/Contracts.csproj ./Contracts/
COPY ./Repository/Repository.csproj ./Repository/
COPY ./Entities/Entities.csproj ./Entities/
COPY ./LoggerService/LoggerService.csproj ./LoggerService/
COPY ./Tests/Tests.csproj ./Tests/
COPY ./AccountOwnerServer.sln .

RUN dotnet restore

COPY . .

RUN dotnet publish ./AccountOwnerServer/AccountOwnerServer.csproj -o /publish/

WORKDIR /publish

ENV ASPNETCORE_URLS="http://0.0.0.0:5000"

ENTRYPOINT ["dotnet", "AccountOwnerServer.dll"]
There, now the
dotnet restore won’t trigger whenever we change something in our source code. We’ll only need to re-publish the assemblies.
But why do we copy every project and solution file manually?
That’s because something like COPY ./**/*.csproj ./ wouldn’t work. It won’t recreate the folder structure. So you would just get the flat structure with all the project and solution files. And that’s no good.
Optimizing Even Further
We can push the optimization even further.
The downside of the current way of creating the Dockerfile is that we need to manually copy each solution and project file. That means we need to change the Dockerfile whenever our solution structure changes, and it just looks bad. It’s a lot of work.
So let’s see how we can remedy that.
Take a look at the next Dockerfile:
FROM mcr.microsoft.com/dotnet/core/sdk:3.1

WORKDIR /home/app

COPY ./*.sln ./
COPY ./*/*.csproj ./
RUN for file in $(ls *.csproj); do mkdir -p ./${file%.*}/ && mv $file ./${file%.*}/; done

RUN dotnet restore

COPY . .

RUN dotnet publish ./AccountOwnerServer/AccountOwnerServer.csproj -o /publish/

WORKDIR /publish

ENV ASPNETCORE_URLS="http://0.0.0.0:5000"

ENTRYPOINT ["dotnet", "AccountOwnerServer.dll"]
So, what happened here?
In short, we used some clever syntax as a workaround for the COPY command to recreate the folder structure we need. The command uses the project names to create folders for the files to be copied in.
To avoid unnecessary explanations here, you can read more about the command in the Andrew Lock’s blog post.
Now we don’t need to change the Dockerfile even if the add more projects to our solution or change project names.
Clear and magical.
Just Run and Test Boys, Run, and Test
There is one more tiny little thing we need to do. We need to run our unit test to see if the project is even worth publishing!
So let’s add that to our Dockerfile as well:
FROM mcr.microsoft.com/dotnet/core/sdk:3.1

WORKDIR /home/app

COPY ./*.sln ./
COPY ./*/*.csproj ./
RUN for file in $(ls *.csproj); do mkdir -p ./${file%.*}/ && mv $file ./${file%.*}/; done

RUN dotnet restore

COPY . .

RUN dotnet test ./Tests/Tests.csproj

RUN dotnet publish ./AccountOwnerServer/AccountOwnerServer.csproj -o /publish/

WORKDIR /publish

ENV ASPNETCORE_URLS="http://0.0.0.0:5000"

ENTRYPOINT ["dotnet", "AccountOwnerServer.dll"]
That’s it. Rebuild the image again and check out the result.
Once you see the tests pass, change the Assert.IsType<List<Owner>>(result); to Assert.IsNotType<List<Owner>>(result); in our OwnerRepositoryTests.csfile and run the Docker build again.
You should get something like this:
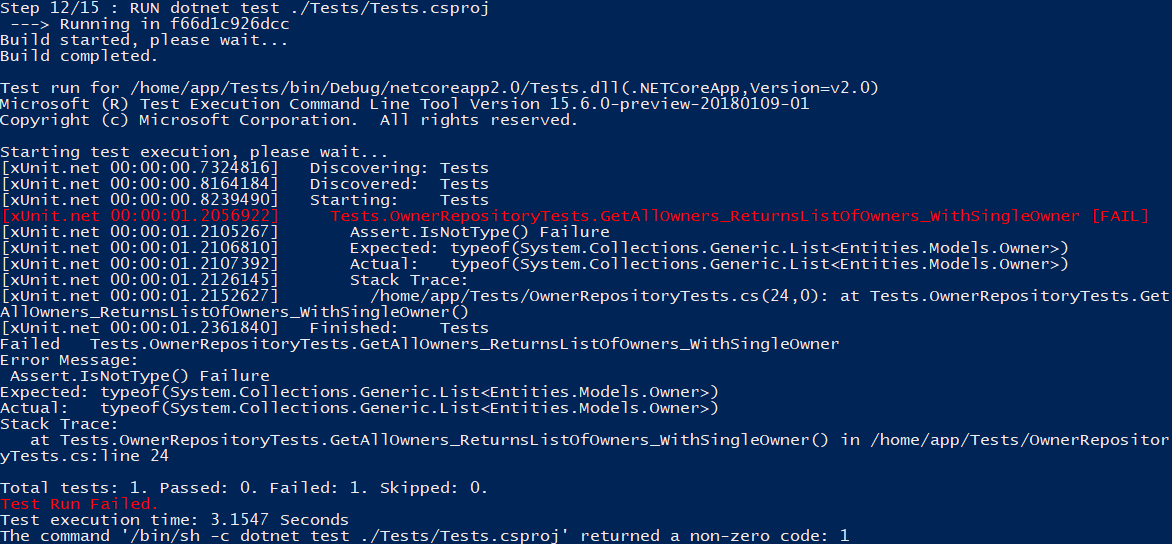
The test has failed, and the build has stopped. The publish step hasn’t been triggered, which is exactly what we want.
Excellent.
We’ve gone through the entire process, but there is one thing that some of you might have noticed. That’s not something you want to use to run your containers from.
SDK images are powerful and we use to build and run applications. Nevertheless, to deploy our application to a production environment, we should create an image that is optimized for that purpose only.
In comparison to SDK images, runtime-only images are much lighter.
So let’s see how to upgrade our Dockerfile and publish our application to the runtime-optimized image.
Creating Multistage Builds in Dockerfiles
For this purpose, we are going to use something called a multistage build in the Docker world. Multistage builds can be created by using FROM command multiple times in a Dockefile.
So we are going to do just that to upgrade our process. Instead of using our SDK image to publish our application to, we are going to introduce another base image to the Dockerfile and publish the artifacts inside it.
Let’s see how to do that:
FROM mcr.microsoft.com/dotnet/core/sdk:3.1 as build-image

WORKDIR /home/app

COPY ./*.sln ./
COPY ./*/*.csproj ./
RUN for file in $(ls *.csproj); do mkdir -p ./${file%.*}/ && mv $file ./${file%.*}/; done

RUN dotnet restore

COPY . .

RUN dotnet test ./Tests/Tests.csproj

RUN dotnet publish ./AccountOwnerServer/AccountOwnerServer.csproj -o /publish/

FROM mcr.microsoft.com/dotnet/core/aspnet:3.1

WORKDIR /publish

COPY --from=build-image /publish .

ENV ASPNETCORE_URLS="http://0.0.0.0:5000"

ENTRYPOINT ["dotnet", "AccountOwnerServer.dll"]
So, what’s new here?
First, we added as build-image to the first FROM command for easier referencing later.
Second, instead of running the application inside the SDK image, we copied the contents of the publish folder inside our SDK image to the publish folder of the runtime image.
Third, we moved the entry point to the runtime image, so that we run the application when we instantiate the runtime container. The SDK container shall no longer be responsible for running our application.
So, what’s the result of all this? Let’s see.
Type the docker build -t codemazeblog/accountowner:runtime . command and enjoy the process.
![]()
When the build finishes, we get two images. One is tagged and one is not. One is runtime and one is SDK. In this case, we are not interested in the SDK image, but you can clearly see the size difference.
So that’s it, now if you run docker run --rm -it -p 8080:5000 codemazeblog/accountowner:runtime you’ll get the same result and you’ll be able to see your application at the http://localhost:8080/swagger.
Let’s wrap the article up with the commands you might find useful while following these steps.
All the changes we made in this article can be found on the docker-series-dockerfiles-end branch of our docker-series repo.
Some Useful Commands
Here are some of Docker commands that might help you along the way:
docker images– lists all Docker images on your machinedocker ps– lists all running Docker containers on your machinedocker ps -a– lists all the attached but not running containersdocker --help– Docker help (no s..t Sherlock)docker logs <container_name>– outputs the container logs (useful when running the container in a detached mode for example)docker events– outputs the events that happen on the server, depending on the Docker object (attach, detach, copy, pull…)docker stop <container_name>– stops the container by namedocker rm <container_name>– removes the container by namedocker rmi <image_id>– removes the imagedocker rmi $(docker images -q -f dangling=true) -- force– this one is particularly interesting, removes all the images that are not tagged (<none>)docker rm $(docker ps -a -q)– removes all containersdocker rmi -f $(docker images -a -q)– removes all images
Conclusion
That’s it for this part.
We’ve learned how to build ASP.NET Core application with Dockerfiles, some useful commands and what each one does. We’ve also learned the difference between the SDK and runtime images, and that we can combine them to achieve the best results by using the multistage Docker builds.
Now that we know all this we can move on to the next part, in which we connect our application to MySQL. That will also be the perfect opportunity to introduce docker compose tool, which will make our lives much easier when working with multiple images.

Hi
Thank you for the series of articles on Docker.
My question is about adding the testing project to the docker file.
When I added the suggested line and then built my image, I did not see the testing stage output in the console. It just emitted the line in the docker file and then moved forward.
However, when I changed the test method for it to fail, I of course saw the output in the console.
I then went back and corrected the failing test and built my image again, this time I did not see the test outputs either. I am using a base docker image of .net5.0.
What do you think about this behavior?
Thanks
Hi, this is a great article btw. I have used VS2019 (Windows 10) to create a Dockerfile – I am using Docker for Windows with Linux Containers – and it builds fine from steps 1 – 20. But when I run it I get an error in powershell
C:Program FilesDockerDockerResourcesbindocker.exe: Error response from daemon: driver failed programming external connectivity on endpoint strange_hopper (f723668e6c985f84e07db63cb30ca3b8b8e944b009f209ee42ba07ae2a9c42b0): Error starting userland proxy: listen tcp 0.0.0.0:8080: bind: An attempt was made to access a socket in a way forbidden by its access permissionsIs there a quick fix for this or do I need to use Windows containers?
Hi! Awesome article, thanks a lot!
I am curious about one thing: when we COPY project files, do Restore and then AGAIN COPY- won’t we get project files duplicated inside the image?
Hey Bogdan,
Thank you for the kind words.
And to answer your question: yes it will. But it doesn’t matter at that point since it only takes a few milliseconds more.
What’s important is that we singled out project files before that and that we did restore. Otherwise whenever we change anything in our code, Docker cache would be broken and we would have to restore packages again which is not ideal.
This way project files get overwritten, but we get a big boost by utilizing Docker cache mechanism.
Hope this helps.
So during second COPY all project files are overwritten(or maybe skipped?) and after second COPY all project files are still unique inside the image (no clones)?
Thanks in advance!
I loved this blog . However i need to know where is the Accountonwer.dll file present exaclty ? I am getting error in the entrypoint of the docker image file, as the container is getting built but not getting started.
Hi Mathangi C,
The file you are looking for is AccountOwnerServer.dll. It is located right in the publish folder of the image.
Hi, thanks for this. Can you perhaps explain why when I run the command “docker run –rm -it -p 8080:80 webapplication10:dev” I only get a bash command line /app#. My test dotnet asp.net is not running on the port specified? This is stock standard asp.net mvc app with Docker support added.