

Started to improve the scalability of an Italian startup, Redis has emerged as a powerful solution for efficient and fast data storage and retrieval. With Redis, applications can achieve lightning-fast access to frequently used data enabling millions of requests per second. In this article, we will learn more about Redis, one of the most popular open-source engines in present times.
We’ll be using Docker to install and set up the Redis server in this article. So, a basic knowledge of Docker is a prerequisite.
However, before we dive into Redis, let’s take a moment to understand what caching is and its usage.
VIDEO: How to Improve Performance of Web APIs Using Redis Cache.
What Is Caching?
Caching is the process of storing data in temporary storage (called cache) to improve the speed of data access. We need to make sure that this storage is faster and more easily accessible than the original data source which can be a database or an API.
When an application requests data, we first check if the data is present in the cache. If so, we return the cached data. This process saves us a trip to the original data source which might be costly in terms of performance. Even if the data is not present in the cache on the first request, we can store it in the cache when retrieving it from the external data source, thus making the subsequent requests better in performance.
Also, we can add expiration time to the cache storage so that we can be sure about the consistency of the data stored in it.
Now that we understand what caching is and how it works, let’s take a look at Redis.
What Is Redis?
Redis (Remote Dictionary Server) is an open-source, in-memory key-value store that allows fast data look-up. We use it primarily as an application cache.
When our applications rely on external data sources such as a database or an API, the performance and the latency of the data access are limited by those resources. We have a bottleneck especially while scaling the application.
This is the problem Redis intends to solve. It combines the best of in-memory caching, to increase the performance of data access and reduce the latency, with distributed caching, to provide scalability and resilience through data replication.
Redis Setup
To get started with Redis setup, we need to set up Docker on our machine.
The first step is to set up a Redis server using the docker command in the command prompt:
docker run --name redis-cache -p 90:6379 -d redis
Here, we create a new Docker container and run it. The --name redis-cache flag sets the name of this container to “redis-cache”.
We map the host machine’s port to the Redis container’s port with the -p 90:6379 flag. Here, “6379” is the default port for Redis that is mapped to port 90 of the host machine. We can select any available port here.
The flag -d ensures that the container runs in a detached mode i.e. in the background. Finally redis is the name of the Docker image used to create the container. If the Redis image is not already present, Docker will download it.
Running the docker ps -a command, we can see all the Docker containers:

Now that we are done creating the Redis server, let’s execute it:
docker exec -it redis-cache sh
This command launches an interactive shell session with our container. Then, we can execute specific commands inside the Redis server.
That’s it. Now that the Redis server is up and running, let’s set up our application.
C# Application Setup
We will create a simple ASP.NET Core Web Application with all the default options enabled, so let’s use the Visual Studio Project wizard or the dotnet new webapp to do so.
Now, before we begin modifying our web application, let’s install a couple of NuGet packages we need to interact with Redis.
In the NuGet Package Manager Console, we need to install Microsoft.Extensions.Caching.StackExchangeRedis:
Install-Package Microsoft.Extensions.Caching.StackExchangeRedis
This package allows us to use caching in the web application. Additionally, we need to install StackExchange.Redis:
Install-Package StackExchange.Redis
This is a client library that allows us to interact with Redis.
Application Configuration
Now, let’s add Redis as our caching provider in our application. To do so, we need to modify the Main() method in the Program class:
builder.Services.AddStackExchangeRedisCache(options =>
{
    options.Configuration = builder.Configuration.GetConnectionString("RedisConn");
    options.InstanceName = "GamesCatalog_";
});
This adds our caching information to the dependency injection system of the application. Hence, we can inject the IDistibutedCache interface into any of our services.
It is important to note that options.InstanceName is an optional property that allows us to prepend a custom instance name to all our cache keys. This is important when we have multiple applications using the same Redis database. It allows us to differentiate between the keys from different instances even if they have the same name.
In the options.Configuration property, we specify the connection string for the Redis server.
Let’s create a connection string “RedisConn” in the appSettings.json file:
{
  "Logging": {
    "LogLevel": {
      "Default": "Information",
      "Microsoft.AspNetCore": "Warning"
    }
  },
  "AllowedHosts": "*",
  "ConnectionStrings": {
    "RedisConn": "localhost:90"
  }
}
The port number we specify here (90) must match the port we mapped the Redis server to in the Docker setup.
Data Setup
In a real-world scenario, we’d be using a database such as SQL or any external API as our data source. We’ll keep it simple in our example and use static JSON data to act as our external data source.
However, let’s first create our model class Game:
public class Game
{
    public int Id { get; set; }
    public string Title { get; set; } = string.Empty;
    public string Genre { get; set; } = string.Empty;
    public string Platform { get; set; } = string.Empty;
    public int ReleaseYear { get; set; }
}
We’ll use this class to map the data from a JSON file GamesData.json:
[
  {
    "Id": 1,
    "Title": "The Witcher 3: Wild Hunt",
    "Genre": "Action RPG",
    "Platform": "PlayStation 4",
    "ReleaseYear": 2015
  },
  {
    "Id": 2,
    "Title": "Red Dead Redemption 2",
    "Genre": "Action Adventure",
    "Platform": "Xbox One",
    "ReleaseYear": 2018
  }
]
This file contains data that represents an array of Game objects. We need to make sure that the structure of the JSON data aligns with the properties of the Game class.
Now that we have our model class and the JSON data file, we can go ahead with mapping the data to the model class.
Let’s create a service class GamesService and add a method to retrieve all Game objects present in our data source:
public Game[] LoadGames()
{
    using var streamReader = new StreamReader("Data/GamesData.json");
    var gamesData = streamReader.ReadToEnd();

    var games = JsonSerializer.Deserialize<Game[]>(gamesData);

    return games;
}
Here, we read the content of the JSON file and then deserialize the JSON data into an array of Game objects. Then, we can use this array Game[] in the application.
Razor Page Setup
Now that we have our data, the next step is to create a user interface to present this data to the user.
Let’s modify the Index.cshtml razor page to show a button that when clicked, will populate the UI with game data.
The button click will send a POST request to our page model:
public class IndexModel : PageModel
{
    private readonly GamesService _gamesService;

    public Game[]? Games { get; set; }

    public IndexModel(GamesService gamesService)
    {
        _gamesService = gamesService;
    }

    public void OnPostListGames()
    {
        Games = _gamesService.LoadGames();
    }
}
We use the GamesService class to populate game data in the Games property of the Index.cshtml.cs razor page model. Now, we can use this property in the Index.cshtml razor page using Model.Games:
@if (Model.Games != null && Model.Games.Length > 0)
{
    <table class="table table-striped table-bordered">
        <thead class="thead-dark">
            <tr>
                <th>Title</th>
                <th>Genre</th>
                <th>Platform</th>
                <th>Release Year</th>
            </tr>
        </thead>
        <tbody>
            @foreach (var game in Model.Games)
            {
                <tr>
                    <td>@game.Title</td>
                    <td>@game.Genre</td>
                    <td>@game.Platform</td>
                    <td>@game.ReleaseYear</td>
                </tr>
            }
        </tbody>
    </table>
}
Here, we create an HTML table with bootstrap CSS classes. We have table headers that represent every property from the Game class. Finally, we iterate over the Model.Games collection to create a new row for each game and store the appropriate information in the respective columns.
Implement Redis Caching in C#
So our application is up and running at this point. However, it is still directly communicating with the database (or mimicking to do so in our case) for every request.
We haven’t implemented caching yet. So next, let’s fix that.
Caching Service
Let’s create a RedisCacheService class:
public class RedisCacheService
{
    private readonly IDistributedCache? _cache;

    public RedisCacheService(IDistributedCache cache)
    {
        _cache = cache;
    }
}
Here, we inject the IDistributedCache interface using the dependency injection system of ASP.Net Core. Thus, we can integrate Redis as the caching solution.
Now, let’s create a method to get the cached data:
public T GetCachedData<T>(string key)
{
    var jsonData = _cache.GetString(key);

    if (jsonData == null)
        return default(T);

    return JsonSerializer.Deserialize<T>(jsonData);
}
The GetCachedData() method allows us to retrieve cached data of any specified type T. We pass a cache key as a parameter to this method. It retrieves the data present in the cache associated with the key. If no such data is present, it returns the default value of the specified type T.
Next, let’s create a method to store any data in the cache:
public void SetCachedData<T>(string key, T data, TimeSpan cacheDuration)
{
    var options = new DistributedCacheEntryOptions
    {
        AbsoluteExpirationRelativeToNow = cacheDuration
    };

    var jsonData = JsonSerializer.Serialize(data);
    _cache.SetString(key, jsonData, options);
}
In the SetCachedData() method we have three parameters, key, for the identifier of the cached data, data, representing the actual data we want to cache, and cacheDuration to specify the duration for which we want to cache the data.
We serialize the data into JSON before storing it in the cache. It remains in the cache for the specified duration after which it expires.
Use the Caching Service
Let’s update the razor page Index.cshtml to use our newly created RedisCacheService:
public class IndexModel : PageModel
{
    private readonly GamesService _gamesService;
    private readonly RedisCacheService _cache;

    public Game[]? Games { get; set; }
    public bool IsFromCache { get; set; } = false;

    public IndexModel(GamesService gamesService, RedisCacheService cache)
    {
        _gamesService = gamesService;
        _cache = cache;
    }
}
Before we use the service, we need to inject the RedisCacheService into the IndexModel class constructor. Additionally, let’s also introduce a property IsFromCache. This will tell us whether the data in the last request was retrieved from the data source or the cache memory.
Also, let’s modify the OnPostListGames() method to utilize the RedisCacheService:
public void OnPostListGames()
{
    var instanceId = GetInstanceId();
    var cacheKey = $"Games_Cache_{instanceId}";

    Games = _cache.GetCachedData<Game[]>(cacheKey);

    if (Games == null)
    {
        Games = _gamesService.LoadGames();
        _cache.SetCachedData(cacheKey, Games, TimeSpan.FromSeconds(60));
        IsFromCache = false;
    }
    else
    {
        IsFromCache = true;
    }
}
First, we generate a cache key. It is important that we make this key unique.
Next, we check if any data associated with the key is already present in the cache using the GetCachedData() method. If so, we assign the data to the Games property.
If no data is cached yet, we send a request to our data source using the LoadGames() method. Then, we store this data in the cache using the SetCachedData() method and associate it with our cache key. Here, we set the expiration time of the cached data to 60 seconds.
Additionally, we set the IsFromCache property to true or false depending on where we retrieve the data from. So, with the click of a button, we send a POST request to the page model and load the data either from the cache or the data source.
To ensure our cache key is unique, we can utilize HttpContext.Session to store an identifier of the current instance:
private string GetInstanceId()
{
    var instanceId = HttpContext.Session.GetString("InstanceId");

    if (string.IsNullOrEmpty(instanceId))
    {
        instanceId = Guid.NewGuid().ToString();
        HttpContext.Session.SetString("InstanceId", instanceId);
    }

    return instanceId;
}
The GetInstanceId() method makes sure that even if we launch multiple instances of our application using different web browsers simultaneously, the application assigns a unique id to each of those instances. Hence, the cache for one browser doesn’t interfere with another.
Redis Caching in C# In Action
Let’s update the Index page to provide the user with a message indicating where the requested data is actually coming from:
<div class="text-center mt-5">
    <h2 class="display-4">Mission Successful!</h2>
    @if (Model.IsFromCache)
    {
        <p class="lead">Loading games from the cache</p>
    }
    else
    {
        <p class="lead">Loading games from the API</p>
    }
</div>
When a user clicks on the button to list all the games, if the application loads the data from the cache, the user will see the message “Loading games from the cache”. Whereas, if the source is GamesService, the user will see the message “Loading games from the API” along with the list of games.
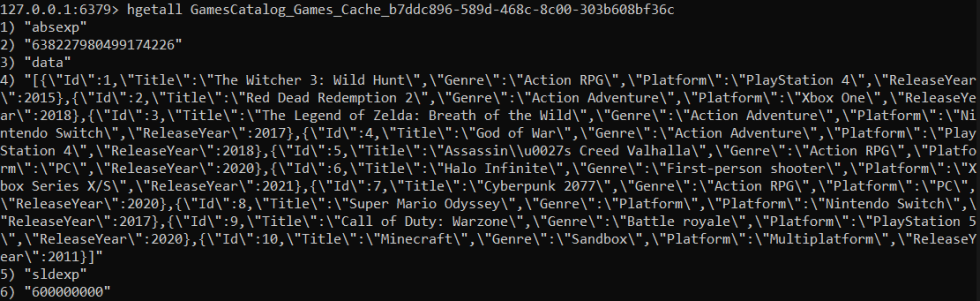
We can check available data in the Redis database on the command prompt through the interactive shell we launched inside the Redis container earlier:
docker exec -it redis-cache sh
# redis-cli
On running this command, we get a command line interface for Redis. Next, we can scan the database to see any present records:
127.0.0.1:6379> scan 0
At this point, our Redis database is empty:
1) "0"
2) (empty array)
Hence, the API will always handle that initial request. However, as soon as we send the first request, we also create an entry in the cache:
127.0.0.1:6379> scan 0
1) "0"
2) 1) "GamesCatalog_Games_Cache_b7ddc896-589d-468c-8c00-303b608bf36c"
   2) "GamesCatalog_4e91c363-6a1a-3268-9ed8-acf2fc8c9fda"
The first key is the key generated to store our game data in the cache.
The session middleware uses our registered cache service to store data. As we have registered Redis as our cache service, it automatically starts using Redis for the storage of Session data. This is the second key we see when scanning.
We can use the hgetall <key> command to see how the cache stores the game data:
So, for the next 60 seconds, Redis serves the subsequent requests. Once the cache expires, the API will again serve the initial request with Redis taking over for the duration of cache expiration.
Cache Expiration Policies With Redis in C#
So, we have this fast and efficient Redis cache for our application. However, we need to manage what data to keep and what to discard from it. This is where cache expiration policies come into the picture.
Cache expiration policies work like time limits that we set for each item in our Redis cache. Once the expiration time is up, the item is automatically removed.
Let’s look at some of the types of cache expiration policies in Redis.
Absolute Expiration
This allows us to set a specific date and time after which the cached data expires. We can set an absolute expiration using the AbsoluteExpiration property:
public void SetCachedData<T>(string key, T data, TimeSpan cacheDuration)
{
    var options = new DistributedCacheEntryOptions
    {
        AbsoluteExpiration = DateTime.Now.Add(cacheDuration)
    };

    var jsonData = JsonSerializer.Serialize(data);
    _cache.SetString(key, jsonData, options);
}
Here, we specify a point in time as a deadline after which the cached data is no longer valid.
Sliding Expiration
When we don’t want to depend on the age of data in the cache and rather its frequency of use, sliding expiration is useful. We can use the SlidingExpiration property to set the sliding expiration:
public void SetCachedData<T>(string key, T data, TimeSpan cacheDuration)
{
    var options = new DistributedCacheEntryOptions
    {
        AbsoluteExpiration = DateTime.Now.Add(cacheDuration),
        SlidingExpiration = cacheDuration
    };

    var jsonData = JsonSerializer.Serialize(data);
    _cache.SetString(key, jsonData, options);
}
Here, the expiration time resets for the same duration each time we access the data within the specified duration. For example, if we have a cache with a sliding expiration of 60 seconds, the expiration time keeps extending by 60 seconds every time we either access or modify the data within the expiration duration.
Time-to-Live (TTL) Expiration
This is similar to absolute expiration. However, instead of setting an absolute time, we use a relative maximum duration till which the data is valid. We can set it using the AbsoluteExpirationRelativeToNow property:
public void SetCachedData<T>(string key, T data, TimeSpan cacheDuration)
{
    var options = new DistributedCacheEntryOptions
    {
        AbsoluteExpirationRelativeToNow = cacheDuration,
        SlidingExpiration = cacheDuration
    };

    var jsonData = JsonSerializer.Serialize(data);
    _cache.SetString(key, jsonData, options);
}
Here, we pass a duration of time using the cacheDuration parameter. Once this duration elapses from the time the data is stored in the cache, the data expires.
It’s important to note that if we set both TTL and sliding expirations, the TTL expiration takes precedence. Thus, the data expires after the cache duration elapses and the expiration is not based on its frequency of access.
Manual Removal of Cache
If we don’t specify any expiration policy, the data lives in the cache indefinitely till we manually remove it. This might be useful if we want to persist some data regardless of how old or infrequently used it is. However, this can lead to our cache being filled with unused and outdated data.
Let’s implement a button to manually remove the cached data in Index.cshtml:
<form method="post">
    <button type="submit" class="btn btn-danger btn-lg" asp-page-handler="RemoveCache">
        Remove Cached Data
    </button>
</form>
Additionally, we need to add a method in RedisCacheService to remove the cache:
public void RemoveCachedData(string key)
{
    _cache.Remove(key);
}
The method takes the cache key as an argument and removes it from the Redis cache. On click of the “Remove Cached Data” button, we send a POST request to get the existing key and remove it:
public void OnPostRemoveCache()
{
    var instanceId = GetInstanceId();
    var cacheKey = $"Games_Cache_{instanceId}";

    _cache.RemoveCachedData(cacheKey);

    OnPostListGames();
}
This forces the application to load data using the RedisCacheService on the next request and the application shows the message “Loading games from the API” even though the cache expiration time isn’t elapsed.
Best Practices for Redis in C#
Let’s explore some of the best practices that can help us make decisions to utilize Redis more efficiently.
One of the most important caching strategies is to select which data to cache. We should cache parts of our application that are read-heavy and frequently accessed. Data that is updated frequently is not a good choice here as the cache might not hold the most updated data always.
To prevent the cache data from going stale, it’s also important to set an appropriate cache expiration duration. This ensures that the data in the cache is up to date and minimizes the need to retrieve data from the original data source. Redis allows us to set the cache expiration using a TTL (time-to-live) key. However, we need to strike a balance here. A short cache expiration will ensure data freshness but might do so at the cost of higher cache misses.
When the underlying data is updated, the cache should also reflect the same and should get rid of the previous outdated data. We call this process cache invalidation, and it’s important to keep the cache consistent. This ensures the application doesn’t serve outdated data to the users.
Finally, similar to the application, caching is a growing process. We need to keep refining our caching strategies based on how the data and the application scale.
Conclusion
In this article, we learned about caching and how to implement it using Redis in C#. We looked at how to configure Redis for a .NET web application and also learned about Redis cache expiration policies and some of the best practices for Redis caching.
