

Sensitive data exposure occurs when an application accidentally exposes sensitive data. This differs from a data breach, in which an attacker accesses and steals information.
Sensitive data exposure usually occurs when we fail to adequately protect the information in the database. Various causes that can lead to this are missing or weak encryption, software flaws, storing data in the wrong place, etc.
An attacker can expose different types of data. Bank account details, credit card data, healthcare data, session tokens, social security numbers, home address, phone numbers, dates of birth, and user account information such as usernames and passwords, etc. are some examples.
To see all the articles from this series, visit the OWASP Top 10 Vulnerabilities page.
Let’s start.
The Sensitive Data Exposure Vulnerability
Data exposure vulnerability depends on how we handle certain information. If we store sensitive data in plain text documents, we make our application vulnerable to this attack.
Similarly, If we don’t use SSL and don’t have HTTPS security on web pages that store information, there is a risk of data being exposed.
Another thing to watch out for is storing data in a database that may be compromised by SQL injection. We have explained SQL injection and how to prevent that in our article OWASP Top 10 – Injection
If we are using weak cryptographic algorithms, keys, etc or not implementing hashed and salted passwords, our application becomes vulnerable to this type of attack.
Sensitive Data Exposure – Attack Scenarios
In the previous section, we looked at sensitive data exposure vulnerability. Now we are going to look at some attack scenarios.
Scenario #1
An application stores credit card numbers in a database without encryption. If an attacker gets access to the database through SQL injection, he could easily get the credit card numbers.
We are going to look at an example of how attackers could get information stored in the database using SQL injection. Let’s follow the Example Injection Attack Scenario we explained in the SQL Injection article.
We are going to add a new table CreditCardData to store the credit card data:
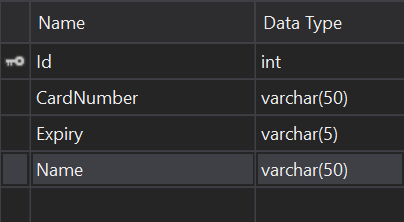
Then let’s populate some data in it:

As explained in the article, an attacker could log into the website by giving the following values in the input fields:
Username: admin
Password: ` OR 1=1 --
Now we are going to slightly modify the password value to fetch data from CreditCardData table. Let’s leave the username field empty:
Username:
Password: 'UNION SELECT SUBSTRING((SELECT ',' + s.[CardNumber] + ';' + s.[Expiry] + ';' + s.[Name] FROM dbo.[CreditCardData] s FOR XML PATH('')),2,200000)--
This will expose all credit card data in the login success page:
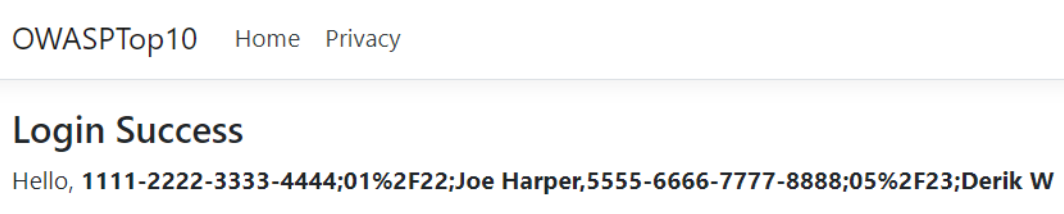
The above query concatenates all data from the CreditCardData table using separators for rows and columns and returns as a string value.
Now let’s examine the actual query that is executed when the application runs:
SELECT [UserName] FROM dbo.[Login] WHERE [Username] = '' AND [Password]=''
UNION SELECT SUBSTRING((SELECT ',' + s.[CardNumber] + ';' + s.[Expiry] + ';' + s.[Name]
FROM dbo.[CreditCardData] s FOR XML PATH('')),2,200000)--'
Since this is an SQL UNION statement, it combines the result of both queries.
Scenario #2
Take the case of a website that doesn’t enforce TLS or uses weak encryption. An attacker could monitor network traffic and downgrade the connections from HTTPS to HTTP. Then, they can intercept the requests and steal the user’s session cookie. The attacker can use this cookie to hijack the user’s authenticated session:
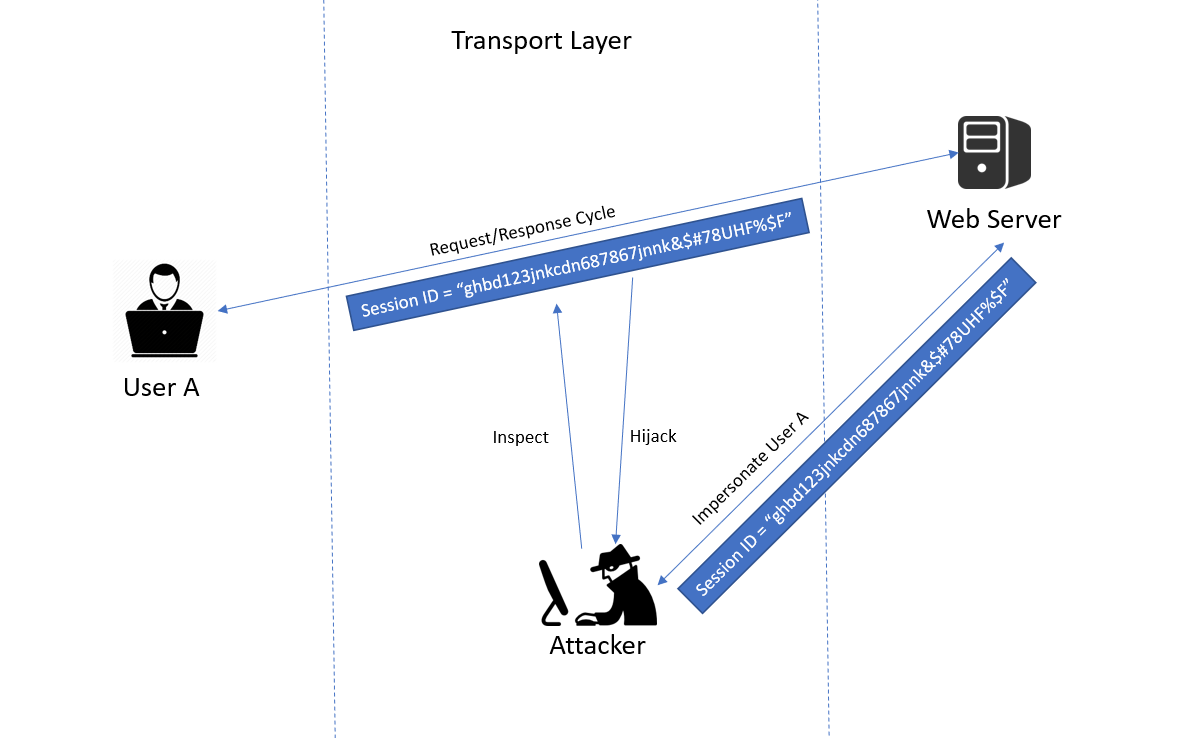
They may then access or modify the user’s private data. The attacker could even modify the transported data, for example, the recipient of a money transfer.
Scenario #3
An application store passwords in the database using unsalted or simple hashes. A flaw in the application design could allow an attacker to retrieve the password from the database. An attacker can expose the unsalted hashes using Rainbow Table attacks.
A Rainbow Table attack is a type of hacking wherein the attacker tries to use a Rainbow hash table to crack the passwords stored in a database system. A Rainbow table is a precomputed table for reversing cryptographic hash functions, usually for cracking password hashes.
We are going to look at how to protect our data from these kinds of attacks in the next section.
Steps to Prevent Sensitive Data Exposure
In this section, we are going to discuss various steps to prevent sensitive data exposure.
Prevent storage of unwanted data
The first step is to make sure that we don’t store any sensitive information that is not required.
We should properly classify the data processed, stored, or transmitted by our application. After this, we need to identify which data is sensitive according to privacy laws, regulatory requirements, or business needs. Then, we need to apply controls as per the classification.
We should never store sensitive data unnecessarily and should discard it as soon as possible. There are industry-specific guidelines to protect sensitive data that need to be stored. For example, the payment industry mandates using PCI DSS compliant tokenization or even truncation.
By not storing unwanted sensitive information, we can take the first level of defense against data exposure.
Encrypt all sensitive data stored
After classifying and determining the sensitive data that needs to be stored, the next step is to protect it. We should encrypt all sensitive data that is stored by our application. Also, we should ensure that we use strong and updated standard algorithms, protocols, and keys to protect it.
In the previous section, we saw how an attacker can expose credit card data using SQL injection. Now we are going to look at how to protect that data.
We have explained how to encrypt and decrypt data using IDataProtector in ASP.NET Core in our article Protecting Data with IDataProtector in ASP.NET Core
Following through the article, we can encrypt the credit card data before storing it. Later when we want to retrieve the data, we can decrypt it and use it. That way, an attacker cannot read our data even if he gets hold of our database.
Encrypt all data in transit
In the previous section, we discussed how to protect sensitive data that is stored. Now we are going to look at how to protect data during transit.
We should encrypt all data in transit with security protocols such as TLS. TLS (Transport Layer Security) is a widely adopted security protocol designed to facilitate privacy and data security for communications over the Internet. It encrypts communication between web applications and servers.
HTTP Strict Transport Security (HSTS) is a web security mechanism that helps to protect websites against man-in-the-middle attacks such as protocol downgrade attacks and cookie hijacking. It allows web servers to demand that web browsers or other user agents should interact with it using only HTTPS connections, which ensures that the Transport Layer Security (TLS/SSL) is taken care of.
In the previous section, we saw how an attacker can intercept the requests and steal the user’s session cookie. Now we are going to look at how to prevent that by using TLS.
Code Changes
While creating ASP.NET Core web applications in production, we should use the following:
- HTTPS Redirection Middleware (
UseHttpsRedirection) to redirect HTTP requests to HTTPS. - HSTS Middleware (
UseHsts) to send HTTP Strict Transport Security Protocol (HSTS) headers to clients.
Let’s look at how to do that. We can configure both middlewares in Startup.cs:
public void Configure(IApplicationBuilder app, IWebHostEnvironment env)
{
    if (env.IsDevelopment())
    {
        app.UseDeveloperExceptionPage();
    }
    else
    {
        app.UseExceptionHandler("/Error");
        // The default HSTS value is 30 days. You may want to change this for production scenarios, see https://aka.ms/aspnetcore-hsts.
        app.UseHsts();
    }

    app.UseHttpsRedirection();
    app.UseStaticFiles();

    app.UseRouting();

    app.UseAuthorization();

    app.UseEndpoints(endpoints =>
    {
        endpoints.MapRazorPages();
    });
}
Testing
Now we are going to inspect what differences this makes to our application.
First, let’s comment out the highlighted code and see the result.
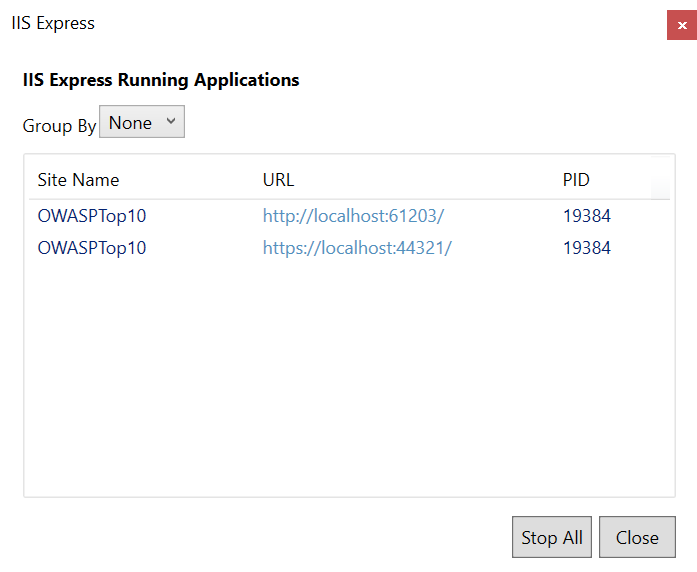
When we run the application, we can see that it runs on 2 ports, one for HTTP and another for HTTPS:
Let’s navigate to http://localhost:61203/ first:
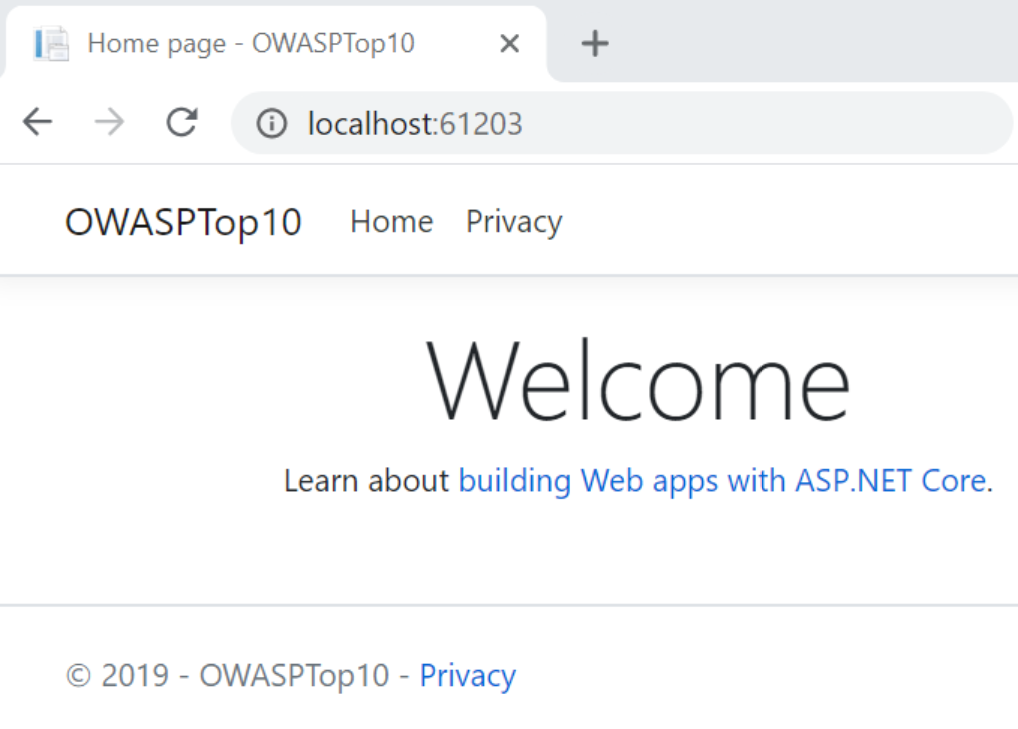
We can see that the website loads using HTTP.
Then, let’s uncomment the code to enable HTTPS redirection and HSTS and navigate to the same URL:
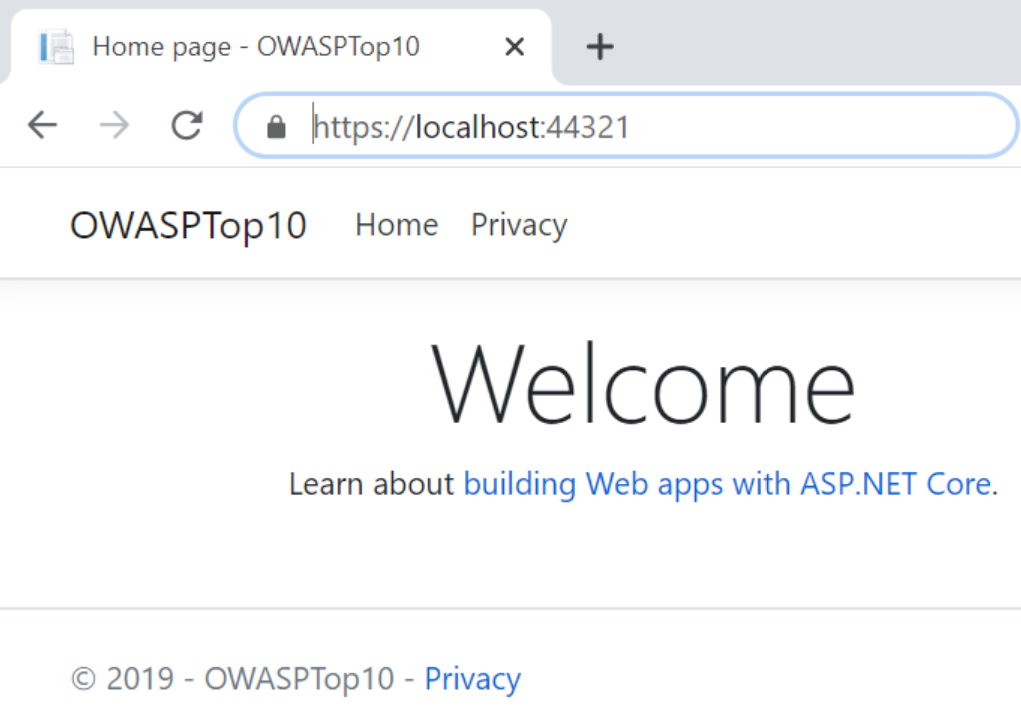
This time, we can see that it is automatically redirected to the HTTPS website.
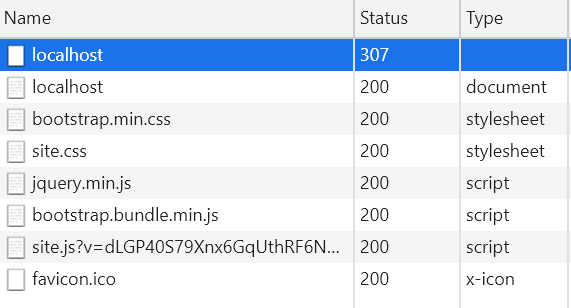
If we inspect the dev tools, we can see that the first HTTP request gets an automatic redirection with HTTP status code 307 to the HTTPS URL:
Similarly, since we implemented UseHSTS(), it will require all requests to be HTTPS. It will add a response header Strict-Transport-Security:
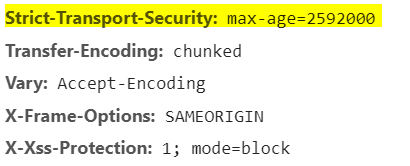
However, UseHSTS() excludes the localhost URL and hence we can see this header only once our application is hosted. Similarly, we recommend UseHSTS() only in production environments.
Disable Caching
We should disable caching for web pages that contain sensitive data. Browser headers should be set to not cache the web page when the sensitive data is presented to the end-user.
Response caching reduces the number of requests a client makes to a web server. It is controlled by headers that specify how we want to cache responses.
Code Changes
In ASP.NET Core, the ResponseCacheAttribute specifies the parameters necessary for setting appropriate headers in response caching. The Response Caching Middleware in an ASP.NET Core app determines if responses should be cached, stores responses, and serves responses from the cache.
We are going to look at how to do that. First, we need to add the response caching service:
public void ConfigureServices(IServiceCollection services)
{
    services.AddRazorPages();
    services.AddResponseCaching();
}
Then, we need to configure the response caching middleware:
public void Configure(IApplicationBuilder app, IWebHostEnvironment env)
{
    // Some code removed for brevity

    app.UseEndpoints(endpoints =>
    {
        endpoints.MapRazorPages();
    });

    app.UseResponseCaching();
}
By making the changes to the Startup.cs class, we can configure our application to use Response Caching middleware.
Now, we’re going to add a property to show current time in LoginSuccess page and add the ResponseCache attribute:
[ResponseCache(Duration = 60)]
public class LoginSuccessModel : PageModel
{
    public string Username { get; set; }

    public string CurrentTime { get; set; }

    public void OnGet(string username)
    {
        Username = username;
        CurrentTime = DateTime.Now.ToLongTimeString();
    }
}
Then let’s make some changes in LoginSuccess.cshtml to display the current time:
@page "{userName}"
@model OWASPTop10.Pages.LoginSuccessModel
@{
    ViewData["Title"] = "LoginSuccess";
}

<h4>Login Success</h4>
<div>Hello, <b>@Model.Username</b> </div>
<div>Current Time is: <b>@Model.CurrentTime</b> </div>We are also going to add a new menu item for accessing this page:
<div class="navbar-collapse collapse d-sm-inline-flex flex-sm-row-reverse">
    <ul class="navbar-nav flex-grow-1">
        <li class="nav-item">
            <a class="nav-link text-dark" asp-area="" asp-page="/Index">Home</a>
        </li>
        <li class="nav-item">
            <a class="nav-link text-dark" asp-area="" asp-page="/Privacy">Privacy</a>
        </li>
        <li class="nav-item">
            <a class="nav-link text-dark" asp-area="" asp-page="/LoginSuccess">LoginSuccess</a>
        </li>
    </ul>
</div>
Now let’s observe the differences while caching is enabled and disabled.
Testing
First, let’ s comment out the ResponseCache attribute and run the application:
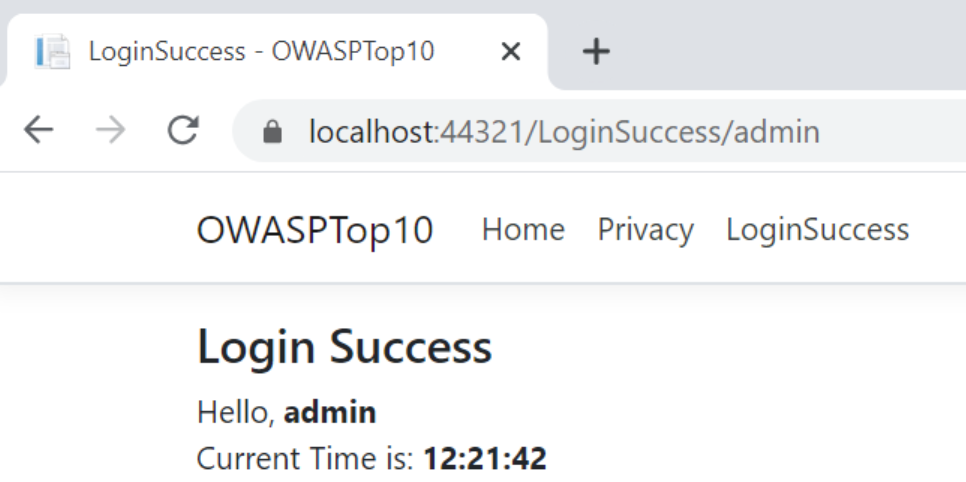
Each time we click on the LoginSuccess page link, we can see that the current time is updated which means the response is not cached.
On inspecting the response headers, we can see that there are no headers corresponding to caching:
Now we are going to uncomment the ResponseCache attribute and run the application. This time we can see that on clicking the LoginSuccess page link, the current time is not updated frequently. As we have specified to cache the response for 60 seconds, the time does not change for 60 seconds. It shows the cached time for 60 seconds.
Let’s inspect the response headers once again:

This time, we can see a cache-control header with the duration specified as 60.
Response Caching is a good technique for improving application performance. But we should disable it for pages that display any sensitive information.
Salt & Hash secrets
As much as possible, we should try not to store passwords and user secrets. If we have to, we should always store passwords using strong and salted hashing functions. We are going to look at how to do that in an ASP.NET Core application.
Code Changes
Let’s create a new page to capture the user’s secret value:
@page
@model OWASPTop10.Pages.HashingWithSaltModel
@{
    ViewData["Title"] = "HashingWithSalt";
}

<form method="post">

    <div class="row">
        <div class="col-md-4">
            <h4>Test Hashing With Salt</h4>
            <hr />
            <div class="form-group">
                <label asp-for="UserSecret.SecretValue"></label>
                <input asp-for="UserSecret.SecretValue" class="form-control" />
            </div>
            <div class="form-group">
                <button type="submit" class="btn btn-primary">Calculate Hash</button>
            </div>
        </div>
    </div>

</form>
In the code file, once the user enters the secret value and submits the page, we are going to redirect them to a different page to show the result:
public class HashingWithSaltModel : PageModel
{
    [BindProperty]
    public UserSecret UserSecret { get; set; }

    public void OnGet()
    {
    }

    public IActionResult OnPostAsync()
    {
        return RedirectToPage("./HashingWithSaltResult", new
        {
            secretValue = UserSecret.SecretValue
        });
    }
}
Let’s create a UserSecret model:
public class UserSecret
{
    public string SecretValue { get; set; }

    public string Salt { get; set; }

    public string HashedKey { get; set; }
}
Now, let’s create a page for calculating the salted hash and displaying the result:
@page
@model OWASPTop10.Pages.HashingWithSaltResultModel
@{
    ViewData["Title"] = "HashingWithSaltResult";
}

<div class="row">
    <div class="col-md-4">
        <h4>Hashing With Salt Result</h4>
        <hr />
        <div class="form-group">
            <label asp-for="UserSecret.SecretValue" class="font-weight-bold"></label>
            <input asp-for="UserSecret.SecretValue" readonly="readonly" class="form-control" />
        </div>
        <div class="form-group">
            <label asp-for="UserSecret.Salt" class="font-weight-bold"></label><br />
            <span class="form-control-sm">
                @Model.UserSecret.Salt
            </span>
        </div>
        <div class="form-group">
            <label asp-for="UserSecret.HashedKey" class="font-weight-bold"></label><br />
            <span class="form-control-sm">
                @Model.UserSecret.HashedKey
            </span>
        </div>
    </div>
</div>
Then, in the code file, once we retrieve the secret value, we need to generate a random salt and then use that to hash the secret value:
public class HashingWithSaltResultModel : PageModel
{
    [BindProperty]
    public UserSecret UserSecret { get; set; }

    public void OnGet(string secretValue)
    {
        if (secretValue != null)
        {
            byte[] salt = GenerateSalt();
            string hashed = GenerateHash(secretValue, salt);

            UserSecret = new UserSecret()
            {
                Salt = Convert.ToBase64String(salt),
                SecretValue = secretValue,
                HashedKey = hashed
            };

        }
    }

    private static byte[] GenerateSalt()
    {
        // generate a 128-bit salt using a secure PRNG
        byte[] salt = new byte[128 / 8];
        using (var rng = RandomNumberGenerator.Create())
        {
            rng.GetBytes(salt);
        }

        return salt;
    }

    private static string GenerateHash(string secretValue, byte[] salt)
    {
        // derive a 256-bit subkey (use HMACSHA1 with 10,000 iterations)
        return Convert.ToBase64String(KeyDerivation.Pbkdf2(
                password: secretValue,
                salt: salt,
                prf: KeyDerivationPrf.HMACSHA1,
                iterationCount: 10000,
                numBytesRequested: 256 / 8));
    }
}
Here, we use a secure cryptographic random number generator to generate a 128-bit salt. Then we hash the secret value using the PBKDF2 algorithm.
Testing
Now, let’s run the application and navigate to /HashingWithSalt page:
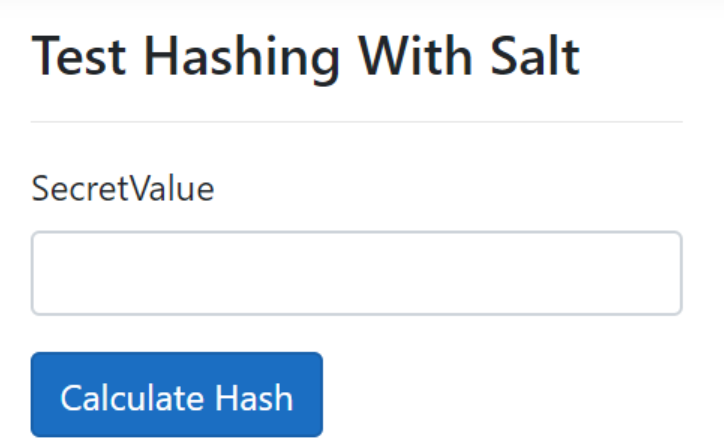
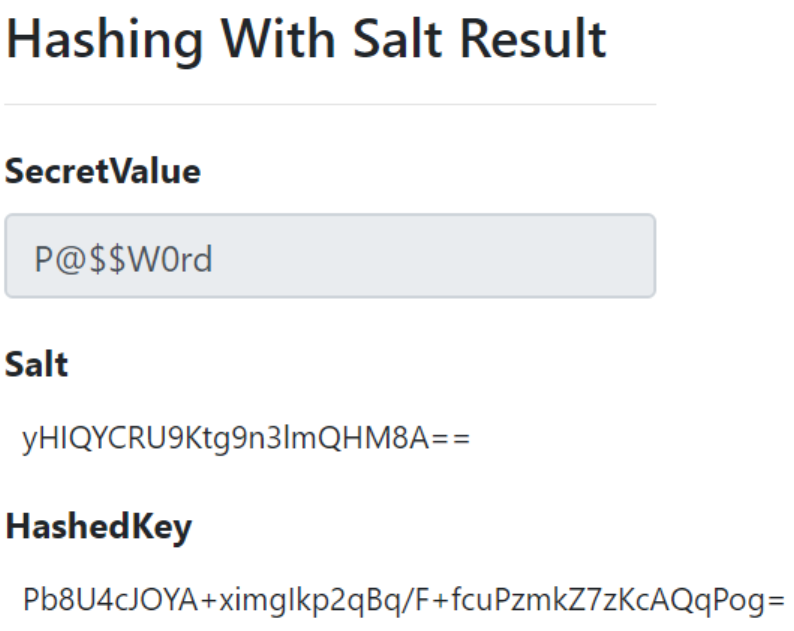
Let’s enter a secret value and click the Calculate Hash button. We’ll be redirected to the HashingWithSaltResult page:
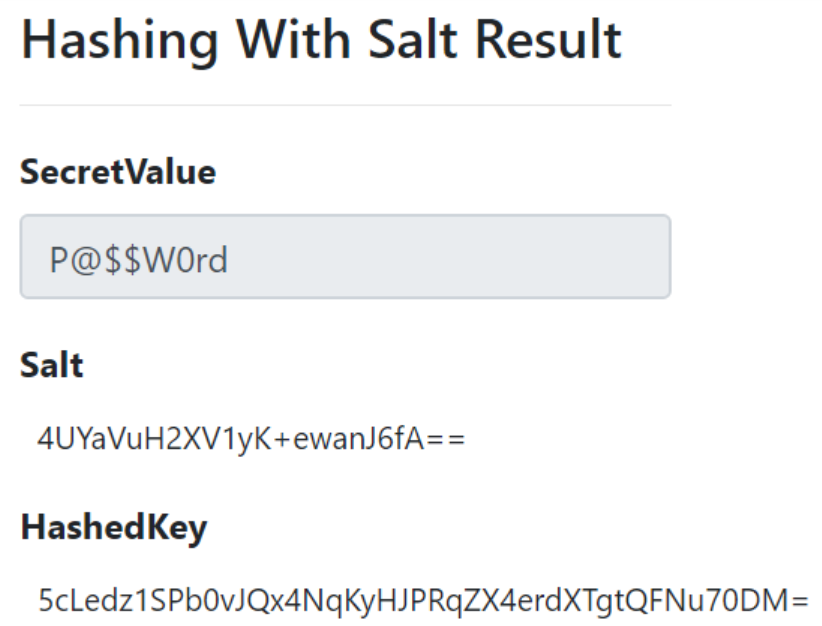
On this page, we can see the generated Salt and Hashed Key.
Now, Let’s try to do it once again using the same secret value:
This time, we can see that the generated values for Salt and Hash are different. Hence, it will be very difficult for an attacker to interpret the hashed values.
Hashing the secret values by adding a random Salt always generates unique values and hence it will be more secure against attacks like Rainbow Table attacks.
Conclusion
We have discussed the following topics in this article
- What is a Sensitive Data Exposure attack
- When does our application become vulnerable to this type of attack
- A few attack scenarios
- How to protect our application against these type of attacks
In the next part of this series, we’ll discuss XML External Entities (XXE) attack and how to prevent them.
