

In this article, we are going to show you how to use the FluentMigrator library to create data migrations with Dapper and ASP.NET Core. In our previous article, where we learned a lot about Dapper and ASP.NET Core, we had to create our database and seed our data manually. Since Dapper doesn’t support migrations, we have to use some additional help if we want to create them. For that, we are going to use FluentMigrator.
So, let’s get going.
Project Creation and Dapper and FluentMigrator Installation
Let’s start with a new ASP.NET Core Web API project creation.
After creating a project, we are going to modify the launchSettings.json file:
{
  "profiles": {
    "DapperMigrations": {
      "commandName": "Project",
      "dotnetRunMessages": "true",
      "launchBrowser": false,
      "launchUrl": "weatherforecast",
      "applicationUrl": "https://localhost:5001;http://localhost:5000",
      "environmentVariables": {
        "ASPNETCORE_ENVIRONMENT": "Development"
      }
    }
  }
}
Now, we need to install Dapper in our project:
PM> Install-Package Dapper
Also, let’s install the FluentMigrationRunner library to help us with the migration process:
PM> Install-Package FluentMigrator.Runner
This library has a dependency on the core FluentMigrator package and also on the FluentMigrator.Runner.SqlServer package, so we don’t have to install them separately. Additionally, the FluentMigrator.Runner.SqlServer package has a dependency on the Microsoft.Data.SqlClient package, which we are going to need while creating the SqlConnection in the DapperContext class, as we did in our previous article.
Entities and Context Classes
After the installation, we are going to create our two entities in the Entities folder:
public class Company
{
    public Guid Id { get; set; }
    public string Name { get; set; }
    public string Address { get; set; }
    public string Country { get; set; }
}
public class Employee
{
    public Guid Id { get; set; }
    public string Name { get; set; }
    public int Age { get; set; }
    public string Position { get; set; }
    public int CompanyId { get; set; }
}
With the entities in place, we can add two connection strings inside the appsettings.json file:
{
  "Logging": {
    "LogLevel": {
      "Default": "Information",
      "Microsoft": "Warning",
      "Microsoft.Hosting.Lifetime": "Information"
    }
  },
  "ConnectionStrings": {
    "SqlConnection": "server=.; database=DapperMigrationExample; Integrated Security=true",
    "MasterConnection": "server=.; database=master; Integrated Security=true"
  },
  "AllowedHosts": "*"
}
We are going to use the SQL connection to fetch the data from the existing database, and the master connection to check if the database exists during the database migration.
Next, we can create the DapperContext class under the Context folder:
public class DapperContext
{
    private readonly IConfiguration _configuration;

    public DapperContext(IConfiguration configuration)
    {
        _configuration = configuration;
    }

    public IDbConnection CreateConnection()
        => new SqlConnection(_configuration.GetConnectionString("SqlConnection"));

    public IDbConnection CreateMasterConnection()
        => new SqlConnection(_configuration.GetConnectionString("MasterConnection"));
}
As you can see, we create two connections. One for the regular queries, and one for the master db check.
For this, we require some additional using directives:
using Microsoft.Data.SqlClient;
using Microsoft.Extensions.Configuration;
using System.Data;
Excellent.
Finally, we have to register our context class as a singleton service in the Startup.cs file:
public void ConfigureServices(IServiceCollection services)
{
    services.AddSingleton<DapperContext>();
    services.AddControllers();
}
In .NET 6 and above, we have to change the Program class:
builder.Services.AddSingleton<DapperContext>();
builder.Services.AddControllers();
Now, we can start with our first migration.
Using Dapper and FluentMigrator to Create a Database Migration
Let’s start with the Migrations folder creation.
Under that folder, we are going to create a new Database class:
public class Database
{
    private readonly DapperContext _context;

    public Database(DapperContext context)
    {
        _context = context;
    }

    public void CreateDatabase(string dbName)
    {
        var query = "SELECT * FROM sys.databases WHERE name = @name";
        var parameters = new DynamicParameters();
        parameters.Add("name", dbName);

        using (var connection = _context.CreateMasterConnection())
        {
            var records = connection.Query(query, parameters);
            if (!records.Any())
                connection.Execute($"CREATE DATABASE {dbName}");
        }
    }
}
Firstly, we inject our context service. Then, we create the CreateDatabase method, where we prepare our query, create a master connection and use it to check if the required database already exists. If it doesn’t exist, we create it. These are standard Dapper queries and executions, and if you want to learn more about them, you can read our Using Dapper with ASP.NET Core Web API article.
Let’s register this class as a singleton service inside the Startup class:
public void ConfigureServices(IServiceCollection services)
{
    services.AddSingleton<DapperContext>();
    services.AddSingleton<Database>();

    services.AddControllers();
}
In .NET 6 and above, we have to do the registration in the Program class:
builder.Services.AddSingleton<Database>();
Great.
To continue, we are going to create a new Extensions folder with a single MigrationManager class inside it:
public static class MigrationManager
{
    public static IHost MigrateDatabase(this IHost host)
    {
        using (var scope = host.Services.CreateScope())
        {
            var databaseService = scope.ServiceProvider.GetRequiredService<Database>();

            try
            {
                databaseService.CreateDatabase("DapperMigrationExample");
            }
            catch
            {
                //log errors or ...
                throw;
            }
        }

        return host;
    }
}
We create an IHost extension method where we get the Database service from a service provider and use it to call our CreateDatabase method. To learn more about this technique, you can read the Initial Migration section of our Migrations and Seed Data with Entity Framework Core article.
Since we are extending the IHost interface, we can call it inside the Program.cs class to ensure its execution as soon as our app starts:
public static void Main(string[] args)
{
    CreateHostBuilder(args)
        .Build()
        .MigrateDatabase()
        .Run();
}
Testing
Okay.
Let’s start our application.
After our application starts successfully, we can check if the database creation process was successful:
And here it is.
Excellent.
As you can see, our migration works, but we didn’t use the FluentMigrator library yet. This was all Dapper. We had to do it that way since FluentMigrator doesn’t support database creation. But now, since we have the database, we can use FluentMigrator to add tables and data to the database.
Adding Tables to the Database Using FluentMigrator
To start adding tables to the database, we are going to create a new InitialTables_202106280001 class under the Migrations folder. As you can see, we use the {fileName_version} pattern for the full file name:
[Migration(202106280001)]
public class InitialTables_202106280001 : Migration
{
}
We have to decorate our migration file with the [Migration] attribute from the FluentMigrator namespace, and provide a version number as a parameter. Also, our class must derive from the abstract Migration class.
Now, we can add two required methods inside:
[Migration(202106280001)]
public class InitialTables_202106280001 : Migration
{
    public override void Down()
    {
        Delete.Table("Employees");
        Delete.Table("Companies");
    }

    public override void Up()
    {
        Create.Table("Companies")
            .WithColumn("Id").AsGuid().NotNullable().PrimaryKey()
            .WithColumn("Name").AsString(50).NotNullable()
            .WithColumn("Address").AsString(60).NotNullable()
            .WithColumn("Country").AsString(50).NotNullable();

        Create.Table("Employees")
            .WithColumn("Id").AsGuid().NotNullable().PrimaryKey()
            .WithColumn("Name").AsString(50).NotNullable()
            .WithColumn("Age").AsInt32().NotNullable()
            .WithColumn("Position").AsString(50).NotNullable()
            .WithColumn("CompanyId").AsGuid().NotNullable().ForeignKey("Companies", "Id");
    }
}
In the Up method, we are creating our two tables by using different methods that FluentMigrator provides. As you can see, the names of the methods describe what each method does, which is great. Also, once we create the Employees table, we configure the CompanyId column as a foreign key by calling the ForeignKey method and providing the primary table name and the primary column name parameters.
In the Down method, we revert our changes if we revert this migration. So, we just remove both tables, first Employees, and then Companies.
Now, to be able to start this migration as soon as our app starts, we have to modify the MigrationManager class:
public static class MigrationManager
{
    public static IHost MigrateDatabase(this IHost host)
    {
        using (var scope = host.Services.CreateScope())
        {
            var databaseService = scope.ServiceProvider.GetRequiredService<Database>();
            var migrationService = scope.ServiceProvider.GetRequiredService<IMigrationRunner>();

            try
            {
                databaseService.CreateDatabase("DapperMigrationExample");

                migrationService.ListMigrations();
                migrationService.MigrateUp();

            }
            catch
            {
                //log errors or ...
                throw;
            }
        }

        return host;
    }
}
Here, we get the IMigrationRunner service and then list all migrations with the ListMigrations method, and execute them with the MigrateUp method. Of course, these are just two of many methods that IMigrationRunner offers. If we inspect that interface, we can see all the other methods:
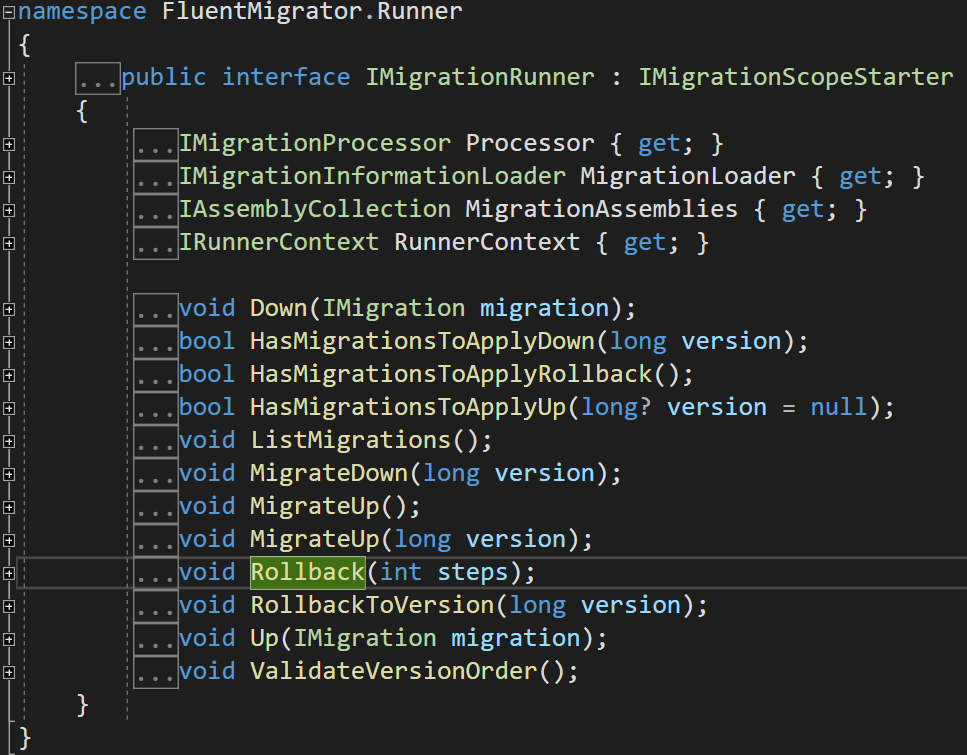
Feel free to check each of them to see what they do.
The final thing we have to do is to configure FluentMigrator in the Startup class:
public void ConfigureServices(IServiceCollection services)
{
    services.AddSingleton<DapperContext>();
    services.AddSingleton<Database>();

    services.AddLogging(c => c.AddFluentMigratorConsole())
        .AddFluentMigratorCore()
        .ConfigureRunner(c => c.AddSqlServer2012()
            .WithGlobalConnectionString(Configuration.GetConnectionString("SqlConnection"))
            .ScanIn(Assembly.GetExecutingAssembly()).For.Migrations());

    services.AddControllers();
}
As you already assume, for .NET 6 and above, we need to use the builder variable to add the configuration in the Program class:
builder.Services.AddLogging(c => c.AddFluentMigratorConsole())
        .AddFluentMigratorCore()
        .ConfigureRunner(c => c.AddSqlServer2012()
            .WithGlobalConnectionString(Configuration.GetConnectionString("SqlConnection"))
            .ScanIn(Assembly.GetExecutingAssembly()).For.Migrations());
We add the FluentMigrator logs to the console, configure the migration runner with the AddFluentMigratorCore method, and configure that runner with the ConfigureRunner method. We have to provide the SQL server support, the connection string, and the assembly to search types from.
Test
Great.
Now, we can start our application and check the database:
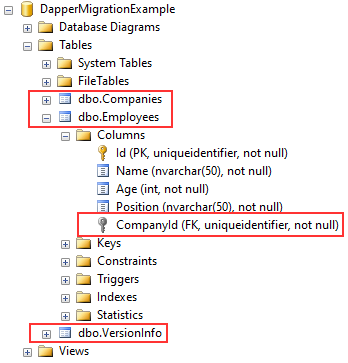
We can see both tables and the created foreign key in the Employees table. Additionally, we can see the third table – VersionInfo. This is the table where FluentMigrator tracks migrations in the same way that EF Core does with the _EFMigrationsHistory table.
If we inspect the logs, we can see a lot of useful information about the executed migrations, the current migration, etc.
Seeding Data with FluentMigrator
Of course, we don’t want empty tables, so let’s add some initial data.
To do that, we are going to create a new class named InitialSeed_202106280002:
[Migration(202106280002)]
public class InitialSeed_202106280002 : Migration
{
    public override void Down()
    {
        Delete.FromTable("Employees")
            .Row(new Employee
            {
                Id = new Guid("59c0d403-71ce-4ac8-9c2c-b0e54e7c043b"),
                Age = 34,
                Name = "Test Employee",
                Position = "Test Position",
                CompanyId = new Guid("67fbac34-1ee1-4697-b916-1748861dd275")
            });

        Delete.FromTable("Companies")
            .Row(new Company
            {
                Id = new Guid("67fbac34-1ee1-4697-b916-1748861dd275"),
                Address = "Test Address",
                Country = "USA",
                Name = "Test Name"
            });
    }

    public override void Up()
    {
        Insert.IntoTable("Companies")
            .Row(new Company
            {
                Id = new Guid("67fbac34-1ee1-4697-b916-1748861dd275"),
                Address = "Test Address",
                Country = "USA",
                Name = "Test Name"
            });

        Insert.IntoTable("Employees")
            .Row(new Employee
            {
                Id = new Guid("59c0d403-71ce-4ac8-9c2c-b0e54e7c043b"),
                Age = 34,
                Name = "Test Employee",
                Position = "Test Position",
                CompanyId = new Guid("67fbac34-1ee1-4697-b916-1748861dd275")
            });
    }
}
So, in the Up method, we create a new company and then a single employee for that company. We do the opposite in the Down method. Of course, we have to remove first the employee entity, and then the company entity.
Reverting Migrations
If we want to revert our migration, we can just simply modify the MigrationManager class. The IMigrationRunner interface contains the MigrateDown method that accepts a single parameter – the migration version we want to revert to. So, this method will execute all Down methods from all the migrations applied after the migration with the version we provide as a parameter.
In our case, if we want to delete previously inserted rows, we can modify the try block in the MigrationManager class:
try
{
    databaseService.CreateDatabase("DapperMigrationExample");

    migrationService.ListMigrations();
    migrationService.MigrateDown(202106280001);
}
As a result of starting the application, all the migrations applied after the provided one will be reverted. In our case, only one migration (202106280002). You can check the tables, and you will find no data inside.
Conclusion
We’ve seen how we can work with migrations using both Dapper and FluentMigrator.
Since FluentMigrator doesn’t support database creation, we used Dapper for that. Additionally, since Dapper doesn’t support migrations at all, we’ve used FluentMigrator to fill the gap. So, if you are using Dapper in your ASP.NET Core project, and want to create migrations, as you can do with EF Core, the FluentMigrator library is the way to go.

i have copied you code but it still says No service for type ‘MyType’ has been registered. In .Net 6
Could you please download our source code and compare it with your solution? There is something you are missing for sure. I used exactly this solution a few months back while upgrading our Dapper book to .NET 7 and everything worked and is still working without a single issue. So, you shouldn’t be having any issues in .NET 6 as well.
I am not sure about your issue, but based on the message, make sure that both DbContext and Database services are registered in the Program class.
How can we manage migration without downtime?
Hy Mayank. I am not sure what you mean by that.
I am talking about – Using the expand and contract pattern for schema changes.In java there is flyway tool. Same if we want to achieve in .NET core with fluent?
Oh, I understand now. Well, not that I used it, but there is something that I found here: https://stackoverflow.com/questions/41757261/is-there-any-c-sharp-api-for-flyway. Again, this is just out of the first search, I didn’t use it at all.
Thanks Marinko for the article.
I also like to work with FluentMigrator. The only caveat comparing to EF migrations is you have to manually create migrations with a time stamp and then manually type command with a parameters to apply or revert migrations.
I’ve decided to solve this problem and implement similar commands we have for EF Migrations. So, I’ve implemented a simple nuget package which allows you to generate migration, update database and rollback.
Welcome to checkout on github: https://github.com/crimcol/Alt.FluentMigrator.VStudio
I got the following exception:
“Unhandled exception. FluentMigrator.Runner.Exceptions.MissingMigrationsException: No migrations found”
Following criteria is all satisfied:
MigrationMigrationAttributeAgain, feel free to download the source code and compare it with yours. You are missing something for sure. I’ve just tested this solution with .NET 6 in our new Dapper with Web API book and everything is working just fine.
Hi
I got the following error (in MigrationManager, line 8) and cannot find anything about it on the internet:
I’m using .Net 6
So sorry, my bad. I didn’t complete applying your codes.
Can you post your .NET6.0 code example please? a website link or a github link would be awesome. Thanks
Is there anything wrong with Our source code? Also in the article you can find all the differences for .NET 6
I get error inProgram.cs.
“Configuration.GetConnectionString(“SqlConnection”)”.
-Configuration dowsn’t exist in the current context.
I’m using .net6
Hi Selim. As I always suggest in this type of situation, please download our source code and see what are the differences after comparing it with yours. It doesn’t matter that you are using .NET 6 everything works there as well, it was tested and differences are added in the article. You can find the link to source code at the start of the article.
Thank you very much.I will download and try after ı give feedback.
ı solved this problem.
Selim, could you share how you resolved the issue? Maybe it Can be helpful to other readers.
Of course.I shared my solution above.
I solved this problem.
I used builder.Configuration.GetConnectionString(“SqlConnection”) instead Configuration.GetConnectionString(“SqlConnection”)
Thank you. This means you have a bit different setup for your project comparing to this one from the article. Here we don’t fetch conn string in the Program class but in the Context class, which we register then as a singleton service. This process is displayed in both .NET 5 and 6 versions.
thank you for description.Have a good day:)
thank you!
You are most welcome.