

Updated on
In this article, we are going to learn Azure Queue Storage in depth.
We’ll start with some introductory stuff about Azure Storage Queue and look at how to create one from the Azure Portal. After that, we’ll see how to build and deploy applications that can send and receive messages from the queue.
So, let’s start.
Azure Queue Storage- Intro
Azure Queue Storage offers a simple, cost-effective, and durable message queueing solution for handling large volumes of messages. One of the best uses of a Storage Queue is to trigger a background job to start asynchronously. It is also possible to send some data in the message.
A Storage Queue can contain any number of messages and is limited only by the capacity of the storage account. There is a maximum size limit of 64 KB for a queue message. We can access messages in a Storage Queue from anywhere in the world via HTTP or HTTPS calls.
Azure Queue Storage enables the communication between components of a distributed application. A sender component can send messages to the queue and a receiver component can receive and process them. With a Storage Queue, we can build application components that are decoupled from each other, which means that we can scale them independently.
Queue storage enables asynchronous message communication between application components, whether they are running in the cloud, on-premises, or mobile devices. We have client libraries available for .NET, Java, Android, C++, Node.js, PHP, Ruby, and Python for working with Azure Queue Storage. Additionally, we can access it via a REST API, the Cloud Shell, or the Azure portal.
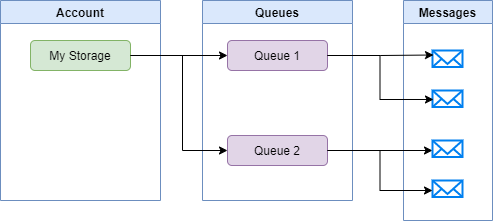
Structure of an Azure Queue Storage
Now let’s look at how an Azure Queue Storage is organized:
Storage account: For accessing any kind of Azure Storage. First, we need to create a storage account. A storage account can have any number of queues and It is used as a namespace to access the queues. It can have multiple storage types like Blobs, Queues, Tables, etc.
Queue: A storage account can have multiple queues and a queue can contain a set of messages. The name of a queue must start with a letter or number, and can include only lowercase letters, numbers, and hyphens(-). It is a good practice to organize messages into different queues if we have multiple messaging functionalities in our application.
Message: A message can be up to 64 KB in size. We can specify the expiry time of a message as a value between 1 second and 7 days. There is also an option to indicate that a message will never expire which will override the expiry period. Messages can contain string values and it is possible to send serialized JSON strings if we need to pass user-defined objects.
That said, we can represent the structure of an Azure Queue Storage with a simple diagram:
Once we know the name of the storage account and queue, we can access a queue using the following URL format:
https://<storage account>.queue.core.windows.net/<queue>
Next, we are going to learn how to create an Azure Storage Queue.
Creating an Azure Queue Storage
In the Creating Azure Storage section of the Upload Files to Azure with .NET Core Web API and Blazor WebAssembly article, we have explained the detailed steps for creating an Azure Storage account. We can follow similar steps to create a Storage account:
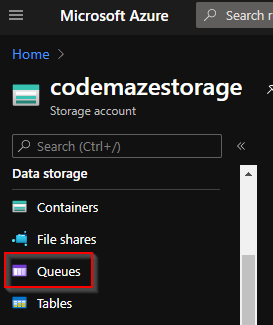
After creating the Storage Account, we can use the Queues menu to navigate to the Queues section of the Storage:
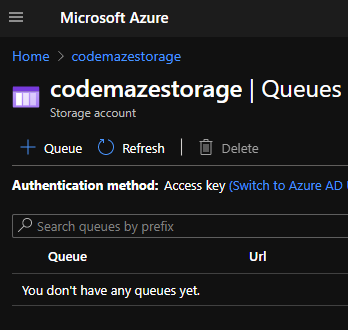
Initially, the Queues section will be empty but don’t worry, we are going to build an app that will create a Queue and insert messages into it. Make sure to note the access key of the storage account as explained in the linked article. We will need this later for connecting to the Storage Queue from our app.
With that, our storage queue is ready. The next step is to build an app that connects to it.
Building an API that Sends Messages to the Queue
Now we are going to build an ASP.NET Core Web API application that can connect with the Azure Storage Queue and send messages to it.
First, let’s create an API using the ASP.NET Core Web API project template. Then, we need to add the Azure.Storage.Queues client library NuGet package to it:

This library simplifies the process of connecting to an Azure Storage Queue and working with it.
We need to make sure to configure the storage connection string correctly in the appsettings file:
{
...
  },
  "StorageConnectionString": "DefaultEndpointsProtocol=https;AccountName=codemazestorage;AccountKey=UjBmoGy.....;EndpointSuffix=core.windows.net",
  "AllowedHosts": "*"
}
Great!
The next step is building a queue service.
Building a Queue Service
For building a Queue Service, first, let’s define an IQueueService interface:
public interface IQueueService
{
    void SendMessage(string queueName, string message);
}
After that, let’s create a QueueService class that implements the interface:
using Azure.Storage.Queues;
using Microsoft.Extensions.Configuration;
using System;

namespace MessageSender.Services
{
    public class QueueService : IQueueService
    {
        private readonly IConfiguration _configuration;

        public QueueService(IConfiguration configuration)
        {
            _configuration = configuration ?? throw new ArgumentNullException(nameof(configuration));
        }

        public void SendMessage(string queueName, string message)
        {
            string connectionString = _configuration["StorageConnectionString"];

            var queueClient = new QueueClient(connectionString, queueName, new QueueClientOptions { MessageEncoding = QueueMessageEncoding.Base64 });

            queueClient.CreateIfNotExists();

            if (queueClient.Exists())
            {
                queueClient.SendMessage(message);
            }
        }
    }
}
The SendMessage() method accepts the queue name and message as parameters. It instantiates a QueueClient object with which we can create and manipulate the queue. A good practice is to encode the message to Base64 using the QueueClientOptions parameter while instantiating the QueueClient object as other encodings may cause issues while some components try to read the message from the Queue later. After that, it will create the queue if it does not exist and then send the message to it.
That’s it. Our queue service is ready. Next, we are going to build an API controller to consume this service.
Creating Controller
The next step is to create a controller endpoint and consume the service. For that, let’s create a MessagesController class:
using MessageSender.Services;
using Microsoft.AspNetCore.Mvc;
using System;

namespace MessageSender.Controllers
{
    [Route("api/[controller]")]
    [ApiController]
    public class MessagesController : ControllerBase
    {
        private const string QUEUE_NAME = "message-queue";
        private readonly IQueueService _queueService;

        public MessagesController(IQueueService queueService)
        {
            _queueService = queueService ?? throw new ArgumentNullException(nameof(queueService));
        }

        [HttpPost]
        public IActionResult Send([FromBody] QueueMessage queueMessage)
        {
            _queueService.SendMessage(QUEUE_NAME, queueMessage.Message);
            return Ok();
        }
    }
}
We inject the queue service into the controller and the controller has the Send() endpoint that calls the SendMessage() method of the service.
Finally, let’s configure the dependency injection for the service in the startup file:
public void ConfigureServices(IServiceCollection services)
{
    services.AddScoped<IQueueService, QueueService>();

    services.AddControllers();
...
}
With this, the API for sending messages is ready. The next step is creating an Azure Function App for receiving the messages.
Creating a Function App that Receives the Messages
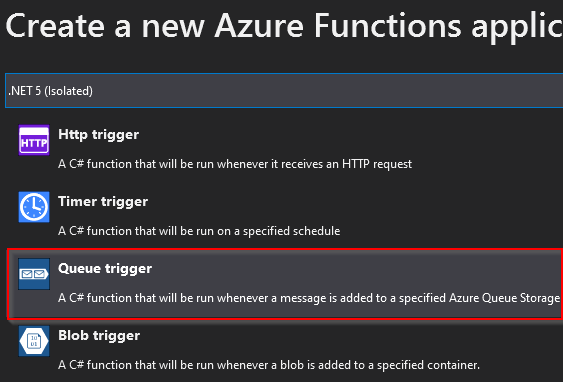
We have learned about Azure Functions in the Creating Serverless Apps with .NET using Azure Functions article. In that example, we have created an HTTP triggered function. But it is possible to trigger an Azure Function in many other ways as well. For instance, we can trigger it whenever a new message is added to the storage queue, which is what we are going to implement in this example.
So let’s create an Azure Function with Queue Trigger:
After creating the Function app, let’s write a function MessageReceiver to receive and process the message:
using Microsoft.Azure.WebJobs;
using Microsoft.Extensions.Logging;

namespace MessageReceiver
{
    public static class MessageReceiver
    {
        private const string QUEUE_NAME = "message-queue";

        [FunctionName("MessageReceiver")]
        public static void Run([QueueTrigger(QUEUE_NAME, Connection = "StorageConnectionString")] string queueMessage, ILogger log)
        {
            log.LogInformation($"Queue trigger function processed message: {queueMessage}");
        }
    }
}
In the QueueTrigger attribute, we specify the name of the queue and the name of the connection string that is defined in the app settings. While developing locally, we can specify app settings in the local.settings.json file. However, while deploying, we have to configure this in our hosting environment. We’ll learn how to do that a little later.
In the Run() method, we are just logging the information about the processed message.
Cool!
Our Function App is ready. The next step is deploying these apps.
Deploying the Apps to Azure
Now that we have the API and Function App ready, let’s proceed to deploy these to Azure. But before that, let’s modify the API app to enable swagger for the hosted version as well so that it will be easier to test our API endpoints. For that, we need to modify the Configure() method of the Startup class:
public void Configure(IApplicationBuilder app, IWebHostEnvironment env)
{
    if (env.IsDevelopment())
    {
        app.UseDeveloperExceptionPage();
    }
    app.UseSwagger();
    app.UseSwaggerUI(c => c.SwaggerEndpoint("/swagger/v1/swagger.json", "MessageSender v1"));

    app.UseHttpsRedirection();

   ...
}
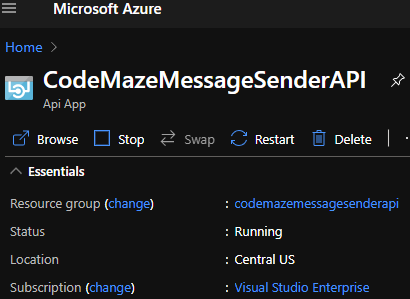
We have explained the process of publishing an ASP.NET Core Web API into Azure in the Deploying ASP.NET Core Web API to Azure API Apps article. Let’s follow the steps mentioned in that article to create an Azure API app and deploy our API into it:
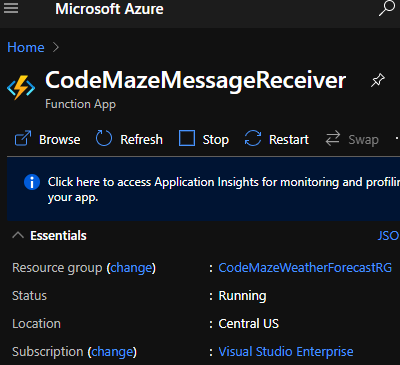
Similarly, we have explained how to publish an Azure Function App using Visual Studio in the Deploying Azure Functions section of the Creating Serverless Apps with .NET using Azure Functions article. We can follow the same steps to deploy the Function App into Azure:
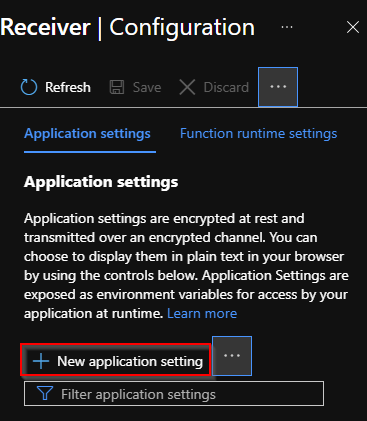
After deploying the Function App, we need to configure the storage connection string in the hosting environment. We can do that in the Application Settings section of the Configuration menu by clicking on the New Application Setting link:
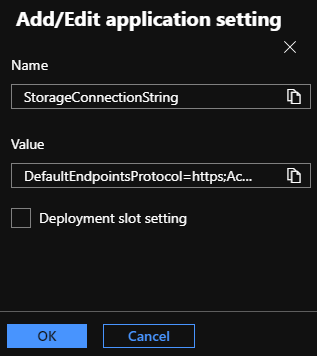
It will open the Add/Edit application setting screen and we can provide the value there:
Cool!
Our API and Function App is deployed and ready for use. The next step is testing the apps.
Testing the Apps
For testing the functionality, we can hit the API URL and send a POST request to the Messages endpoint:
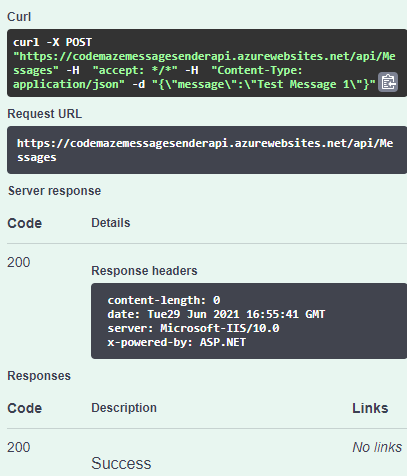
We got a 200 response code which indicates the operation is successful.
Now let’s open the Azure Function and check its logs. We have explained how to investigate the logs of an Azure Function in the Testing Azure Functions section of the Creating Serverless Apps with .NET using Azure Functions article.
Please note that we don’t need to run the Function manually in this example as we have already triggered it by sending a message to the Storage Queue that it listens. So, we just need to verify that it has run successfully. For that, let’s inspect the logs:

From the logs, we can see when a new message arrives in the queue, it triggers the Azure Function, and the Function processes the message that it receives.
Cool!
We have verified that the API, Storage, and Function works very well together in the Azure environment.
It is possible to represent the architecture of this example in this way:
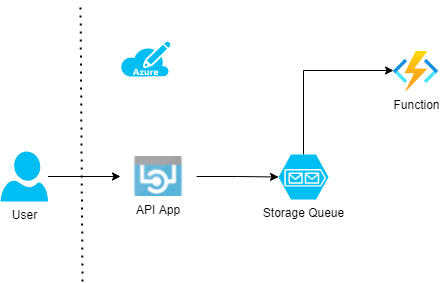
Users can access the API in Azure, which will send messages to the Storage Queue. When new messages arrive in the Queue, it will trigger the Azure Function. This is a great way of building distributed application components in Azure that communicate with each other without direct coupling.
Dependency Injection for Azure Client Libraries
It is possible to register Azure service clients in an ASP.NET Core application’s DI container.
Microsoft.Extensions.Azure.Core provides the functionality to integrate Azure client libraries with the ASP.NET Core dependency injection and configuration systems.
For using this, first, we have to install Microsoft.Extensions.Azure NuGet package:
Install-Package Microsoft.Extensions.Azure
After that, we need to call the AddAzureClients() method in the ConfigureServices() method of the startup class. While doing so, we can use the AzureClientFactoryBuilder to build and configure the client instances with the dependency injection container. Additionally, we can configure the authentication and client options as well so that the consumers of this service need not be aware of these settings:
services.AddAzureClients(builder =>
{
    builder.AddClient<QueueClient, QueueClientOptions>((_, _, _) =>
    {
        return new QueueClient
        (
            Configuration["StorageConnectionString"]
            , Configuration["QueueName"]
            , new QueueClientOptions { MessageEncoding = QueueMessageEncoding.Base64 });
    });
});
That’s it. Now we can inject the QueueClient directly into our controllers or other parts of the application and use it:
[Route("api/[controller]")]
[ApiController]
public class MessagesController : ControllerBase
{
    private readonly QueueClient _queueClient;

    public MessagesController(QueueClient queueClient)
    {
        _queueClient = queueClient ?? throw new ArgumentNullException(nameof(queueClient));
    }

    [HttpPost]
    public IActionResult Send([FromBody] QueueMessage queueMessage)
    {
        _queueClient.SendMessage(queueMessage.Message);
        return Ok();
    }
}
To download the full source code with this implementation, you can visit our GitHub repository.
Conclusion
In this article, we have implemented a distributed system where application components communicate with each other by sending messages into a queue.
We have learned the following topics in this article:
- An introduction to Azure Storage Queue and its structure
- Creating an Azure Storage Queue from Portal
- Building an ASP.NET Core Web API that can send messages to the Azure Storage Queue
- Creating an Azure Function that can read messages from an Azure Storage Queue

In the below method, is it ok to return Ok() always :
[HttpPost]
public async Task<IActionResult> Send([FromBody] QueueMessage queueMessage)
{
await _queueService.SendMessageAsync(QUEUE_NAME, queueMessage.Message);
return Ok();
}
Hello Santosh,
I returned Ok() to keep it simple. In a real-world application, we may have to do some validations, do error handling etc. and make the corresponding response like Bad request, Server error etc or some application specific response codes.
Thanks a lot Muhammed Saleem
It would be nicer to inject the queueclient rather than instantiating in queueservice.
Hi Paul,
The QueueClient class, which is part of the Azure.Storage.Queues package is implemented in such a way that it needs to be instantiated by passing all its fields via constructor. So I don’t see a point in injecting that class.
References:
https://docs.microsoft.com/en-us/dotnet/api/microsoft.azure.servicebus.queueclient?view=azure-dotnet
https://github.com/Azure/azure-sdk-for-net/blob/main/sdk/storage/Azure.Storage.Queues/src/QueueClient.cs
You could DI using this pattern here Azure client library integration for ASP.NET Core – Azure for .NET Developers | Microsoft Docs
I prefer to DI the client so that I can pick and choose the authentication model and also the queue names etc at the application startup and not have the details leaked into application code. These are implementation level details and prefer to keep MessagesController agnostic of that. The method signatures also become much cleaner IMO.
Hi Rahul,
Thanks for sharing this. This looks like a much better approach.
So to correct my original answer, it should be possible to inject the QueueClient using the ‘Microsoft.Extensions.Azure’ package. This should also help us to keep the configurations, authentication model etc separate.
I’m yet to come across a complete working example for this, but I’ll try to build one and update later.
Here’s an example using Managed Identities to connect to Queue using DefaultAzureCredential if that helps. Thank you.
I have updated the article with a new section – Dependency Injection for Azure Client Libraries.
Thank you guys so much for bringing up this discussion and sharing your thoughts.