

In our Blazor WebAssembly series, we have already talked about File Upload with Blazor and Web API. In that article, we’ve learned how to upload files to local storage. Of course, there are other places we can upload our files to. So, in this article, we are going to learn how to upload files to Azure blob storage using Blazor WebAssembly and ASP.NET Core Web API.
If you want to learn more about Blazor WebAssembly, we strongly suggest visiting our Blazor WebAssembly series of articles, where you can read about Blazor WebAssembly development, authentication, authorization, JSInterop, and other topics as well.
Let’s start.
Creating Azure Storage
The first thing we have to do is to navigate and sign in to Azure Portal where we can create our storage. If we don’t have a subscription we can create a free subscription account on the dashboard.
Next, we are going to create a new storage account service:

After choosing the Storage accounts service, we have to click the Add button to create an account. We have to go through several steps to successfully create a storage account. That said, let’s first populate the Basic options:
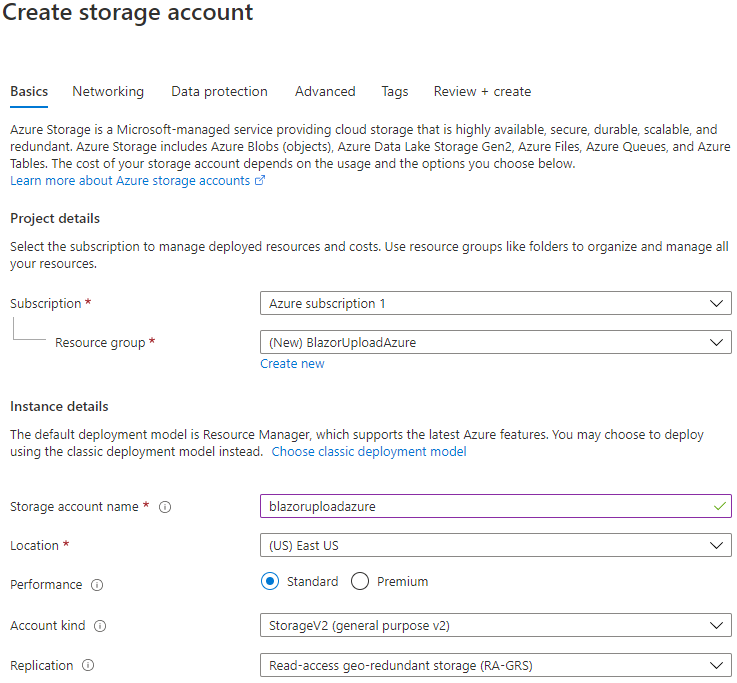
For Networking and Data protection options, we are not going to change a thing.
Then, in the Advanced menu, we are going to select disabled for the Secure Transfer Required option. All the other options will stay as-is.
After these steps, we are going to click the Next button two times until our validation passes:

Finally, we can click the Create button, and after some time our deployment will be completed:
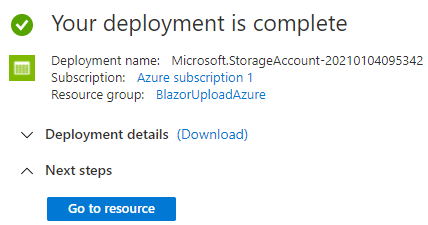
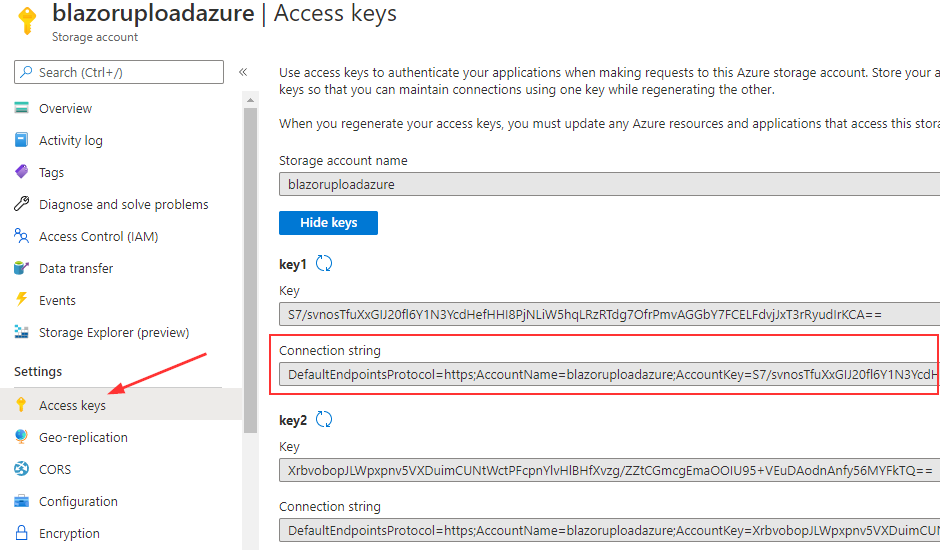
Let’s click the Go to resource button to see our storage. There, we can click the Access keys settings (menu on the left) and inspect our keys and connection string. We are going to leave it open because we are going to need it soon enough.
Upload Files to Azure with ASP.NET Core Web API
Let’s start with the server-side project creation. We are going to create a new ASP.NET Core Web API project named UploadAzure.Server.
As soon as we create our new project, we are going to modify the appsettings.json file by adding a connection string section:
{
    "Logging": {
        "LogLevel": {
            "Default": "Information",
            "Microsoft": "Warning",
            "Microsoft.Hosting.Lifetime": "Information"
        }
    },
    "ConnectionStrings": {
        "AzureConnectionString": "DefaultEndpointsProtocol=https;AccountName=blazoruploadazure;AccountKey=S7/svnosTfuXxGIJ20fl6Y1N3YcdHefHH...;EndpointSuffix=core.windows.net"
    },
    "AllowedHosts": "*"
}
We can find this connection string in the Access keys menu that we already have opened:
Then, we have to install the Azure.Storage.Blob library. This library helps us working with the Azure Storage Blob service. Also, we should be aware that the Microsoft.Azure.Storage.Blob library is now deprecated and the Azure.Storage.Blob library is recommended for use:

After the installation, we are going to create a new UploadController in the Controllers folder and modify it:
[Route("api/upload")]
[ApiController]
public class UploadController : ControllerBase
{
    private readonly string _azureConnectionString;

    public UploadController(IConfiguration configuration)
    {
        _azureConnectionString = configuration.GetConnectionString("AzureConnectionString");
    }
}
So, we extract the Azure connection string from the appsettings.json file and store it in the private variable.
After extracting the connection string from the appsettings.json file, we can add a new action that will upload the file to the Azure storage:
[HttpPost]
public async Task<IActionResult> Upload()
{
    try
    {
        var formCollection = await Request.ReadFormAsync();
        var file = formCollection.Files.First();

        if(file.Length > 0)
        {
            var container = new BlobContainerClient(_azureConnectionString, "upload-container");
            var createResponse = await container.CreateIfNotExistsAsync();
            if(createResponse != null && createResponse.GetRawResponse().Status == 201)
                await container.SetAccessPolicyAsync(Azure.Storage.Blobs.Models.PublicAccessType.Blob);

            var blob = container.GetBlobClient(file.FileName);
            await blob.DeleteIfExistsAsync(DeleteSnapshotsOption.IncludeSnapshots);
            using (var fileStream = file.OpenReadStream())
            {
                await blob.UploadAsync(fileStream, new BlobHttpHeaders { ContentType = file.ContentType });
            }

            return Ok(blob.Uri.ToString());
        }

        return BadRequest();
    }
    catch (Exception ex)
    {
        return StatusCode(500, $"Internal server error: {ex}");
    }
}
Code explanation
First, we extract the file from the form collection. If the file exists, we get a reference to a container with the upload-container name. For that, we have to use the BlobContainerClient class and provide the Azure connection string and the container name. After getting a reference, we use the CreateIfNotExistsAsync method to create our container if it doesn’t exist. This method returns a result of type Task<Response<BlobContainerInfo>>where we can find different information about the status, headers, content stream, etc. So, we check if the result is different than null and also, is the Status 201 (created). If this is true, this means we successfully created our container, and we set a public access type to Blob. With this access type, we allow public access only to blobs in this container, but not to the container itself.
After that, we create a new blob client with the GetBlobClient method. If the blob with the same name exists, we delete it including the snapshots to completely delete the blob. Then, we create a stream and use the UploadAsync method to upload the blob with the specific content type. Finally, we return the URI of the blob.
Of course, if the file doesn’t exist, we return a bad request.
Testing
Now, we can test our logic. Let’s start the API, open postman, and send a POST request with a prepared form-data body:

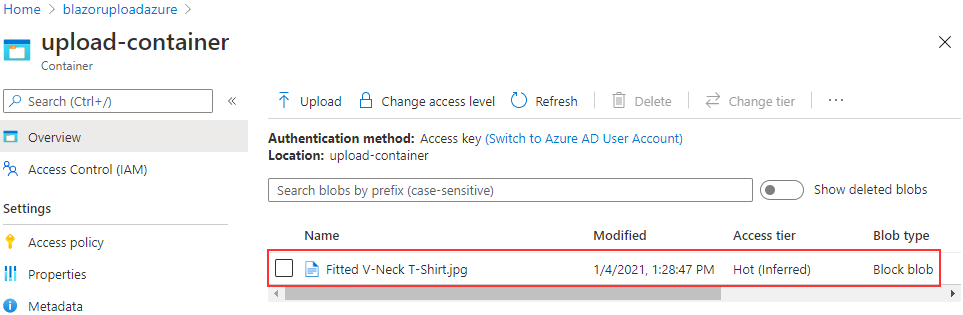
We can see that our request is successful with the URI in a response. Also, we can inspect our Azure storage and click the Containers option:
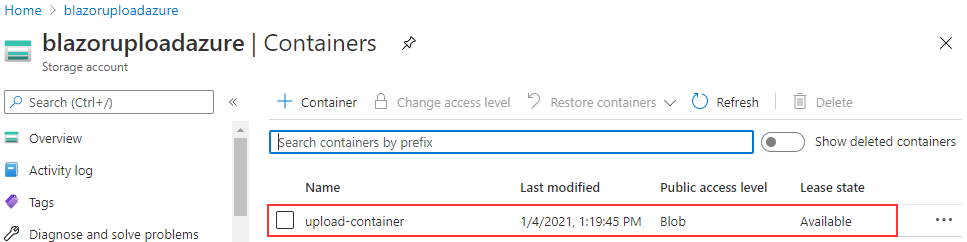
There is our created container. Once we click on it, we are going to find our file there:
Excellent.
You can click on the file and click the Download link to verify that the file was uploaded.
Upload Files to Azure – Blazor WebAssembly Implementation
Before we create a Blazor WASM app, we are going to add CORS support to our Web API project.
So, let’s modify the ConfigureServices method in the Startup class:
public void ConfigureServices(IServiceCollection services)
{
    services.AddCors(policy =>
    {
        policy.AddPolicy("CorsPolicy", opt => opt
        .AllowAnyOrigin()
        .AllowAnyHeader()
        .AllowAnyMethod());
    });

    services.AddControllers();
}
And also the Configure method:
public void Configure(IApplicationBuilder app, IWebHostEnvironment env)
{
    if (env.IsDevelopment())
    {
        app.UseDeveloperExceptionPage();
    }

    app.UseHttpsRedirection();
    app.UseCors("CorsPolicy");

    ...
}
As we mentioned at the beginning of this article, we already have an article related to file upload with Blazor WebAssembly and ASP.NET Core Web API. Following that article, we are going to create a similar client functionality here.
So, let’s create a new Blazor WebAssembly application (we are not going to select ASP.NET Core Hosted checkbox) and name it UploadAzure.Client.
After the creation, we are going to modify the launchSettings.json file:
{
  "profiles": {
    "UploadAzure.Client": {
      "commandName": "Project",
      "dotnetRunMessages": "true",
      "launchBrowser": true,
      "inspectUri": "{wsProtocol}://{url.hostname}:{url.port}/_framework/debug/ws-proxy?browser={browserInspectUri}",
      "applicationUrl": "https://localhost:5011;http://localhost:5012",
      "environmentVariables": {
        "ASPNETCORE_ENVIRONMENT": "Development"
      }
    }
  }
}
Here, we remove unnecessary parts of the configuration and change the ports for the client app.
After that, we have to modify the HttpClient registration in the Program.cs file:
public static async Task Main(string[] args)
{
    var builder = WebAssemblyHostBuilder.CreateDefault(args);
    builder.RootComponents.Add<App>("#app");

    builder.Services.AddScoped(sp => new HttpClient
    {
        BaseAddress = new Uri("https://localhost:5001/api/")
    });

    await builder.Build().RunAsync();
}
Then, let’s create a new ImageUpload.razor file in the Shared folder:
<p>
    <InputFile OnChange="@HandleSelected" />

    @if (ImgUrl != null)
    {
        <div>
            <img src="@ImgUrl" class="image-preview" />
        </div>
    }
</p>
Here we use the InputFile component to enable file upload actions and also show the uploaded image once we get the URI from the server.
Of course, we need the ImageUpload.razor.cs file:
public partial class ImageUpload
{
    [Inject]
    public HttpClient HttpClient { get; set; }

    public string ImgUrl { get; set; }

    private async Task HandleSelected(InputFileChangeEventArgs e)
    {
        var imageFile = e.File;

        if (imageFile == null)
            return;

        var resizedFile = await imageFile.RequestImageFileAsync("image/png", 300, 500);

        using (var ms = resizedFile.OpenReadStream(resizedFile.Size))
        {
            var content = new MultipartFormDataContent();
            content.Headers.ContentDisposition = new ContentDispositionHeaderValue("form-data");
            content.Add(new StreamContent(ms, Convert.ToInt32(resizedFile.Size)), "image", imageFile.Name);

            var response = await HttpClient.PostAsync("upload", content);
            ImgUrl = await response.Content.ReadAsStringAsync();
        }
    }
}
Here, we read the file, create a stream, create a request payload, and send a request to the server. Once we get the result, we populate the ImgUrl property to show the image on the screen.
Finally, we have to call this component in the Index.razor file:
@page "/"

<h1>Hello, world!</h1>

Welcome to your new app.

<ImageUpload />
Testing
That’s all it takes. We can now start our API and Blazor applications.
As soon as the Blazor app starts, we are going to see the Upload button on the screen.
We can click the button and select the image to upload:

Also, we can check our container on the Azure storage to verify that the file is uploaded.
Of course, you can always refer to the mentioned article, to learn how to return the URL of the image to the parent component and how to store it in the database as a part of the created entity.
Conclusion
In this article, we have learned:
- About creating an Azure Storage Account
- How to prepare a server project for file upload action to Azure
- The way to create a Blazor WebAssembly application to support the file upload action
In the next article, we are going to learn how to download files from this Azure blob storage.
So, until that one,
Best regards.

Very useful guide, but getting out dated, example Blazor doesn’t use startup.cs, now it is Program.cs and the given services config code doesn’t work directly. Needs to be rewritten to work with latest Blazor WASM .NET6. Your article would be better if updated.
Hello Vignes. I agree, but it is pretty hard to update all the articles on the site at the same time, this is a time-taking process. That said, we never used the Startup class in Blazor WASM because it was never there, it was always the Program class. But in the Web API project, we use the Startup class for this article because, in .NET 5, it was a default solution. Now, even though this is not the .NET 6 solution, it is pretty easy to use with .NET 6 because all the things you see in the ConfigureServices and Configure methods should be just moved to the Program class. And instead of using servces.AddCors, you have to use builder.Services.AddCors… it is that simple.
How can Blazor wasm read a file without using the InputFile element? Instead the file that must be read has a hard coded name. Blazor has to read the file and post the contents to the server. The file actually contains a report definition that must be used by the server to generate a report. The report is sent to the user by means of an e-mail.
I hope you can provide me with a proper answer.
regards, Henk
hey! do ya have any code for adding progress bar tho?
[in the same piece of code]
thanks in advance
No, we don’t. But I saw couple of articles online so I am pretty sure the logic can be integrated here as well
Hey there. Can you please suggest me how to upload large files in same code.
No. I really didn’t work with a large file upload. I saw some articles about it but never tried them
can you suggest me how can i upload txt file too with the same piece of code plz.
Hello there. I can’t see why would you have any problem with uploading a text file? The upload process works perfectly for that.
it is not getting stored in Azure blob [which is my main motive].
although when i choose file it gets uploaded on browser but does not get stored in Azure Blob.
I must say this is pretty strange. Right before I wrote my answer to your comment, I’ve tested with the docx file and the upload action worked. Of course, I’ve used Postman to test the result, didn’t use the client application because I don’t want to preview the word file. So, this code should work without a single problem. Are you sure that your connection string is good? Now, I am just guessing because as I said, our source code is tested and it works.
I am to able to upload everything through postman.
but what i want to do is to upload all types of files through blazor code [via blazor code that’s running on browser]..
but that’s not working here.[only png,jpeg files are gettting uploaded].
hope you are getting what i want to convey.
I understand what you are doing. Basically, if you inspect the code in the Blazor app, you will find this line:
var resizedFile = await imageFile.RequestImageFileAsync("image/png", 300, 500);This is image-specific and it will break if you upload any other file. So, you don’t want to comment it out, since you want to upload image files as well. But, you can add an if statement to check whether the uploaded file (in this case imageFile variable) is really an image. The imageFile variable is of type IBrowserFile and it contains the ContentType property. You can inspect that property and if it is an image use the code line I mentioned above and if it is not, just skip it. I’ve tested it out by commenting that line of code and the upload works with the .docx file.
ohhh thank you.
This will solve my problem most probably.
tanks again for your help.
You are most welcome. It should solve the issue for sure, as I said, I’ve tested it. Probably it would be a good idea to update the article as well. So, thank you for pointing it out.
IT’S A PERFECT.
THANK’S TO THE CLEAR CODE.
TOVA
You are most welcome. Thank you for reading the post.