

In this article, we will learn how to generate PDFs using the iText library in C# and delve into the nuances of manipulating PDF documents using the iText library.
Let’s start.
Names, Licenses, and Versions: An Overview
The iText library has an interesting history and can be found under different names and with different licenses. A quick search for ‘iText’ brings you to its official web page with detailed information and discussion about licensing. In this section, we aim to distill the most critical information pertinent to any developer.
Firstly, we can find this library and many of its different versions on GitHub and different web pages.
Secondly, a noteworthy mention goes to its other popular name, iTextSharp, particularly familiar among .NET developers. Despite being originally christened as ‘iText’ and being written for Java, it was later ported to .NET and rebranded as ‘iTextSharp’.
Thirdly, and arguably the most crucial factor to bear in mind when choosing a library, is licensing.
Licenses
Initially, the library was licensed under the LGPL. This license allows the development of even closed-sourced commercial software. But after a few years, the license changed to AGPL, which is much more restrictive.
Without getting into too much detail, the AGPL license demands that all our software be licensed under it. AGPL software is open-sourced or “visible to anyone”. With an AGPL license, we can’t develop closed-sourced commercial software. We must buy a commercial license if we want or need to develop closed-sourced, commercial software. Licenses and further information are available on the official web page.
Versions
The shift from LPGL to AGPL for the library was indeed a significant milestone. All releases prior to this transition were under LPGL, while the subsequent ones adopted AGPL. As a consequence, we can continue using LPGL libraries; however, this applies exclusively to older, no longer actively maintained versions. This critical transition occurred in version 4.1.6.
Should our requirements demand an open-sourced, LGPL-licensed version of the library, the iTextSharp-LGPL library remains a viable choice for .NET Framework projects. Alternatively, for .NET Core and more recent projects, the iTextSharp-LGPL-core library can be used. It’s worth noting that this is far from an exhaustive list of options and versions; instead, it should serve as a springboard for further exploration.
That being said, we can now turn our attention to the main theme of the article: manipulating PDF documents. For the purposes of this discussion, we will use the AGPL library on GitHub.
Prepare The Project
For testing purposes, we will use a command line project.
We can create a new command line project in Visual Studio by selecting a new Console App. Or we can use the command line and execute:
dotnet new console
Because we want to use the iText library, we have to add the appropriate Nuget library. We can again do that in Visual Studio by selecting Tools/Manage NuGet Packager for Solution... and then searching for itext7. Or we can do it from the command line by executing:
dotnet add package itext7
With that, we have an empty project with the iText7 library where we can begin creating PDF documents.
Here we installed the iText library version 7, but recently a new version 8 was released. If you want to use it, you need to install the additional package:
dotnet add package itext.bouncy-castle-adapter
With this one, all the examples from our article will work without an issue. So, if you want, you can use the newest iText library.
Create PDF Documents
We can generate a PDF document in memory, but sooner or later, we have to write it to disk to be able to see it. That is why we will generate all our examples directly on disk.
For these two actions, we have to write two methods. One is for preparing a file name, where we will write our PDF document. The other is for displaying the PDF itself.
Preparing a File Name
We can create a PDF file in any folder to which we have write access. Let’s create all PDF documents under the PFDDocuments folder in our program’s current folder:
string CreatePDFFileName(string pdfFilePrefix)
{
    string executablePath = Path.GetDirectoryName(Environment.ProcessPath)!;

    var pdfFolder = Path.Combine(executablePath, "PFDDocuments");
    if (!Directory.Exists(pdfFolder))
        Directory.CreateDirectory(pdfFolder);

    return $"{pdfFilePrefix}_{Guid.NewGuid()}.pdf";
}
We take our working application folder (executablePath) and then create the PFDDocuments folder (if it does not yet exist). We create a unique name under this folder with a pdfFilePrefix prefix and a .pdf extension.
Displaying Generated PDF Document
After we have prepared a unique file name for the newly created PDF document, we will populate it and show it at the end of the method. We have to create a DisplayPDFFile method for displaying the file:
void DisplayPDFFile(string pdfFileName)
{
    var process = new Process
    {
        StartInfo = new ProcessStartInfo(pdfFileName)
        {
            CreateNoWindow = true,
            UseShellExecute = true
        }
    };

    process.Start();
}
For displaying a generated PDF file, we use a Process class and let Windows run its default PDF-handling application.
Generic Method for Creating and Displaying PDF Documents
Now that we have created methods for generating unique file names and a method for displaying generated files, we can create a generic method to create a file name, create a document and display the document at the end.
As we will have different methods for generating different PDF documents, our new methods will receive an action that will have a code for generating PDF documents:
void CreatePDFFile(string pdfFilePrefix, Action<string> pdfCreateAction)
{
    Console.Clear();
    var psfFileName = CreatePDFFileName(pdfFilePrefix);

    Console.WriteLine($"\n Creating PDF file '{psfFileName}'");
    pdfCreateAction(psfFileName);

    Console.WriteLine($"\n PDF file '{psfFileName}' created");
    DisplayPDFFile(psfFileName);

    Console.WriteLine($"\n Displaying PDF file '{psfFileName}'");
}
This method’s purpose is clear – it takes a pdfFilePrefix and action pdfCreateAction to generate the document. Firstly it generates a unique filename on disk. Then uses the pdfCreateAction to generate the document. Lastly, it displays the document to the user.
Create a Hello World PDF
With all that preparation, we are now ready to use the iText library and generate our PDF documents.
As with any new programming language, we will first create a PDF file containing classic ‘Hello World’ text:
public static void CreateBasicPDF(string pdfFileName)
{
    using var writer = new PdfWriter(pdfFileName);
    using var pdfDocument = new PdfDocument(writer);
    using var document = new Document(pdfDocument);

    var message = "Hello World";
    var para = new Paragraph(message);
    document.Add(para);
}
This is a typical iText startup method, where we first create PdfWriter. This PdfWriter object is responsible for writing the PDF content to a file or an output stream. On top of that object, we create a PdfDocument object that contains low-level methods for manipulating the PDF structure. And on top of that, we create yet another Document object that knows the concept of paragraphs, fonts, images, and other elements that we know from editors like MS Word.
Until we need to manipulate low-level PDF elements, it’s best to use the Document class alone, but we have to create the other two as a foundation.
Now that we have a Document object, we can easily add other text elements. The first and most important is a Paragraph object representing a paragraph in our document.
The first paragraph we create has the text ‘Hello World’, and we proceed to add this paragraph to the document.
Exception on First Run
If we run this code on a typical Visual Studio installation, we will get an Exception in line 8 (System.NullReferenceException: ‘Object reference not set to an instance of an object.’)
We can ignore this Exception and proceed, as there is nothing wrong with our code. But what is happening? Well, there is a problem with the iText library, and it’s a fairly well-established one. This is an iText internal exception, and if we do not change the property in our Visual Studio installation, Visual Studio will catch this exception whenever we run our program in debug mode.
As this can be pretty annoying, we can turn it off by going to Visual Studio Tools / Options and there in the Debugging / General enable an option called ‘Enable Just My Code‘:
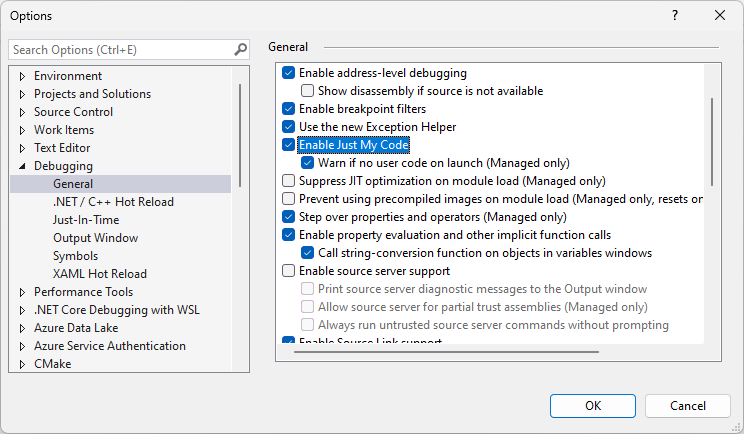
With this option selected, Visual Studio will break only on our exceptions. If an exception gets thrown by the library we use, it will not halt the execution.
Modifying Text
Regardless of whether we turn off library exceptions, we end up with a PDF document displaying the text ‘Hello World’. Now we will learn how to manipulate font and other properties of a paragraph:
public static void CreateAdvancedHeaderPDF(string pdfFileName)
{
    using var writer = new PdfWriter(pdfFileName);
    using var pdfDocument = new PdfDocument(writer);
    using var document = new Document(pdfDocument);

    var message = "Hello World";
    var para = new Paragraph(message)
        .SetTextAlignment(TextAlignment.RIGHT)
        .SetFontSize(50)
        .SetBold()
        .SetBorder(new SolidBorder(4));

    document.Add(para);
}
This is a very similar method to the first one CreateBasicPDF, except here, we also change text alignment to the right, font size to 50, and text to bold. Not only that but in the end, we’ll also draw a border around the whole paragraph.
The Document class uses a beneficial concept of the fluent interface. With this programming concept, we can chain one method after another and so build a paragraph. By expecting Visual Studio suggestions, when we add a dot to a Paragraph object, we can easily see what an object can do. So we can add Margins, Borders, Images…
Adding an Image
As mentioned earlier, we can also quite easily add images to a PDF document:
public static void CreatePDFWithImage(string pdfFileName)
{
    using var writer = new PdfWriter(pdfFileName);
    using var pdfDocument = new PdfDocument(writer);
    using var document = new Document(pdfDocument);

    string? executablePath = Path.GetDirectoryName(Environment.ProcessPath);
    string imageFile = Path.Combine(executablePath!, "Resources", "flower.jpg");

    var imageData = ImageDataFactory.Create(imageFile);
    var image = new Image(imageData);
    document.Add(image);

    var message = "Hello World";
    var para = new Paragraph(message);
    document.Add(para);
}
In lines 7 and 8, we get the image file in the program Resources folder. The image name is flower.jpg, and is an image in our project.
In line 10, we get the imageData out of the file. Then we use this data to create an Image object in line 11. In line 12, we add an image to a document as we have done with paragraphs.
In lines 14-16, we create and add a ‘Hello World’ paragraph to the document as we have done before. With this code, we create a document with an image and text.
Page Breaks
Let’s try to add a lot of paragraphs and see what will happen:
public static void CreateAdvancedMoreParagraphsPDF(string pdfFileName)
{
    using var writer = new PdfWriter(pdfFileName);
    using var pdfDocument = new PdfDocument(writer);
    using var document = new Document(pdfDocument);

    var message = "Hello World";
    int numberOfLines = 130;
    for (int i = 0; i < numberOfLines; i++)
    {
        var para = new Paragraph($"{i + 1,-3}: {message}");
        document.Add(para);
    }
}
We create 130 paragraphs with the text ‘Hello World’ in this method. By examining the created PDF document, we can see that the iText library will create a page break in the document when it encounters the end of a page and will proceed to the next page.
But not only that, we can see that paragraphs are separated by some space. This space is called a margin; paragraphs have automatic margins so they are easier to read.
Creating Longer Documents
For the last example in this introductory article on using the iText library let us create a longer document with headers and sub-headers.
Creating Sample Text
For creating a sample text, it is customary to use ‘Lorem ipsum’ (or Greek) text. We’ll create a method that will generate such a string with a specified number of words:
private static string LoremIpsum(int numberOfWords)
{
    var loremIpsumText = "Lorem ipsum ... anim id est laborum.";
    var words = loremIpsumText.Split(' ');

    var sentences = new List<string>();
    while (numberOfWords > 0)
    {
        var wordsToTake = Math.Min(numberOfWords, words.Length);
        sentences.Add(string.Join(' ', words.Take(wordsToTake)));
        numberOfWords -= wordsToTake;
    }

    return string.Join(' ', sentences);
}
Note that line 3 is not displayed in full. The program contains the traditional Lorem ipsum paragraph, which contains 69 words.
This method accepts the number of needed words, and then in lines 7-12, we generate a list of Lorem ipsum sentences. The execution stops when it reaches the specified number of words. In the end, we join all the sentences into one string and return it.
Creating a Header
The header is nothing more than a paragraph with a bigger font and centered, bolded text:
private static Paragraph CreateHeader1(string caption)
{
    return new Paragraph(caption)
        .SetTextAlignment(TextAlignment.CENTER)
        .SetFontSize(20)
        .SetBold();
}
Creating a Sub-Header
Likewise, the sub-header is a paragraph with bolder and bigger text:
private static Paragraph CreateHeader2(string caption)
{
    return new Paragraph(caption)
        .SetTextAlignment(TextAlignment.LEFT)
        .SetFontSize(15)
        .SetBold();
}
Creating a Bigger Document
As we already know how to add an image and a paragraph to the document, we will not show the code here again.
We can now write a method to combine all these methods and create a multi-page document with headers, sub-headers, images, and text:
public static void Create(string pdfFileName)
{
    using var writer = new PdfWriter(pdfFileName);
    using var pdfDocument = new PdfDocument(writer);
    using var document = new Document(pdfDocument);

    string? executablePath = Path.GetDirectoryName(Environment.ProcessPath);
    string imageFile = Path.Combine(executablePath!, "Resources", "flower.jpg");

    for (int i = 0; i < 3; i++)
    {
        document.Add(CreateHeader1(LoremIpsum(3)));
        document.Add(CreateHeader2(LoremIpsum(7)));
        document.Add(CreateNormalParagraph(LoremIpsum(100)));

        document.Add(CreateHeader2(LoremIpsum(7)));
        document.Add(CreateNormalParagraph(LoremIpsum(55)));
        document.Add(CreateNormalParagraph(LoremIpsum(27)));

        document.Add(CreateHeader1(LoremIpsum(6)));
        document.Add(CreateHeader2(LoremIpsum(3)));
        document.Add(CreateNormalParagraph(LoremIpsum(50)));
        document.Add(CreatePictureParagraph(imageFile));
        document.Add(CreateHeader2(LoremIpsum(3)));
        document.Add(CreateNormalParagraph(LoremIpsum(45)));
    }
}
As before, lines 3 to 5 are standard. We get the image file in lines 7 and 8 as we already know how. Then in lines 12 to 25, we generate different text elements in a loop.
So we are adding headers, sub-headers, images, and text by just using words from lorem ipsum.
Conclusion
We’ve discovered that iText is an exceptional library designed for creating and manipulating PDF documents, offering a wealth of possibilities that we’ve only begun to explore in this article.
Our exploration has demonstrated the library’s capacity to facilitate the easy creation of sophisticated documents, resembling the familiar structure of Word documents, complete with headers and paragraphs.
However, it’s essential to bear in mind that the usage of the iText library is subject to licensing conditions. Therefore, as users, we must exercise due diligence in understanding these terms to ensure appropriate and lawful usage, which may, depending on our intended use, incur licensing costs.

document.Add(CreateNormalParagraph(LoremIpsum(100)));
private static AreaBreak CreateNormalParagraph(string v)
{
throw new NotImplementedException();
}
Es posible que me ayuden con este error que lamentablemente no lo puedo solucionar
mil gracias por su ayuda.
Estoy usando la versión itext7 9.2 (2025-05-21)
[email protected]
perdon me olvide de poner el error gracias.