

In this article, we are going to learn how to implement the broker architectural pattern in .NET applications.
So let’s get going.
The Broker Architectural Pattern
By using a broker architectural pattern, we can design distributed software systems that communicate with each other using an intermediary broker. While using this pattern, we can decouple the distributed components and each of them need not be aware of the other component details. In other words, the broker acts as a middleman who receives the message from one component and sends it to the appropriate recipients. Additionally, we can implement broker architectural patterns to enable communication between different types of applications that are technology and programming language-agnostic.
Different Broker Communication Models
Message brokers can support two types of communication models – Point-to-Point messaging and Publish-Subscribe messaging model.
Point-to-Point Messaging
In this model, a producer produces messages and a consumer consumes them. This is a one-to-one communication model:
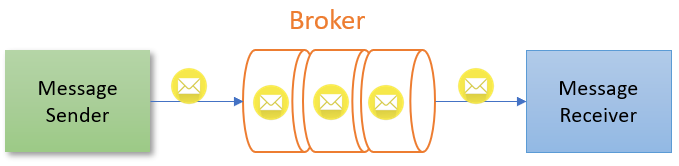
In other words, in a point-to-point messaging model, a sender sends messages to a queue and the receiver receives the message from the queue.
Publish-Subscribe Messaging
This is a one-to-many communication model in which a publisher publishes the messages to the broker and all interested subscribers subscribe to it and receive those messages:
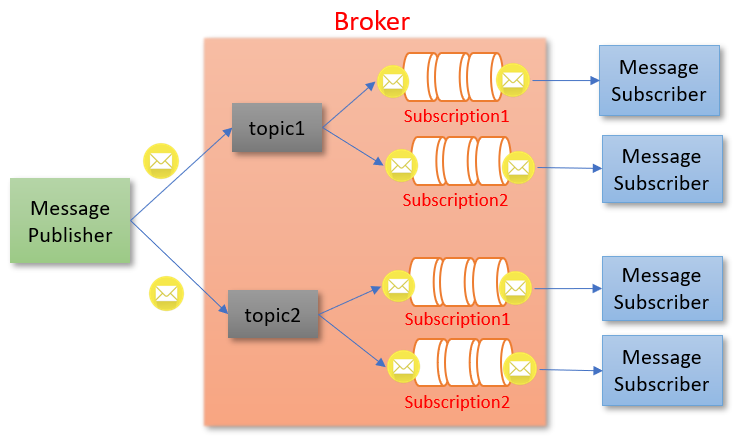
Put another way, in a publish-subscribe message model, a sender sends messages with topics. A set of subscribers will subscribe to topics and each of them will receive messages sent with that topic.
Simple Implementation of Broker Architectural Pattern
Now let’s see how to create a very simple broker component in .NET that can send and receive messages. In addition, we are going to show how components can communicate with each other using a publish-subscribe messaging model as well.
For that, let’s create a .NET console application. In the project, first, let’s create an IBroker interface:
public interface IBroker
{
    void Publish(Message message);
    void Subscribe(string topic, Action<Message> callback);
}
In the interface, we declare method stubs for Publish() and Subscribe().
Along with that, let’s define the Message record with Topic and Data parameters:
public record Message(string Topic, string Data);
After that, let’s create the Broker class that implements the IBroker interface:
public class Broker : IBroker
{
    private readonly Dictionary<string, List<Action<Message>>> _subscriptions = [];

    public void Publish(Message message)
    {
        if (_subscriptions.TryGetValue(message.Topic, out List<Action<Message>>? callbacks))
        {
            foreach (var callback in callbacks)
            {
                callback(message);
            }
        }
    }

    public void Subscribe(string topic, Action<Message> callback)
    {
        if (!_subscriptions.TryGetValue(topic, out List<Action<Message>>? value))
        {
            value = [];
            _subscriptions.Add(topic, value);
        }

        value.Add(callback);
    }
}
Notice that we create a _subscriptions dictionary field to hold the topics and their callback methods. After that, in the Publish() method, we call all the callback methods that have registered with this topic and pass the message to it. Finally, the Subscribe() method will attach a callback method to a topic.
Next, let’s create the Publisher class:
public class Publisher(IBroker broker)
{
    public void Publish(Message message)
    {
        broker.Publish(message);
    }
}
In the Publisher class, we inject the object that implements the IBroker interface, and from the Publish() method, we call the Broker’s Publish() method.
After that, let’s create the Subscriber class as well:
public class Subscriber(IBroker broker, string name)
{
    public void Subscribe(string topic)
    {
        broker.Subscribe(topic, (message) =>
        {
            Console.WriteLine($"{name} received a message: {message.Data}.");
        });
    }
}
We inject the IBroker implementation into the Subscriber class as well. After that, in the Subscribe() method, we call the Broker’s Subscribe() method.
Finally, let’s test the functionality in the Program class:
var broker = new Broker();

var publisher1 = new Publisher(broker);
var publisher2 = new Publisher(broker);

var subscriber1 = new Subscriber(broker, "Subscriber1");
var subscriber2 = new Subscriber(broker, "Subscriber2");
var subscriber3 = new Subscriber(broker, "Subscriber3");

subscriber1.Subscribe("topic1");
subscriber2.Subscribe("topic2");
subscriber3.Subscribe("topic1");

publisher1.Publish(new Message("topic1", "Publisher1 publishing a message for topic1"));
publisher2.Publish(new Message("topic2", "Publisher2 publishing a message for topic2"));
Here, we create a Broker object and initialize two Publisher objects with it. Similarly, we create three Subscriber objects as well by using this Broker object.
subscriber1 and subscriber3 subscribe to topic1 and subscriber2 subscribes to topic2. After that, publisher1 publishes a message with the topic1 topic and the publisher2 publishes a message with the topic2 topic.
Finally, let’s run the application and observe the results:
Subscriber1 received a message: Publisher1 publishing a message for topic1.
Subscriber3 received a message: Publisher1 publishing a message for topic1.
Subscriber2 received a message: Publisher2 publishing a message for topic2.
We can see that Subscriber1 and Subscriber3 receive the message that Publisher1 sends for topic1. At the same time, Subscriber2 receives the message that Publisher2 sends for topic2.
Real-World Implementation of Broker Architectural Pattern
Now let’s look at real-world implementations of broker architectural patterns using the Azure Service Bus. Azure Service Bus is a cloud-based messaging broker service that Microsoft Azure provides. It supports point-to-point messaging using the Message Queues. Additionally, for implementing the publish-subscribe model, we use the concepts of Topics and Subscriptions.
To try this out, we can create an Azure Service Bus Namespace in the Azure portal. While creating a new Azure Service Bus Namespace, we have 3 pricing tiers to choose from – Basic, Standard, and Premium. The basic tier works for smaller applications with low message volumes. However, it supports only Message Queues. If we want to implement Topics and Subscriptions, we need to go with Standard or Premium tiers. That is to say, Standard Tier is ideal for applications with moderate message volumes whereas Premium Tier is designed for mission-critical applications with very high message volumes.
Point-to-Point Messaging Using Broker Architectural Pattern
Now let’s see how to implement Point-to-Point messaging using Azure Service Bus Message Queues. For this, first, we need to create a new queue inside the Queues section of the Service Bus Namespace. While doing so, make sure to note the queue name. Let’s keep the default values for all the configuration and save it.
After that, let’s get the connection string from the Shared Access Policy section:
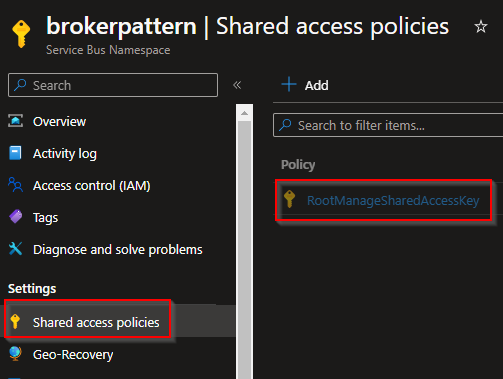
Once we get into the policy details of the RootManageSharedAccessKey policy, we can copy the primary connection string and store it safely for later use.
The MessageService
First, let’s create a MessageService class library project for handling the Azure Service Bus communications.
To work with Azure Service Bus, let’s add the Azure.Messaging.ServiceBus NuGet package to the application:
dotnet add package Azure.Messaging.ServiceBus
Next, let’s create an IMessageService interface:
public interface IMessageService
{
    Task SendMessageAsync(string queueOrTopicName, string message);
    Task ReceiveMessagesFromQueueAsync(string queueName,
        Action<string> callback,
        int millisecondsDelay);
    Task ReceiveMessagesWithSubscriptionAsync(string topicName,
        string subscriptionName,
        Action<string> callback,
        int millisecondsDelay);
}
After that, let’s create the MessageService class that implements the interface:
public class MessageService : IMessageService
{
    private const string ConnectionString = "{service bus connection string}";

    private static readonly ServiceBusClient ServiceBusClient = CreateClient();

    public async Task SendMessageAsync(string queueOrTopicName, string message)
    {
        await using var sender = ServiceBusClient.CreateSender(queueOrTopicName);
        var serviceBusMessage = new ServiceBusMessage(message);
        await sender.SendMessageAsync(serviceBusMessage);
    }
}
In the MessageService class, we implement the SendMessageAsync() method that accepts queueOrTopicName and message as parameters. The ServiceBusClient is the top-level client object through which we can interact with all service bus entities. Also, we have the ServiceBusSender object that can send messages to specific service bus queues or topics. We create a ServiceBusSender object through the ServiceBusClient and send a message using it.
The CreateClient() method creates a ServiceBusClient object using the connection string:
private static ServiceBusClient CreateClient()
{
    var clientOptions = new ServiceBusClientOptions()
    {
        TransportType = ServiceBusTransportType.AmqpWebSockets
    };

    return new ServiceBusClient(connectionString, clientOptions);
}
Now let’s implement the ReceiveMessagesFromQueueAsync() method for receiving messages from a queue:
public async Task ReceiveMessagesFromQueueAsync(
    string queueName, Action<string> callback, int millisecondsDelay)
{
    await using var processor = ServiceBusClient.CreateProcessor(
        queueName, new ServiceBusProcessorOptions());
    await ProcessMessages(millisecondsDelay, processor, callback);
}
The method accepts queueName, millisecondsDelay, and a callback method as parameters. Here we’re using the ServiceBusClient to create a ServiceBusProcessor object. Once we do that, the ServiceBusProcessor object allows us to process the messages that we receive in the queue using an event-based model.
In the ProcessMessages() method, we implement two event handler methods using the ServiceBusProcessor object:
private static async Task ProcessMessages(int millisecondsDelay, ServiceBusProcessor processor, Action<string> callback)
{
    processor.ProcessMessageAsync += args => MessageHandler(args, callback);
    processor.ProcessErrorAsync += ErrorHandler;

    await processor.StartProcessingAsync();
    await Task.Delay(millisecondsDelay);
    await processor.StopProcessingAsync();
}
Here we add a delay based on the millisecondsDelay parameter to wait for processing messages.
After that, let’s define the MessageHandler() method to process the messages that we receive in the queue:
private static async Task MessageHandler(ProcessMessageEventArgs args, Action<string> callback)
{
    var body = args.Message.Body.ToString();
    callback(body);

    await args.CompleteMessageAsync(args.Message);
}
Here we get the body of the message and pass it along to the callback method.
Next, let’s create the ErrorHandler() method to process any errors that may occur:
private static Task ErrorHandler(ProcessErrorEventArgs args)
{
    Console.WriteLine(args.Exception.ToString());

    return Task.CompletedTask;
}
Likewise, let’s implement the ReceiveMessagesWithSubscriptionAsync() method:
public async Task ReceiveMessagesWithSubscriptionAsync(
    string topicName, string subscriptionName, Action<string> callback, int millisecondsDelay)
{
    await using var processor = ServiceBusClient.CreateProcessor(
        topicName, subscriptionName, new ServiceBusProcessorOptions());
    await ProcessMessages(millisecondsDelay, processor, callback);
}
Here the only difference is that we pass topicName and subscriptionName instead of the queueName and use those to create the ServiceBusProcessor object. Apart from that, the code is similar to how we receive messages from a queue.
The MessageSender Application
Now let’s create the MessageSenderApp console application.
For that, first, let’s create a MessageSender class and implement the functionality to send a few messages to the queue:
public class MessageSender(IMessageService messageService)
{
    public async Task SendMessagesAsync()
    {
        await SendMessageAsync();
        await Task.Delay(5000);
        await SendMessageAsync();
        await Task.Delay(5000);
        await SendMessageAsync();
    }

    private async Task SendMessageAsync()
    {
        var currentDateTime = DateTime.Now;
        var message = $"Message from sender at {currentDateTime}!";
        await messageService.SendMessageAsync("queue1", message);
        Console.WriteLine($"Message sent to the queue at {currentDateTime}!");
    }
}
Here we inject the IMessageService service. The SendMessageAsync() method sends a message with a timestamp and writes the details into the console. By using that, the SendMessagesAsync() method sends three messages with a delay of 5 seconds.
In the Program class, let’s configure the dependencies in the service collection and invoke the SendMessagesAsync() method of the MessageSender class:
public class Program
{
    public static async Task Main()
    {
        HostApplicationBuilder builder = Host.CreateApplicationBuilder();
        builder.Services.AddSingleton<IMessageService, MessageService.MessageService>();
        builder.Services.AddSingleton<MessageSender>();

        var serviceProvider = builder.Services.BuildServiceProvider();

        var myService = serviceProvider.GetService<MessageSender>();
        await myService.SendMessagesAsync();
    }
}
With that, the MessageSenderApp is ready.
The MessageReceiver Application
Now let’s create another console application MessageReceiverApp for receiving the messages.
In the project, let’s create a MessageReceiver class and implement the functionality to receive messages:
public class MessageReceiver(IMessageService messageService)
{
    public async Task ReceiveMessagesAsync()
    {
        await messageService.ReceiveMessagesFromQueueAsync("queue1", MessageHandler, 30000);
    }

    public static void MessageHandler(string message)
    {
        Console.WriteLine($"Received Message: {message}");
    }
}
Here we inject the IMessageService and call the ReceiveMessagesFromQueueAsync() method to receive messages from the queue. While doing so, we pass the queue name, callback method, and the time to wait for messages into the method. Apart from that, we log the received message into the console in the MessageHandler() callback method.
After that, in the Program class, let’s configure the dependencies in the service collection and invoke the ReceiveMessagesAsync() method of the MessageReceiver class:
public static class Program
{
    public static async Task Main()
    {
        HostApplicationBuilder builder = Host.CreateApplicationBuilder();
        builder.Services.AddSingleton<IMessageService, MessageService.MessageService>();
        builder.Services.AddSingleton<MessageReceiver>();

        var serviceProvider = builder.Services.BuildServiceProvider();

        var myService = serviceProvider.GetService<MessageReceiver>();
        await myService.ReceiveMessagesAsync();
    }
}
With this, the MessageReceiverApp is ready.
Finally, let’s run both these applications and observe the output. The MessageSenderApp sends three messages to the queue:
Message sent to the queue at 03-11-2023 15:09:26!
Message sent to the queue at 03-11-2023 15:09:36!
Message sent to the queue at 03-11-2023 15:09:46!
At the same time, the MessageReceiverApp receives all the messages from the queue:
Received Message: Message from sender at 03-11-2023 15:09:26!
Received Message: Message from sender at 03-11-2023 15:09:36!
Received Message: Message from sender at 03-11-2023 15:09:46!
In summary, we can implement point-to-point messaging using the broker architectural pattern with Azure Service Bus Message Queues.
Publish-Subscribe Messaging Using Broker Architectural Pattern
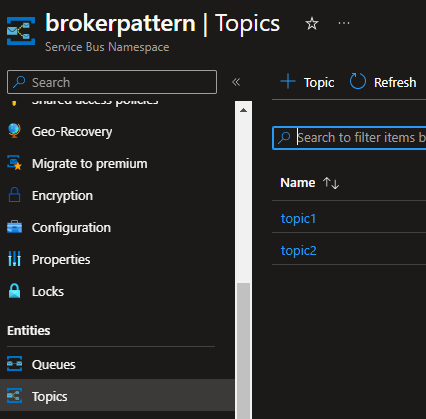
Now let’s look at how to implement a Publish-Subscribe messaging model using Azure Service Bus topics and subscriptions. To do that, first, let’s create two new topics from the Topics section of the Azure Service Bus Namespace – topic1 and topic2:
Remember that topics and subscriptions are available only with the Standard or Premium tiers.
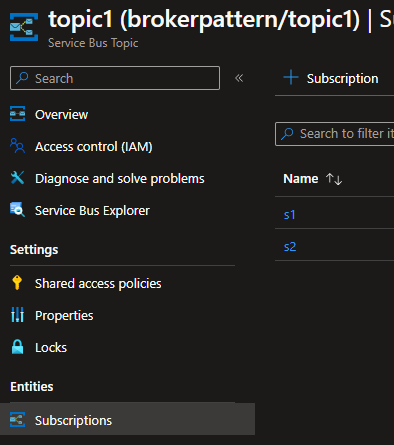
Once we create the topics, we can create subscriptions from the topic details page. Subscriptions are needed for subscribers to get messages with topics. Keeping that in mind, let’s create two subscriptions – s1 and s2 for topic1:
Similarly, let’s create a subscription s1 for the topic2. Each subscriber app can use a subscription to get the messages sent with that particular topic.
Next, we are going to create two publisher apps and three subscriber apps. Let’s create separate console applications for each of these.
Message Publishers
Let’s start by creating the MessagePublisherApp1 project. In the project, let’s create MessagePublisher1 class to publish messages with a topic:
public class MessagePublisher1(IMessageService messageService)
{
    private static readonly string topicName = "topic1";

    public async Task SendMessagesAsync()
    {
        await SendMessageAsync();
        await Task.Delay(5000);
        await SendMessageAsync();
        await Task.Delay(5000);
        await SendMessageAsync();
    }

    private async Task SendMessageAsync()
    {
        var currentDateTime = DateTime.Now;
        var message = $"Message from sender for topic:{topicName} at {currentDateTime}!";
        await messageService.SendMessageAsync(topicName, message);
        Console.WriteLine($"Message sent for topic:{topicName} at {currentDateTime}!");
    }
}
Here the only difference is that we pass the topic name instead of the queue name while invoking the method of the MessageService. Apart from that, the rest of the code is similar to how we send messages to a queue. Let’s set the topicName as topic1 here. Remember that once we send a message with a topic, all the subscribers of that topic will receive that message.
In the Program class, let’s configure the dependencies in the service collection and invoke the SendMessagesAsync() method of the MessageSender class:
public static class Program
{
    public static async Task Main()
    {
        HostApplicationBuilder builder = Host.CreateApplicationBuilder();
        builder.Services.AddSingleton<IMessageService, MessageService.MessageService>();
        builder.Services.AddSingleton<MessagePublisher1>();

        var serviceProvider = builder.Services.BuildServiceProvider();

        var myService = serviceProvider.GetService<MessagePublisher1>();
        await myService.SendMessages();
    }
}
Next, let’s create the MessagePublisherApp2 project for sending messages with topic topic2. Here we just need to change the topicName to topic2. The rest of the code will be the same as the MessagePublisherApp1 application.
Message Subscribers
Now let’s create the Message Subscriber applications.
First, let’s create the MessageSubscriberApp1 project. In the project, let’s create the MessageSubscriber1 class for receiving the messages sent with a topic using a subscription:
public class MessageSubscriber1(IMessageService messageService)
{
    private static readonly string topicName = "topic1";
    private static readonly string subscriptionName = "s1";

    public async Task ReceiveMessagesAsync()
    {
        await messageService.ReceiveMessagesWithSubscriptionAsync(
            topicName, subscriptionName, MessageHandler, 30000);
    }

    public static void MessageHandler(string message)
    {
        Console.WriteLine(
            $"Received Message: {message} with topic:{topicName}-subscription:{subscriptionName}");
    }
}
Within the class, in the ReceiveMessages() method, we call the ReceiveMessagesWithSubscriptionAsync() method of the MessageService and pass the topicName, subscriptionName, MessageHandler callback method, and the time to wait for messages. Once we use this approach, the processor will process only messages that are sent with specified topics using the specified subscription. That said, here we specify the topicName as topic1 and subscriptionName as s1. Furthermore, in the MessageHandler callback method, we log the received message details along with the message.
Finally, in the Program class, let’s configure the dependencies in the service collection and invoke the ReceiveMessagesAsync() method of the MessageSubscriber1 class:
public static class Program
{
    public static async Task Main()
    {
        HostApplicationBuilder builder = Host.CreateApplicationBuilder();
        builder.Services.AddSingleton<IMessageService, MessageService.MessageService>();
        builder.Services.AddSingleton<MessageSubscriber1>();

        var serviceProvider = builder.Services.BuildServiceProvider();

        var myService = serviceProvider.GetService<MessageSubscriber1>();
        await myService.ReceiveMessagesAsync();
    }
}
Likewise, let’s create the MessageSubscriberApp2 and MessageSubscriberApp3.
For the MessageSubscriberApp2, we’ll specify the topic as topic1, but change the subscription to s2. Similarly, for MessageSubscriberApp3, let’s specify the topic as topic2 and the subscription as s1.
Output
Now let’s run all the publisher and subscriber applications and observe the output. For starting multiple projects in the same solution, we can go to the solution properties in Visual Studio and choose Multiple startup projects for the Startup Project option. It will list all the projects and we can select the Action as Start for all the projects that we want to run.
The MessagePublisherApp1 will send three messages with topic1 topic:
Message sent for topic:topic1 at 03-11-2023 19:18:56!
Message sent for topic:topic1 at 03-11-2023 19:19:26!
Message sent for topic:topic1 at 03-11-2023 19:19:56!
Similarly, the MessagePublisherApp2 will send three messages with topic2:
Message sent for topic:topic2 at 03-11-2023 19:18:56!
Message sent for topic:topic2 at 03-11-2023 19:19:26!
Message sent for topic:topic2 at 03-11-2023 19:19:56!
Now let’s take a look at the subscriber applications. Keep in mind that MessageSubscriberApp1 has subscribed to topic1 with subscription s1:
Received Message: Message from sender for topic:topic1
at 03-11-2023 19:18:56! with topic:topic1-subscription:s1
Received Message: Message from sender for topic:topic1
at 03-11-2023 19:19:26! with topic:topic1-subscription:s1
Received Message: Message from sender for topic:topic1
at 03-11-2023 19:19:56! with topic:topic1-subscription:s1
Here we can see that the MessageSubscriberApp1 receives all the messages with topic1 topic using the subscription s1 that we defined for the topic.
Similarly, the MessageSubscriberApp2 receives all the messages with topic1 topic using the subscription s2 that we defined for the topic:
Received Message: Message from sender for topic:topic1
at 03-11-2023 19:18:56! with topic:topic1-subscription:s2
Received Message: Message from sender for topic:topic1
at 03-11-2023 19:19:26! with topic:topic1-subscription:s2
Received Message: Message from sender for topic:topic1
at 03-11-2023 19:19:56! with topic:topic1-subscription:s2
At the same time, the MessageSubscriberApp3 receives all the messages with topic2 topic using the subscription s1 defined for the topic:
Received Message: Message from sender for topic:topic2
at 03-11-2023 19:18:56! with topic:topic2-subscription:s1
Received Message: Message from sender for topic:topic2
at 03-11-2023 19:19:26! with topic:topic2-subscription:s1
Received Message: Message from sender for topic:topic2
at 03-11-2023 19:19:56! with topic:topic2-subscription:s1
To sum up, we can use Azure Service Bus topics and subscriptions to implement a publisher-subscriber messaging model.
Conclusion
In this article, we learned what a broker architectural pattern is and how to implement it in .NET applications. Additionally, we learned about different broker communication models like point-to-point messaging and publisher-subscriber messaging and how to implement those in real-world applications using the Azure Service Bus.
