

The Client-Server Architectural Pattern is a system that divides an application between clients that initiate requests and the server that fulfills them. This model of architecture forms the basis of countless applications, from web browsing to email.
In this article, we’ll learn about Client-Server architecture. We’ll delve into how it works, its components, its benefits, and the challenges it poses.
Let’s begin.
Components of Client-Server Architecture
As the name suggests, the main components of a client-server architecture, are the client, and the server. Each of them plays an important role in the seamless functioning of this architecture.
Client
The client is something that initiates requests for services or resources. This request can be in the form of a web browser seeking a webpage or an application fetching some data after calculations.
Clients can be classified into thin clients and thick clients based on their processing capabilities.
A thick client is a client that has significant processing power. It handles most of the data processing locally without relying on a server. A web-based application for graphic design is an example of a thick client.
In contrast, a thin client relies more on the server for processing and mostly presents processed data provided by the server. A web-based email client is a thin client.
Server
A server responds to the requests made by clients. It can provide various functionalities, referred to as “services”. These services can range from performing computations to sharing a piece of information with different clients.
Servers can be dedicated servers that execute a specific function, thus prioritizing optimal performance. They can also be shared servers that perform multiple functions, hence trading performance for efficiency.
A server doesn’t necessarily work with a single client. It can serve multiple clients, and a single client can use multiple servers. Similarly, the client and the server may run on the same device, or the client can connect to a server present in another device over a network.
Based on the services they provide, there can be multiple types of servers. For example, a Web Server that responds to HTTP requests, a Database Server that handles database-related tasks, or a File Server that provides shared disk access.
How Client-Server Architecture Works
Now, that we know about the components, let’s see how the architecture works in steps.
It starts with a client initiating a request. This request could be a click on a webpage or a query for some specific data. This request transmits across a network and arrives at the server. There are communication protocols like HTTP, or FTP that regulate how the request is transmitted.
Once the request reaches the server, the processing starts. Here, the server interprets the request and identifies the required action. Based on the exact nature of the request, the server takes appropriate action. This could be something like querying a database, executing some business logic, or retrieving files. In scenarios involving data, the server interacts with the database. This interaction typically includes executing SQL queries to perform CRUD operations.
After executing the requested action the server generates a response. This could be any output relevant to the initial client request such as a webpage, or a dataset. The client receives this response and processes it. In the case of a web browser, it renders the received HTML, CSS, and JavaScript to display the final web page.
This continuous cycle repeats as users interact with the client interface. The client keeps triggering new requests and the server continues providing responses to these requests, maintaining the flow of data and services.
Types of Client-Server Architecture
We use the client-server architecture in various applications. However, it’s not a one-size-fits-all solution and it comes in different forms based on the complexity of the system. Some of the most common types of client-server architecture are 2-tier, 3-tier, and n-tier.
2-tier Architecture
The 2-Tier architecture is a straightforward implementation of the client-server model. Here, we divide the system into two main components: the client and the server.
The client is typically responsible for the user interface and application logic. It interacts directly with the server, which contains the business logic and any database calls.
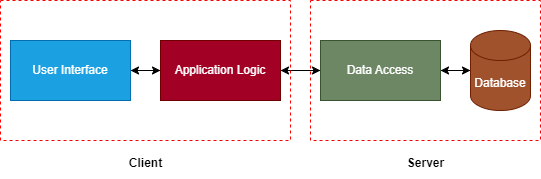
This implementation makes 2-tier architecture relatively easy to implement. The direct communication between the client and the server makes it suitable for small-scale applications where simplicity is more important than scalability.
However, due to the tight coupling of its components, this design doesn’t scale well. The 2-tier system is not optimal for complex systems or applications with evolving requirements.
3-tier Architecture
The 3-tier architecture is the evolved version of a 2-tier architecture. The most important distinction between them is that the 3-tier architecture introduces a separation of concerns in the system.
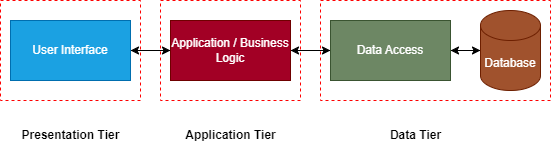
We divide the system into three major components: the presentation tier, the application tier, and the data tier.
The presentation tier handles the user interface. This is our client tier that deals with displaying data and presenting information to the end-user.
The application tier is an intermediary layer between the client and the database. Here, we implement business rules and execute any application logic. This tier plays the most important part in ensuring the separation of concerns in our application by separating the user interface from the application logic and data management.
The data tier is where we have the database. It manages data storage, retrieval, and manipulation. This tier responds to requests from the application server. We control the access to the database here. Thus, there’s a reduced risk of unauthorized access.
In a 3-tier system, changes in one tier are less likely to impact the others. In addition, as the system isn’t as tightly coupled as a 2-tier, it’s easier to update different components without affecting the entire system.
These features allow us to create complex applications ensuring easier scalability, and maintainability.
N-tier Architecture
The N-tier architecture is an advanced and highly modular client-server architectural model. The term “N” denotes that there aren’t any fixed number of tiers in this architecture. Thus, it provides a flexible solution for complex applications.
In the N-Tier architecture, we divide the system into multiple tiers each with its specific responsibilities.
Similar to the 3-tier architecture, the presentation tier in the N-tier is responsible for user interface and user interactions.
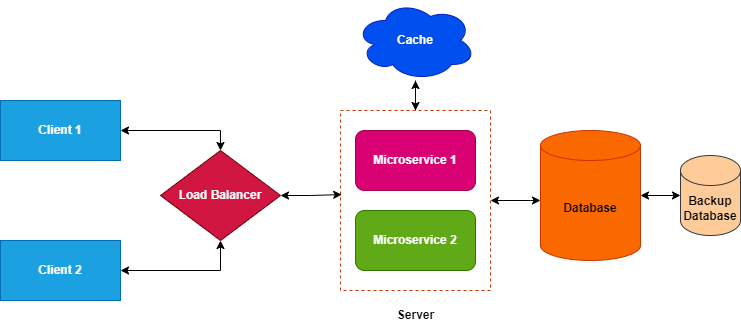
The application tier in the N-tier is often further divided into multiple layers each handling specific application logic. For instance, we can have multiple microservices handling specific business logic.
In other scenarios, we introduce additional components like load balancers, which distribute incoming network traffic across multiple servers. Thus ensuring efficient utilization and preventing request overload on a particular server.
We often introduce another tier known as the business logic tier. This tier specifically focuses on implementing the core business rules and logic. Thus, we abstract the core functionality away from the application tier and centralize it. The introduction of these additional components complements the traditional tiers.
The data access tier manages data storage, retrieval, and manipulation. Similar to the application tier, we can further divide this tier into services specializing in different aspects of data management, such as storage, retrieval, and caching.
The caching mechanisms store frequently accessed data thus reducing the load on the data access tier and improving overall application performance. We can use these mechanisms to implement Content Delivery Networks (CDN). CDNs store cached versions of content in multiple locations. This ensures efficient content delivery to users worldwide by reducing latency.
The main advantage of N-tier architecture over others is its higher degree of granularity. We can create different microservices where each can handle specific tasks. It also allows the components of an application to scale independently based on demand. Thus, it’s well-suited for large-scale applications.
Real-World Application
Now that we have understood what client-server architecture is and its different types, let’s look at a practical example to see how this architectural pattern works in a real-world scenario.
Application Setup
Let’s create a simple ASP.Net web application that deals with inventory management. We’ll start with a 2-tier architecture and then evolve the application to be more complex.
To start, let’s navigate to the folder we want our application and run the dotnet new webapp command:
dotnet new webapp -n ClientServerArchitecture
This creates a new ASP.NET web application using Razor Pages.
Required Nuget Packages
We’ll use SQLite as our database. Let’s install the Entity Framework SQLite package and the tools package to enable migrations:
Install-Package Microsoft.EntityFrameworkCore.Sqlite
Install-Package Microsoft.EntityFrameworkCore.Tools
Creating the Model
Let’s create a Product class within it:
public class Product
{
    public int Id { get; set; }

    [Required(ErrorMessage = "Please enter the product name.")]
    public string? Name { get; set; }

    [Required(ErrorMessage = "Please enter the product price.")]
    public decimal? Price { get; set; }

    [Range(1, int.MaxValue, ErrorMessage = "Please enter a quantity greater than 0.")]
    public int? Quantity { get; set; }
}
Configuration of Data Context
Next, let’s create a “Data” folder and create a ProductDataContext class:
public class ProductDataContext : DbContext
{
    public ProductDataContext(DbContextOptions options) : base(options)
    {
    }

    public DbSet<Product> Products { get; set; }
}
Here, the ProductDataContext class inherits from DbContext, which is a part of the Entity Framework. It helps us interact with the database using .NET objects. The options constructor parameter typically contains configuration details like the connection string.
The DbSet<Product> property acts as a table in the database and we can perform database operations on the property.
To tie the DbContext to the application, we need to add a configuration in the Main() method of the Program class:
builder.Services.AddDbContext<ProductDataContext>(options =>
{
    options.UseSqlite(builder.Configuration.GetConnectionString("DefaultConnectionString"));
});
This configuration uses ASP.Net Core’s dependency injection and makes sure that the ProductDataContext instance is available throughout the application.
Finally, let’s create and apply initial migrations in the Package Manager Console:
Add-Migration InitialCreate
Update-Database
With this our backend setup is complete. We are starting with a 2-tier architecture where this will act as the “server“. Let’s now create the “client“.
User Interface Creation in Client-Server Architecture
In the “Pages” folder, let’s update the Index.cshtml page:
<p>
    <a asp-page="/Create">Create New Product</a>
</p>

<table class="table">
    <thead>
        <tr>
            <th>ID</th>
            <th>Name</th>
            <th>Price</th>
            <th>Quantity</th>
        </tr>
    </thead>
    <tbody>
        @foreach (var product in Model.Products)
        {
            <tr>
                <td>@product.Id</td>
                <td>@product.Name</td>
                <td>@product.Price</td>
                <td>@product.Quantity</td>
            </tr>
        }
    </tbody>
</table>
This gives a tabular representation of what products are available in our inventory to the end-user. Let’s also update the model Index.cshtml.cs class:
public class IndexModel : PageModel
{
    private readonly ProductDataContext _context;
    public List<Product> Products { get; set; }

    public IndexModel(ProductDataContext context)
    {
        _context = context;
    }

    public void OnGet()
    {
        Products = _context.Products.ToList();
    }
}
Here, we get all the products present in the database and put them into the Products list. In addition to displaying all the products, we also need a user interface to add new products to the inventory.
Let’s create a new Create.cshtml page in the “Pages” folder:
@page
@model CreateModel
@{
    ViewData["Title"] = "Add Product";
}

<h2 class="mb-5">@ViewData["Title"]</h2>

<form method="post">
    <div class="form-group mb-3 row">
        <label asp-for="Product.Name" class="col-sm-2 col-form-label">Name:</label>
        <div class="col-sm-6">
            <input asp-for="Product.Name" class="form-control" />
            <span asp-validation-for="Product.Name" class="text-danger"></span>
        </div>
    </div>

    <div class="form-group mb-3 row">
        <label asp-for="Product.Price" class="col-sm-2 col-form-label">Price:</label>
        <div class="col-sm-6">
            <input asp-for="Product.Price" class="form-control" />
            <span asp-validation-for="Product.Price" class="text-danger"></span>
        </div>
    </div>

    <div class="form-group mb-3 row">
        <label asp-for="Product.Quantity" class="col-sm-2 col-form-label">Quantity:</label>
        <div class="col-sm-6">
            <input asp-for="Product.Quantity" class="form-control" />
            <span asp-validation-for="Product.Quantity" class="text-danger"></span>
        </div>
    </div>

    <div class="form-group row">
        <div class="col-sm-10 offset-sm-2">
            <button type="submit" class="btn btn-primary">Add Product</button>
        </div>
    </div>
</form>
Here, we create a form to add a new product to our database. The form controls map to the Name, Price, and Quantity properties of the Product class respectively.
In the OnPost() method of the Create.cshtml.cs page model, we add the product that the end-user enters into the Products DbSet:
public IActionResult OnPost()
{
    if (!ModelState.IsValid)
    {
        return Page();
    }

    _context.Products.Add(Product);
    _context.SaveChanges();

    return RedirectToPage("/Index");
}
Finally, we redirect the user back to the Index page. This completes the basic CRUD operations for our inventory management application.
We have the 2-tier architecture where the client handles presentation and user interaction, and the server manages data storage and retrieval.
However, our client and database logic are coupled tightly. Any change in the data retrieval logic will need a code change in the client. Let’s address this issue by refactoring our application to 3-tier.
Evolution to 3-Tier Architecture
In the 3-tier architecture, we’ll add an intermediary layer called the application tier to handle our business logic. This is in addition to the existing two components: the presentation tier (client), and the data tier (database). This separation helps us make the components loosely coupled and thus our application easier to manage.
Let’s create the ProductService class:
public class ProductService
{
    private readonly ProductDataContext _context;

    public ProductService(ProductDataContext context)
    {
        _context = context;
    }

    public List<Product> GetProducts()
    {
        return _context.Products.ToList();
    }

    public void AddProduct(Product product)
    {
        _context.Products.Add(product);
        _context.SaveChanges();
    }
}
Here, we move the business logic of viewing all products into the GetProducts() method, and that of adding a new product to the AddProduct() method.
Next, let’s register the ProductService class as a scoped service so that we can inject it into our client-side code:
builder.Services.AddScoped<ProductService>();
Now, let’s refactor the Index.cshtml.cs page model to update the dependencies:
public class IndexModel : PageModel
{
    private readonly ProductService _productService;
    public List<Product> Products { get; set; }

    public IndexModel(ProductService productService)
    {
        _productService = productService;
    }

    public void OnGet()
    {
        Products = _productService.GetProducts();
    }
}
Similarly, let’s update the Create.cshtml.cs page model:
public class CreateModel : PageModel
{
    private readonly ProductService _productService;

    [BindProperty]
    public Product Product { get; set; }

    public CreateModel(ProductService productService)
    {
        _productService = productService;
    }

    public void OnGet() { }

    public IActionResult OnPost()
    {
        if (!ModelState.IsValid)
        {
            return Page();
        }

        _productService.AddProduct(Product);

        return RedirectToPage("/Index");
    }
}
This change in both the page models provides us with a separation of concerns. Now, every tier can scale independently. Additionally, the client tier and the data tier aren’t tightly coupled anymore.
At this point, our presentation and data tier are completely independent. However, the application tier that we introduced is taking care of business logic execution as well as data access. We can further modularize our application by introducing a separate data access tier.
Evolution to N-Tier Architecture
Now, let’s add the ProductRepository class:
public class ProductRepository
{
    private readonly ProductDataContext _context;

    public ProductRepository(ProductDataContext context)
    {
        _context = context;
    }

    public List<Product> GetProducts()
    {
        return _context.Products.ToList();
    }

    public void AddProduct(Product product)
    {
        _context.Products.Add(product);
        SaveChanges();
    }

    public void SaveChanges()
    {
        _context.SaveChanges();
    }
}
This new class contains all the data access logic that we previously had in the ProductService class.
Next, let’s introduce an IProductService interface:
public interface IProductService
{
    List<Product> GetProducts();
    void AddProduct(Product product);
}
This interface will contain all the methods for implementing the business logic which at the moment are GetProducts() and AddProduct() methods.
Now, let’s implement this interface in the ProductService class:
public class ProductService : IProductService
{
    private readonly ProductRepository _productRepository;

    public ProductService(ProductRepository productRepository)
    {
        _productRepository = productRepository;
    }

    public List<Product> GetProducts()
    {
        return _productRepository.GetProducts();
    }

    public void AddProduct(Product product)
    {
        _productRepository.AddProduct(product);
    }
}
Thus, our ProductService class in the business tier loses its tight coupling from the data tier. This class no longer needs to interact with the database directly and can depend on the ProductRepository class for data access.
This allows our service layer to contain business logic calculations without being tightly coupled with the database. Let’s introduce an ApplyDiscount() method to see this:
public void ApplyDiscount(decimal discountPercentage)
{
    var products = _productRepository.GetProducts();

    foreach (var product in products)
    {
        var discountedPrice = product.Price - (product.Price * discountPercentage / 100);

        product.Price = discountedPrice;
    }

    _productRepository.SaveChanges();
}
Here, we use the ProductRepository class for the CRUD operations in GetProducts() and SaveChanges() methods while also applying a discount on the product prices based on the discountPercentage parameter.
Finally, let’s register the ProductService and ProductRepository classes:
builder.Services.AddScoped<ProductRepository>();
builder.Services.AddScoped<IProductService, ProductService>();
In the presentation tier, all we need to do is to replace the ProductService class call with IProductService interface in Index.cshtml.cs:
public class IndexModel : PageModel
{
    private readonly IProductService _productService;

    public IndexModel(IProductService productService)
    {
        _productService = productService;
    }
}
A similar change in the Create.cshtml.cs:
public class CreateModel : PageModel
{
    private readonly IProductService _productService;

    public CreateModel(IProductService productService)
    {
        _productService = productService;
    }
}
Hence, we get an application that is highly modular making it easy to maintain and to extend its various components. Every tier has a clear specific responsibility, thus achieving separation of concerns.
However, this doesn’t come without its challenges. After all, we inherently make the application more complex by introducing more layers. Thus, when choosing which type of client-server architecture to implement we must always consider our specific requirements and the complexity of our application.
When to Use Client-Server Architecture
Now that we’ve learned about the different ways the client-server architecture is implemented, let’s look at when this architecture is suitable in real life.
One of the primary situations where we can adopt the client-server architecture is when we need a clear separation between the user interface and the data and business logic in an application. This separation is important to keep our components loosely coupled such that changes in one component do not necessarily disrupt the others. Additionally, in scenarios where multiple users need access to centralized data or resources, client-server architecture proves useful.
As an application grows in complexity, the modular design of client-server systems helps us scale easily. This is crucial for large-scale applications that may expand or have an increased user base in the future.
Finally, the client-server architecture is suitable for scenarios where we want diverse clients, such as web browsers, mobile devices, or desktop applications, to interact with a server. As the application logic is abstracted in the server, there is a consistent user interaction regardless of the client type. This helps us achieve cross-platform compatibility in our applications.
When Not to Use Client-Server Architecture
While client-server architecture offers a robust solution for many scenarios, there are situations where it may not be a suitable choice.
In applications where we don’t expect much growth, the client-service architecture isn’t a good option as the overhead introduced by the additional layers might outweigh the benefits.
Additionally, in scenarios where we require low latency, the communication between the client and server layers may introduce delays. In applications like online gaming, where we require immediate responses this delay can become a hindrance. Thus, client-server architecture isn’t a suitable choice in such cases.
Finally, for systems that rely on peer-to-peer communication, client-server architecture might not be an optimal choice. The client-server model is inherently centralized. Thus, in cases where we want each node in the network to interact directly with others, the centralization can introduce bottlenecks and limit the system’s overall efficiency. Decentralized architectures might better suit these scenarios.
Conclusion
In this article, we learned about the client-server architectural pattern in C#. We looked at how it works, its different components, and the scenarios in which it may or may not be the suitable choice for a system. We also looked at its different types like 2-tier, 3-tier, and n-tier architecture. Finally, we saw the client-server architecture in action in a code example.
