
Selenium is a library that helps us automate browser behavior. We can use it for different purposes, but its primary use is for automated UI testing of web applications.
In this article, we are going to use Selenium to write automated UI tests and with that finish our testing series. Selenium has support for many different browsers and for this article, we are going to use the ChromeDriver. It also contains many different useful methods (Navigate, GoToUrl, FindElement, SendKees, Click…) which help us manipulate different HTML elements. These methods are going to be of great use in our examples.
For the complete navigation of this series, you can visit ASP.NET Core Testing.
So, let’s get down to business.
Selenium Installation in the Test Project
First thing first.
We are going to create a new xUnit test project and name it EmployeesApp.AutomatedUITests. After the creation process, we are going to rename the existing class to AutomatedUITests.
Now we can open the NuGet Package Manager window and install two required libraries, Selenium.WebDriver and Selenium.WebDriver.ChromeDriver:
PM> Install-Package Selenium.WebDriver
PM> Install-Package Selenium.WebDriver.ChromeDriver
That’s all it takes. We are now prepared to write automated UI tests.
Writing a Selenium Automation Test
Let’s open the AutomatedUITests class and modify it by implementing the IDisposable interface:
public class AutomatedUITests : IDisposable
{
    public void Dispose()
    {

    }
}
We are going to use the Dispose method to close a chrome window opened by the ChromeDriver and also to dispose of it.
To continue on, let’s create our driver:
public class AutomatedUITests : IDisposable
{
    private readonly IWebDriver _driver;

    public AutomatedUITests() => _driver = new ChromeDriver();

    public void Dispose()
    {
        _driver.Quit();
        _driver.Dispose();
    }
}
We instantiate the IWebDriver object by using the ChromeDriver class. In the Dispose method, we dispose of it. With that done, everything is ready for the first UI test with Selenium:
[Fact]
public void Create_WhenExecuted_ReturnsCreateView()
{
    _driver.Navigate()
        .GoToUrl("https://localhost:5001/Employees/Create");

    Assert.Equal("Create - EmployeesApp", _driver.Title);
    Assert.Contains("Please provide a new employee data", _driver.PageSource);
}
We use the Navigate method to instruct the driver to navigate the browser to another location and with the GoToUrl method, we provide that location. Once the browser navigates to the requested Url the _driver.Title and _driver.PageSource properties will be populated.
After using the Navigate method, we just make assertions on the mentioned properties to verify that we have actually navigated to the Create page.
Before we start the Test Explorer window, we need to start our application without debugging (CTRL+F5) because a running server is required for UI tests to pass.
As soon as we run our test, we are going to see a new browser window opened and soon after that closed because we call the Quit method in the Dispose method. A little bit later, our test will pass:
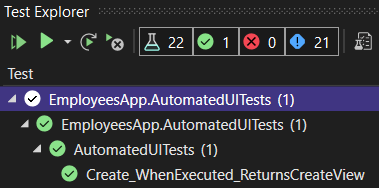
Excellent!
We can shut down our app, and move on to the other Selenium tests.
Using Selenium to Manipulate Input Fields
Let’s write another test where we verify that the error message appears on the screen if we populate some input fields, not all of them, and click the Create button:
[Fact]
public void Create_WrongModelData_ReturnsErrorMessage()
{
    _driver.Navigate()
        .GoToUrl("https://localhost:5001/Employees/Create");

    _driver.FindElement(By.Id("Name"))
        .SendKeys("Test Employee");

    _driver.FindElement(By.Id("Age"))
        .SendKeys("34");

    _driver.FindElement(By.Id("Create"))
        .Click();

    var errorMessage = _driver.FindElement(By.Id("AccountNumber-error")).Text;

    Assert.Equal("Account number is required", errorMessage);
}
One more time, we navigate to the required location by using the Navigate and the GoToUrl methods. After that, we start populating our input fields. Of course, we have to find an element first. To achieve that we use the FindElement(By.Id("ElementId")) expression.
The FindElement method searches for the required element on the HTML page. It accepts a parameter of type By. The By class consists of the different methods which allow us to search different elements on our page (Id, ClassName, CssSelector, TagName, etc.).
Once we find the element, we use the SendKeys method to populate it. The same process is repeated for the Age element and the Create button, just for the Create button we use the Click method to click on it.
Finally, we extract the error message from the page and make an assertion.
If you want, you can debug this test code to see how our driver opens the page and manipulates the input fields and the button.
Let’s start our app without debugging again and run our test:
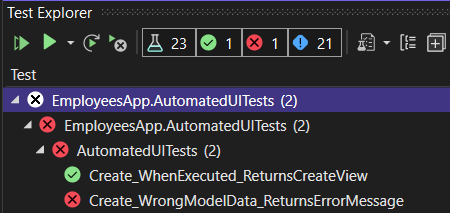
We can see that it fails, and the message explains it pretty well:
OpenQA.Selenium.NoSuchElementException : no such element: Unable to locate element: {"method":"css selector","selector":"#Create"}
The FindElement method can’t find our Create button because it is missing the id attribute.
To solve that, we can inspect our source page and look for a valid attribute or we can change our code a bit. We are going to change the code.
Let’s open the Create view in the main project and just add the id attribute to the button element:
<input type="submit" id="Create" value="Create" class="btn btn-primary" />
Now, let’s start the app and run the Test Explorer window – it passes now.
Testing the Create POST Action with Selenium
Let’s write one additional test where we populate all the fields, click the Create button, and then verify that the Index page is loaded with a new employee:
[Fact]
public void Create_WhenSuccessfullyExecuted_ReturnsIndexViewWithNewEmployee()
{
    _driver.Navigate()
        .GoToUrl("https://localhost:5001/Employees/Create");

    _driver.FindElement(By.Id("Name"))
        .SendKeys("Another Test Employee ");

    _driver.FindElement(By.Id("Age"))
        .SendKeys("34");

    _driver.FindElement(By.Id("AccountNumber"))
        .SendKeys("123-9384613085-58");

    _driver.FindElement(By.Id("Create"))
        .Click();

    Assert.Equal("Index - EmployeesApp", _driver.Title);
    Assert.Contains("Another Test Employee ", _driver.PageSource);
    Assert.Contains("34", _driver.PageSource);
    Assert.Contains("123-9384613085-58", _driver.PageSource);
}
We can see that there are small differences between this code and the previous one. Here, we just populate all the fields and make assertions on the page’s title and newly created data.
So, let’s try if this passes:
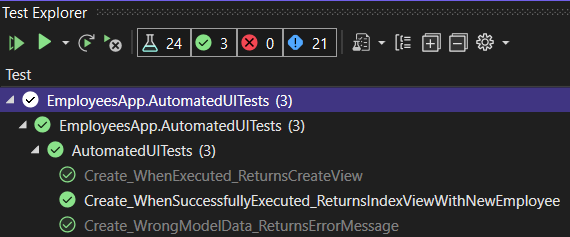
And it does.
Great job. Now, let’s refactor our code to eliminate repetitions and make it more readable.
Using Page Object Model Design Pattern to Make the Code Even Better
We can see that we have a lot of redundant code in our testing methods when we navigate to the URI or find different elements on the HTML page.
This is something we want to avoid.
This pattern, that we are going to use, is called Page Object Model Design Pattern. But, we are not going to use the PageFactory class (as you can see in many different examples) because it is not supported in .NET Core and it is getting obsolete in .NET Framework.
So, let’s start by creating a new EmployeePage class in the EmployeesApp.UITests project and modifying it:
public class EmployeePage
{
    private readonly IWebDriver _driver;
    private const string URI = "https://localhost:5001/Employees/Create";

    private IWebElement NameElement => _driver.FindElement(By.Id("Name"));
    private IWebElement AgeElement => _driver.FindElement(By.Id("Age"));
    private IWebElement AccountNumberElement => _driver.FindElement(By.Id("AccountNumber"));
    private IWebElement CreateElement => _driver.FindElement(By.Id("Create"));

    public string Title => _driver.Title;
    public string Source => _driver.PageSource;
    public string AccountNumberErrorMessage => _driver.FindElement(By.Id("AccountNumber-error")).Text;

    public EmployeePage(IWebDriver driver) => _driver = driver;

    public void Navigate() => _driver.Navigate()
            .GoToUrl(URI);

    public void PopulateName(string name) => NameElement.SendKeys(name);
    public void PopulateAge(string age) => AgeElement.SendKeys(age);
    public void PopulateAccountNumber(string accountNumber) => AccountNumberElement.SendKeys(accountNumber);
    public void ClickCreate() => CreateElement.Click();
}
This code is pretty easy to understand because we only extract the logic for finding HTML elements, add some methods to populate them, and click the Create button. Additionally, we extract the logic for the Title, Source, and error message properties.
After these changes, we can modify the AutomatedUITests class:
public class AutomatedUITests : IDisposable
{
    private readonly IWebDriver _driver;
    private readonly EmployeePage _page;

    public AutomatedUITests()
    {
        _driver = new ChromeDriver();
        _page = new EmployeePage(_driver);
        _page.Navigate();
    }

    [Fact]
    public void Create_WhenExecuted_ReturnsCreateView()
    {
        Assert.Equal("Create - EmployeesApp", _page.Title);
        Assert.Contains("Please provide a new employee data", _page.Source);
    }

    [Fact]
    public void Create_WrongModelData_ReturnsErrorMessage()
    {
        _page.PopulateName("New Name");
        _page.PopulateAge("34");
        _page.ClickCreate();
        Assert.Equal("Account number is required", _page.AccountNumberErrorMessage);
    }

    [Fact]
    public void Create_WhenSuccessfullyExecuted_ReturnsIndexViewWithNewEmployee()
    {
        _page.PopulateName("New Name");
        _page.PopulateAge("34");
        _page.PopulateAccountNumber("123-9384613085-58");
        _page.ClickCreate();
        Assert.Equal("Index - EmployeesApp", _page.Title);
        Assert.Contains("New Name", _page.Source);
        Assert.Contains("34", _page.Source);
        Assert.Contains("123-9384613085-58", _page.Source);
    }

    public void Dispose()
    {
        _driver.Quit();
        _driver.Dispose();
    }
}
And that is it. It is pretty obvious that this code is much cleaner and easier to read.
You can run the test explorer to verify that all tests pass as they did before.
Conclusion
And there we go. With this article, we have finished our Testing series.
Now you should have enough knowledge to do your own automated UI testing with Selenium and to explore testing features in ASP.NET Core more deeply.
We hope you have enjoyed this series as much as we did.

Good job
thanks for creating this article.
just a small bug in which the GitHub source code is not correct
Can you please point out the issue you are referring to? Source code should be the same as the article.
I think the source code in https://github.com/CodeMazeBlog/testing-aspnetcore-mvc/tree/ui-testing-selenium
I understand what you mean. I just don’t know what is the bug you are talking about? The last time I tested it, it was working without an issue, thus my confusion.
No problem in code,
In the article invalid source link is “, you can visit our GitHub repository.”
Ok?
Oh, thank you, I get it now. Yeah, it leads to a different branch in the same repo. Will be fixed. Thanks again.
Thank you too,
I saw the testing series and thank you very much.
I like to improve my knowledge of testing.
Could you help me?
Which one better article to improve it?
In that testing series, different articles cover different parts of testing but to improve as a tester, you should read them all as all the topics are very important. Unit testing, integration testing, automation testing, mocking, and all those stuff are pretty important. So basically just start from the beginning of the series and move forward.
Its a very nice blog. I came to learn a lot from it. points discussed are to the point nothing more nothing less. I am also reading Ultimate ASP.NET Core 5 Web API which appears to be full of learning.
Thank you.
Thank you too Hamad for this nice comment. It is always great to hear something like that from our readers.
That’s an excellent way to complete the testing series, Marinko! We now have enough knowledge to write our own tests and to deeply explore testing features in the ASP.NET core. Global enterprises are increasingly shifting towards adoption of Selenium, thanks to some compelling benefits offered by the tool – cost-effectiveness, compatibility, speed, and much more. However, for enterprises, migrating to Selenium involves time, effort, costs, and challenges. It is critical to leverage the right resources, tools, and best practices to ensure a seamless migration. Thus, it becomes imperative to migrate test assets from commercial test tools to Selenium right from the beginning. It can be done by pooling in industry best practices and accelerating the process of migration. I found these insightful blogs on Selenium that are really useful and am sharing them for the benefit of our readers. https://bit.ly/3GFbkdW
I am facing below issue
OpenQA.Selenium.WebDriverException: ‘unknown error: net::ERR_CONNECTION_REFUSED
(Session info: chrome=96.0.4664.110)’
How can i resolve this ?
If I remember correctly, this can happen if a Selenium process is already running. Try opening a TaskManager and closing down the process and then start the app again.
Hello,
Is there a way to handle windows actions like keyboard inputs in .net core test project?
Thanks,
Salma.
Hi, I have downloaded your sample project and trying to run it And I get the below erro.
I believe this is due to employee app not running. How can I start the employee app before starting the test on localhost:5001?
Well, if I understood correctly, as I explained in this article, you need to start a server with CTRL+F5, and once the app is started, you can run your tests.
Hi Marinko,
I also ran into trouble with the version of Selenium.Chrome.WebDriver like Zoltan Halasz. Eventually I found a ‘Selenium.Webdriver.ChromeDriver nuget package which did the trick. To install (for Chrome 90) run: PM> Install-Package Selenium.WebDriver.ChromeDriver -Version 90.0.4430.2400` in PMC.
Many thanks for these tutorials. For a back end guy trying to learn the web they are invaluable.
You are most welcome. Also, than you for the kind words and for this suggestion, it will help our readers a lot. Have a great day and all the best.
Excellent tutorial.
Thank you very much Diego. I am glad it was useful to you.
thank you for walking through the scenario.. Apart from adding id’s is there any other option .. I have a good size project that rarely uses IDs and refactoring is a huge task
By class contains different methods like ClassName, CssSelector, Name, TagName, LinkText… So, as you can see plenty of options.
When I try to run the downloaded Integration tests (from initial source code), I get the following error: ” OpenQA.Selenium.WebDriverException : unknown error: cannot find Chrome binary”
Hi Zoltan. Since this article is a bit older, the selenium driver in our source code is a bit older as well. It needs to align with the your browser’s version. I believe that is the problem here. With every new Google Chrome version, the selenium driver version needs to be updated.
Thanks for reply. My Chrome has version 87.0.4280.88 but the latest driver for Selenium Chrome is 85.0.0 in nuget. Now I have a build error too.
Yeah I see that. For some reason there is no yet Selenium.Chrome.WebDriver package version 87. But they usually update it ferquently.
Thanks for checking. I will see it later on, maybe they update it. The UI Test is important for me, this is totally missing from my knowledge. Your materials, and this one also, are alwayse great and worthwile to explore. Thanks for this one. 🙂
Trying to do integration test to a spa (angular) with .net core backend. I started the test server using the wenserverfactory approach.
My endpoints call to the controller works but not the / home page. Do I have to use selenium to trigger npm start?
I don’t think you should do that. Try starting your Angular app and then navigating to the URI. If it works, and it should, shut down the browser (not the Anuglar app) and then run the test. Maybe the test just times out until the Home page gets loaded.
It works…but when i tried to not useProxyToSpaDevelopmentServer (i.e. no need to start npm externally), i got 500 internal error….or do i need to somehow start npm on my integration test? i have also tried calling spa.UseAngularCliServer(npmScritp: “start”) on startup and shut down my external npm but still got 500
@disqus_GtEeIZUUDN:disqus hiii,
i have two page one page for login and another page for index, i can not test index page because i have login page , how can i pass username and password to login and test index page
Target the login page, find your inputs and write credentials with selenium, hit the login button with selenium (all the steps are in the article) and then just continue with the test logic. Just pay attention that the index page might get loaded a little slower, so you might want to place some thread.sleep to wait for the index page before continue with the test logic.
Hii Marinko
OpenQA.Selenium.DriverServiceNotFoundException : The chromedriver.exe file does not exist in the current directory or in a directory on the PATH environment variable. The driver can be downloaded at http://chromedriver.storage.googleapis.com/index.html.
You have updated your chrome browser. Therefore you have to download a new version of the chrome driver. Do it over the NuGet, you don’t have to go to that link.
thank you, i have did, and the test works now
Hi Marinko,
I upvote this blog for this wonderful article on Selenium Webdriver Automated testing in asp.net core. It really helped me write my first ever tests with Selenium. However, I am struggling with one issue. I have a asp.net mvc core view with a anchor tag. When I click this link it opens a twitter bootstrap modal popup which I am opening dynamically using jquery ajax call.The problem is I am unable to find the elements in this popup. I did google a lot with no luck.
Please help me find the solution for this. Any links or any inputs will be appreciated.
Thanks,
Asma
Hello. Well, it is not that easy for me to help you just from your description, I understand your problem, but still, without code, it is pretty hard. But one thing comes to my mind. Maybe you are trying to find elements in the popup too soon. What I mean by that is that the popup hasn’t been opened yet, but your code was executed nevertheless. So just try small hack to see if this is the case. Once you open the popup window place some Thread.Sleep code right below the code line that opens the popup. This will wait for your popup to open and then try to find the required elements. Again this is just a suggestion, but who knows, maybe this is the real problem. All the best.
Let me try to post some code here:
This is portion of Automated UI Test…
//This is url I open to find the button
driver.Navigate(). GoToUrl(“http://localhost:xxxx/ManageWorkOrder/ViewWorkorders”);
//This is the button “addWO” that gets found and opens the pop via., jquery ajax call
driver.FindElement(By.Id(“addWO”)).Click();
//This is the window handle that has the popup which opens fine
string window = driver.CurrentWindowHandle;
//Switching the focus to popup
driver.SwitchTo().Window(window);
//Below statement fails
//Below button is located on popup which is never found
var text = driver.FindElement(By.Id(“btnSubmit”)).Text;
//test fails
Assert.Contains(“Save”, text);
I hope this makes it clear
Hello. First of all have you checked that the button has the required Id attribute with value btnSubmit? The second thing, have you tried to do what I have suggested in my previous reply. Right below this line driver.FindElement(By.Id(“addWO”)).Click(); try to write System.Threading.Thread.Sleep(time in miliseconds here). Maybe your code drops to quickly and in the moment it tries to find the button it hasn’t been created in the DOM at all.